Twitch is an American video live streaming platform that offers the gaming live streaming community. Additionally, it also includes music broadcasts, creative content, etc. However, it seems that plenty of users are experiencing issues with the Twitch buffering while live streaming. Well, latency issues are always there, but it may also possible that you’ll encounter the same issue due to several other reasons.
Obviously, there is nothing more frustrating than seeing Twitch buffering during streaming. Sometimes it may get disconnected from the internet for unfortunate reasons and spoil your mood for watching your favorite Twitch streams. Here we’ve shared a couple of possible workarounds that should gonna help you to fix the buffering issue completely.
Page Contents
- Why is Twitch buffering so much?
- How to Fix If Twitch Buffering Too Much
- 1. Disable Hardware Acceleration
- 2. Clear Browser Cache and Cookies
- 3. Disable Browser Extensions
- 4. Update Windows OS Build
- 5. Check Your Antivirus Software
- 6. Disable VPN Service
- 7. Perform a Clean Boot
- 8. Check Other Browsers Too
- 9. Change DNS Server Addresses
- 10. Close Background Running Tasks
- 11. Disable Ad Blocker
- 12. Block IP Range and Flush DNS
Why is Twitch buffering so much?
Twitch buffering can be frustrating and may be caused by a variety of factors. Here are some reasons why Twitch might be buffering so much and some potential solutions:
- Internet connection issues
One of the most common reasons for buffering on Twitch is a slow or unstable internet connection. To fix this issue, try restarting your modem and router or connecting your device directly to your modem with an Ethernet cable. You can also try lowering the quality of the stream you are watching by clicking on the settings icon in the video player and selecting a lower quality option.
- Overloaded server
Twitch servers can become overloaded during peak hours when many users are watching streams simultaneously. If this is the case, try watching streams during off-peak hours to avoid buffering.
- Device performance
If your device is not powerful enough to handle the stream, you may experience buffering. Try closing any other applications or programs that are running on your device and ensure that your device meets the minimum system requirements for streaming on Twitch.
- Browser issues
Browser extensions or plugins can interfere with Twitch streaming, causing buffering. Try disabling any browser extensions or plugins you have installed and clearing your browser cache and cookies.
- Ad-blockers
Ad-blockers can sometimes interfere with Twitch streaming and cause buffering. Try disabling your ad-blocker and reloading the stream to see if the buffering stops.
How to Fix If Twitch Buffering Too Much
Before heading over to the troubleshooting guide, make sure that the internet connection is active and stable enough to stream online content properly. You should try watching the live stream on another platform using the same device and internet connection to cross-check the issue.
1. Disable Hardware Acceleration
Hardware Acceleration is a kind of feature that allows the system to use the computer’s hardware at its full capacity in order to perform more efficiently. To do that:
- Open Chrome browser > Click on the Action Menu button (three vertical dots icon) from the top-right corner.
- Click on Settings > Select Advanced.
- Now, click on System from the left pane.
- Make sure to Turn off the Use hardware acceleration when available toggle.
- Launch the Chrome browser again to check for the issue.
2. Clear Browser Cache and Cookies
Web browser cache and data can cause several issues with the webpage loading or redirects error which will eventually trigger buffering issues in online content. So, clearing the saved cache and data can fix webpage loading issues. To do so:
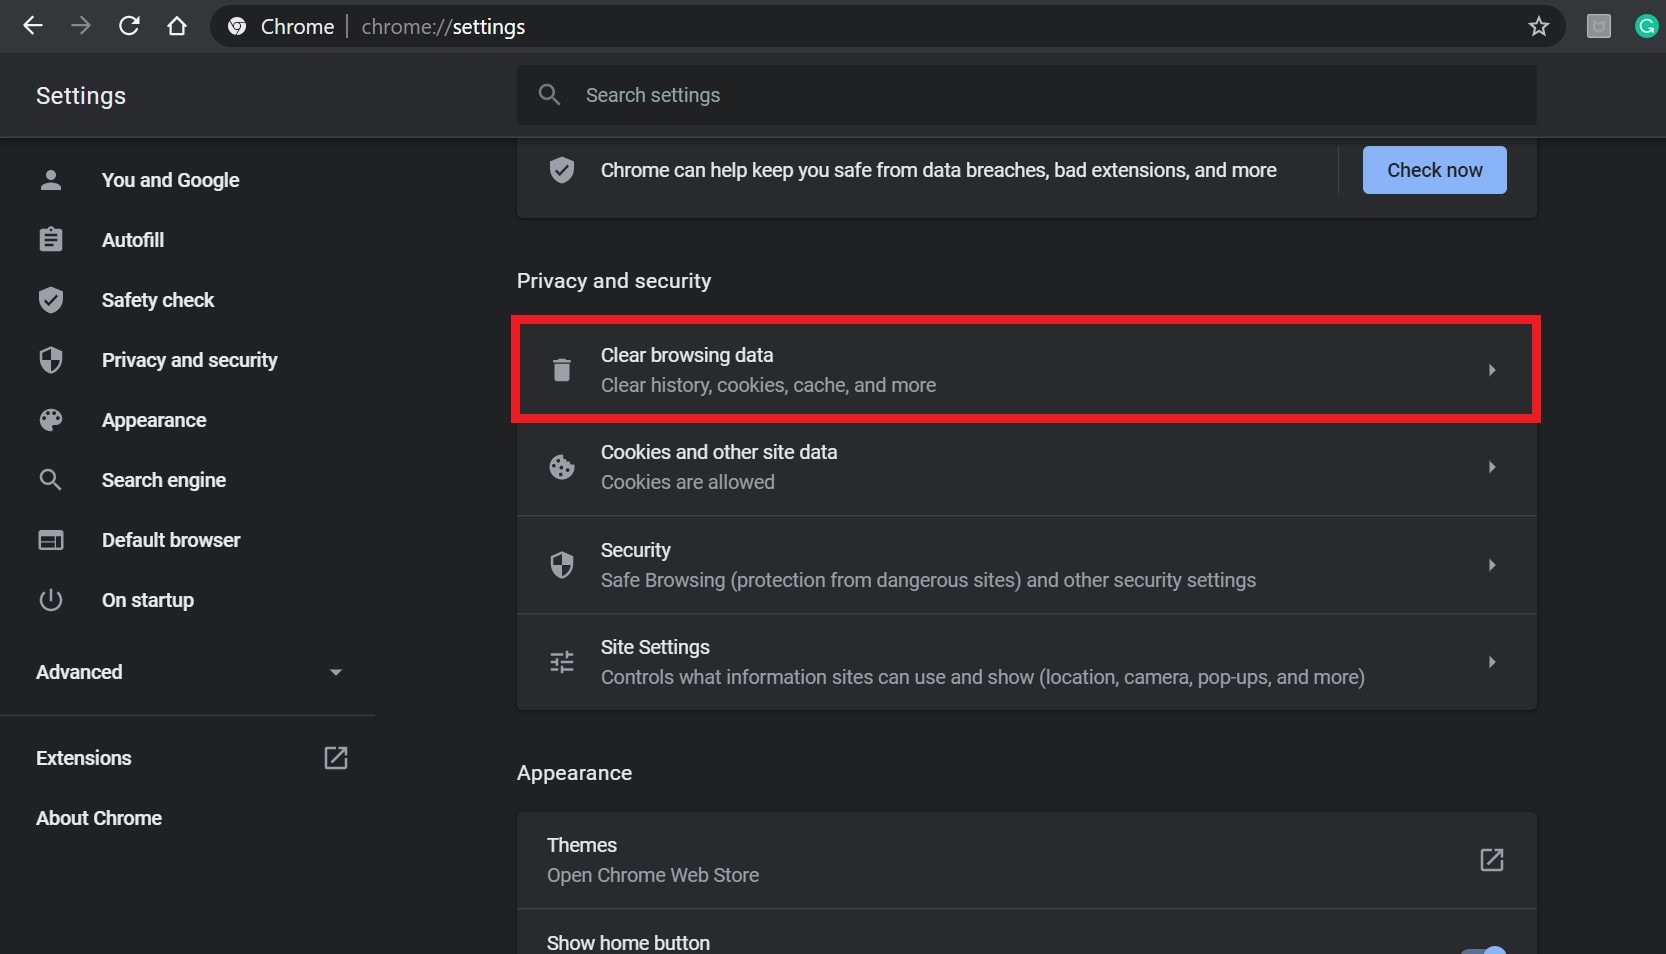
- Open Chrome browser > Click on the Menu (three vertical dots icon) from the upper right side of the browser interface.
- Now, hover over the More tools field to expand the drop-down list.
- Click on Clear browsing data.
- Next, under the Basic tab, select the Time range according to your preference.
- Then click on the checkbox of Browsing history, Cookies and other site data, Cached images and files to select them.
- Finally, click on Clear data.
- Once done, restart your Chrome browser, and check whether the problem has been fixed or not.
3. Disable Browser Extensions
The particular Twitch buffering issue can happen due to the wrong or rogue extensions on the Chrome browser. So, you should always check for the browser extension and try disabling them all to cross-check whether the problem is still appearing to you or not. To do that:
- Open Chrome browser > Click on the Menu (three vertical dots icon) from the upper right side of the browser interface.
- Now, hover over the More tools field to expand the drop-down list.

- Click on Extensions > Disable all the extensions one by one (Turn off toggle).
- Once done, exit the browser > Relaunch it.
- Finally, try running a Twitch stream to check for the issue.
4. Update Windows OS Build
An outdated Windows OS build can also cause several performance issues on your computer and online streaming issues. You should try checking for the Windows OS update and install all available updates to always up-to-date.
- Press Windows + I keys to open up the Windows Settings menu.
- Next, click on Update & Security > Select Check for updates under the Windows Update section.
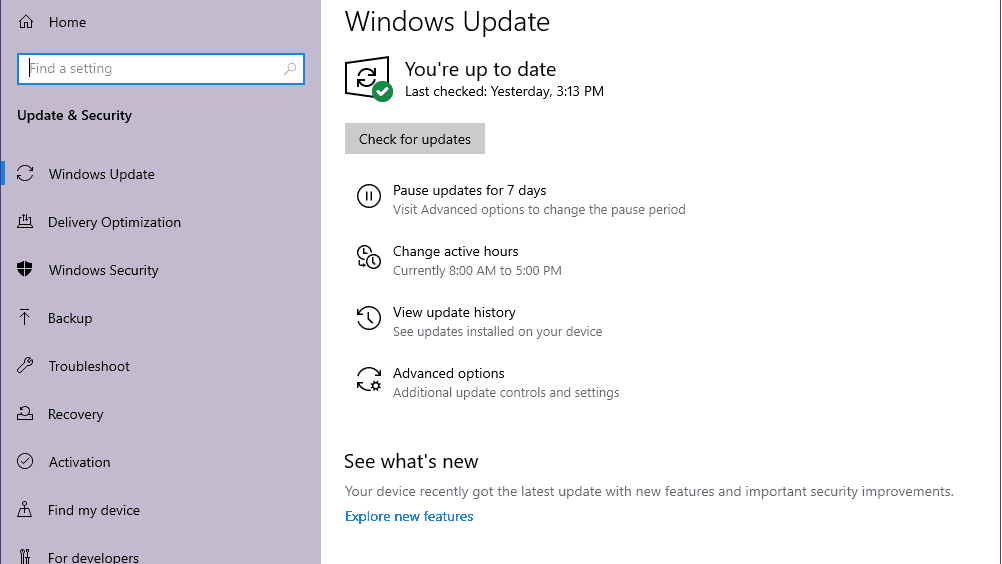
- If there is a feature update available, select Download and install.
- It may take a while to complete the update.
- Once done, restart your computer to install the update.
5. Check Your Antivirus Software
If there is any kind of malware or adware is blocking the Twitch stream ongoing process on your computer due to some unexpected reasons then make sure to check your antivirus program to check for the issue.
So, if you’re using the default Windows Defender program, then make sure to follow the steps below:
- Just open Windows Settings by pressing Windows + I keys.
- Now, click on Privacy & Security from the left pane.
- Click on Windows Security from the right pane.
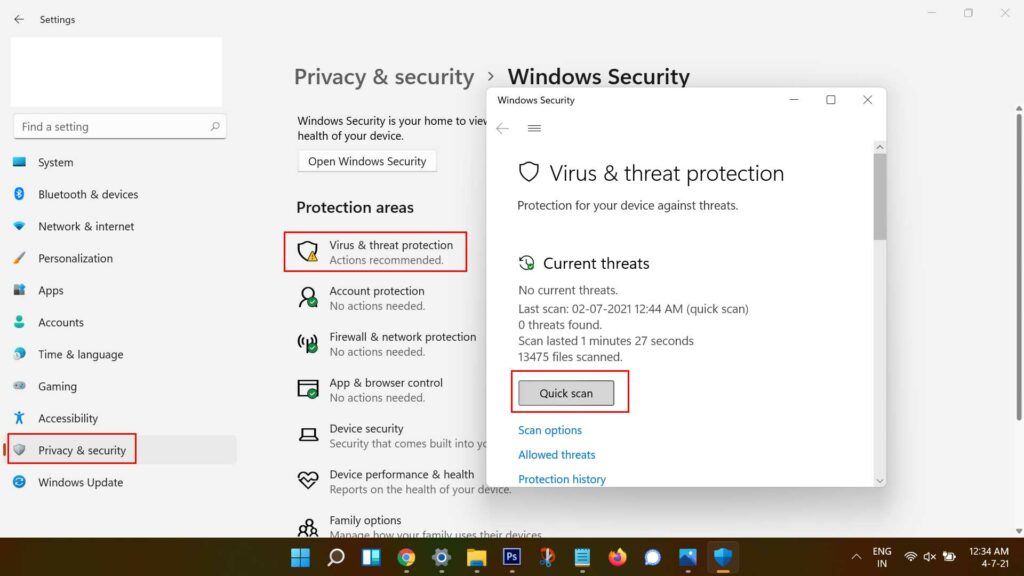
- Next, single-click on Virus & threat protection > Click on Quick scan.
- Wait for the scanning process to be completed.
- If there is a potential vulnerability found then the Windows Defender software will automatically remove it from your computer or ask you to choose whatever you want.
- But if there is no malware or virus found then make sure to follow the next method.
6. Disable VPN Service
It may also possible that the active VPN service is somehow triggering the Twitch buffering issue on your computer or browser. Make sure to turn VPN off temporarily and check whether the problem is still bothering you or not.
7. Perform a Clean Boot
The chances are high enough that some of the installed third-party programs are conflicting with the system functions that can prevent ongoing connections with Twitch streaming. We highly recommend performing a clean boot on your PC to disable the third-party programs. To do this:
- Press Windows + R keys to open the Run dialog box.
- Now, type msconfig and hit Enter to open the System Configuration window.
- Go to the Services tab > Enable the Hide all Microsoft services checkbox.
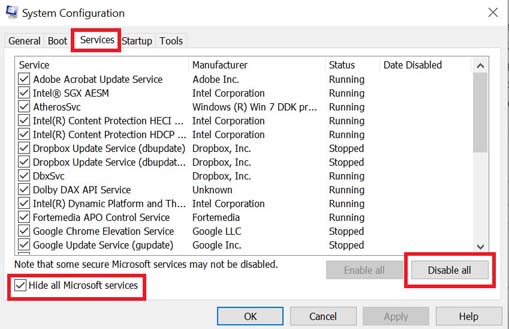
- Check all the services from the list and click on Disable all.
- Click on Apply and then OK to save changes.
- Now, click on the Startup tab > Click on Open Task Manager.
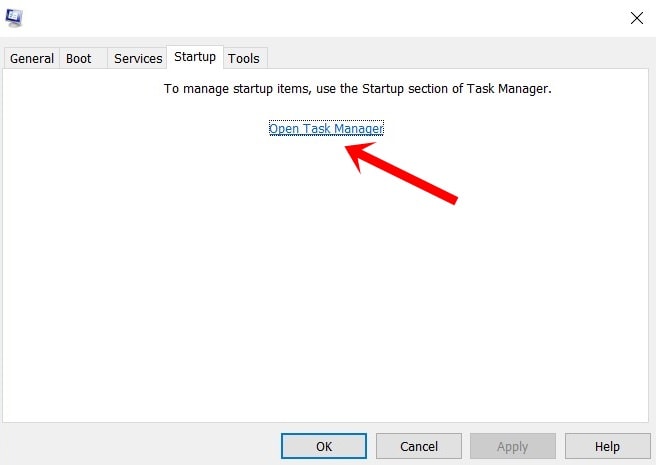
- Under the Startup tab from the Task Manager interface, click on the particular tasks which are enabled for startup boot > Click on Disable.
- Make sure to select and disable one by one.
- Once done, restart your computer to change effects immediately.
8. Check Other Browsers Too
Sometimes it may also possible that something is conflicting with the Google Chrome browser on your PC. Therefore, we’ll also recommend you try using another web browser to check whether the same problem is still occurring or not.
If the same problem is happening with other browsers then the chances are high that Twitch servers are encountering outages or downtime in specific regions.
9. Change DNS Server Addresses
- Open Control Panel from the Start menu.
- Click on Network and Internet > Go to Networking and Sharing.
- Select Change adapter settings > Right-click on the active network.
- Then click on Properties > Double-click on Internet Protocol Version 4 (IPv4).
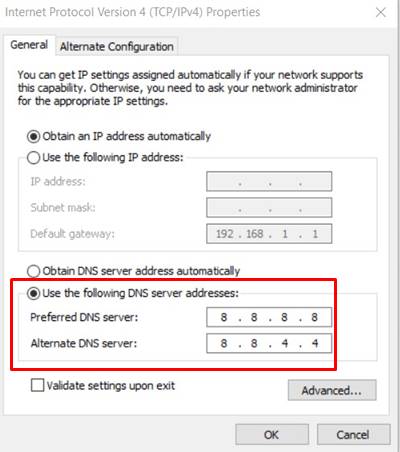
- Click on Use the following DNS server addresses > Type 8.8.8.8 as the Preferred DNS and 8.8.4.4 as the Alternate DNS.
- Click on OK to save changes > Reboot your PC.
10. Close Background Running Tasks
It’s also worth mentioning that closing the unnecessary background running tasks can easily help you to fix multiple issues on your computer by reducing the use of system resources. To do so:
- Press Ctrl + Shift + Esc keys to open up the Task Manager.
- Now, click on the Processes tab > Click to select tasks that are unnecessarily running in the background and consuming enough system resources.
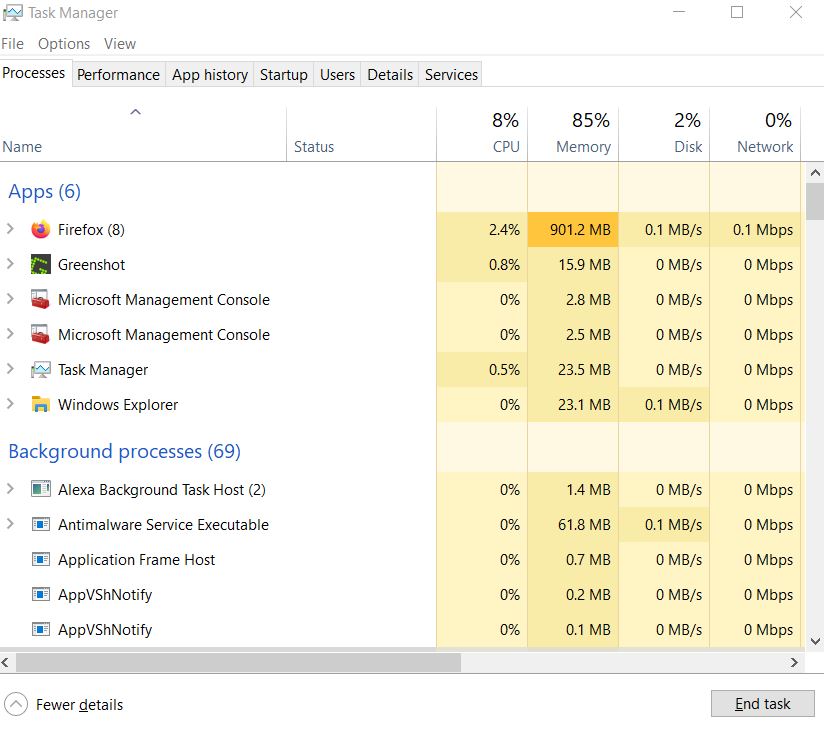
- Click on End Task to close it individually.
- Once done, restart your system, and check for the issue again.
11. Disable Ad Blocker
Disabling the ad blocker may help you to completely fix such an issue because it may block the Twitch streaming in some scenarios. Therefore, you should turn off the ad blocker on your browser temporarily and then refresh the Twitch page to check if it’s still buffering or not.
12. Block IP Range and Flush DNS
- Press Windows + S keys (or directly click on Search) to open Windows Search.
- Now, type Windows Defender Firewall with Advanced Security.
- Then click on Inbound Rules > Click on New Rule.
- Select Custom Rule > Click on Next.
- Make sure to click on Next multiple times until you see the Scope screen.
- Click on ‘These IP addresses’ > Select Add > Copy and paste the following IP addresses in the field.
From: 206.111.0.0
To: 206.111.255.255
- Once added, click on OK to proceed > Repeat the same steps for the following IP addresses as well.
From: 173.194.55.1
To: 173.194.55.255
- Finally, click on Next > Select ‘Block the connection’ option > Click on Next multiple times to finish the process.
Once all done, you should flush the DNS configuration from the computer to refresh by following the steps below:
- Open the Start Menu > Type Command Prompt and open it.
- If prompted by UAC, click on Yes to grant admin privilege.
- Now, copy and paste the following command line then hit Enter to execute it:
ipconfig /flushdns
- Once done, close the cmd window > Restart your computer to apply changes.
That’s it, guys. We hope this guide was helpful to you. For further queries, let us know in the comment below.
Also Read
Fix: PS5 Twitch No Audio | Mic Sound Not Working
Twitch Stream Not Loading, How to Fix It?
Fix: Twitch Not Working or Crashing on Xbox One, Xbox Series S|X
How To Check Twitch Chat Logs | 2022 Guide
Fix: Twitch Login Error “Something went wrong”
Fix: Twitch Error While Loading Followed Channels
How to Fix Twitch Stream Lagging Issue
How to Fix If Your Twitch Emotes not Showing
How to Fix Hogwarts Legacy Twitch Drops Not Working
Two Factor Authentication Twitch Not Working, How to Fix?
