In the world of Android, unlocking the bootloader and gaining root access is among the first steps taken by users looking to personalize their devices. This access enables the installation of advanced applications that require superuser privileges on your Android device’s subsystem. If you’re a proud new owner of the recently launched Pixel 7A, unveiled at the Google I/O 2023 event with the latest Android 13 right out of the box, this guide will take you through the process of unlocking the bootloader and rooting your device.
It’s important to note that root access on an Android device always necessitates an unlocked bootloader. Thanks to Android’s open-source nature, many users explore system-level customizations to unlock extra functionalities and custom aesthetics. In such situations, unlocking the bootloader and rooting the device becomes essential. What’s more, unlocking the bootloader paves the way for flashing custom ROMs.
Also Read
While stock ROMs offer stability and speedy software updates, some users might crave more than a simplistic, less feature-rich stock firmware over time. Moreover, once the software support period ends, many users are eager to install custom firmware to experience the latest Android OS features. Google has promised three major OS updates and five years of security updates for the Pixel 7A. However, the freshness of the Pixel 7A in the market makes it an attractive prospect for developers to build custom firmware, which would require a rooted device and an unlocked bootloader.
![]()
Page Contents
What is Bootloader Unlock?
A Bootloader is a set of processes (programs) that comes out of the box with the operating system and always runs when you power your device. It tells the hardware to whether boot into the recovery or the system (depending on the command provided by the user). Usually, a stock bootloader is a vendor-specific program that comes in locked status, and it doesn’t allow other third-party programs or files to get flashed like Custom ROM or Root.
That’s why interested users or Android freaks must unlock the device bootloader first to start customizing or flashing the firmware according to their choice. A locked bootloader only loads up the vendor-signed image on the device after verifying the secure boot state. So, if you’re trying to boot a third-party unsigned image on a locked bootloader, it won’t work. OEMs offer a locked bootloader for enhanced security and privacy.
As we’ve mentioned, you can unlock the bootloader as needed. But keep in mind that an unlocked bootloader will perform a factory reset of your device, meaning all of the internal storage data will be wiped out. Additionally, unlocking the bootloader will void the manufacturer’s warranty (if applicable). Last but not least, an improper bootloader unlocking method or attempt may brick your device or it gets stuck in the bootloop.
What is Rooting, and Why is Magisk Root Important?
Rooting is nothing but superuser access on your device system, so you can manually tweak the system files according to your preference. Without having root access, you won’t be able to tweak, adjust, edit, or delete system files, or can’t do some extraordinary tasks. After rooting your device, you can flash many compatible custom firmware, install custom modules, delete system apps or bloatware, etc.
So, if you’re considering rooting your Android handset, then Magisk is a good option. Magisk is a systemless rooting method that not only provides you a seamless user experience but also works well with Google’s SafetyNet security without touching the system files on your handset. Although the SuperSU or one-click root apps are in the market, they’ve multiple issues with the device compatibility & limitations.
Another major advantage of rooting the Magisk patched boot image file is that flashing Magisk using the TWRP recovery isn’t accessible for all device models. A big thanks to topjohnwu (senior XDA recognized developer) for working hard on providing Magisk for free to use. It’s needless to say that Magisk offers a bunch of modules for tweaking the Android device apart from bypassing Google’s SafetyNet security feature to use banking apps, etc.
How to Unlock Bootloader and Root Google Pixel 7A
Before heading over to the bootloader unlocking and Magisk rooting guide, follow all the requirements, useful tips, download links, etc, for a successful process on your Google Pixel 7A.
Requirements:
- You’ll require a computer and a USB cable.
- Factory Images for Pixel 7A Devices.
- Magisk APK file to patch the stock boot.img file
- Install Google USB Driver on your PC.
- Install ADB & Fastboot Tool on the PC.
- Perform a full data backup on your handset.
Download Links:
- Google USB Driver
- ADB & Fastboot Tools [Platform Tools]
- Factory Images | OTA Images
- Magisk Canary
Warning:
Unlocking the device, Bootloader will void your device warranty (if any). GetDroidTips will not be responsible for any bricking/damaging issue to your phone while/after following this whole rooting process. You should know what you’re doing. So, do it at your own risk.
Steps to Unlock Bootloader on Google Pixel 7A
- Enable the Developer Options > Enable OEM Unlock and USB Debugging.
- Go to your device Settings > About Phone > Tap on the Build Number 7 times continuously to see the message ‘You are now a developer!’.
- Return to the main Settings menu > Search for Developer Options > Open it and enable OEM Unlock and USB Debugging.
- After extracting it, install the ADB Fastboot zip file on your PC.
- You should also install the Google USB Driver on your PC.
- Simply connect your Google Pixel 7A phone to the computer via a USB cable.
- Go to the PC’s installed ADB & Fastboot (Platform Tools) folder.
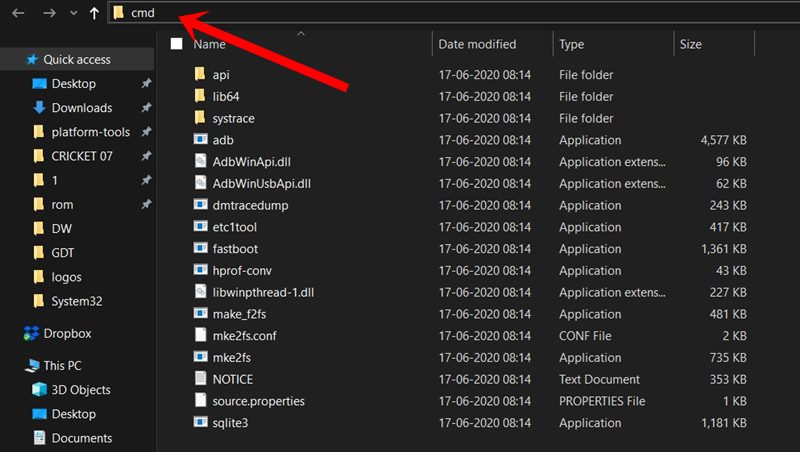
- Next, click on the address bar inside the folder, and type cmd then hit Enter to open the Command Prompt window. [If prompted by UAC, click on Yes to allow the admin access]
- Then type the following command in the command prompt window and press Enter to check whether your Pixel 7A device is connected into the adb mode or not:
adb devices
- If the device is connected to the PC in adb mode, then it’ll give you a device ID. If not, then re-install the USB Driver and retry the steps again.
- Once the device is ready, make sure to run the following command to reboot the device into the bootloader:
adb reboot bootloader
- Now, run the following command to unlock the bootloader:
fastboot flashing unlock
- Once done, make sure to download the latest factory image for your Pixel 7A and extract the zip file on the PC.
- Now, open the extracted folder, and here you’ll find out the bootloader image, the radio image, the image-device-buildnumber.zip file, etc.
- Simply extract the image-device-buildnumber.zip file > Here you’ll get the stock boot.img file and the vbmeta.img file.
- Just copy and transfer the stock boot.img file to your device’s internal storage (keep it without any folder).
- Then run the following command to flash the vbmeta image file on your handset:
fastboot flash vbmeta --disable-verity --disable-verification vbmeta.img
- Once done, run the following command to boot your device into the system:
fastboot reboot
- Wait for the process to complete as it may take some time for the first time.
- Once the device booted, you can skip the initial setup process (if you want), and jump into the Magisk rooting method below.
Root Google Pixel 7A via Magisk
- Now, it’s important to copy the stock boot.img file to your desktop screen and on your phone’s internal storage via the USB cable. [Don’t skip it]
- Make sure to download and install Magisk Manager on your Pixel 7A.
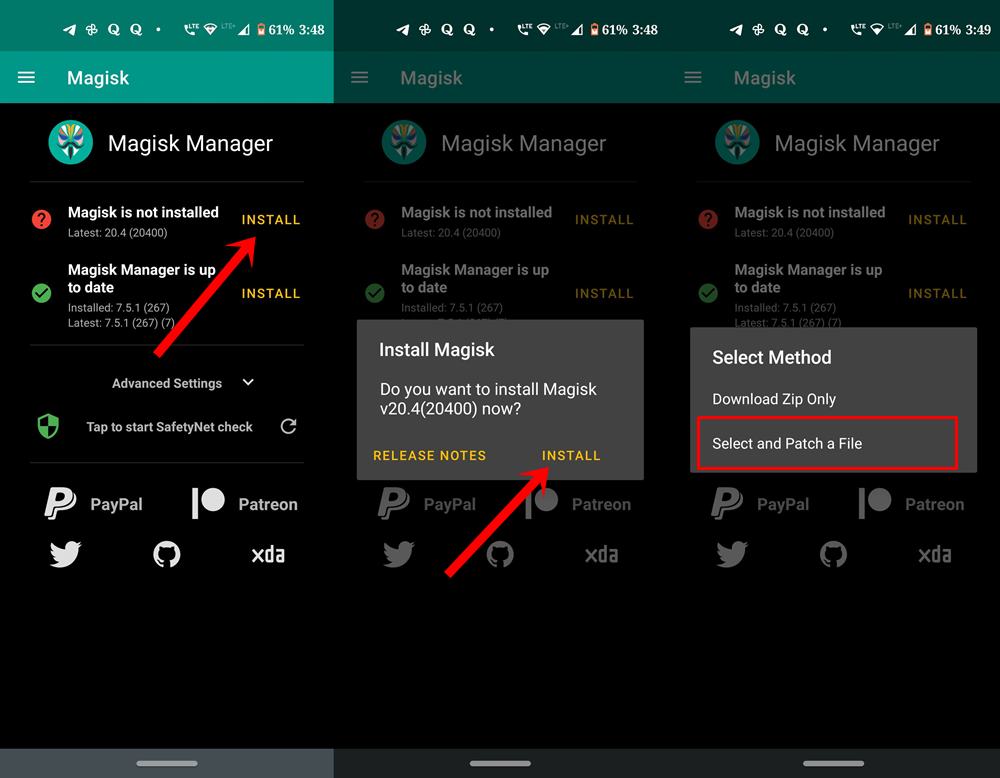
- Once installed, launch the Magisk Manager app > Hit Install > Select Install again.

- Once done, tap on Select and Patch a File > Go to the internal storage on your phone.
- Head over to the transferred stock boot.img file and select it.
- Now, tap on the Let’s Go button at the top-right corner > Magisk Manager will automatically start patching it on your device.
- Make sure to wait for the process to complete.
- You’ll get the All done! message on the device screen that means patching the boot image file is successful.
- Next, go to the ‘Download’ folder on the internal storage section of your phone. Here you’ll find out the magisk_patched.img file.
- Just transfer the magisk_patched.img file to your PC (inside the Platform Tools folder).
- Again check whether the USB Debugging option has been enabled on your device or not. If not, turn it on.
- Disconnect and reconnect your device to the PC via the USB cable to refresh the connectivity.
- Now, head over to the installed ADB & Fastboot folder (Platform Tools folder) again.
- Type cmd on the address bar and hit Enter to open Command Prompt. [If prompted by UAC, click on Yes to run it as administrator]

- Now, run the following command line on the Command Prompt window to check whether the device is properly detected in fastboot or not:
fastboot devices
- Then run the following command to easily boot your Pixel 7A device into the Fastboot (Bootloader) mode:
fastboot reboot bootloader
- Once done, execute the command line below to boot your Pixel 7A using Magisk Patched Boot.img file: [If you don’t run this command then you may face the “Can’t load Android system. Your data may be corrupted.” error]
fastboot boot magisk_patched.img
- Next, run the following command to flash the patched boot image file on your Pixel 7A device:
fastboot flash boot magisk_patched.img
- Once done, make sure to reboot your device to the system manually. It may take some time to load.
- Enjoy! You’ve successfully enabled root access on the Google Pixel 7A.
If you want subsequent updates:
We do not recommend personally updating via the OTA Sideload method because you’ll have to download and extract the factory zip anyway.
Note: The automatic OTA update will simply lose the root access and require a wipe to root again the next time.
However, if you want to choose to update via OTA sideload then make sure to follow the steps below:
- Just sideload the OTA file and then immediately reboot to the bootloader using the ‘fastboot reboot bootloader’ command as mentioned above.
- Now, re-flash vbmeta by running the command below:
fastboot flash vbmeta --disable-verity --disable-verification vbmeta.img
- Once done, boot the device to the system, and allow the update to complete.
- Finally, patch and flash the stock boot image file as mentioned above.
# Steps to Fix failed to load/verify boot images
If in case, you’re getting a bootloader error message that says “failed to load/verify boot images” that means you forgot to disable the verity and verification. So, make sure to re-flash vbmeta with the –disable options.
# Steps to Fix Can’t load Android system
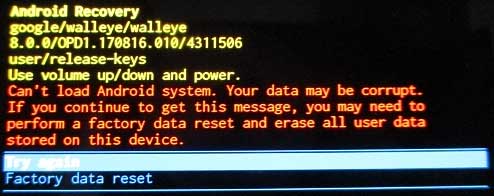
You may also run into this recovery message where it says, “Can’t load Android system. Your data may be corrupt. If you continue to get this error message, you may need to perform a factory data reset and erase all user data stored on this device.”
So, if you’re facing this issue, you didn’t disable the verity and verification before, and now it’s required to have a factory data reset to proceed. Therefore, perform the factory data reset method directly from the recovery interface as shown in the screenshot below.

This is how you can completely unlock the bootloader and enable root access on your Google Pixel 7A device.
That’s it, guys. We assume this guide was helpful to you. For additional queries, you can comment below.
