• Skip to primary navigation
  • Skip to main content
  • Skip to primary sidebar
  • Skip to footer
Get Droid Tips

Get Droid Tips

Custom ROM | CyanogenMod | Android Apps | Firmware Update | MiUi | All Stock ROM | Lineage OS |

  • Android
  • Games
  • iPhones/iPad
  • Social Media
  • Windows
  • LineageOS 17.1
  • Android 10
  • iOS 14
  • Free Among Us for PC
  • Write for US
  • Watch IPL 2020 For Free
Home Troubleshoot Guide

Vivo V17 Pro PD1931F ISP PinOUT | Test Point | EDL Mode 9008

Updated on January 14, 2021 by Abd Razaaq

Advertisements

In this guide, we will show you the real image of the ISP pinout and test point for the Vivo V17 Pro PD1931F. By using the ISP PinOUT, you can easily restore the stock ROM, bypass FRP lock, or reset user data on your device via UFi Box. In this guide, we will also guide you on how to reboot into 9008 EDL Mode.

Table of Contents

  • 1 What is ISP PinOUT?
    • 1.1 Vivo V17 Pro ISP Pinout Image:
  • 2 Vivo V17 Pro Specifications:
  • 3 How to Enter EDL Mode on Vivo V17 Pro (PD1931F)
    • 3.1 Method 1: Using ADB
    • 3.2 Method 2: Using Fastboot
    • 3.3 Method 3: By Hardware Test Points / Restore Your device

What is ISP PinOUT?

ISP or In-system programming also known as in-circuit serial programming (ICSP) for hardware that has a cross-reference of pins or contacts. By shorting the pins together, you can power or signal the logic board (motherboard) of an electronic device such as a mobile, computer. You will find the IS Pinout connection on the logic board of your device. Therefore, you will need to remove the back panel of the handset and follow the below image to locate the pinout.

Vivo V17 Pro ISP Pinout Image:
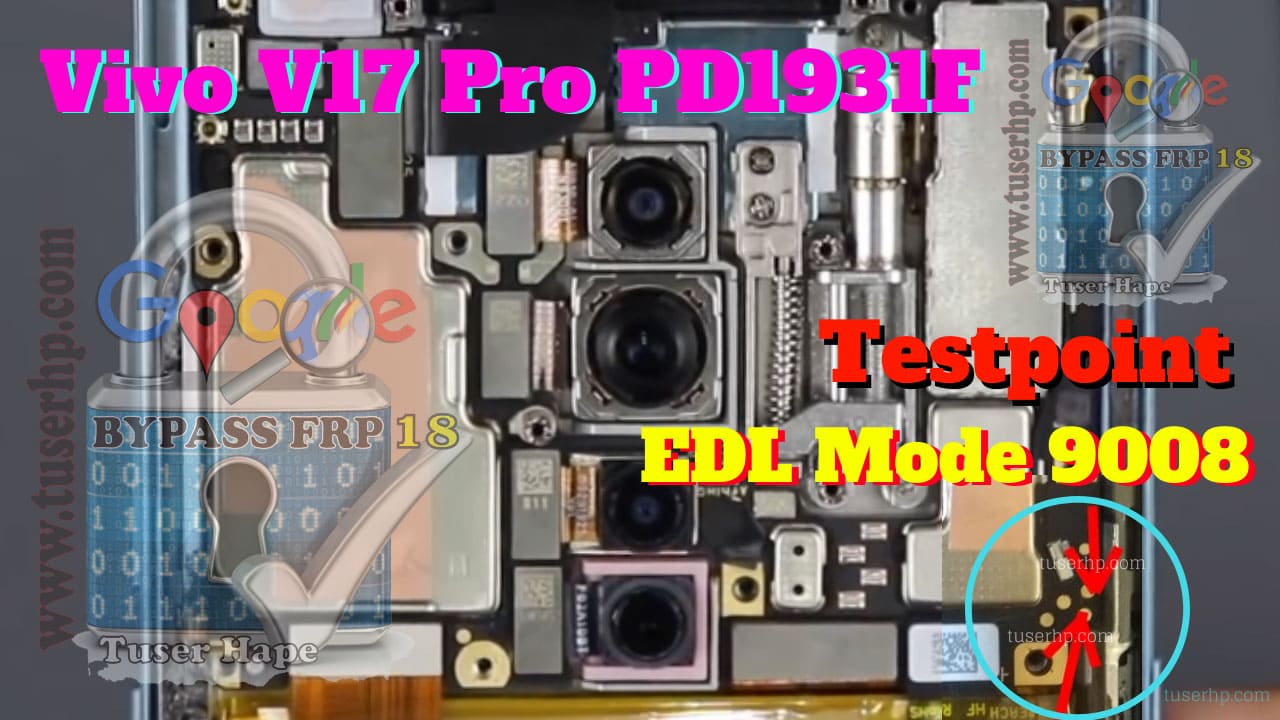
Vivo V17 Pro
Credits to Tuserhp.com

Vivo V17 Pro Specifications:

Vivo V17 Pro was announced in September 2019 which sports a 6.44-inch Super AMOLED display with a screen resolution of 1080 x 2400 pixels. The device has an aspect ratio of 20:9 and a screen-to-body ratio of 84.3 %.

Vivo V17 Pro is powered by an Octa-core (2×2.0 GHz Kryo 460 Gold & 6×1.7 GHz Kryo 460 Silver) with Qualcomm Snapdragon 675 chipset coupled with 8GB of RAM and 128GB of internal storage. The device came out of the box with Android 9.0 Pie under FuntouchOS 9.1 and backed by a 4100 mAh battery (Non-removable).

Advertisements

As far as the camera concerned, the device has a quad-camera setup with 48MP + 8MP + 13MP + 2MP primary sensors and a dual selfie camera with a 32MP + 8MP lens. Other connectivity option includes 4G-VoLTE, GPS, Glonass, Bluetooth, Mobile Hotspot, accelerometer, ambient light sensor, gyroscope, proximity sensor, and compass. etc. The Vivo V17 Pro comes with a face unlock feature.

How to Enter EDL Mode on Vivo V17 Pro (PD1931F)

Follow this instruction carefully to boot your device into EDL Mode (aka Emergency DownLoad Mode)

Also Read:

What is EDL Mode? How to Enter EDL Mode on Any Qualcomm Device

Method 1: Using ADB

  • Download ADB and Fastboot Tool and extract it to your PC (C:/ Drive)
  • Connect your device to your PC
  • Open the adb command and enter the command
    .\adb reboot edl

Method 2: Using Fastboot

  • Download ADB and Fastboot Tool and extract it to your PC (C:/ Drive)
  • Boot your device into the bootloader
  • Open the command window on your PC on the same folder extracted (ADB and Fastboot Tool)
  • now enter the command
    .\fastboot oem edl

Method 3: By Hardware Test Points / Restore Your device

  • Download the QDLoader driver
  • Find the EDL PinOUT/Test Point on your device (refer image above to find the test point)
  • To enter EDL mode, you need to use a metal tweezer or a conductive metal wire to short the points.
  • Once you are done, connect your device to the PC using a USB cable
  • This way, your device will enter EDL mode. Now you can open the QFil or QPST Tool to flash the firmware and restore your device.

I hope this guide was helpful to find the Vivo V17 Pro PD1931F ISP Testpoints.

Advertisements

Tagged With: Vivo, Vivo V17 Pro

Primary Sidebar

Buying Guide

Top 6 Smartphones on Black Friday Deals 

Best Motherboards for the AMD Ryzen 9 5900X

Best Power Supply Unit (PSU) For Nvidia RTX 3090, 3080, And 3070 GPU

Best 3D Mu6 Dummy Head Recording Earphone

Best Hidden Cams To Buy in 2020

60Hz vs 144Hz vs 240Hz Monitors – Differences and Purchase Guide

How To Use PayPal On Amazon To Shop Safely?

RTX 3070 vs 3080 vs 3090: Differences, Performance, Design, Price, and More

Geforce RTX 3080 and RTX 3090 Pre-Order Guide: Where To Buy in India

How Much Will it Cost in India for Nvidia GeForce RTX 3070 / 3080 / 3090?

Advertisements
Advertisements

Footer

Will Samsung Galaxy M30 Get Android 11 (OneUI 3.0) update?

Signal Private Messenger Alternatives for Android and iPhone

How to Change Android DNS Settings

Download Google Camera for Samsung Galaxy M12 [GCam APK]

How to Change Google Drive Backup and Sync Folder Location

How to Stop Signal From Telling You When Your Contacts Join

Download Google Camera for Oukitel C22 [GCam APK]

How to Automatically Turn Off Wi-Fi Upon Ethernet Connect in Windows

How to Change Presentation Mode to Project Display in Windows 10

Fix: Cannot Delete Key: Error While Deleting Key on Windows 10

How to Fix Your Slow SSD on Windows 10

How to Recover PowerPoint Password on Windows 10

How to Switch Windows Hello Login method from PIN to Password?

Best CSV File Viewer Software for Windows 10

Best 5 Google Slides Alternatives

Enable or Disable Printing in Microsoft Edge in Windows 10

How To Add New WhatsApp Contact Using QR Code

Wondershare Document Cloud – All Around Document Solution

What is Doordash Error Code 400 and How to Fix It?

Why Does Zoom Error Code 3113 Appears and How to Fix?

Zoom Error 2011 | What This Error Code Mean and How To Fix it?

© 2021 · Get Droid Tips

  • About Us
  • Contact Us
  • Privacy Policy
  • Disclaimer
  • Editorial Policy
  • Terms of Use
  • Write for Us