Escape from Tarkov is a story-driven hardcore plus realistic online first-person action RPG/Simulator game that has MMO features. If you’re one of the Escape from Tarkov players and facing issues like server connectivity then it’s quite common and you’re not alone for sure. Plenty of reports are coming out that players are getting affected by the Server Connection Lost in Escape from Tarkov.
If you’re also facing the same problem then make sure to follow this troubleshooting guide completely. Well, issues with the server connection are a widespread thing that most online gamers may experience multiple times in their lifetime but it’s also expected that not every time the fault is with the game server. Sometimes it may happen that you’re experiencing server connectivity issues and the problem is at your end.
Also Read
Escape From Tarkov Network Provider – Part 1 Quest Guide
How to Complete Chemical 1, 2, 3, and 4 in Escape from Tarkov
Escape From Tarkov Single Player Mod: How to Install, Is It Safe to Play Without Ban?
Escape From Tarkov Humanitarian Supplies Quest Guide
Where are Gas Analyzers in Escape from Tarkov

Fix: Server Connection Lost in Escape from Tarkov
Initially, it may occur due to an internet connection issue or there may be issues with the game server actually such as downtime or outage. But in other ways, the chances are also high that router issues, outdated networking drivers, issues with the IPv6, issues with the antivirus or firewall protection, etc causing such a problem.
Also Read
1. Check Server Status
In most scenarios, the chances are high that the problem is specific to the game servers. Maybe the game server is down or going through an outage issue. So, you should always check for the server status first and then head over to other methods or conclusions. Make sure to visit the official Battlestate Games Twitter handle to check all the latest updates or reports on the server.
Whereas you can directly visit the third-party DownDetector website to check the Escape from Tarkov game server status whether there is an outage or not. You’ll find out all info to know everything about the server.
2. Restart Your PC
Sometimes a simple reboot of your PC can resolve plenty of potential errors or bugs regarding games. Although this method may not work for everyone, we’ll suggest you rebooting your computer once to check the issue.
3. Check Your Network Connection
It’s also possible that your internet connection is having issues with the game servers. Either the network is slow or unstable. So, make sure to cross-check your network connection that whether the connection is poor or not. If that’s the reason then we’ll recommend you choose a higher package so that you’ll get higher internet speed.
Also, keep in mind that if you’re using a Wi-Fi network then try switching it to a wired network and try again. Sometimes wireless connectivity can also cause several glitches or congestion during peak hours.
4. Power Cycle Wi-Fi Router
Try performing the power cycle to your Wi-Fi router to fix the internet connectivity issue.
- First of all, power off your Wi-Fi Router > Now, disconnect the power cable from the router.
- Wait for around 30 seconds and then connect the power cable again to the router.
- Finally, turn on the Wi-Fi router and check for the issue again.
5. Disable IPv6
- Click on the Start Menu > Search for Control Panel and click to open it.
- Now, click on Network and Internet > Select Network and Sharing Center.
- Go to Change adapter settings > Click on the active network that you’re using.
- Right-click on the Wi-Fi/Ethernet connection details > Select Properties.
- If prompted by UAC, click on Yes to allow the admin privilege.
- Next, go to the Networking tab > Uncheck the Internet Protocol Version 6 (TCP/IPv6) checkbox to disable it.
- Click on OK to save changes > Finally, restart your computer to change effects immediately.
6. Choose a Lower Ping Server
Make sure to uncheck the ‘Use automatic server selection’ option and manually select whatever server is near to you and offers a lower ping or input delay on average. After selecting that server, you should be able to connect to the game online.
7. Use a VPN
It’s recommended to use a VPN (Virtual Private Network) service on your computer to easily route the IP address and region so that you can easily connect to the game server than before.
8. Disable Antivirus and Firewall
If you’re using the default Windows Defender and Firewall security program then make sure to disable them by following the steps below:
- Press Windows + I keys to open Windows Settings.
- Click on Update & Security > Click on Windows Security from the left pane.
- Click on Virus & threat protection > Click on Manage settings.
- Turn Off Real-time Protection feature.
Additionally, you should also disable the Windows Firewall program by following the steps below:
- Click on the Start menu > Type Control Panel and click on it.
- Now, type firewall in the search box > Click on Windows Firewall.

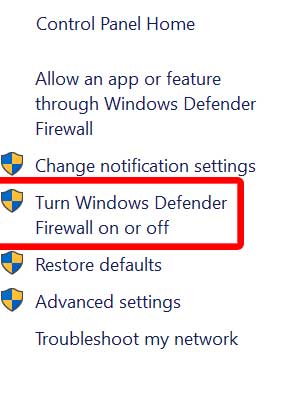
- Click on Turn Windows Firewall on or off from the left pane.
- Select Turn off Windows Firewall for the Private, Domain, and Public Network Settings.
- Finally, restart your computer to apply changes, and then check if the Server Connection Lost in Escape from Tarkov issue is fixed or not.
9. Update Network Drivers
An outdated or corrupted networking driver on the Windows computer can also cause issues with online gaming or connecting to the servers. So, it’s better to check for updates by following the steps below:
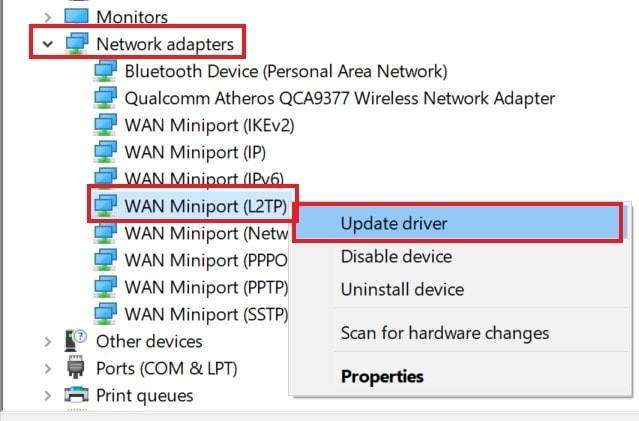
- Press Windows + X keys to open the Quick Start Menu.
- Now, click on Device Manager from the list > Double-click on Network adapters.

- Right-click on the active networking device that you’re using.
- Next, select Update driver > Choose to Search automatically for drivers.
- If there is an update available, it’ll automatically download & install the latest version.
- Once done, restart the computer to change the effects.
10. Use Google DNS Addresses
Well, changing the Google DNS server addresses instead of a private DNS address can quickly resolve issues with the game server connectivity that may occur on your Windows PC. To do this:
- Click on the Start Menu > Search for Control Panel and click to open it.
- Now, click on Network and Internet > Select Network and Sharing Center.
- Go to Change adapter settings > Click on the active network that you’re using.
- Right-click on the Wi-Fi/Ethernet connection details > Select Properties.
- If prompted by UAC, click on Yes to allow the admin privilege.
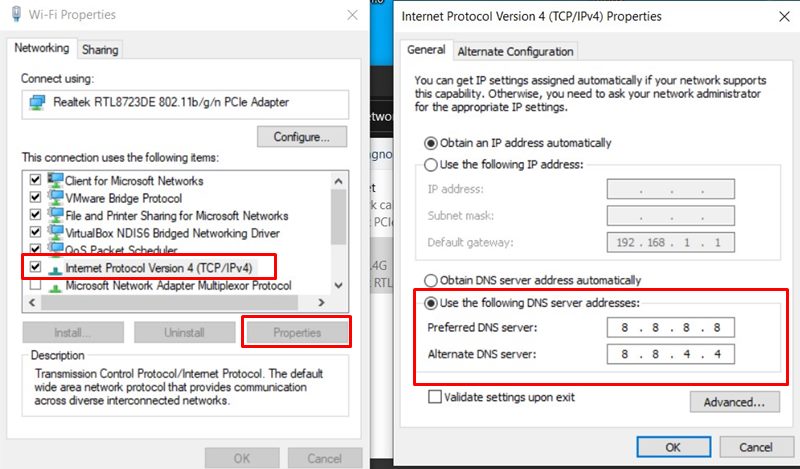
- Next, go to the Networking tab > Double-click on Internet Protocol Version 4 (TCP/IPv4).
- Click on Use the following DNS server addresses. (If any DNS addresses are listed there, write them down for future reference, and remove them)

- Input 8.8.8.8 for Primary DNS and 8.8.4.4 for Secondary DNS.
- Once done, click on OK to save changes.
- Finally, reboot your PC to apply changes immediately.
That’s it, guys. We assume this guide was helpful to you. For further queries, you can comment below.