As launching Valorant on your PC requires you to log in to the Riot Game Servers first, some of the unfortunate players may find it difficult to run the game. Plenty of players are getting affected due to the Critical System Error on Valorant which indicates them to terminate processes that are already running in the background. Now, if you’re also one of the victims then check out this troubleshooting guide.
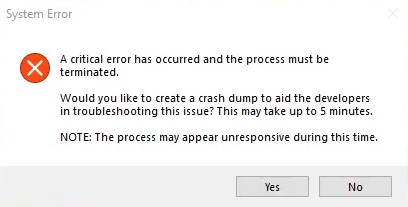
Though there is no specific reason or workaround available for this error, it seems one of the glitches that basically prevents players to enter into the Valorant game. Additionally, it also asks the affected players to create a crash dump file that will gonna help the game developers to improve it. So, if you also receive a “A critical error has occurred and the process must be terminated” error while launching Valorant then check the guide below.
Also Read
How to Fix Valorant Crashing on PC
Fix: Valorant Invalid Access to Memory Location Error
Fix: Valorant Won’t Launch or Not Loading on PC
Valorant Ranking System Guide: How Does It Work?
Top 7 Best Valorant Stat Trackers
Fix: Valorant Val 59 Login Queue Fetch Token Failure Error
How to Fix If Valorant Texture Not Loading or Blurry
How to Fix Valorant VAN9005 Error
How to Fix If Valorant Not Updating on your PC
How to Fix Valorant Error Code VAN 152

Page Contents
How to Fix Critical System Error on Valorant
If in case, you’ve already launched Valorant and got the error message, then do the following:

- Click on OK > Then select No to exit the Valorant (exe) file.
Now, follow some of the possible workarounds below to easily fix the issue.
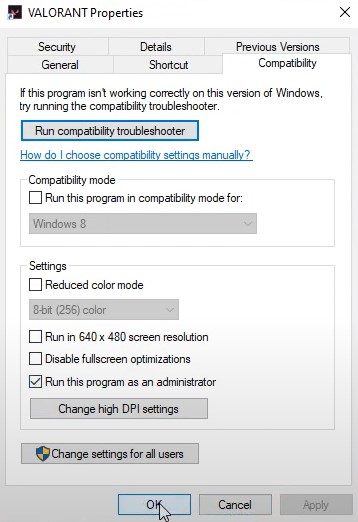
1. Run as administrator
- First of all, right-click on the Valorant game icon on your Desktop/Start menu.
- Next, click on Properties > Choose the Compatibility tab.
- Click on the checkbox “Run this program as Administrator”.

- Finally, click on Apply and then OK to save changes.
- Launch the Valorant game by double-clicking on the icon and you’ll be good to go.
2. Update Graphics Drivers
- Press the Win+X shortcut to open up the Quick Start Menu.
- Now, click on Device Manager > Click on Display adapters (arrow icon) to expand the list > Right-click on the dedicated graphics card > Select Update driver > Click on ‘Search automatically for drivers’ > If any update is available, it will automatically download and install the update > Next, restart your computer to apply changes.
- Alternatively, you can download the latest Nvidia GPU driver or AMD GPU driver for your PC and install it accordingly.
3. Adjust VGC Service
- Press the Win+R shortcut to open up the Run dialog box.
- Now, type services.msc and hit Enter.
- Services (Local) interface will open up > Next, you’ll need to search for ‘VGC’ service.
- Once found, right-click on the VGC service > Click on Properties.
- Make sure to click on the Automatic Startup type > Click on Apply and hit OK to save changes.
- Now, go to the installed Valorant directory and head over to the Riot Games > Valorant > live > ShooterGame > Binaries > Win64 path.
- Right-click on the Valorant-Win64-Shipping file > Choose Properties.
- Switch to the Compatibility tab > Make sure that Run this program as an administrator option is turned on.
- If not, enable it then click on Apply and hit OK.
4. Change Valorant Launch Option
- Press the Win+R shortcut to open up the Run dialog box.
- Now, type %AppData% and hit Enter.
- The Windows Explorer interface will open > Press Backspace key to go to the previous page.
- Go to the Local folder > ShooterGame > Saved > Config > WindowsClient.
- Now, you’ll need to open the GameUserSettings.ini file.
- Then change the default value of DefaultMonitorIndex from 0 to -1.
- Next, change the default value of LastConfirmedMonitorIndex from 0 to -1 also.
- Finally, save changes and close the file and then close the window also.
- Restart your computer once and then try launching the Valorant game.
5. Restore Clockspeed to Default
If in case, you’ve already overclocked your GPU or CPU, you should use any overclocking tool like MSI Afterburner to restore the CPU/GPU overclocking speed to the default.
6. Uninstall MSI Afterburner and Rivatuner
- Click on Start > Type Control Panel and click on it from the search result.
- Click on Uninstall a program > Now, search for MSI Afterburner and right-click on it.
- Select Uninstall and follow the on-screen prompts to easily delete it.
- Similarly, Uninstall the Rivatuner program.
- Once done, restart your computer and check for error.
7. Reinstall Valorant
- Make sure that Valorant is not running in the background. Press Ctrl+Shift+Esc shortcut to open up the Task Manager > Go to Processes and look for Valorant and Vanguard tasks > If running, click on it to select and click on End Task one by one.
- Now, restart your computer > Then click on the System Tray icon on the Taskbar and right-click on the Vanguard icon > Select Exit Vanguard > Click on Yes to confirm.
- Then you’ll need to uninstall Vanguard from the Start menu > Control Panel > Uninstall a program > Right-click on Riot Vanguard > Select Uninstall > Follow on-screen prompts to complete the process.
- Now, you should also Uninstall the Valorant game just like step 3.
8. Update BIOS
Finally, make sure to update your BIOS version on the PC. Most of the latest PC/Laptop brands offer an official support tool where users can easily update BIOS and drivers. However, you can simply head over to the manufacturer’s website according to your PC/Laptop model number or brand and search for BIOS update.
You’ll also find plenty of ways to safely update your PC BIOS firmware. This is how you can fix the Critical System Error on Valorant easily.
That’s it, guys. We assume you’ve found this guide pretty helpful. For further queries, you can comment below.
