If you are using Adobe Creative Cloud, you must be using online file save storage offered by it. Generally, when users purchase and login to their account Adobe Creative Cloud automatically allow back up or synchronization process. This process saves all the necessary file created using adobe apps to the cloud. This way, user’s data remains backed up in the cloud, and even if they lose offline data, they can get it back from the cloud. But not all users need to have Sync services, so they search for how to disable file sync for Adobe Creative cloud. The sync service is very helpful, but in most cases, it eats up your internet bandwidth.
We all are familiar with Adobe. Adobe is a company that offers different types of creative software. Somewhere in our daily life, we come around a different adobe software like photoshop, illustrator, after effects, and many more. If you are a regular user of this software, you must be using Creative Cloud. And if you use Adobe Creative Cloud, then it automatically files synch with your PC.
This service is very helpful, but some users don’t want to use it, or they simply don’t want to back up their data. In all cases, the user wants to disable file sync with Adbove creative cloud. Here we are going to provide a step by step guide to turn off sync for adobe creative cloud.
Also Read
How to Fix Adobe Illustrator SVG Export Issue
Fix: Adobe Creative Cloud Login Not Working
/note]

Page Contents
How to Disable File Sync for Adobe Creative Cloud?
Creative Cloud is a service by adobe which provides 20+ desktop and mobile apps for a different kind of works. Creative cloud has photography, design, video, web, UX, and more services to offer. Since adobe launched Creative Cloud, it has a monthly subscription plan which offers not only the apps but different kind of services like regular updates for all apps and Cloud storage to its users. The first way to disable Sync for Adobe Creative Cloud is by switching off the sync setting.
Steps to Delete Files Folder of Creative Cloud
The first way to disable Sync for Adobe Creative Cloud is by Deleting Files Folder of Creative Cloud. To completely remove the creative cloud option from the file explorer, you need to delete the files folder of the Creative Cloud.
First, you need to download the Pinccf.zip file. You can get it on Google, or you can download it below. This zip file has the official registry file from Adobe CC. Once you have the file, follow the below-mentioned steps.
[btn title="Download Pinccf.zip" link="https://helpx.adobe.com/content/dam/help/en/creative-cloud/kb/remove-cc-files-folder/jcr_content/main-pars/download_section_1160112894/download-1/PinCCF.zip"]
Firstly, you have to extract the Pinccf.zip file. You can do it using any zip extraction app of your choice.
[note color="yellow" title_tag="p" title=""]
If you want to restore the files and folder with the creative cloud option from the left navigation panel of your file explorer follow the upper mentioned process. But double click on rePinCCF.reg instead of unPinCCF.reg and complete the dialogue box process. This way, you can restore it back.
After that, open the Pinccf folder, and you will find a file named unPinCCF.reg. Double click on this file, and it will open the Registry Editor dialogue box. Click on Yes option and then the Ok option to proceed. Once you do this, restart your computer. This way, you can remove the creative cloud option from the left navigation panel of your file explorer.
Steps to Disable & switch off sync setting in Adobe Creative Cloud
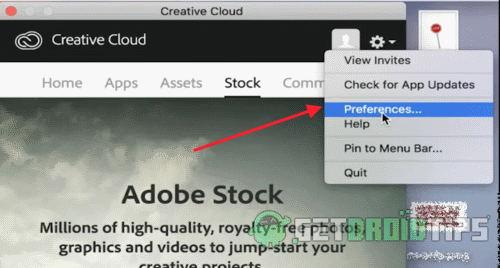
First, launch the Adobe Creative Cloud app on your PC. After launching the app, click on the gear icon. You will find the gear icon on the top right corner of your creative cloud app screen. When you click the gear icon, it will show a drop-down menu. Select the Preferences option from the drop-down menu.

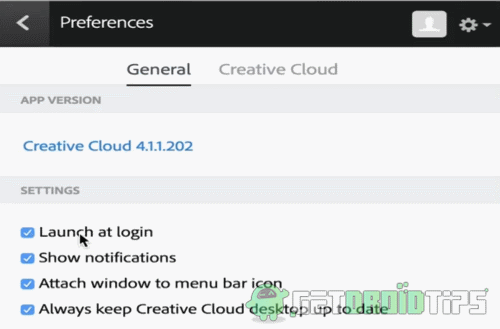
Once you are in the preference menu screen, you will see two different tabs. The first tab has various options for the app. you can enable or disable launch at login, notifications, menu bar icon, and Creative Cloud updates.

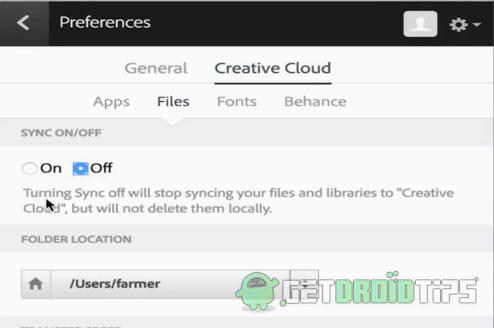
To continue, click on the creative cloud tab. In the Creative Cloud Tab, select the files tab. Once you click on the file option, you will see an option named SYNC ON/OFF. This has On option selected by default. Click on the checkbox in front of the Off option, and thus, you have successfully disabled sync setting off.

You can turn it on by following the same method. Just check on the checkbox in front of the On option.
The steps down below are for Mac OS, but they will work on Windows PC as well. Simply follow all the steps to disable file sync with your Adobe creative cloud.
Conclusion
We hope this guide will help you with Disabling File Sync for Adobe Creative Cloud. If you disable sync to Adobe Creative Cloud, you may lose your data if it gets deleted from your PC.
Since there is no way to upload your choice of files to the Creative Cloud, you need to disable this option or upload all the files. If you want to upload only selected files, then enable Sync option when working on those files and disable it during other works. We are hoping that with the upcoming updates, Adobe Creative Cloud makes this process optional and lets the user upload files of their choice.
