Android is popular mostly because of its open-source nature, much like what we see from Linux in the case of PCs. Developers from around the globe can work around it and tinker with the OS to customize it accordingly. But most smartphone manufacturers don’t really prefer users tinkering with their custom UIs. To prevent anybody from making changes to the customized version of OS, OEMs usually put a software switch, which acts as a firewall, that is, until it is turned off.
OEMs put this switch so that the usual day to day smartphone users will have a preserved worry-free experience. OEMs test their software a lot before releasing it to the consumers, and allowing tinkering with it by default may result in an inconsistent software experience. On top of it, most smartphone manufacturers (except Oneplus) straight away void the device warranty if the user enables OEM unlocking and then bootloader. But that doesn’t really stop some users from still through with it. For some people customizing the OS according to their liking, is more important than maintaining the device’s warranty. So for those users looking to enable OEM unlocking to unlock the bootloader, this article is for you.
Also Read
Page Contents
What is OEM unlocking?

OEM unlocking is an option in the developer options section that normally stays off by default. It was back introduced back in Android Lollipop and has stayed persistent ever since. Once you enable the OEM unlock on your device, the “unlock ability” flag is set to 1, which will allow users to use the “fastboot flashing unlock” command. Once you have enabled it, it stays on. Even if the user does a factory reset, it stays unlocked until the setting is manually altered again by going into the developer options section. This is not safe to do so at all, though, if you do not know much about flashing ROMs.
Why is it important to enable OEM unlock?
The main reason why most users go for OEM unlocking is custom ROM. Maybe their OEM stopped providing software support, or maybe the OEM UI is just not to the liking of the user. Now to install a custom ROM, the device needs to have root permissions. Rooting requires installing a custom recovery like TWRP, and installing custom will again require access to the device storage partitions. Again to access and modify the device storage partitions, the user needs to have an unlocked bootloader.
The bootloader is what the OEMs set on your device by default, and the first time that the device boots up, the bootloader starts running. It is basically a software program that contains a list of OS instructions to ensure the smooth functioning of the device. Once this bootloader is unlocked, the user can manually change what image file was set as default by the OEM, and customize the device according to their liking.
Warning/ Disclaimer about warranty/backup:
Despite the customizable benefits, the bootloader unlocking will result in a few disadvantages too.
Firstly, you will void your warranty and support from the OEM. There are special OEMs like Oneplus, which is an exception to this disadvantage.
Secondly, the entire data on your phone will be wiped. So a backup of all the necessary files is a must before getting into unlocking bootloader.
Thirdly, DRM protected applications like Netflix; Amazon prime won’t work on the newly customized Android phone anymore in most cases.
Steps To Enable OEM Unlocking:
This will be a step by step guide to taking you through the procedure.
Step 1: Backup device.
Get a complete backup of your contacts, messages, apps, and internal storage. Now usually, Enabling OEM unlock won’t erase the data on the device. But obviously, the eventual step after OEM unlock is bootloader unlocking, and that will wipe away everything on your device.
Step 2: Activate the Developer option.

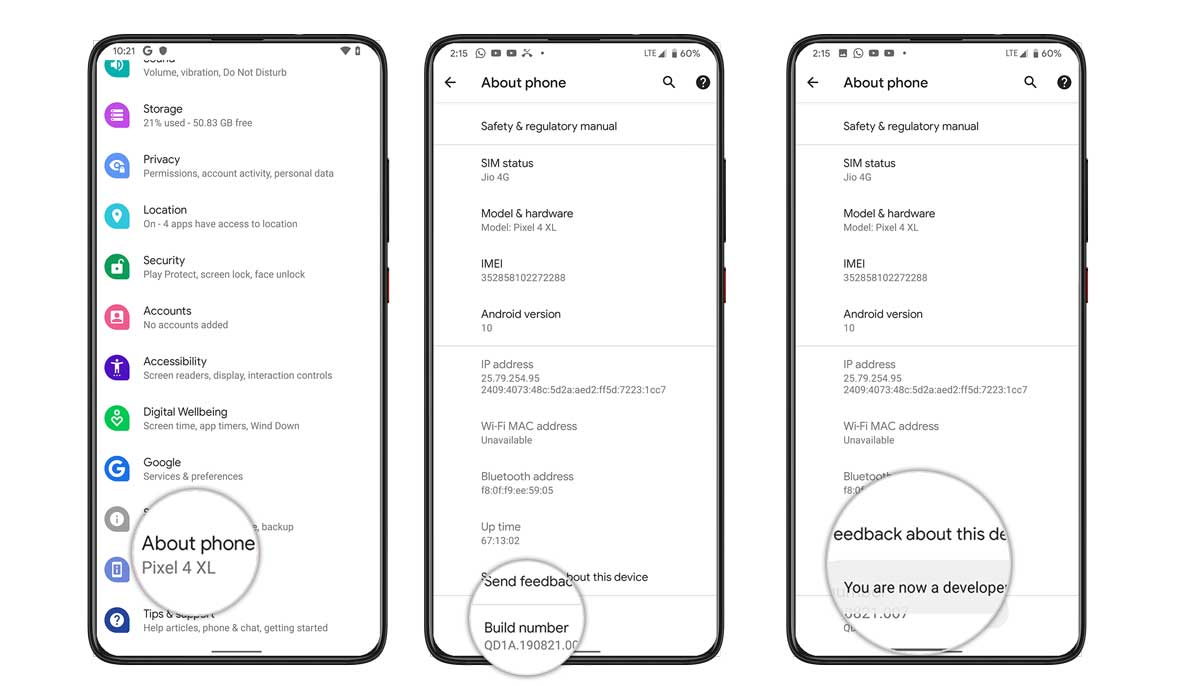
- Open settings and head over to the “About Phone” section and tap on it.
- There you will find all the information regarding your device, like the Android version, security patch, and so. Find the section that says “Build Number”.
- Tap on the build number 7 times, and you will see a popup on the screen saying you are now a developer.
- Go back to the main settings menu, and there you will see the new option that says developer options.
Step 3: Enable OEM Unlocking.

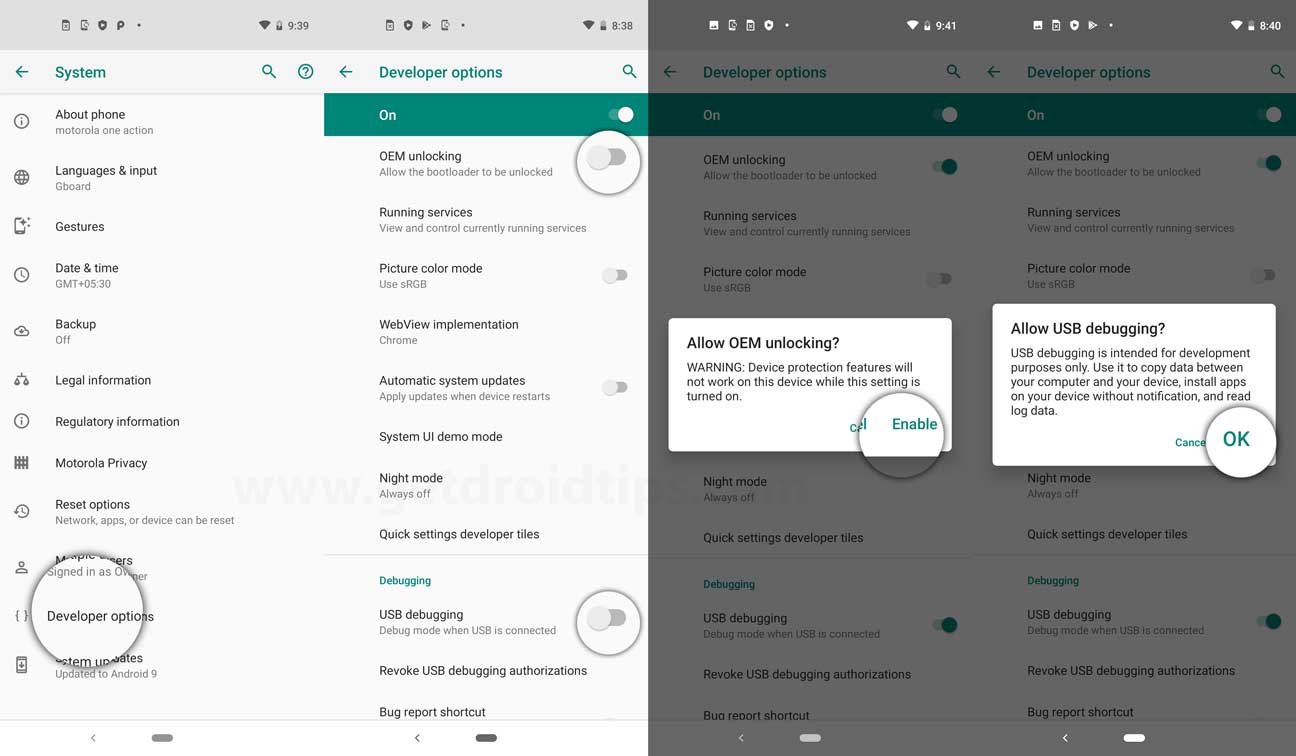
- Open the settings on your phone.
- Find the section that says “Developer options” and tap on it.
- Scroll down till you find the option “OEM unlock”
- Tap on it to turn the toggle on, and you are done.
Step 4:Unlocking Bootloader using the Fastboot method.
- Firstly, you need to boot your device in fastboot mode. For that, restart your device by pressing on any one of the volume keys + power key. It is different for different OEMs.
- Go to the folder where ADB and Fastboot binaries are installed.
- Right-click in an empty location inside the folder while holding the Shift button.
- Then select ‘Open command window here’ or ‘Open PowerShell window here.’
- Now for devices launched in 2015 or later, type the following command: fastboot flashing unlock.
- For devices launched prior to 2015, type the following command: fastboot oem unlock.
- After the command is executed, you will see an option for bootloader unlock on your device’s screen.
- Use the volume buttons to move up and down and select the option to unlock the bootloader.
- A prompt will pop up, asking for confirmation. Use the power button to confirm your selection as yes, and you are done.
- The phone will now reboot to fastboot mode. Enter the command “fastboot reboot,” and it will boot into PC.
Conclusion:
So that’ it. If you follow the steps accurately, you will have a bootloader unlocked device on your hand. However, sometimes thing does go south, so just to make sure that you have a restore point to back to, keep a backup of everything.
Also Read
