One of the many versatile features in iOS is how they manage to add location tags to the pictures on the iPhone and iPad. This is a very useful feature for almost every user. However, the location tags might frustrate you sometimes, especially when you’re at a point where you’re trying to share the image with a particular person. Maybe you don’t want them to identify the location of the photo, or you simply want to remove the tag from it.
Either way, we have the same goal here – to remove the location data from photos. The first thing you need to make sure is that your device is running on i0S 13 or later version of the software. This is because the earlier versions of iOS do not have the feature to remove location tags. Once you got this covered, just follow the guide below. So without any further ado, let’s see how to remove location data from photos before sharing on iPhone and iPad.
Also Read
How to Remove Location Data from Photos Before Sharing on iPhone and iPad
- Before we start, make sure your iPhone or iPad is running on iOS 13 or above. Once that is confirmed, open the Photos app on your device

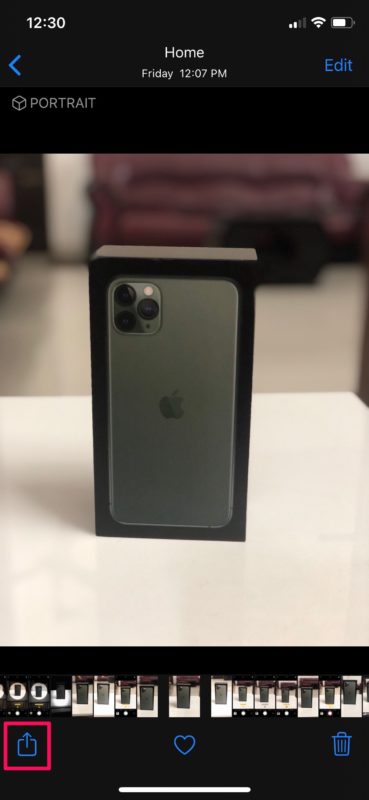
- Open the photo that you want to remove the location for sharing
- Now, on the bottom left corner of the screen, you’ll see the share icon. Click on it
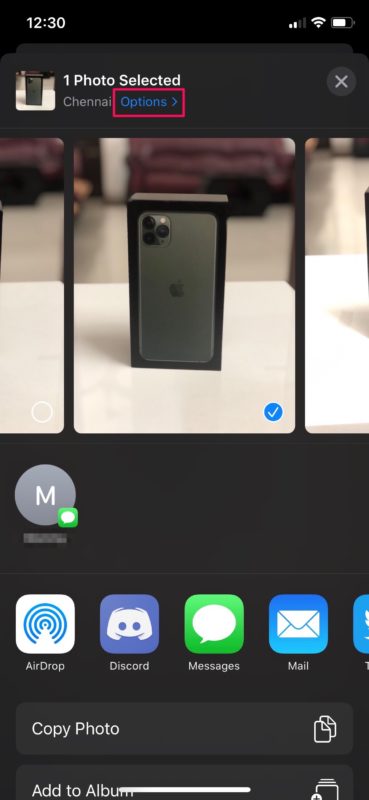
- This opens up the share sheet. On the top of the screen, you’ll see the location of the photo. Click Options that is shown right next to the location
- On the next screen, you’ll see a slider to the right side of Location. Click on it to toggle it off, which removes the location data from the opened image
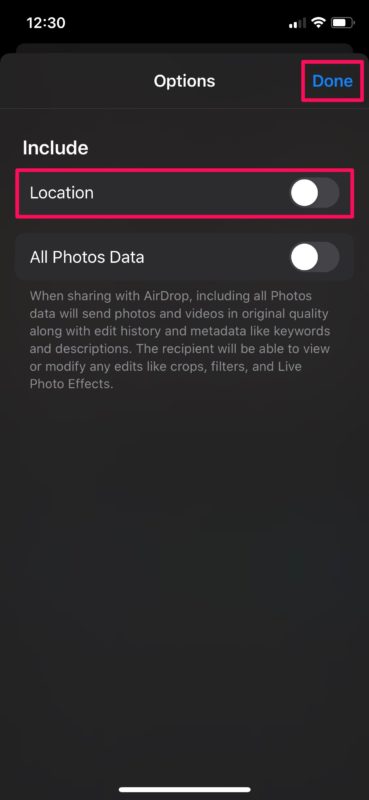
- Click Done to exit the menu and go back to the sharesheet. The location data for the image is now removed and you now free to share
- How to Markup Screenshots on iPhone or iPad?
- How to Move Emails from Junk to Inbox in iPhone or iPad?
- Managing Your Outlook Tasks from Your iPhone or iPad
- How To Add Friends To Game Center In iOS 13/iPadOS On iPhone Or iPad
- Changing Passcode on iPhone or iPad
- How to Download Torrents Directly on your iPhone or iPad?
Summing up our guide, the basic requirement to remove the location data from photos before sharing on iPhone and iPad is that your need device needs to be running on iOS 13 or later versions of system software. Once you meet the requirements, follow the steps given above in this guide and you’ll be set. That said, we hope reading the guide above has brought some valuable information and help to you. Please let us know by commenting down below if you have any further queries regarding the same.
Also, check out our iPhone Tips and Tricks, PC tips and tricks, and Android Tips and Tricks if you’ve got queries for it or want help. Thank you!
Also Read
