Both the ZTE Nubia Red Magic 6 and Nubia Red Magic 6 Pro has been released in March 2021 & they came with Android 11 out of the box. It’s also worth mentioning that both the models do come with Snapdragon 888 SoC which offers stunning performance. But if you’re interested to enable Root access on your Nubia Red Magic 6 and Nubia Red Magic 6 Pro Using Magisk Without TWRP then follow this full guide.
Rooting on Android is all about having superuser access over your device system and Android subsystem. So that you can easily tweak, modify, add, delete system files or applications which isn’t possible without rooting. If in case, you’re having issues with the custom firmware flashing without root and your device stuck into the bootloop issue then there is nothing better option than Magisk.
Also Read
Page Contents
Why do we need Magisk for rooting?
If you’re thinking to root your Android handset then Magisk is the good option and most featured-pack option right now. Previously, Android users prefer to use SuperSU or one-click root apps but those are now outdated and don’t provide you full root access mostly. Meanwhile, flashing Magisk using TWRP recovery is also not accessible for all because most of the latest devices don’t have an official TWRP recovery.

That’s why using Magisk for your Android rooting is best due to its systemless rooting method. Magisk is a rooting tool that allows root access on an Android device without even touching or breaking Android system files. A big thanks to topjohnwu (senior recognized developer) for making it possible.
Additionally, Magisk offers a bunch of modules for tweaking your handset much better just like Xposed Modules. Whereas Magisk also bypasses Google’s SafetyNet security feature while using banking apps, online payments, etc. A huge thanks to chocolote4444 (XDA Senior Member) for sharing the rooting guide of Nubia Red Magic 6 and 6 Pro.
Root Nubia Red Magic 6 and Magic 6 Pro Using Magisk Without TWRP
Before heading over to the rooting guide, make sure to follow all the requirements, useful tips, downloads, etc for a successful rooting process on your Nubia Red Magic 6 series.
Note: You may find several websites that claim to root Nubia Red Magic 6 series devices using KingRoot, iRoot, KingoRoot, etc third-party rooting tools. But do not fall into those traps because you may end up installing malware and they may steal your data. The only proper method is Magisk rooting because it’s safe to use.
Another thing to mention is that SafetyNet does NOT bypass even with MagiskHide enabled. Please keep that in mind!
Requirements
- You’ll require a computer and a USB cable to connect your Nubia handset with the PC.
- A Global Firmware File for Nubia Red Magic 6 or Red Magic 6 Pro.
- A Payload Dumper Tool on the PC.
- Magisk APK file to patch the stock boot.img file
- Download and Install Nubia USB Driver on your PC.
- Install ADB & Fastboot Tool on the PC.
- The device Bootloader should be Unlocked.
Download Links
- Nubia USB Driver
- ADB & Fastboot Tools [Platform Tools]
- Global ROM – NX669J
- Payload Dumper Tool
- Magisk ZIP and Magisk Manager
Warning:
Unlocking the device Bootloader will void your device warranty (if any). GetDroidTips will not be responsible for any type of bricking/damaging issue to your phone while/after following this whole rooting process. You should know what you’re doing. So, do it at your own risk.
Steps to Unlock Bootloader on Nubia Red Magic 6 and 6 Pro
Note: Bootloader Unlocking will wipe all the data from your phone. So, if possible, you should take a complete data backup.
First of all, you need to unlock the bootloader on your handset. Otherwise, you can’t install root or a third-party firmware file. To do so:
- Enable the Developer Options > Enable OEM Unlock and USB Debugging.
- Go to your device Settings > About > Software Information > More > Tap on the Build Number 7 times continuously to see a message ‘You are now a developer’.
- Now, go back to the main Settings menu > Search Developer Options > Open it and enable OEM Unlock and USB Debugging.
- Make sure to download and install the ADB Fastboot zip file on your PC after extracting it.
- You should also install the Nubia USB Driver on your computer just like a Windows application.
- Now, make sure to connect your ZTE Nubia Red Magic 6 series phone to the computer via a USB cable.
- Head over to the installed ADB & Fastboot (Platform Tools) folder on the PC.
- Then press the Shift key + Right Mouse click in a blank area inside the folder to open the context menu.
- Select Open Command Prompt here > If prompted by UAC, click on Yes to launch the command prompt as an administrator.
- Now, type the following command in the command prompt window and press Enter to check whether your device is connected into the fastboot mode or not:
fastboot devices
- It will list the connected device serial number. If your phone’s serial number shows up there then you are good to go. (If not listed, then re-install the USB Driver and retry typing the above command)
- Now, execute the following command to unlock the bootloader:
fastboot flashing unlock
- Once done, run the following command to boot your device into the system:
fastboot reboot
- Wait for the process to complete as it may take some time for the first time.
- Now, your Nubia Red Magic 6 series bootloader has been unlocked.
Extract Android OTA Payload.bin File
Now, you’ll have to download and use a Payload Dumper Tool on your PC to extract the Payload.bin file that has been included in the stock firmware file. You can follow our full-depth Extract Payload.bin using the Payload Dumper Tool guide here.
Root Method via Magisk
- Once you extracted the Payload.bin file, just make sure to copy/paste the stock boot.img file and the vbmeta.img file to your desktop screen as well as on your phone’s internal storage via the USB cable. [It’s important]
- Make sure to download and install Magisk Manager on your handset.
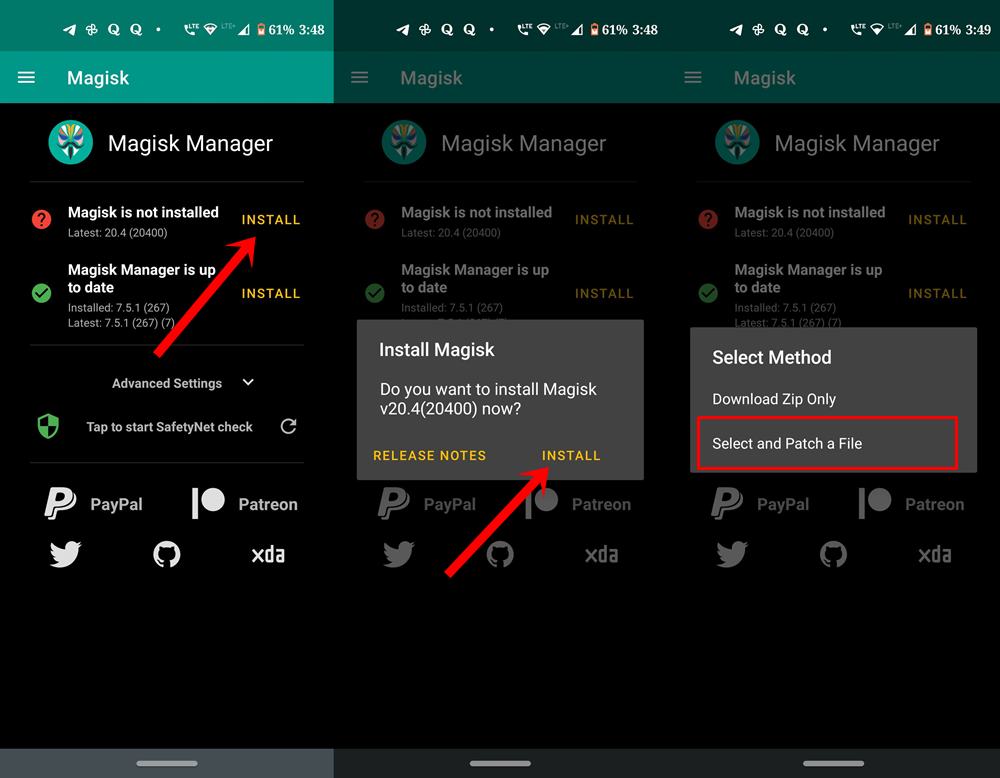
- Launch the Magisk Manager app > Hit Install > Select Install again.

- Once done, tap on Select and Patch a File > Go to the phone storage and select the extracted stock boot.img file that you’ve moved earlier.
- Now, the Magisk Manager will automatically patch it on your device.
- Wait for the process to complete > You’ll get All done! message on the device screen.
- Then magisk_patched.img file will be saved on your device automatically. [Check the ‘Download’ folder of the internal storage]
- Now, copy/paste the magisk_patched.img file on the desktop screen for your ease.
- Open Command Prompt > Change your directory to the Desktop something like [cd c:/Users/Your Name/Desktop].
- Again check whether the USB Debugging option has been enabled on your device or not. If not, turn it on.
- Reconnect your handset to the PC via the USB cable.
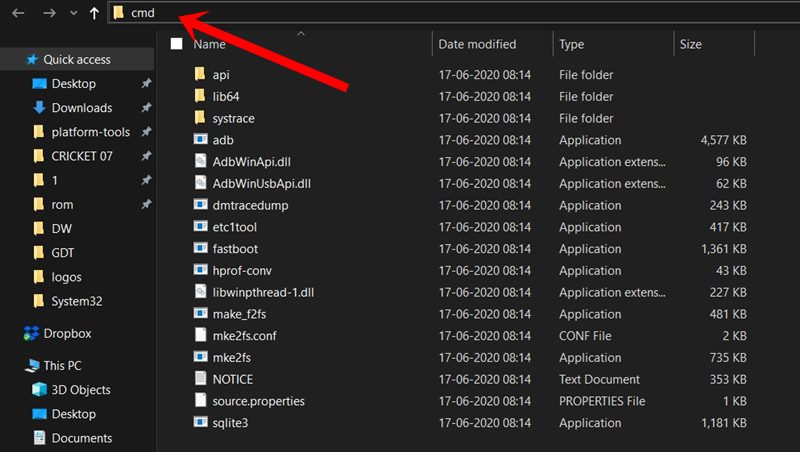
- Head over to the installed ADB & Fastboot folder (Platform Tools folder) > Type cmd on the address bar and hit Enter to open Command Prompt. [If prompted by UAC, click on Yes to run it as administrator]

- Now, run the following command line on the Command Prompt window to check whether the device is properly detected in fastboot or not:
fastboot devices
- Then run the following command to easily boot your Nubia Red Magic 6/6 Pro device into the Fastboot (Bootloader) mode:
fastboot reboot bootloader
- Next, run the following command to flash the patched boot image file on your Realme device:
fastboot flash boot magisk_patched.img
- Then you’ll need to execute the following command line to disable verity on the device using the vbmeta.img file:
fastboot --disable-verity --disable-verification flash vbmeta vbmeta.img
- Reboot your device into recovery from the bootloader by running the following command:
fastboot reboot recovery
- Now, make sure to perform a factory reset of the phone. [Important]
- Finally, restart your device into the system normally and wait for a couple of minutes.
- Enjoy! You’ve successfully rooted your Nubia Red Magic 6 or 6 Pro via Magisk.
That’s it, guys. We assume this guide was helpful to you. For additional queries, you can comment below.
Source: XDA

Hello nice post about root red magic 6and 6pro, but can i do the same procedure with my red magic 6S pro??? NX669J-S ?