If we talk about tracking connected devices or accessories efficiently, Apple AirTag seems a good option for Apple ecosystem users. We can also consider AirTag as one of the better alternatives to Galaxy SmartTag easily. In spite of having a pretty good reason to use such a device tracker with your iPhone, it has plenty of issues too. If you’re also Unable to Set Up Apple AirTag with iPhone, follow this guide.
Apple AirTag comes with a ‘Precision Finding’ feature that claims to track the connected device or gadget very precisely and keep notifying the user whenever needed. But several users have found that it doesn’t offer a consistent precision finding experience. Meanwhile, being not able to set up or connect AirTag with an iPhone is a pain to the users in most cases.
Also Read
iPhone Battery Draining Overnight, How to Fix?
Fix: Apple Wallet Not Showing Add Card Option
5 Easy Ways to Turn Off iPhone without Power Button
How to Fix If iOS 16.4 Update Won’t install on iPhone
Fix: Google Chat Notifications Not Working on Android and iPhone
How to increase Cellular Data/ Mobile Data Speed on iPhone
Fix: iPhone Reminders Not Working on iOS 16
Page Contents
- Fix: Unable to Set Up Apple AirTag with iPhone
- 1. Turn On AirTag
- 2. Set Up AirTag using Find My
- 3. Enable Two-Factor Authentication
- 4. Do Not Use Managed Apple ID
- 5. Turn On/Off Bluetooth, Wi-Fi, Mobile Data
- 6. Turn On/Off Location Services
- 7. Enable Find My Network on iPhone
- 8. Check iOS Updates
- 9. Replace or Reinsert Battery on AirTag
- 10. Factory Reset AirTag
- 11. Try Using Another iPhone
- 12. Reset Network Settings on iPhone
- 13. Contact Apple Customer Support
Fix: Unable to Set Up Apple AirTag with iPhone
There may be multiple reasons behind such an issue when facing problems with the Apple AirTag connectivity or set-up. It can be network-related issues, Apple ID-related issues, Find My feature-related issues, iPhone software version-related issues, and more. So, without wasting any more time, let’s jump into it.
1. Turn On AirTag
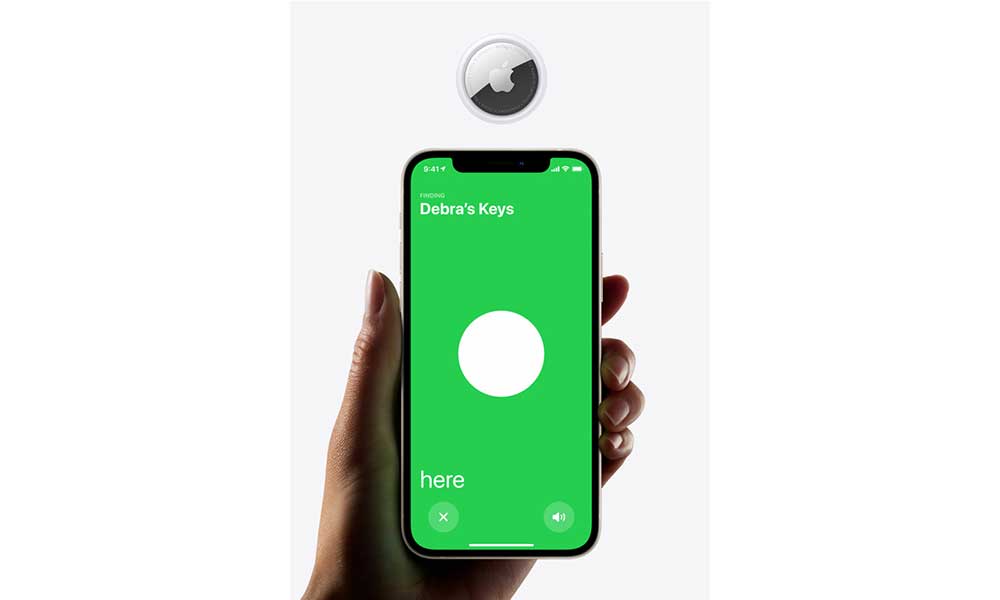
All-new Apple AirTag comes turned off by default to avoid battery discharge or any accidental registration. Additionally, Apple puts a plastic tab between the AirTag and the AirTag battery for further safety measurements. Therefore, once you open up the Apple AirTag out of the box, you should pull off the plastic tab to enable it.
Now, hold the AirTag near your iPhone or iPad to get a popup on your device. Finally, start the setup process and you’re good to go.
2. Set Up AirTag using Find My
If in case, the popup screen not appears on your iPhone after setting up a new AirTag, it means your iPhone isn’t detecting the AirTag nearby. To fix this issue:
- First, set up your AirTag from the Find My app on your iPhone.
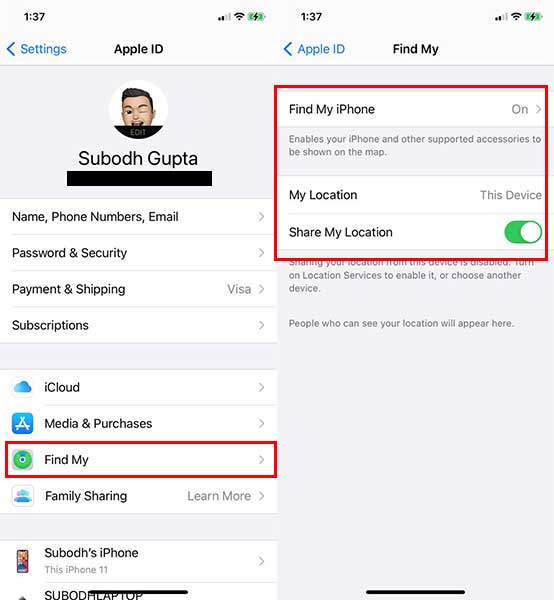
- Go to Settings > You’ll see [your name] at the top of the settings page.
-
- Tap on your name > Tap on Find My > Go to Find My iPhone.
- Now, Turn on the Find My iPhone toggle.
- To set up an AirTag from the Find My app, open the app > Go to the Items tab.
- Tap on the ‘Add Item’ button.
- A new popup window will appear with a button that says ‘Add AirTag’.
- Simply tap on it to initiate the process.
- It’ll show you a screen with the ‘Searching for AirTag…’ text on your iPhone.
- Tap on the Connect button immediately.
If the ‘searching for AirTag…’ screen shows infinitely, you can follow other methods one by one.
3. Enable Two-Factor Authentication
You should have enabled the two-factor authentication (2FA) feature on your iPhone for an additional layer of security. In order to enable the two-factor authentication on your Apple ID:
- Go to Settings > Tap on [your name] that’s showing on the top of the page.
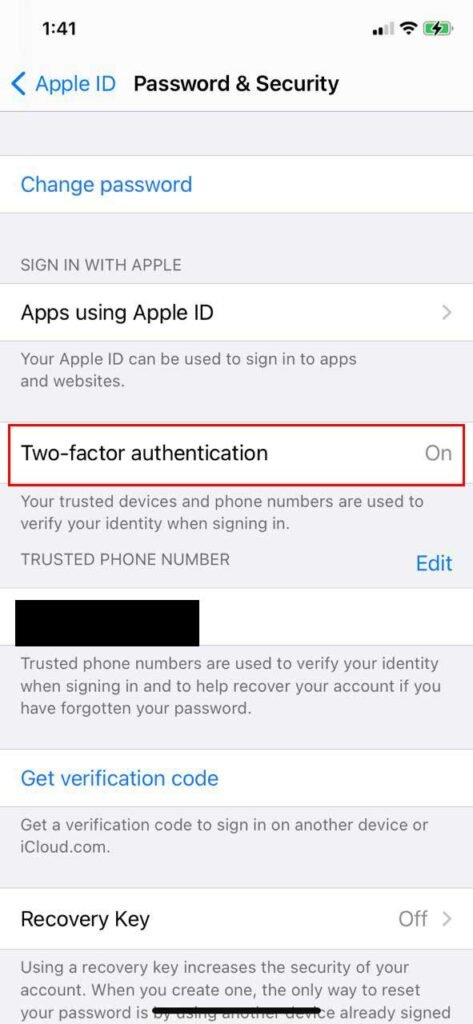
- Head over to Password & Security > Turn on the ‘Two-Factor authentication’ feature.
- You’ll need to enter your phone number and answer a few security questions to enable 2FA for your Apple ID.
4. Do Not Use Managed Apple ID
If you’re using a managed Apple ID then you can’t set up an AirTag. Make sure to check it out as well with your device. For such scenarios, you can always create an individual Apple ID and sign in to your iPhone to add AirTags.
5. Turn On/Off Bluetooth, Wi-Fi, Mobile Data
The chances are high that may be due to the Bluetooth, Wi-Fi, or your cellular network, the AirTag can’t be set up or added. You should always go to the Settings app on your iPhone > Go to Wi-Fi, Bluetooth, and Mobile Data option one by one. Then turn off the toggles and restart your device.
Once rebooted, make sure to turn it on Wi-Fi, Bluetooth, and Mobile Data one by one to check for the issue again.
6. Turn On/Off Location Services
Location Services play a major role when it comes to tracking or precision tracking in case of navigation or using AirTags. So, even if the Location Services option is enabled/disabled, you should repeat it to clear any kind of potential glitch or cache issue.
- Go to Settings > Tap on Privacy > Select Location Services to turn it on/off.
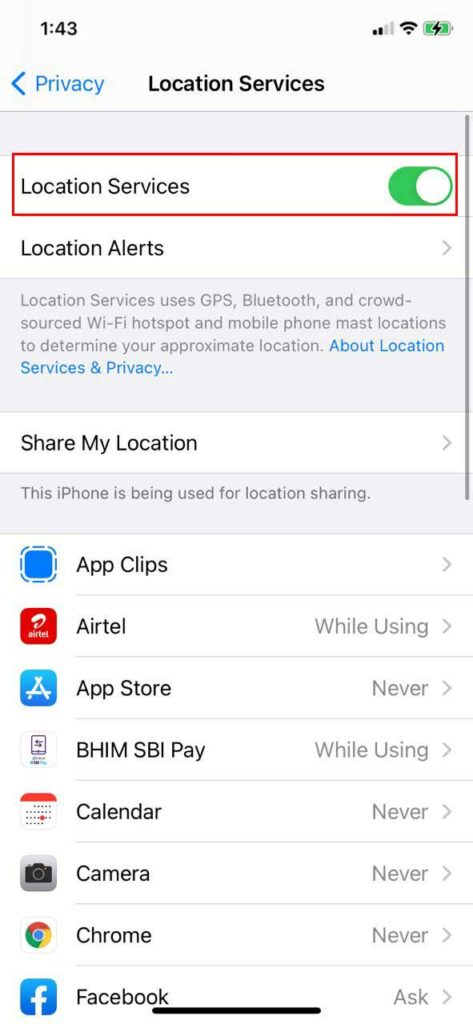
- Now, restart your iPhone and turn on/off the feature again to clear the cache.
- You can now try adding AirTags with your iPhone.
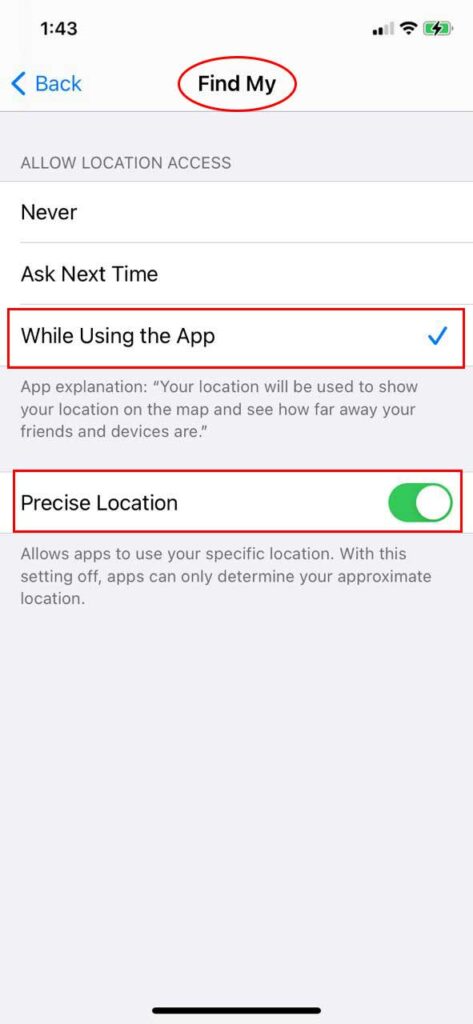
- Meanwhile, make sure to enable the Location Access for Find My app. To do that:
- Head over to Settings > Tap on Privacy > Select Location Services.
-
- Go to Find My > Choose ‘While Using the App’ > Turn on the ‘Precision Location’ toggle.
7. Enable Find My Network on iPhone
Apple AirTag basically works with Apple’s Find My feature that can be found on iPhones, iPads, Mac, and other Apple devices. If you want to run the AirTag properly, make sure to enable the Find My Network on your iPhone. To do this:
- Go to iPhone Settings.
- Tap on [your name] at the top of the page.
- Go to Find My > You’ll see the ‘Find My iPhone’ option.
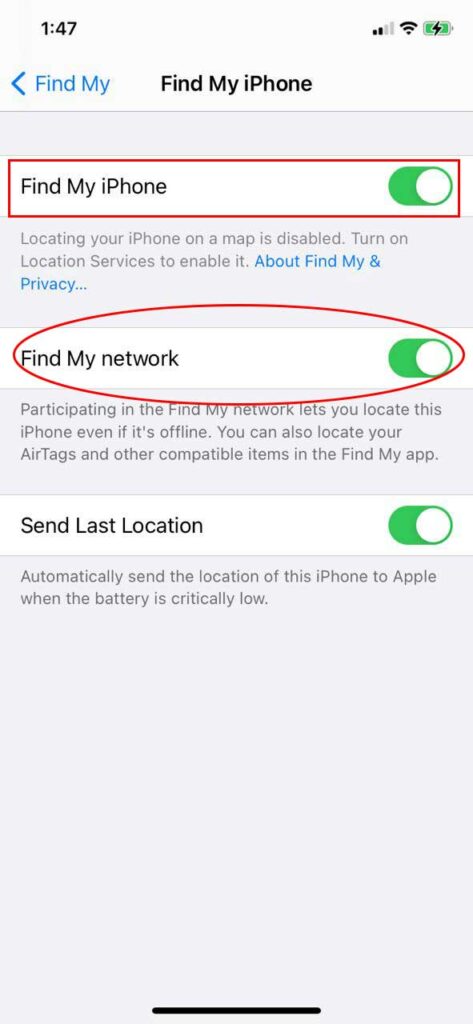
- Tap on it > Turn on the ‘Find My iPhone’ toggle and the ‘Find My network’ toggle.
- Now, the new AirTag will be able to identify and pair with your iPhone easily.
8. Check iOS Updates
However, if none of the above methods worked for you, it may also possible that your iPhone’s software version becomes outdated enough. So, if you haven’t updated your handset for a while, make sure to check for iOS updates properly. The latest firmware update always brings additional features, improved privacy or security options, and improves bugs.
- Open the Settings app on your iPhone > Go to General.
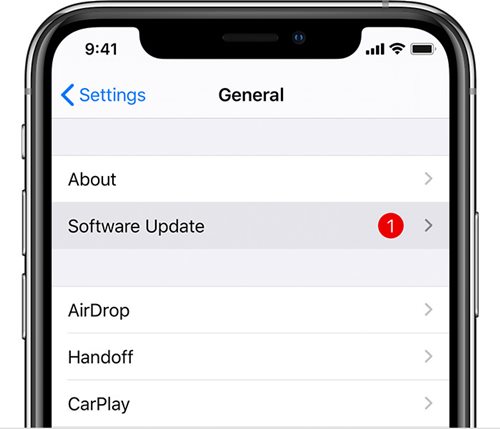
- Tap on Software Update and it’ll automatically start checking for available updates.
- If there is an update available, make sure to Download and Install it.
- Once the update installed, your device will reboot automatically.
- Finally, you should be able to fix the Unable to Set Up Apple AirTag with iPhone issue completely.
9. Replace or Reinsert Battery on AirTag
If your AirTag is still not working properly then you should try removing and replacing the battery of the AirTag. The user-replaceable CR2032 battery may get drained or damaged unexpectedly. So, try changing it to check whether the Unable to Set Up Apple AirTag with iPhone issue has been fixed or not. To do so:
- Pull out the AirTag from its case or accessory > Press down the stainless steel back of the AirTag with two fingers.
- Rotate counter-clockwise while pressing it down to open up the cover.
- Now, pull apart two halves of the AirTag and remove the old battery.
- Place a new battery gently > Put the cover and rotate it clockwise until the cover gets tightened.
You can find out CR2032 battery for AirTag on Amazon.
10. Factory Reset AirTag
If nothing works for you, try performing the factory reset of your AirTag by following the steps below. The chances are high that it has some connectivity issues or precision finding feature not working wisely. To reset an AirTag:
- You’ll have to remove it from the Find My app. Just open the Find My app on your iPhone.
- Go to the ‘Items’ tab > Choose the AirTag that you want to reset or remove.
- Swipe up to access AirTag settings > Tap on the ‘Remove item’ option at the bottom.
- Now, confirm the action by tapping on ‘Remove’ again.
- Once you’ve successfully reset your AirTag, try reconnecting it to your iPhone or iPad.
- To do that: just hold the AirTag nearby your iPhone > Tap on the ‘Connect’ button.
- If in case, you’ve set multiple AirTags then you’ll see the ‘More than one AirTag detected’ message. Make sure to set only one AirTag with a device once at a time.
11. Try Using Another iPhone
It may also possible that may be your iPhone is having some issues with the connectivity. So, it’s always a better idea to try using another iPhone to set up AirTags in order to check for the issue again. Also, try using another Apple ID on the secondary iPhone.
12. Reset Network Settings on iPhone
Even if you’ve restarted your iPhone and turned on/off the networking connectivity options to fix the problem, sometimes it may not work properly. In that case, try resetting your Network Settings on iPhone to exactly clear the networking glitch or system cache issues. To do so:
- Open the Settings app on your iPhone > Tap on General.
- Next, scroll down to the bottom and select Reset.
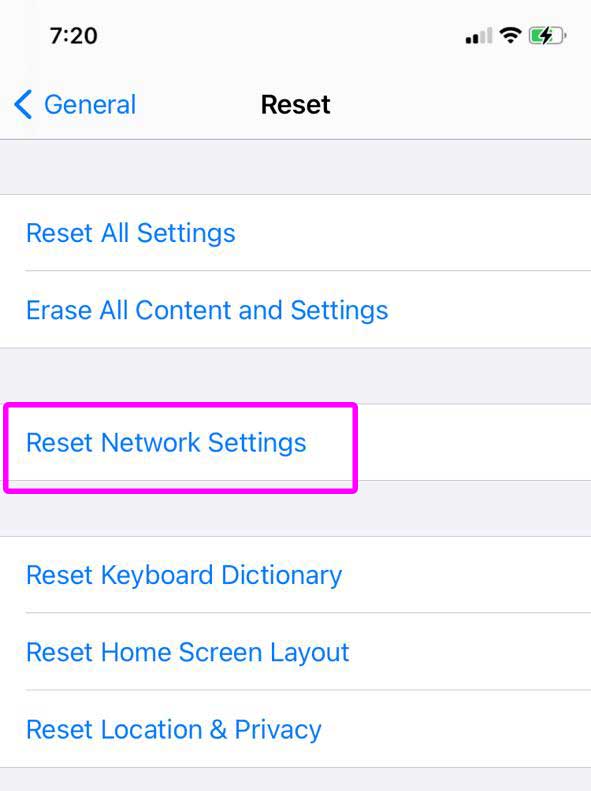
- Tap on Reset Network Settings > make sure to enter your device passcode.
- Finally, tap on Reset Network Settings again.
It may take some time to reset the network settings on your device. Once done, restart your iPhone, and connect to your Wi-Fi or Bluetooth or Mobile Data to check for the issue.
13. Contact Apple Customer Support
As a final resort, you can always try contacting Apple Customer Support for additional help or assistance. It’s worth mentioning that only an Apple care executive can help you out of such issues whatsoever. If you still can’t set up the new AirTag with your iPhone, either you can contact Apple’s customer care or pay a visit to your nearest Apple Store/Service center.
That’s it, guys. We hope this guide was useful to you. For further queries, let us know in the comment below.
