COD Vanguard is 2021’s first-person shooter video game under the Call of Duty franchise, developed by Sledgehammer Games and published by Activision. It offers a multiplayer mode, zombies mode, and more all in one place. However, there are some issues that can be found in the Call of Duty Vanguard game that may bother players a lot like the DirectX Unrecoverable Error on PC. If you’re also facing the same, you can follow this guide.
Mostly DirectX-related errors appear while trying to launch the game application on the Windows PC, which has been quite a widespread issue among PC users for years. That may happen due to several possible reasons such as an outdated DirectX version, outdated graphics driver, outdated Windows version/build, incompatible PC hardware configuration, issues in the Windows system drive, mismatch in display settings, etc.
Also Read
Fix: Call of Duty Vanguard Mouse Not Working or Lags Badly
Fix: Call of Duty Vanguard Error Code DUHOK – LESTER
How to Fix Latency Variation in Call of Duty Vanguard
Fix: Call of Duty Vanguard Private Match not loading
Fix: Call of Duty Vanguard Connection Failed Update Required Error
Fix: Call of Duty Vanguard Stuttering, Lags, or Freezing constantly
How to Fix the Call of Duty: Vanguard Kadena-Keesler Error
Fix: Call of Duty Vanguard Stuttering on PS4, PS5, Xbox One, Xbox Series X/S Consoles

Page Contents
Fix: Call of Duty Vanguard DirectX Unrecoverable Error on PC
Here we’ve provided with you a couple of possible workarounds that should gonna help you to fix this issue. So, without further ado, let’s jump into the guide below.
1. Check System Requirements
It seems that your PC configuration isn’t compatible enough with the COD Vanguard game’s system requirements and that’s why the game isn’t running well on your system. You can check out the system requirements of the COD Vanguard game below to ensure whether your PC is capable enough to handle it or not. If not then make sure to upgrade the specific hardware to the latest generation so that you can play the game smoothly.
Also Read: Fix: Call of Duty Vanguard Black Screen Issue on PC, PS5, PS4, or Xbox Consoles
Minimum Requirements:
- OS: Windows 10 64-Bit (latest update)
- CPU: Intel Core i3-4340 or AMD FX-6300
- RAM: 8 GB RAM
- STORAGE SPACE (at launch): 36 GB (Multiplayer and Zombies only), 177 GB all game modes
- HIGH-REZ ASSET CACHE: Up to 32 GB
- VIDEO CARD: NVIDIA GeForce GTX 960 or AMD Radeon RX 470
- VIDEO MEMORY: 2 GB
- GRAPHICS DRIVER: NVIDIA 472.12 or AMD 21.9.1
Recommended Requirements:
- OS: Windows 10 64-Bit (latest update) or Windows 11 64-Bit (latest update)
- CPU: Intel Core i5-2500K or AMD Ryzen 5 1600X
- RAM: 12 GB RAM
- STORAGE SPACE: 177 GB
- HIGH-REZ ASSET CACHE: Up to 32 GB
- VIDEO CARD: NVIDIA GeForce GTX 1060 or AMD Radeon RX 580
- VIDEO MEMORY: 4 GB
- GRAPHICS DRIVER: NVIDIA 472.12 or AMD 21.9.1
Also Read
2. Update GPU Driver
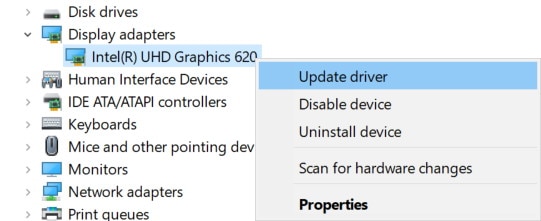
It may also be possible that an outdated GPU drive is causing a couple of issues with your Windows computer whatsoever. It’s always recommended to simply update your graphics driver manually if you haven’t done it for a while. To do so:
- Press Windows + X keys to open the Quick Start Menu.
- Now, click on Device Manager from the list > Double-click on Display adapters.
- Right-click on the dedicated graphics card that you’re using.

- Next, select Update driver > Choose to Search automatically for drivers.
- If there is an update available, it’ll automatically download & install the latest version.
- Once done, the system will reboot automatically. Otherwise, you can manually restart the system to apply changes.
3. Update Windows
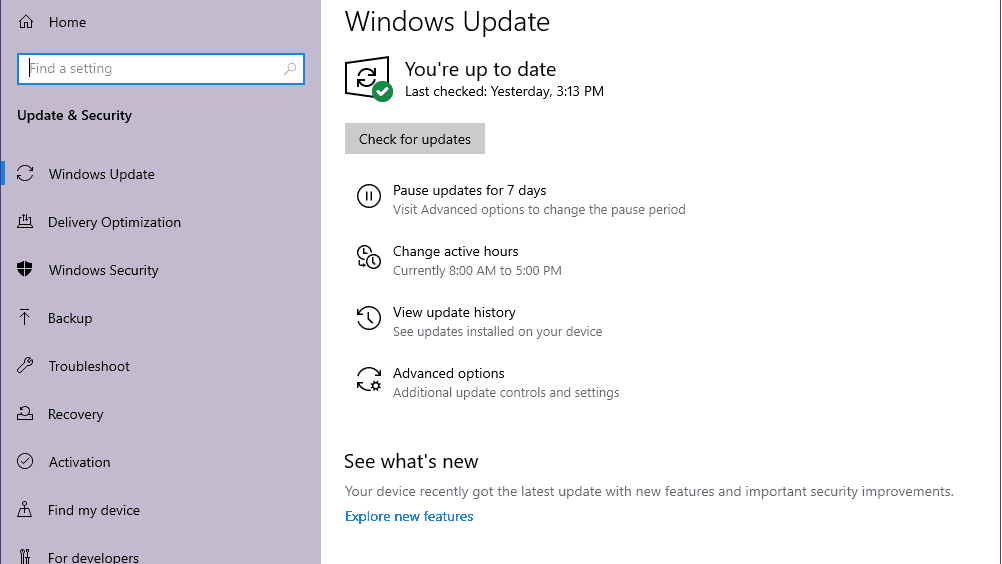
An outdated Windows version can cause multiple issues with the game files or other programs to launch properly. You should always upgrade your Windows system to the latest version.
- Press Windows + I keys to open Windows Settings.
- Now, click on Update & Security > From the Windows Update section, click on Check for updates.

- If there is an update available, you can click on Download and Install.
- Wait for the process to complete the installation.
- Once done, make sure to reboot your computer to apply changes.
4. Update Call of Duty Vanguard
It’s also worth recommending to check for the COD Vanguard game update on your PC if you haven’t updated it for a while. Sometimes an outdated or buggy game version can also cause several issues with the game launching such as DirectX errors.
- Open the Battle.net desktop app on your PC.
- Now, click on the particular COD: Vanguard game icon that you’re trying to repair.
- Click on the cogwheel icon (settings) next to the Play button.
- Finally, select Check for Updates and wait for the process to be completed. [If there is an update available, make sure to download and install the game update]
- Once done, make sure to close the Battle.net client, and restart your computer to fix the issue.
5. Update DirectX
If you’re still having the outdated DirectX version on the PC then make sure to manually update it by following the steps below:
- Head over to this Microsoft link to download the DirectX End-User Runtime Web Installer on your PC.
- Next, install or update the DirectX version manually.
- Once done, restart your computer to apply changes.
Note: Currently, the DirectX 12 version is running widely on most computers if you’re running Windows 10 or Windows 11 OS with the latest build.
6. Change Display and FPS Settings
If you’re using the Nvidia graphics card then you can follow the steps below to set a maximum frame rates per second limit for the COD Vanguard title which may eventually reduce the DirectX-related issues in some cases. To do this:
- Open the Nvidia Control Panel > Click on Manage 3D Settings.
- Now, go to the Program Settings > Browse and choose the installed Call of Duty: Vanguard game file.
- Simply TURN ON the Max FPS Limit count > Set the Value to 30 FPS.
- Once done, close the Nvidia Control Panel window.
- Restart your system to change effects immediately.
You should ensure that your PC display is using the 100% (Recommended) screen scale & layout size by default. Using a mismatched or incompatible scale & layout size can cause DirectX errors. You can follow the steps below to do so:
- Press Windows + I keys to open Windows Settings.
- Click on System > Go to Display.
- Select 100% (Recommended) Scale and layout option.
- Additionally, you can set the display resolution to the default mode according to compatibility.
- Once done, reboot your PC to apply changes properly.
7. Scan and Repair Game Files
If the above methods didn’t work for you then try scanning and repairing the game files directly on your PC using the Battle.net client to fix the possible issues with the corrupted or missing game files. To do so:
- Open the Battle.net client on your PC.
- Click on the Call of Duty: Vanguard game from the left panel.
- Next, select OPTIONS (Gear icon) > Click on Scan and Repair.
- Click on Begin Scan and wait for the process to complete.
- Once done, you’ll just need to close the Battle.net launcher and restart your PC.
8. Run an SFC Scan
If none of the methods come in handy to you, make sure to run the system file checker (SFC) scan on your Windows PC to check for any kind of possible or corrupted system files and restore them. It can automatically find out and fixes the bad sectors, corrupted or missing system files, etc. To do this:
- Click on the Start Menu and type cmd.
- Now, right-click on Command Prompt from the search result.
- Select Run as administrator > If prompted, click on Yes to give admin privileges.
- Once the command prompt window opens, type the following command and hit Enter to execute it: [There is a space before /]
SFC /scannow

- Now, wait for the process to complete.
- Once done, restart your computer to change effects immediately.
That’s it, guys. We assume this guide was helpful to you. For further queries, you can comment below.
