With the increase in the amount of data, the use of cloud storage services has increased. We now require a huge amount of storage space in order to keep our content and thanks to various cloud storage options, we can store and access any content that we want from anywhere. Besides, every operating system these days comes with an in-built storage service. For instance, there is iCloud for Apple users, Microsoft operating laptops or devices come with OneDrive pre-installed whereas, Android comes with its parent’s Google Drive. However, cloud storage does not mean that we can store anything that we throw at it. It has some storage limitations that need to be taken care of before we run out of space.
Fortunately in this post, we will give you a guide on how to delete iCloud storage from iPhone and Mac OS. If you are a user of Apple products then, you might be familiar that you get just 5GB of cloud storage space with iCloud which according to the current scenario is not a lot of space. Moreover, you will quickly run out of storage because by default your phone settings, files, app data are stored in the iCloud. And it can be pretty annoying to constantly free up space for storing more data, especially if you are a new iPhone or macOS user. But, with this post, you will be able to do just that very effectively. So, without any further ado, let us get straight into the article itself:
Also Read
FIX: Crunchyroll Black Screen When Streaming
Fix: macOS Ventura WiFi Not Working Issue
Fix: macOS Monterey Not Connecting to WiFi
Continuity Camera Not Working After macOS update, How to Fix?
Fix: Cannot Change Folder Background Color in Mac (macOS Ventura)
Fix: SanDisk Extreme Pro SSD Not Recognized or Detected on macOS
Fix: iPhone Won’t Update Payment Method
What Does ‘No Location Found’ Mean on iPhone?

Page Contents
How to Delete iCloud Storage from iPhone and Mac
Below are the steps that you can follow to effectively manage your iCloud storage space in iPhone and Mac. If you like such similar posts then, you can also check out our dedicated iPhone section for more interesting content related to Apple products.
Turn OFF auto-backup
As mentioned above, your iPhone comes with automatic backup for apps, settings, and files. This means that all your data including photos and videos are also automatically stored in iCloud which can eat up space. In order to stop automatic backup:
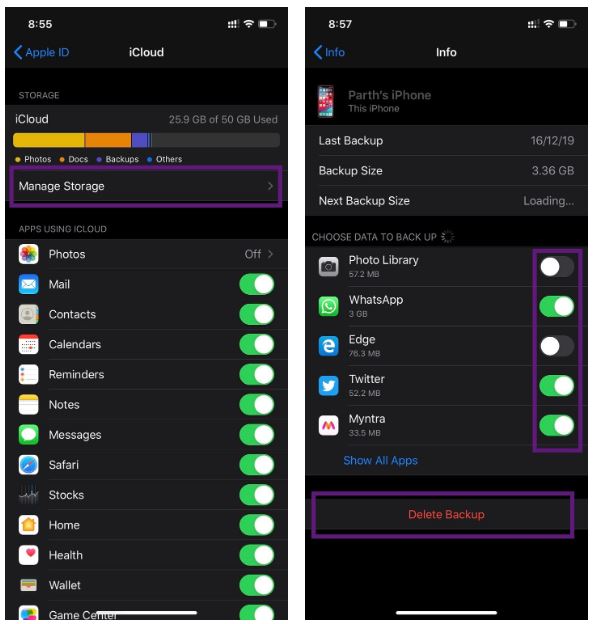
- Head to Settings>> User Profile>> iCloud>> Photos and make sure to toggle off the backup option.

This will stop the automatic backup. But, if you wish to delete the already uploaded files as well then you can go to iCloud>> Manage storage, where you will be presented with a complete breakup of the files that are taking up space in your iCloud. Choose the specific app that you wish you delete and that’s it.
Delete Apps backup data
Apps installed on your iPhone use iCloud as the preferred backup option. This means that sometimes they can eat up a lot of storage space in your iCloud than your personal data. To get rid of this, you can head to Settings>> Profile>> iCloud>> Manage Storage>> Backups>> Choose Device and then, toggle off backups for those apps that you use very rarely. However, it is not advisable to deleted backup files for important apps like WhatsApp.

Delete iCloud Documents and Data
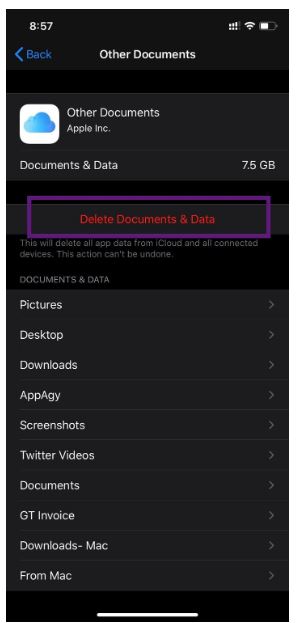
You can always go ahead and delete the new folders that can be created by to store data in iCloud Drive. Head to Settings>> Profile>> iCloud>> iCloud Drive and delete the unwanted folders. This process might look a bit longer when you would try it out for real on your iPhone. If you also find it tiresome then, the below method is a bit easy.

Delete data from Files app
There is another way to remove iCloud folders via the Files app. Navigate to Open Files>> iCloud and you will be presented with the iCloud folders. Select specific folders that you wish to delete. [/note]
So, there you have it from my side in this post. I hope you were able to create and free up some space in your iCloud by using any of the above-mentioned methods. Drop a comment below if you like this post that helps you in order to create some more storage space for your important content by deleting or removing unwanted data from your cloud storage. Until the next post…Cheers!
Also Read
