Oculus Quest is one of the most preferred VR products on the market. However, regardless of their huge popularity and usability, they are also prone to technical difficulties. Among all the problems, the one that has been troubling users the most is the black screen of death. Uses are experiencing an Oculus Quest black screen of death problem while using the VR product.
Also Read
Oculus Quest 2 Not Turning On After Update, How To Fix?
How to Connect and Cast Oculus Quest 2 to TV
Fix: Oculus Air Link Not Working or Pairing to Windows 7, 10, or 11
How to Install SideQuest on Oculus Quest 2
Fix: Oculus Quest Software Update Stuck on Downloading
Fix: Oculus / Meta Quest 2 Not Working After Update or Factory Reset
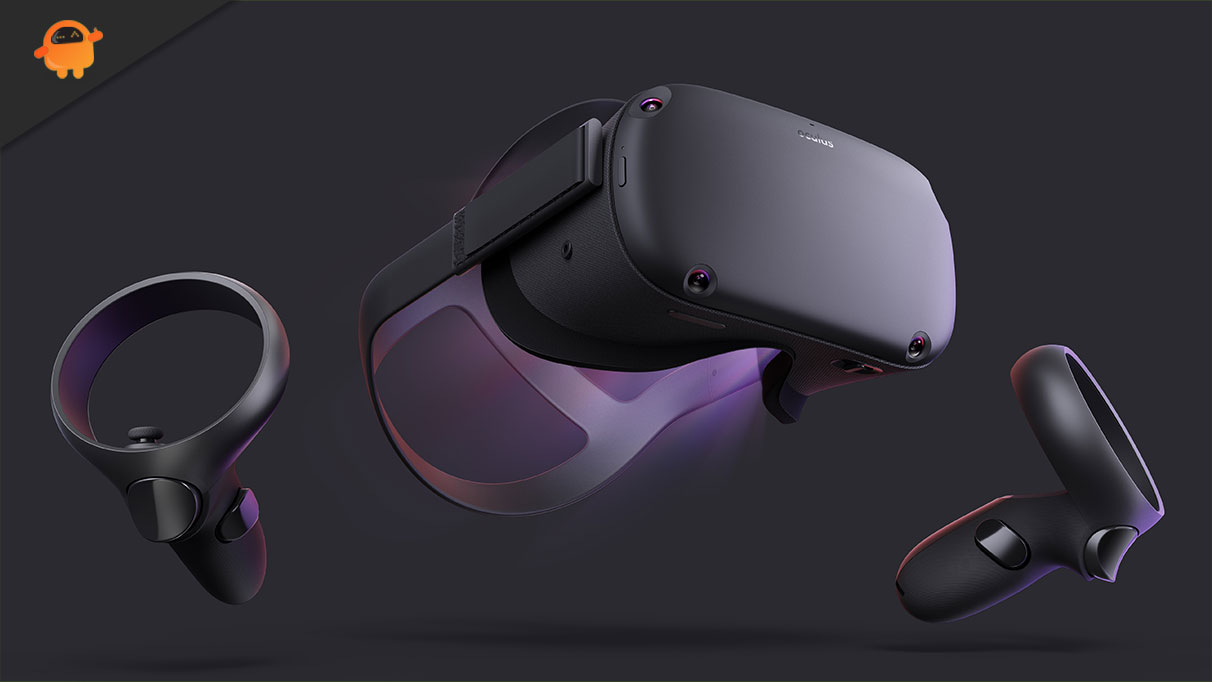
This problem is mainly occurring while users are in between enjoying their VR experience. In fact, the problem has different faces for different users. Some users are experiencing a completely black screen. Whereas, for some users, the Oculus logo is followed by the black screen of death.
That said, if you are also a part of this crowd, then fret no more, as it’s very easy to get rid of the Oculus Quest black screen of death problem. So, without any further delay, let’s check out different workarounds that will help solve the problem.
Page Contents
Reasons Behind Oculus Quest Black Screen of Death Problem
There can be more than one reason triggering the Oculus Quest black screen of death problem. But among all, the below-mentioned are some of the top culprits causing the problem.
- You will face the consequences in the face of the mentioned problem if you have configured the settings to a very high resolution, even higher than your device can handle.
- If you haven’t updated graphics, USB, or any other installed appliance drivers for a long time, then you are most likely to face the problem.
- Oculus Quest’s black screen of death can also be caused because of enabling the in-game overlay feature.
- Keeping “Public test channel feature” enabled can also trigger the problem.
- Lastly, considering the complexity of Windows OS, if there is any corrupted or misleading file available on your system, then also you can face the mentioned issue.
Now that you are aware of all the main reasons causing the Oculus Quest black screen of death problem, it’s time to check how to get rid of them.
How to Fix Oculus Quest Black Screen of Death Problem?
Till the time of writing this article, developers haven’t released any specific method to fix the problem. Thus, you might have to go through all the below-mentioned workarounds and stick with the one that does the job for you. So, here are different methods to help you out in solving the mentioned problem.
Fix 1: Minimize Oculus Quest Resolution
The black screen of death problem is mainly caused if you have configured the settings to a very high resolution. As a solution to it, you will have to minimize the Oculus Quest solution. So, here are the steps you need to follow to get the work done.
- To begin with, remove Oculus Quest from the connected device.
- Now, on the connected device, navigate to the Oculus folder. The Oculus folder will be situated in C:\Program Files\Oculus.
- In the folder, head towards Support > oculus-diagnostics.
- Look for the “OculusDebugTool.exe” file and double-click on it.
- It will open the Oculus Debug Tool window.
- In the debug tool window, adjust the “Encode Resolution Width”. We recommend you to set it to 2784.
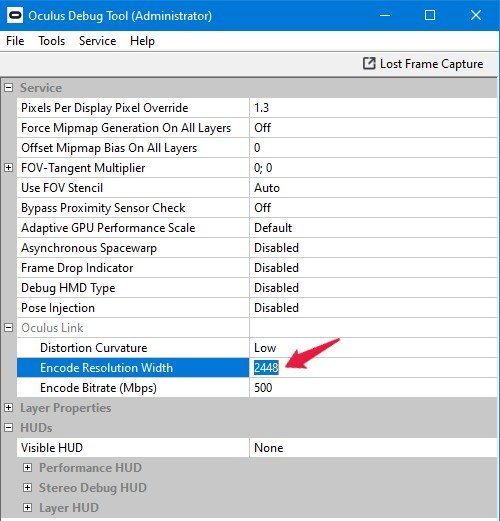
That’s it. Restart the device. Attach Oculus Quest to the device once it’s booted. Now, check if the problem is fixed or not. If it continues, move to the next workaround.
Fix 2: Toggle Off Public Test Channel
You are most likely to face the Oculus Quest black screen of death problem if you have kept the public test channel feature enabled. In fact, it is also warned by the Oculus official support to keep this feature disabled, unless you don’t want to try the beta versions of different Oculus software. So, here are the steps you need to follow to toggle off the public test channel feature.
- Launch Oculus Quest on your system.
- Click on the Settings option present on the left panel of the screen.
- Now, tap on the “Beta” section.
- Here, disable the Public Test Channel feature.
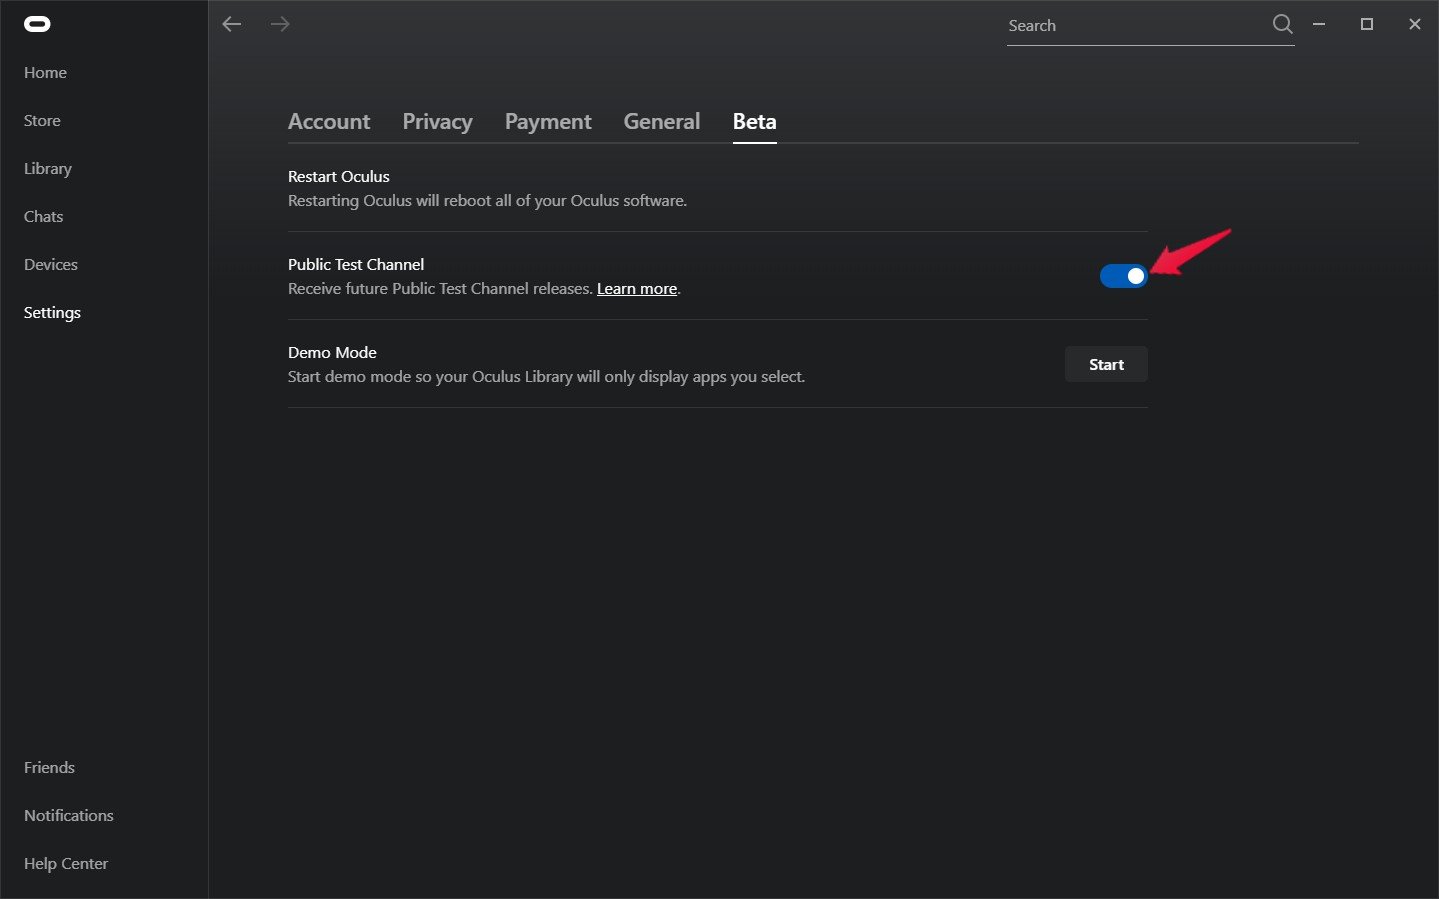
Once complete, check whether the Oculus Quest black screen of death problem is fixed or not. If not, continue with the article.
Fix 3: Use System GPU
Another effective workaround that you can try to fix the mentioned problem is to connect the Oculus Quest to the installed graphics card. So, here are the settings you need to do to get the work done.
- On your desktop, right-click on empty space and select “Nvidia control panel”.
- The Nvidia control panel window will pop up.
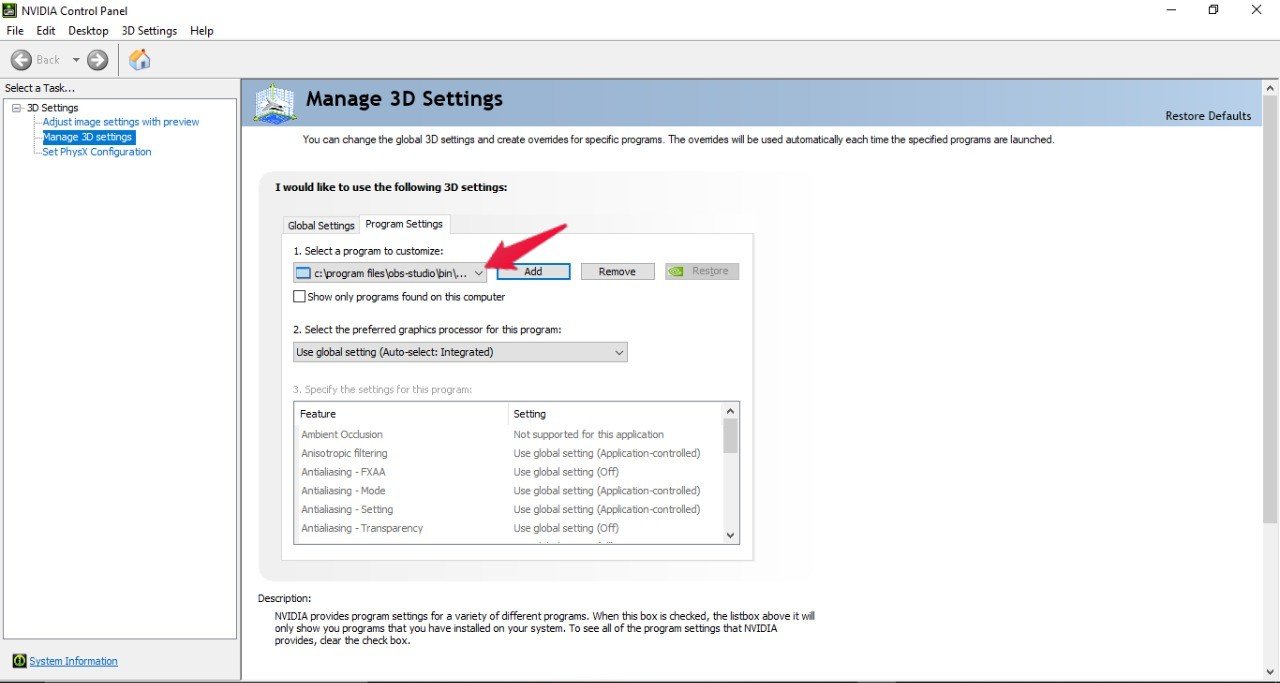
- On the left panel of the screen, click on “Manage 3D settings”.
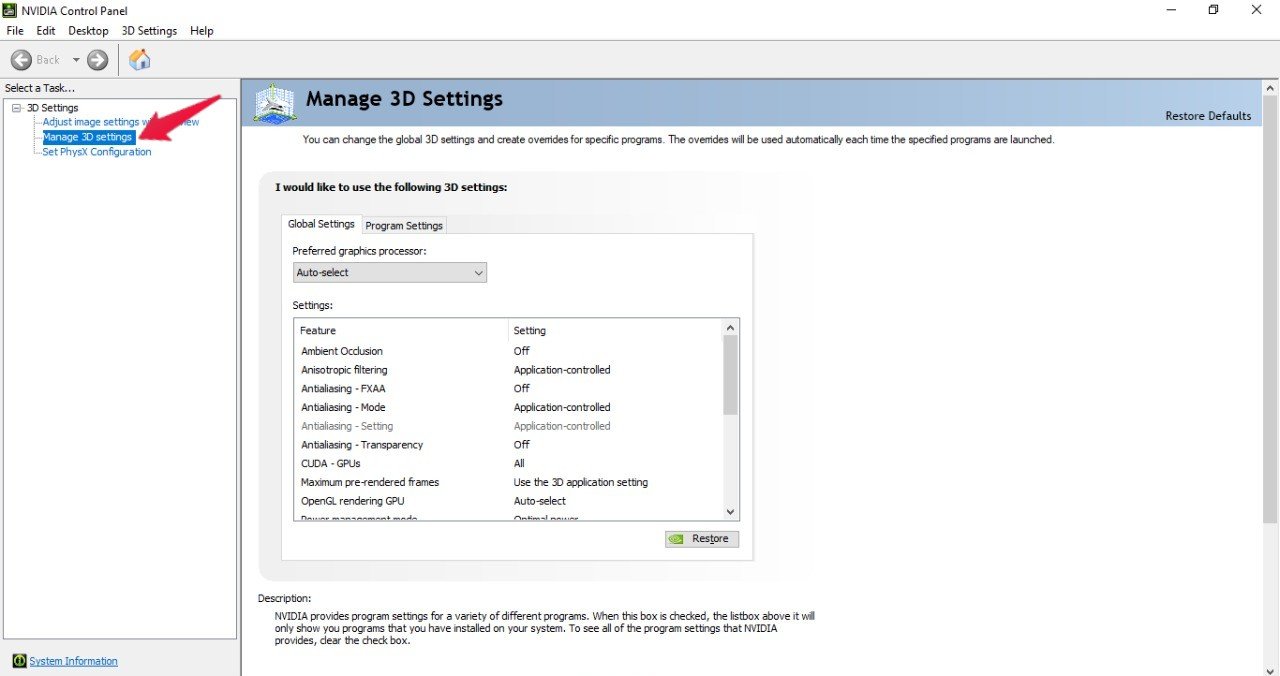
- Tap on “Program Settings“.
- Click on the drop-down icon present under, “Select a program to customize” and choose the Oculus Quest app.
- Lastly, click on the drop-down icon present under, “Select the provider graphics processor for this program” and choose, “High-performance NVIDIA processor” option.
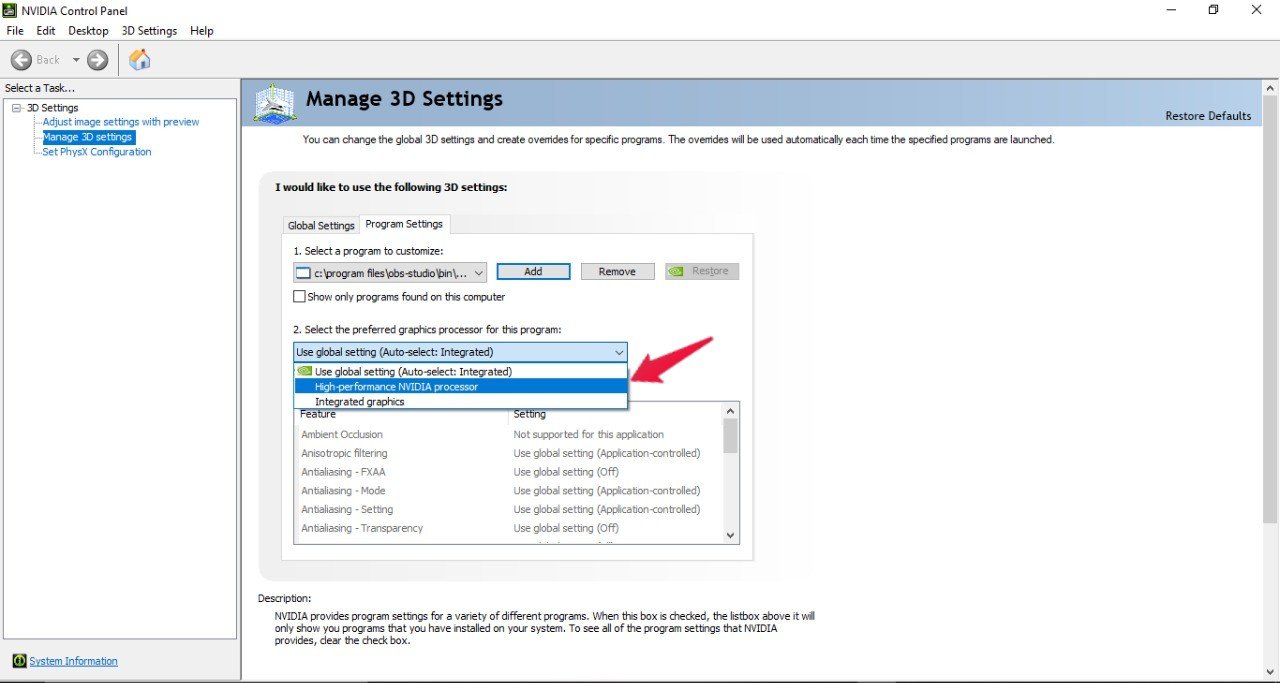
That’s it. Check if the black screen of that problem is fixed or not. If it continues, it’s time to update the drivers.
Fix 4: Download Latest System Drivers
Updating system drivers is a working way to fix the mentioned problem. Downloading the latest system drivers will not only fix the black screen of death problem, but it will also make sure that your system is free from any other kind of bugs and glitches. So, here’s what you need to do to update your system drivers.
- Open the start menu by pressing the windows key.
- Now in the search bar, type “Device Manager” and press enter.
- The Device Manager window will pop up.
- Double click on the Display Adaptors option to expand it.
- Right-click on the installed graphics and select “Update driver“.
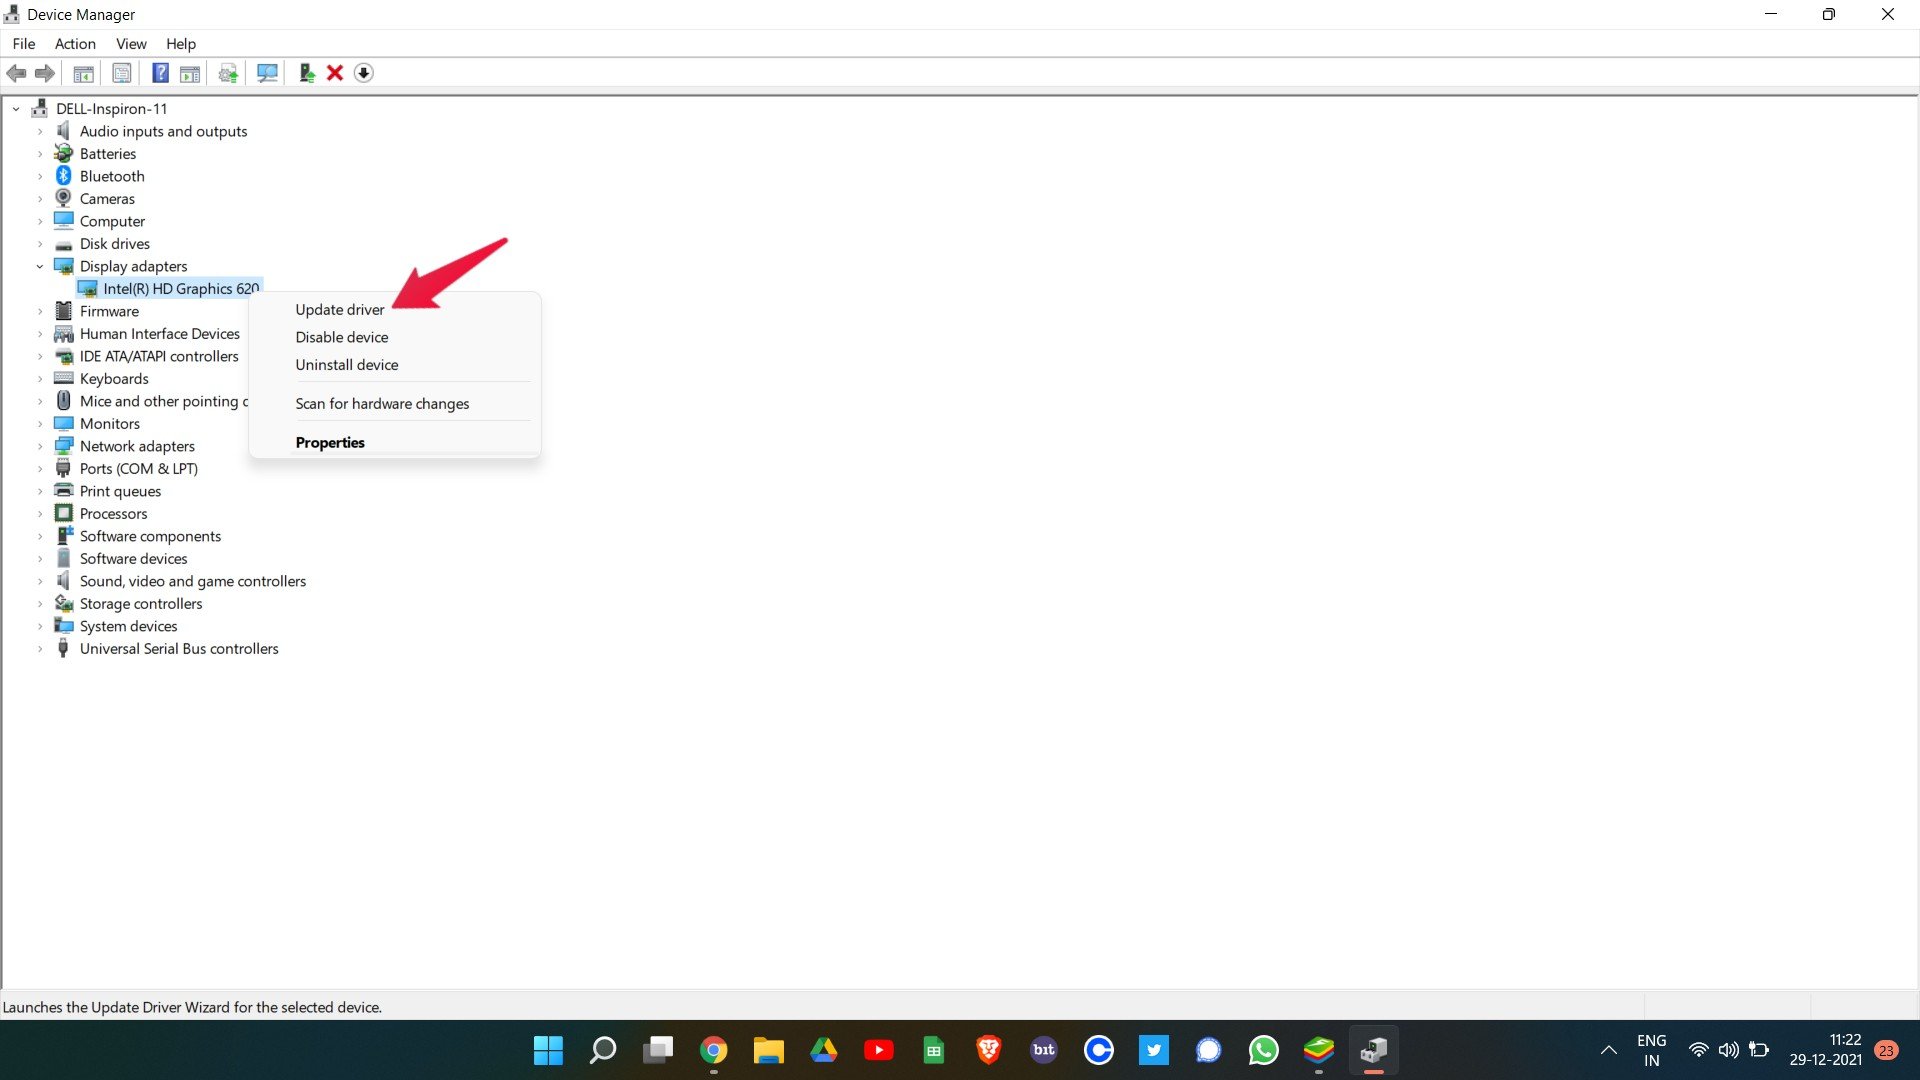
- In the confirmation box that pops up, select “Search automatically for drivers”.
Repeat the same process with “Mice and other pointing devices” as well. Once updated, reboot your system and check if the problem is solved or not. If yes, you are good to go. However, if it still persists, move on to the next workaround.
Fix 5: Disable In-Game Overlay
You can turn off the in-game overlay feature of a program or device to fix any error that revolves around it. It also boosts the overall performance. And the same has worked with the Oculus Quest as well. So, here’s what you need to do for disabling in-game overlay in Nvidia GeForce.
- Launch GeForce experience on your PC.
- Click on the gear icon present at the top section of the screen.
- In the General settings, click on the In-Game Overlay toggle to turn it off.
Once done, restart the Oculus Quest and see if you are still facing the black screen of death problem or not. If yes, move to the last workaround.
Fix 6: Run SFC Scan
System File Checker aka SFC scan is very helpful in resolving all the corrupted and damaged system files including the one that is causing the black screen problem. So, here are the steps you need to follow to perform an SFC scan on Windows 11 PC.
- Press the Windows button to open the Start menu.
- In the search bar, type “CMD”, and click on “Run as administrator”.
- The command prompt window will pop up.
- Type the below-mentioned code in the space provided and press enter.
sfc /scannow
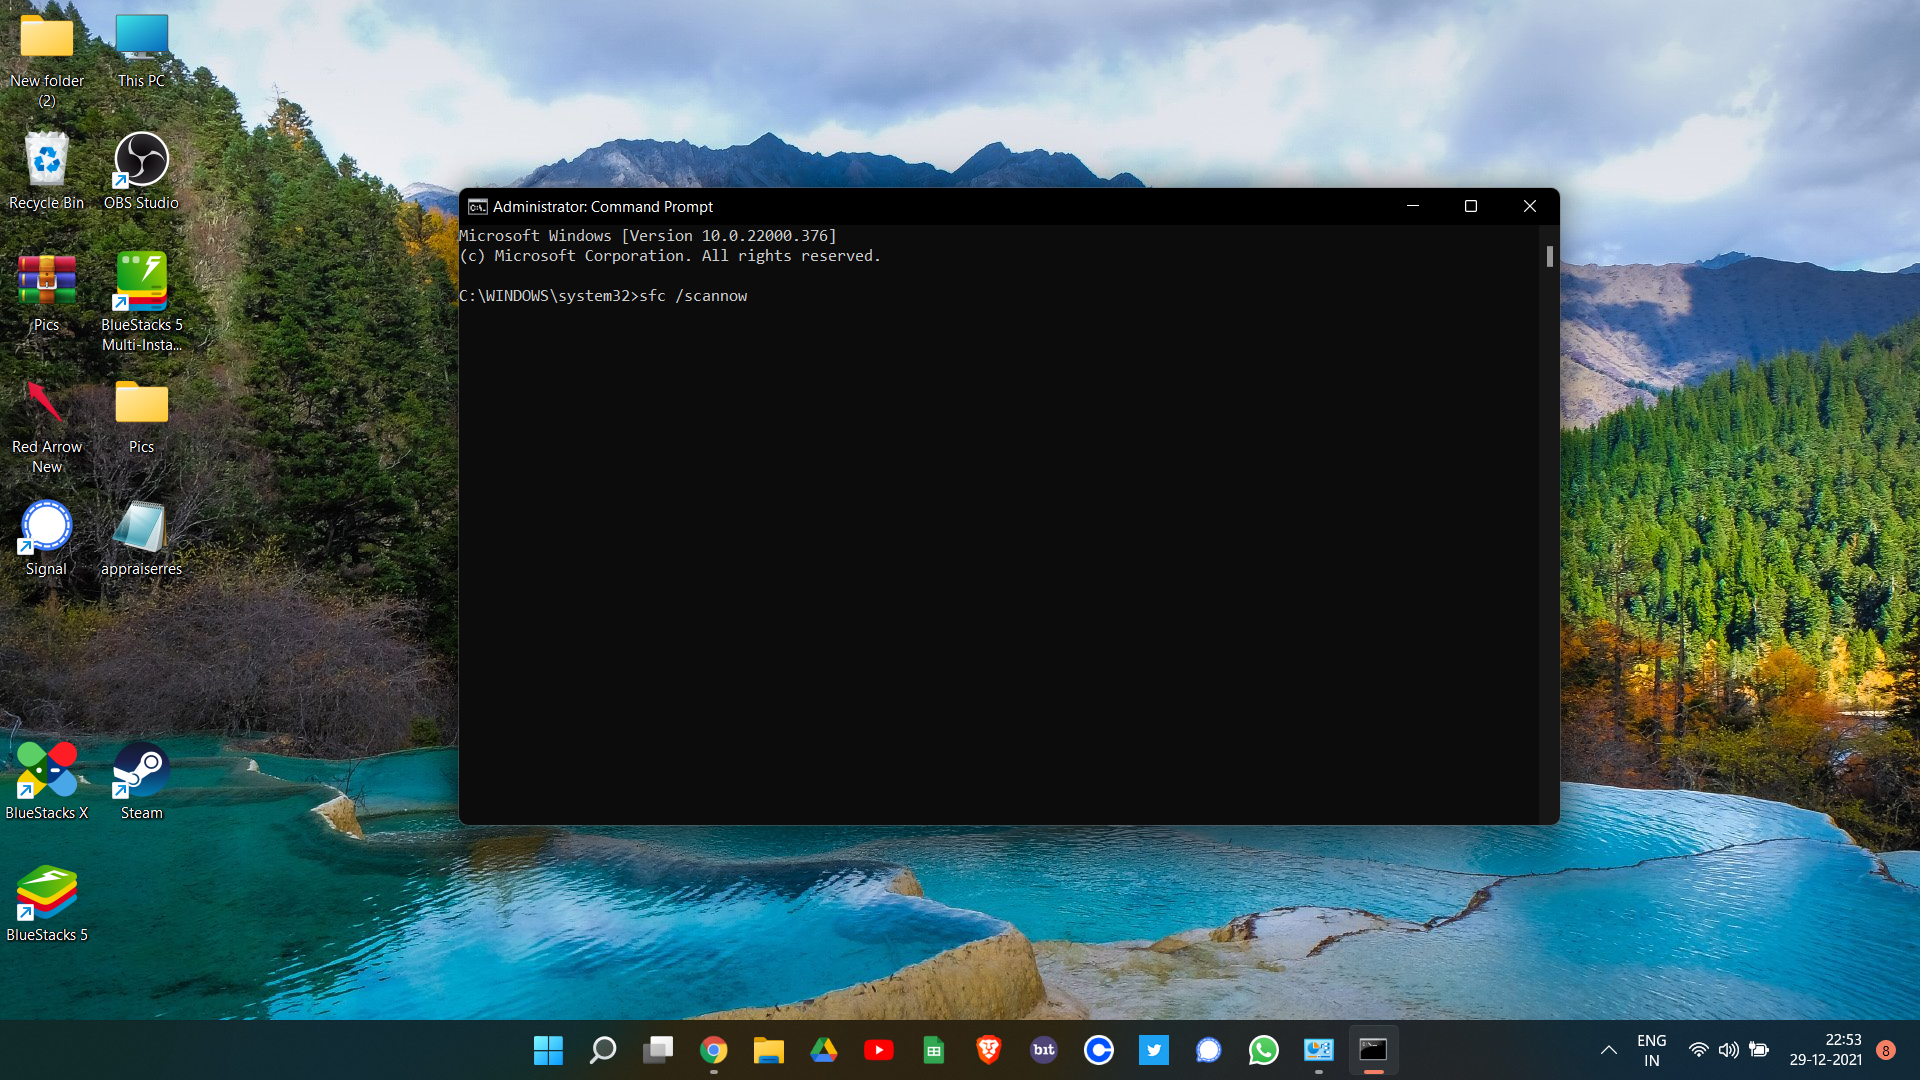
Wait for a few seconds until the code is executed. Once done, you will be surprised to see that you are no longer facing the Oculus Quest black screen of death problem.
Fix 7: Contact Support Team
In the worst-case scenario, if you are still facing Oculus Quest black screen of death issues, then the only option left with you is to contact the officials. To do so, go to the “Help Centre” option present on the Oculus official page, and select “Contact Us”. You can also click this link to directly visit the contact us section of Oculus. Put down your problem in the query area, and click on Submit. The Oculus support team will reply to your problem as soon as possible.
Final Words
This was how to fix the Oculus Quest black screen of death issue. Let us know whether the above-mentioned methods worked for you or not. You can also share any other working solution in the comments. Moreover, don’t forget to check our other guide on Oculus to solve different problems revolving around the product.
