Here in this guide, we will help you to flash the magisk to root UmiDigi F1 Play. Read our step by step guide properly!
Who doesn’t want to get the most of his Android device..?! Getting the superuser access through root and to be able to control various aspects like clock, access to cache etc. are few of the various possibilities that we can explore. When we mention root access, this means we need to perform a certain modification that will root our phone and we will have access to the root directory of our device. In this post, we will show you how to root UmiDigi F1 Play.
![Easy Method To Root UmiDigi F1 Play Using Magisk [No TWRP needed]](https://www.getdroidtips.com/wp-content/uploads/2019/05/Umidigi-F1-Play.jpg)
We will use the Magisk by patching the stock boot image and flash that to your boot partition. All you need to do is download the patched image file from Magisk Manager and flash it.
Mostly uninitiated people compare rooting with hacking which is not correct. The purpose in both contexts is quite different. Hacking is more like breaking into someone’s else system illegally, whereas rooting is mostly done by the owner of an Android device to gain superuser advantages of the device.
Page Contents
Steps To Root UmiDigi F1 Play Using Magisk
Remember,
- After Rooting, it may void the warranty of your phone.
- Rooting will block the OTA updates
Before moving on to the flashing steps, you need to follow a few,
Pre-Requisites
- Make sure to have enough battery charge on your phone to avoid interruption during the patch installation.
- Before performing any modification take backup of your device data.
- This image file is strictly for UmiDigi F1 Play only. Do not use it on any other Android devices.
- You need PC/Laptop with a micro USB cable to connect.
- Make sure that you download all the required files on your PC/Laptop
Required Downloads:
- Download ADB and Fastboot files. (Windows/MAC)
- Download and Install itel USB Drivers.
- Download Latest UmiDigi F1 Play Stock ROM
- Download and Install SP Flash tool on your PC
Disclaimer: We are at GetDroidTips will not be responsible for any bricking/damage to your phone while/after installing this ROM.
1. How to Extract and Patch Boot.image using Magisk?
- First of all, download and extract the ROM to your PC.
- Attach your device via USB cable and copy only the boot.img file from the extracted folder to your device storage
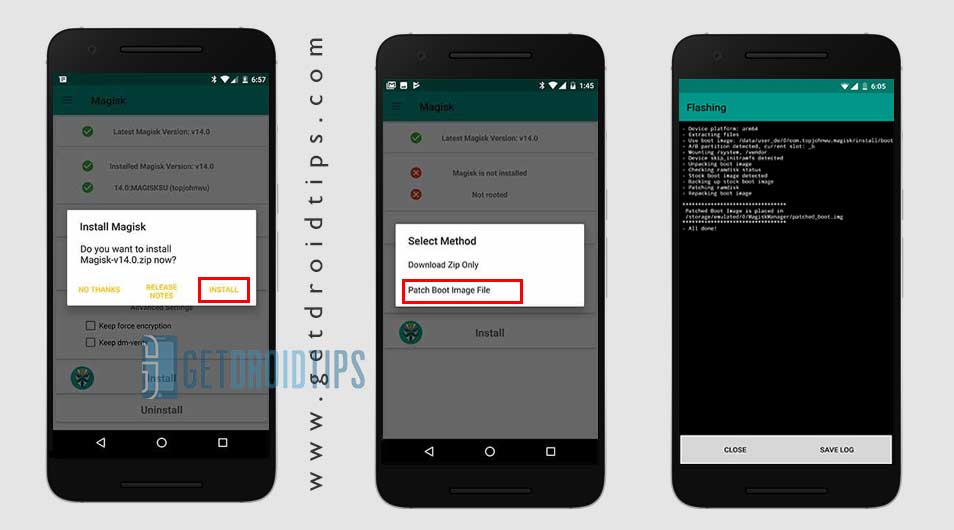
- Launch Magisk Manager. When a popup appears asking to install Magisk, select INSTALL and choose install again.
- Tap on “Patch Boot Image File”.

- Navigate to internal storage and select your phone’s boot image that you transferred earlier.
- Wait for a couple of seconds. Magisk will start patching the boot image.
- Once the boot image has been patched, copy the “patched_boot.img” from the internal storage and replace it in the same extracted ROM folder on your PC.
Now you can follow the second step to flash the patched boot image file.
If you are using any new version of ROM, then you can just download the Stock firmware and then create the boot patched image via Magisk. Here is this guideline on how to Create Patched Stock Boot Image using Magisk.
2. How To Install the Patched Boot Image on UmiDigi F1 Play
Follow the given link to install Patched Boot Image on UmiDigi F1 Play:
How To Install the Patched Boot Image on MediaTek deviceIn some cases, if the above method doesn’t work on your UmiDigi F1 Play, then try via ADB fastboot method.
- After extracting ADB fastboot tool, you must move the patched boot image to the same folder. Hold the SHIFT key and click on the right mouse button to open the command window/PowerShell.
- Run the following command in the open command prompt.
fastboot flash recovery [filename.img]
Please replace [filename.img] with the name of the TWRP Recovery img file you downloaded followed by the .img extension.
- The flashing process will begin. Once done, run
fastboot reboot
How to Verify if your phone has a systemless root?
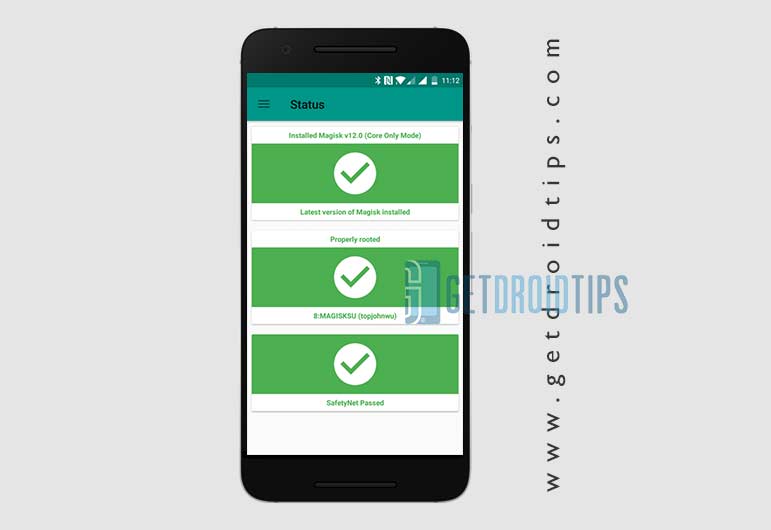
- Download and install the Magisk Manager app APK, and launch it.
- To verify that you have systemless root, check the top of the screen and if you see all option with Green Tick which means you have successfully rooted and bypassed SafteyNet.

So, that’s it. Now that you have rooted your UmiDigi F1 Play. If you have any queries regarding this, do let us know.
UMiDIGI F1 Play specifications:
Talking about the specifications, UMiDIGI F1 Play features a 6.3-inch IPS display with a screen resolution of 1080 x 2340 Pixels. It is powered by MediaTek Helio P60 MT6771, 64-Bit Processor coupled with 6GB of RAM. The phone packs 64GB internal memory with expandable storage support of 256GB via microSD card. The camera on the UMiDIGI F1 Play comes with a Dual 48MP + 8MP rear camera with dual-LED dual-tone flash and 16MP front camera for selfies. It is backed by a Non-Removable 5150 mAh Lithium-Polymer Battery. UMiDIGI F1 Play also has a fingerprint sensor on the back.
