Samsung Galaxy S20 Plus (codename: y2q) launched in February 2020 which came out of the box with Android 10 Q. In this article, we will guide you on how to install the TWRP Recovery on Galaxy S20 Plus.
TWRP recovery is probably the most used and most popular custom recoveries that we all know. For those who are quite accustomed to rooting and flashing custom ROM, etc. then, they know what TWRP Recovery is. However, for naive, the TWRP Recovery allows users to install custom ROMs/mods, take a complete backup of their phone, gain root access on their phone using Magisk Manager.
However, you are required to have TWRP access before you can go ahead and root your Galaxy S20 Plus. And for flashing the TWRP recovery image, you need to follow the guide properly to avoid errors. And if you happen to own a Galaxy S20 Plus and are looking for ways to download and install the TWRP Recovery on your phone then, you are at the right place as in this post, and we will guide you on how to download and install TWRP Recovery on Galaxy S20 Plus and eventually root using Magisk. So, that being said, let us get straight into the article itself:
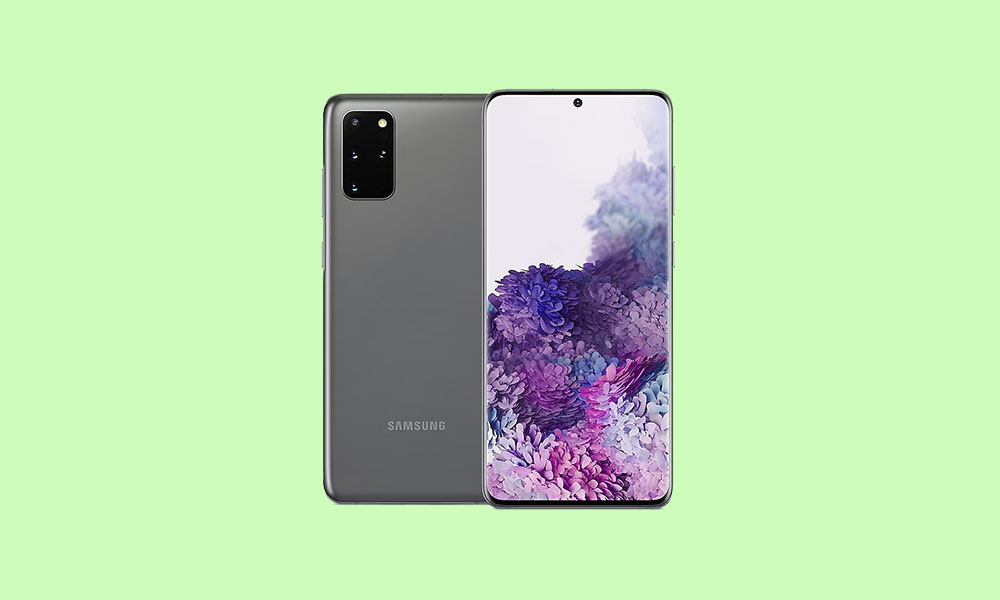
The Samsung Galaxy S20+ sports a 6.7 inches Dynamic AMOLED 2x display with a Quad HD+ resolution i.e. with 1440 x 3200 pixels. Samsung Galaxy S20+ features the latest flagship SoC from Qualcomm i.e. the Snapdragon 865 SoC and this SoC is built on the 7nm process. While in other markets, the Galaxy S20+ sports the in-house Exynos 990 SoC which is also built on the 7nm process. Coming to the memory options, the device is available in 8GB LPDDR5 RAM and 128GB of UFS 3.0 internal storage variant. This is further expandable via a micro SD card up to 1TB.
It sports a triple rear camera setup that gets arranged in a vertical setup which is placed to the left of the device. The triple rear camera setup of this device includes a 12MP primary sensor with f/1.8 aperture value, Dual Pixel PDAF, and also Optical Image Stabilization (OIS). Finally coming to the front, the new Galaxy S20+ sports a 10MP sensor with an f/2.2 aperture value. Further, it also comes with support for Dual Pixel PDAF, and Auto HDR.
What is TWRP Recovery?
Team Win Recovery Project or TWRP Recovery is a useful and popular custom recovery, which is open-source software. The touch-screen enabled interface allows users to flash third-party firmware and back up the system or data easily like never before. For Android customization lovers or developers, a custom recovery is a much-needed tool or software.
Additionally, you can install the kernel, modules, root or unroot, take Nandroid backups, etc. Meanwhile, you can wipe system partitions, internal storage, data, cache, vendor, etc. very easily.
Advantages of TWRP Recovery
- Backups of partitions in TAR or raw Image format
- Restore backups from internal storage, external SD storage or OTG devices
- Install Custom Firmware
- Install flashable ZIPs and image files
- Partition wiping
- Delete System, Cache, Vendor, Partition, User Data, etc
- Install Root or Unroot by flashing ZIPs
- Terminal access
- ADB Root Shell
- Theme Support
- Possible decryption support depending on the device
Steps to Install TWRP Recovery on Galaxy S20 Plus:
Now before we go ahead and install TWRP Recovery on the Galaxy S20 Plus, let us make a list of pre-requisites that are required to unlock it:
Charge your phone
You need to make sure that your Galaxy S20 Plus is charged to about 60% before installing TWRP recovery to avoid any boot loop issues during the unlocking process.
Take a complete backup
Before rooting, one of the most important things that you need to do on your phone is to take a complete backup of your phone. For that, you can follow the guide by clicking the link below:
Activate Developer Options
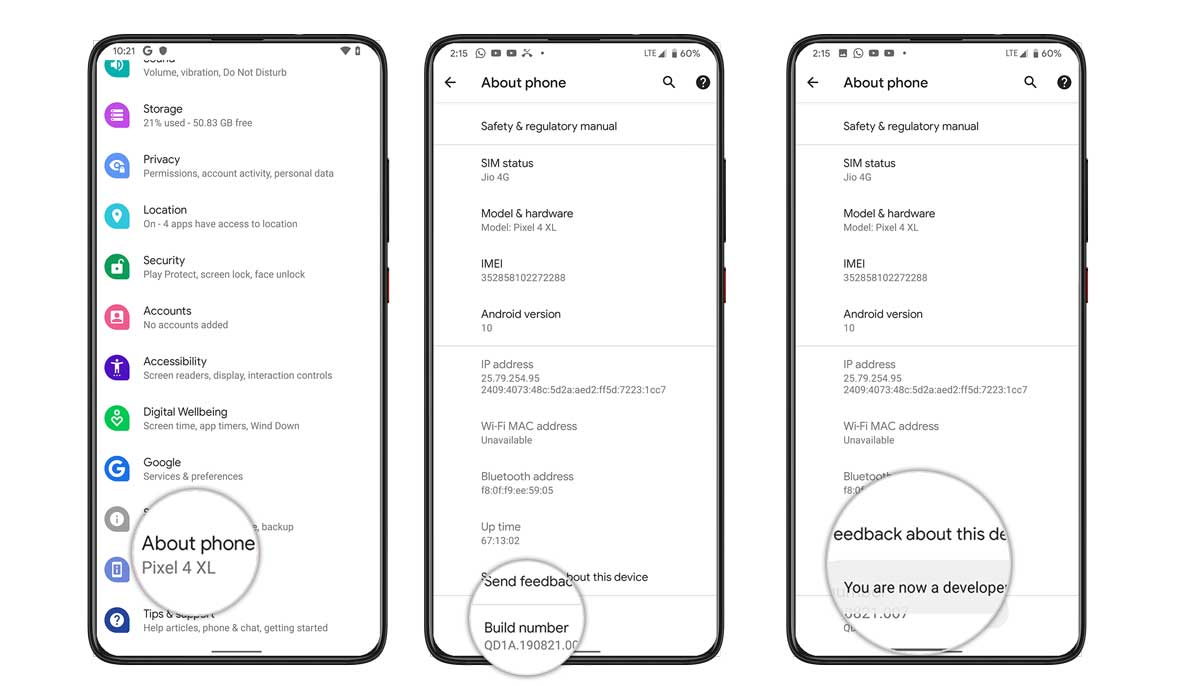
To Enable the Developer Option on your device, follow the below steps:
- Go to the Settings menu of your Android device.
- Then scroll down and go to About.
- Now you need to head to Software Information>> More.
- Here tap on the Build Number 7-8 times until you see a message “You are now a developer”.
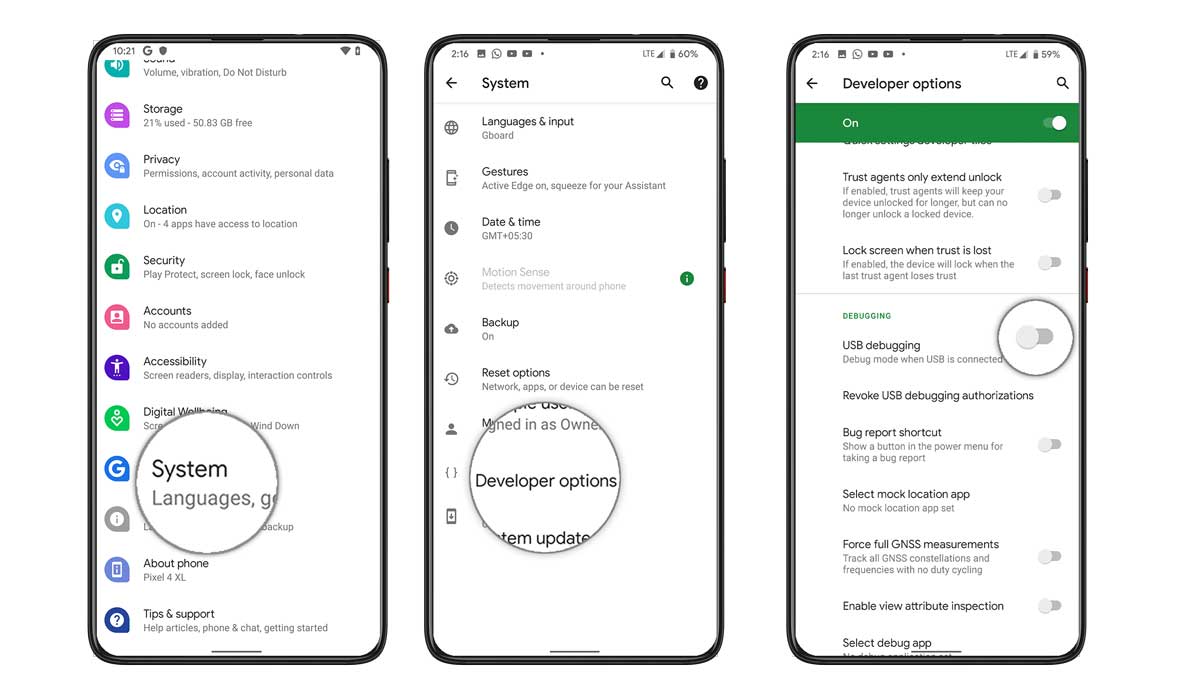
You also need to enable USB Debugging and OEM unlock option under the Developer Options menu. And to do that:
- Head over to Developer Options and toggle ON the USB Debugging option as well as the OEM unlock option.

Install ODIN tool
You need to install the latest Odin tool on your PC. For that, you can follow the link mentioned below:
Unlock the bootloader
In order to install the TWRP Recovery, you have to first unlock the bootloader on Galaxy S20 Plus.
Warning!
Download Samsung USB Drivers
You can follow the link below in order to download the correct Samsung USB drivers for your phone.
Download Samsung USB Drivers for Windows and Mac
Download TWRP Recovery
Here you will find the latest and TWRP recovery for the Galaxy S20 Plus.
Instructions to Install TWRP
Follow the step by step instructions mentioned below to simply install the TWRP Recovery on your Galaxy S20 Plus:
Guide to Install TWRP Recovery via Odin Tool
You can check out our full-depth tutorial video as well:
Watch the Video Guide on Steps to Install TWRP Recovery on any Samsung Device
- Once the device booted into TWRP Recovery mode, you need to decrypt data partition. In order to do it: Go to Wipe > Format Data and follow the on-screen instructions.
- Then reboot to recovery mode again.
- Now, flash the no-verity-opt-encrypt, Magisk, and RMM Bypass zip one-by-one to prevent boot loops.
- That’s it. Reboot to the system finally. Enjoy!
Root Galaxy S20 Plus Using Magisk
- Now you need to install the Magisk Manager APK on your phone.
- Place it in the internal memory on your device.
- Then head over to recovery by pressing the Volume up + Power button together.
- Make sure you have created a backup of your Galaxy S20 Plus.
- In TWRP, select Install and locate Magisk.zip and select the file.
- Swipe to Install and flash it.
- Restart your device.
- Voila!
So, there you have it from my side in this post. I hope you guys liked this post and were able to install the TWRP Recovery and root your Galaxy S20 Plus smartphone. Let us know in the comments below if you faced any issues while installing the TWRP recovery on your phone and then rooting it using Magisk. Until the next post…Cheers!