The Samsung Galaxy J7 is a larger variant of the mid-range Samsung Galaxy J5. The device sports a similar form factor as the J5. Samsung Galaxy J7 (codenamed: J7ELTE & J7XLTE) launched in June 2015. The smartphone came out of the box with an Android 5.1 Lollipop. On this page, we will guide you to install the unofficial Android 13 Custom ROM on Galaxy J7. If you are someone who wants to install the vanilla version of Android 13, then this guide is for you.

Android 13 and Its Features
Google has finally started rolling their stable Android 13 update to the public. As expected, only Google has released the update to their Pixel lineup, but no OEM has started cooking a stable yet.
Regarding the Android 13, it seems that the Android 12’s successor has plenty of additional features and improvements to its predecessor. We’ve already seen and used the major UI and design element changes in Android 12 last year, known as ‘Material You.’ This materialistic theming design enhanced the Android user experience from the minimal subtle look, rounded corners, improved pop-ups, etc.
Whereas the improved scrolling screenshots, optimized one-handed UI mode, better privacy & security features, improved app notifications, per-app basis language preferences, app permissions to send notifications, BT LE Audio support, auto theme icons, updated now playing widget, etc. Users will also find intuitive QR scanner support, enhanced silent mode, tap-to-transfer media controls, multiple profiles for NFC payments, and more.
What’s Working and Known Bugs:
Whats working?

Wi-Fi
RIL
Volte
Mobile data
GPS
Camera
Flashlight
Camcorder
Bluetooth
Fingerprint
FM radio
Sound
vibration

Known issues ?
You tell me
How to Install AOSP Android 13 on Galaxy J7 (J7ELTE & J7XLTE)
As the title suggests, we’ve shared the requirements and steps to flash the AOSP Android 13 build on the Galaxy J7 (J7ELTE & J7XLTE) variant.
Before heading over to the guide, make sure to follow all the requirements below.
Pre-Requisites
Before we begin with this procedure, I would strongly recommend you create a backup of your device storage and all your files stored on your device. Moreover, following the steps mentioned in this post carefully is advised to avoid permanent damage or bricking your device.
Charge Your Phone
It’s highly recommended to charge your handset before unlocking the bootloader to avoid your device from shutting down occasionally while going through the process. Make sure to keep at least 50% of charge or higher for a smooth operation.
Download ADB and Fastboot Binaries
You can skip this adb and fastboot part if you have already installed TWRP Recovery on your Galaxy J7.
Using the ADB and Fastboot command (platform-tools), you’ll be able to boot your Android device into the bootloader mode (download mode), which will be easy for you to proceed with further steps. ADB (Android Debug Bridge) creates a connection or bridge between the device and computer to sideload files.
Fastboot is a more advanced command utility tool for Android devices that works with computers. You can download ADB and Fastboot Binaries (Platform-Tools).
Download Samsung USB Drivers
A USB Driver is a set of files that allows you to create a successful and strong connection between a mobile device with a computer properly using a USB data cable. It’ll be useful to transfer files between the connected devices, flash files on the handset, and more.
It’s also worth mentioning that mobile devices and other external devices can use and run USB Drivers on a Windows computer. Such as a mouse, keyboard, printer, external hard drives, speakers, USB flash drives, etc. You can grab Samsung USB Drivers here.
Unlock Bootloader Your Phone:
You must first unlock the bootloader on your Galaxy J7 to enjoy any custom ROM.
Install TWRP Recovery:
You must install TWRP Recovery on your phone to install any custom ROM on your device. After unlocking the bootloader, follow our guide to install TWRP Recovery on your Galaxy J7.
Download Android 13 ROM:
Here, you will find all the Android 13 custom ROM for your Galaxy J7 (J7ELTE & J7XLTE).
| Lineage OS 20 | XDA Development Page |
Download Android 13 Gapps:
It’s worth mentioning that most of the third-party AOSP (Android Open Source Project) ROMs (also known as aftermarket firmware) come without any preinstalled Google apps package. You can manually install the Android 13 GApps by following our guide.
Warning!
GetDroidTips won’t be responsible for any issue that may happen to your device if you flash it on another device and brick it. Do it at your own risk.
Instructions to Install:
- Connect your device to the PC via USB cable. Make sure USB Debugging is enabled.
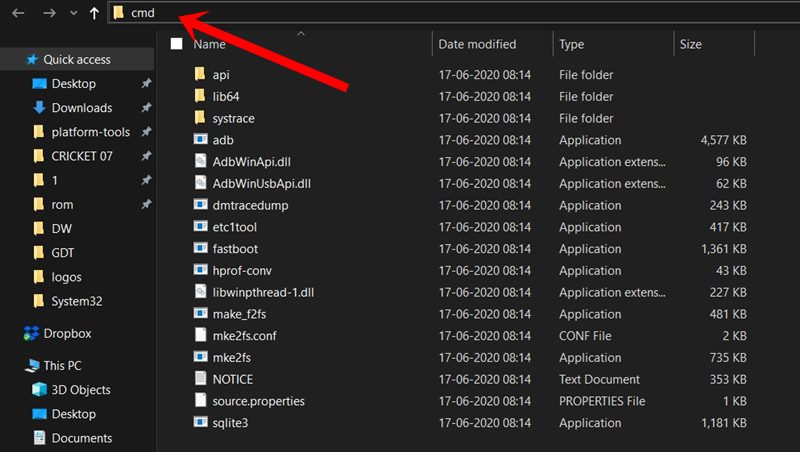
- Then head over to the platform-tools folder, type in CMD in the address bar, and hit Enter. This will launch the Command Prompt.

- Execute the below command in the CMD window or enter recovery mode by using the Volume and Power button combination. your device to TWRP Recovery:
adb reboot recovery
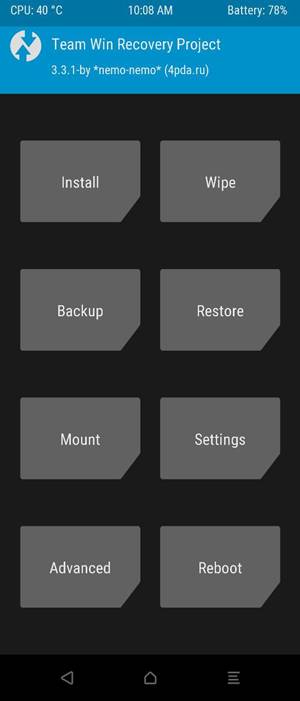
- Now head over to the Install section and navigate to the downloaded vendor and firmware. Perform a right swipe to flash it.
 TWRP Home
 - If you want Google Apps as well, then you need to flash it at this instance itself. Go to Install, select the GApps ZIP file, and perform a right swipe to flash this file.
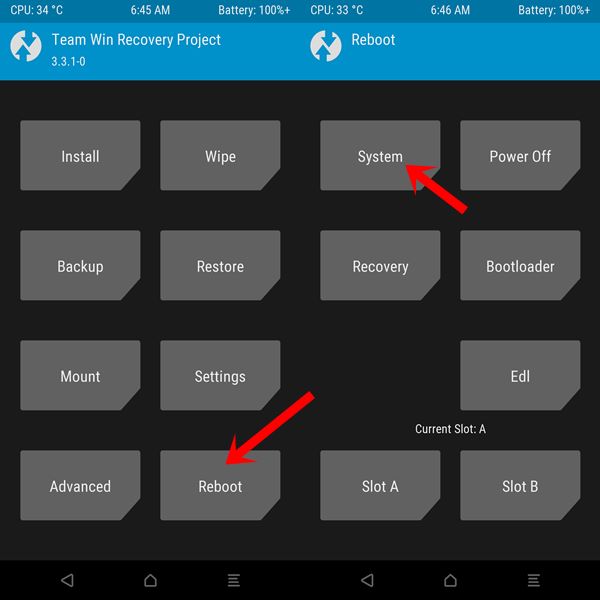
- When that is done, you may reboot your device. Head over to Reboot and select System.

Your device will now boot to the newly installed OS. With this, we conclude the guide on installing the AOSP Android 13 on Galaxy J7. Remember that the first boot might take time, and you might have to set up your device from scratch.
Conclusion
Flashing the ported Android 13 on your Galaxy J7 will give you an early taste of the latest Android OS version. It looks like the Galaxy J7 model won’t officially receive the Android 13 update from the manufacturer. So, it’s a good idea to get most of the features and visual treatment. However, if you find any extra bugs or stability issues, you should report them to the respective forum.
That’s it, guys. We assume this guide was helpful to you. For further queries, you can comment below.
Discussion
2 CommentsSb
vahgfhfgh fhfjg g gdb fhc
Quero o Android 13