2022’s Elden Ring is a souls-like dark fantasy action role-playing video game by FromSoftware and Bandai Namco Entertainment. Within a few months of release, the game received thousands of positive reviews for its visuals and gameplay. However, plenty of Elden Ring players are encountering the Connection Error Occurred issue while trying to get into the game server. Players are getting kicked out of the multiplayer mode quite often.
Now, if you’re one of the victims to encounter such an issue, then make sure to follow this troubleshooting guide completely to fix it. Luckily, some possible workarounds mentioned below might come in handy. Multiple unfortunate players are encountering the server connectivity issue while unexpectedly getting into the co-op matches. The chances are high that, somehow, the game servers are busy or down in some specific regions.
Also Read
How to Fix ELDEN RING Long Load Times
Elden Ring Subtitles: How to Change Subtitles Language, Fonts, and Size
Steam Deck Elden Ring Crashing, Not Launching, and Other Fixes
Fix: Elden Ring Subtitles Out of Sync or Not Showing Up
Elden Ring Soft Caps For Each Stat and Attribute
Fix: Discord Doesn’t Work While Playing Elden Ring
What Is the Recommended Meta PvP Level in Elden Ring?
Elden Ring: All Dungeons Locations and Their Bosses
Elden Ring Tombsward Catacombs Entrance, Secret Room, Location and Boss
Elden Ring Blasphemous Blade Build Guide

Page Contents
- Elden Ring Connection Error Occurred, How to Fix?
- 1. Turn Off Voice Chat in Elden Ring
- 2. Check Internet Connection
- 3. Check the Elden Ring Server Status
- 4. Update Elden Ring
- 5. Verify Integrity of Game Files
- 6. Update Windows
- 7. Run the game as an administrator
- 8. Disable Windows Firewall or Antivirus Program
- 9. Flush the DNS Cache
- 10. Try Using Google DNS
- 11. Set up Game Network Settings
- 12. Try Disabling Overlay Apps
Elden Ring Connection Error Occurred, How to Fix?
Additionally, it’s also possible that issues with the internet connection at your end, outdated game version, outdated networking drivers, conflicts with the DNS cache data, issues with the DNS servers of your service provider, etc are one of the reasons behind the connection error occurred of Elden Ring. Whereas an outdated system version, conflicts with the VPN service, not using recommended ports, in-game voice chat settings, etc can trigger this error.
Also Read
1. Turn Off Voice Chat in Elden Ring
First of all, you should disable the voice chat option in Elden Ring because some players have reported that the specific “connection error occurred” issue may happen due to the conflict of voice chat. To do so:
- Open the Elden Ring game > Go to Settings.
- Go to the Network tab > Turn Off the Voice Chat feature. [Connected to the internet for sure]
- Now, try joining another player from the next summon in the game world.
However, if this trick didn’t help you then turn on voice chat again.
2. Check Internet Connection
It’s also recommended to have a faster and more stable internet connection at your end no matter whether you’re using a wired connection or a wireless connection. Sometimes the game requires additional resources to get downloaded once you launch it and are connected to the internet. If the internet network isn’t stable enough, you may face server connectivity issues quite often. You can also try switching to a different network whatever is available.
3. Check the Elden Ring Server Status
Sometimes issues with the game server or outages may cause multiple errors as well as connectivity conflicts in the game. Make sure to keep checking the official @ELDENRING Twitter handle to get real-time updates and the latest info. If there is any downtime or outage happens, just wait for a couple of hours, and try again. If there is no server downtime then you can head over to the next method.
4. Update Elden Ring
If in case, you haven’t updated your Elden Ring game for a while then make sure to follow the steps below to check for updates and install the latest patch (if available). To do this:
- Open the Steam client > Go to Library > Click on Elden Ring from the left pane.
- It’ll automatically search for the available update.
- If there is an update available, click on Update.
- The process may take some time to install the update.
- Once done, ensure to close the Steam client.
- Finally, reboot your PC to apply changes.
5. Verify Integrity of Game Files
Sometimes issues with the game files such as missing or corrupted files on the PC can trouble you a lot. Even though you may not get any file missing error while launching the game, you may face network connectivity errors with the servers which will automatically kick you out of the co-op mode. To fix it:
- Launch Steam > Click on Library.
- Right-click on Elden Ring from the list of installed games.
- Now, click on Properties > Go to Local Files.

- Click on Verify Integrity of Game Files.
- You’ll have to wait for the process until it gets completed.
- Once done, just restart your computer to apply changes.
6. Update Windows
Updating Windows OS build is always essential for PC users as well as PC gamers to reduce system glitches, compatibility issues, and crashes. An outdated system version can cause multiple issues with the performance and program running that you may encounter in several ways. To update Windows:
- Press the Windows + I keys to open Windows Settings.
- Click on Update & Security > Select Check for updates under the Windows Update section.
- If there is a feature update available, select Download and install.
- It may take a while to complete the update.
- Once done, restart your computer to install the update.
7. Run the game as an administrator
Make sure to run the game exe file as an administrator to avoid user account control regarding privilege issues. You should also run the Steam client as an administrator on your PC. To do this:
- Right-click on the Elden Ring exe shortcut file on your PC.
- Now, select Properties > Click on the Compatibility tab.

- Make sure to click on the Run this program as an administrator checkbox to checkmark it.
- Click on Apply and select OK to save changes.
As mentioned, follow the same steps, and allow the admin access to the Steam launcher too.
8. Disable Windows Firewall or Antivirus Program
The chances are high enough that maybe your default Windows Defender Firewall protection or any third-party antivirus program is preventing the ongoing connections or game files to run properly. So, make sure to temporarily disable or turn off the real-time protection and firewall protection. Then you should try running the game to check if the Elden Ring connection error occurred issue has been fixed or not. To do this:
- Click on the Start Menu > Type firewall.
- Select Windows Defender Firewall from the search result.
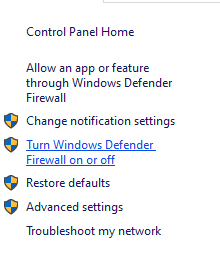
- Now, click on Turn Windows Defender Firewall on or off from the left pane.

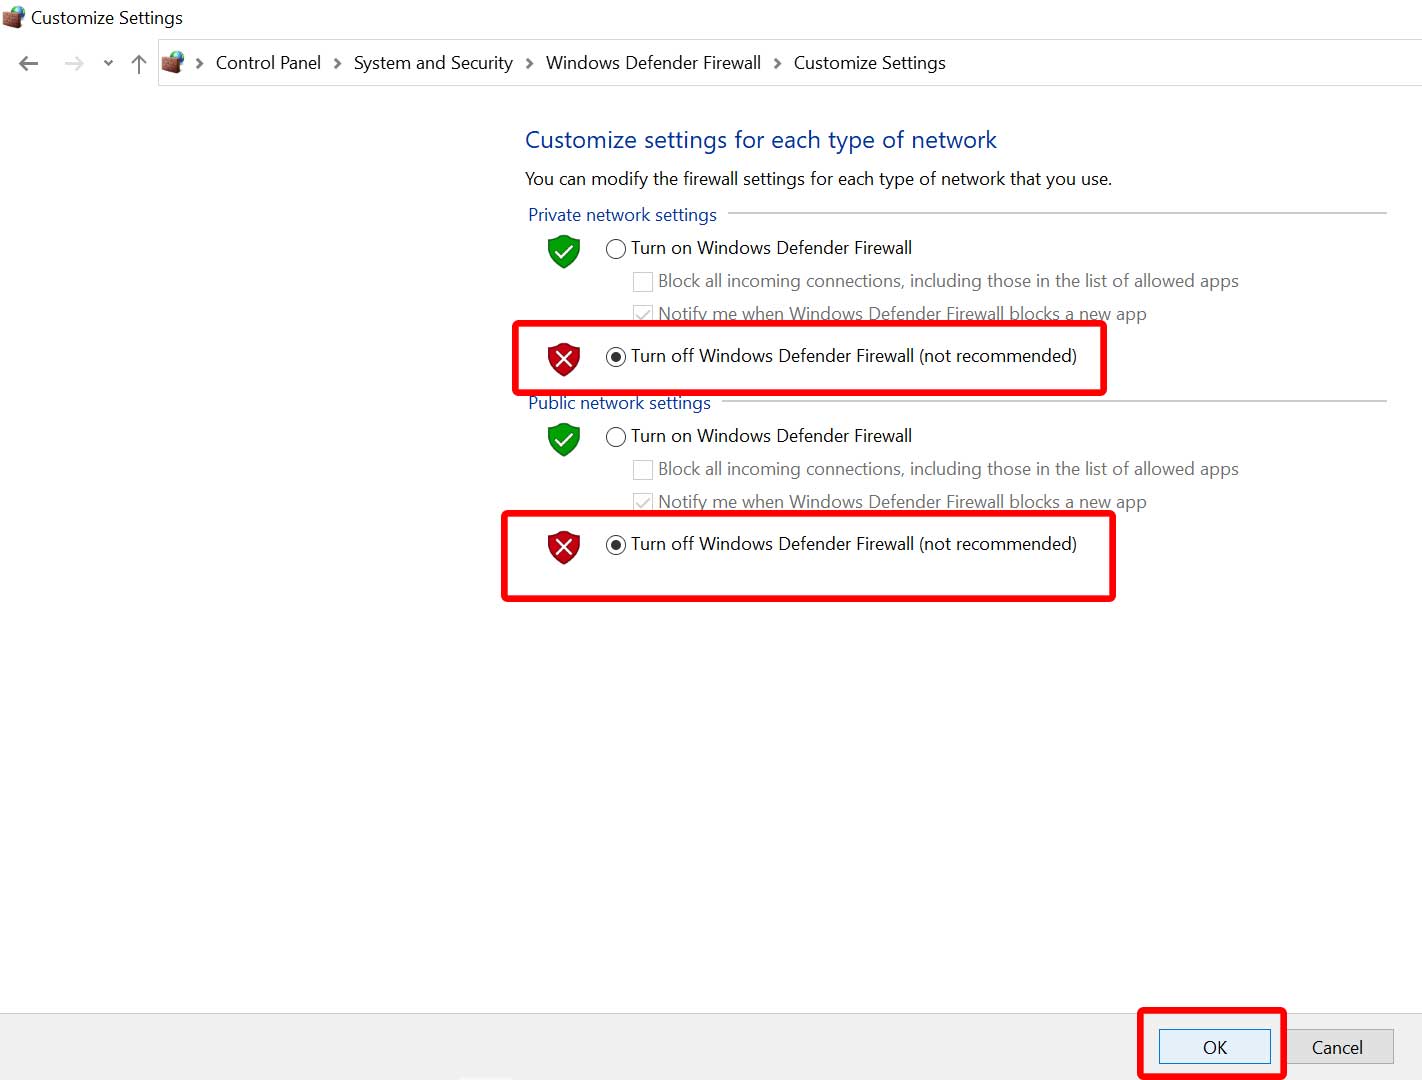
- A new page will open > Select the Turn off Windows Defender Firewall (not recommended) option for both the Private & Public Network Settings.

- Once selected, click on OK to save changes.
- Finally, restart your computer.
Similarly, you have to turn off the Windows Security protection too. Just follow the steps below:
- Press the Windows + I keys to open Windows Settings.
- Click on Update & Security > Click on Windows Security from the left pane.
- Now, click on the Open Windows Security button.
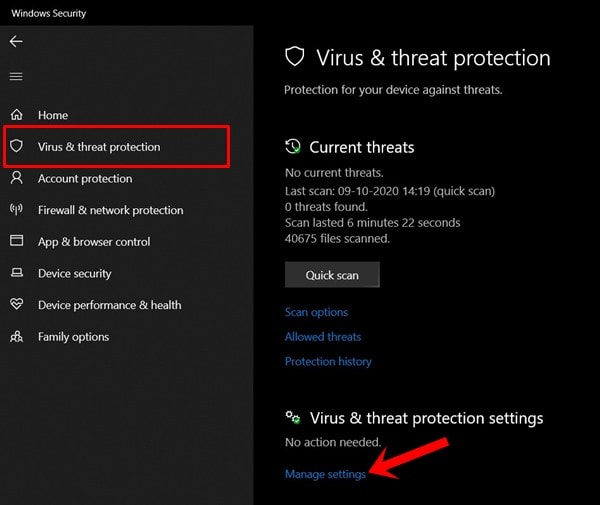
- Go to Virus & threat protection > Click on Manage settings.

- Next, you’ll need to simply turn off the Real-time protection toggle.
- If prompted, click on Yes to proceed further.
- Additionally, you can also turn off Cloud-delivered protection, and Tamper protection if you want.
9. Flush the DNS Cache
It seems that somehow your system has gathered plenty of DNS cache data that are related to the internet configuration. By following the steps below, you can easily connect with the game servers after removing the DNS resolver cache data from the system.
- Press the Windows key to open the Start menu > Type Command Prompt and search for it.
- Now, right-click on Command Prompt > Select Run as administrator.
- Click on Yes to run with the admin access > Once the command prompt window opens, type the following command and hit Enter:
ipconfig /flushdns
- A successful message will appear that says “Successfully flushed the DNS Resolver Cache.”
- Finally, close the command prompt window, and restart the PC to apply changes.
10. Try Using Google DNS
Sometimes a custom DNS server address specified by your ISP (Internet Service Provider) might have some issues with the game server connectivity. You should always try changing the DNS server address to a public domain such as Google DNS for better reachability and speed. Make sure to follow the steps below to easily add the Google Public DNS address on your Windows computer to fix the particular error.
- Press the Windows + R keys to open the Run dialog box.
- Now, type control and hit Enter to open Control Panel.
- Click on Network and Internet > Select Network and Sharing Center.
- Go to your Connections to select Ethernet, Wi-Fi, or others depending on what you’re using.
- Next, click on Properties > Double-click on Internet Protocol Version 4 (TCP /IPv4) to open a new window.
- Click on Use the following DNS server addresses and input 8.8.8.8 as a Preferred DNS server.
- While you’ll have to enter 8.8.4.4 as the Alternate DNS server > Click on the checkbox of Validate settings upon exit.
- Click on OK to confirm the changes > Launch the Elden Ring game to check for the issue.
11. Set up Game Network Settings
Sometimes the in-game network settings issue may cause multiple conflicts with the game server connectivity. It’s suggested to properly configure the network options in the game settings menu. Once you’re inside the game menu, follow the steps below:
- Go to the in-game Settings option > Navigate to Network.
- Select Cross-Region Play as Perform Matchmaking.
- Select Play Online for the Launch Settings option.
12. Try Disabling Overlay Apps
It seems that a couple of popular apps do have their own overlay program that can eventually run in the background and cause issues with the gaming performance or even launching issues. You should turn them off to fix the issue by following the steps below:
Disable Discord Overlay:
- Launch the Discord app > Click on the gear icon at the bottom.
- Click on Overlay under App Settings > Turn on the Enable in-game overlay.
- Click on the Games tab > Select Elden Ring.
- Finally, turn off the Enable in-game overlay toggle.
- Make sure to reboot your PC to apply changes.
Disable Xbox Game Bar:
- Press the Windows + I keys to open Windows Settings.
- Click on Gaming > Go to Game Bar > Turn off Record game clips, screenshots, and broadcast using Game bar option.
If in case, you’re unable to find out the Game Bar option then just search for it from the Windows Settings menu.
Disable Nvidia GeForce Experience Overlay:
- Launch the Nvidia GeForce Experience app > Head over to Settings.
- Click on the General tab > Disable the In-Game Overlay option.
- Finally, restart the PC to apply changes, and launch the game again.
Also do keep in mind that you should disable some other overlay apps like MSI Afterburner, Rivatuner, RGB software, or any other third-party overlay apps that run in the background always.
That’s it, guys. We hope this guide was useful to you. For further queries, you can comment below.
Also Read
