Samsung has introduced its new lineup of Galaxy S10 phones and fitting 10th-anniversary phone for Samsung and its storied S series. Today we will guide on How to Install Stock Firmware for Samsung Galaxy S10 and S10 Plus. We will use the tool officially distributed from Samsung for flashing Stock ROM on Samsung device called ODIN. ODIN is a very popular tool to flash stock firmware on any Samsung device. So in this guide, we will use the same tool to install Stock firmware on Galaxy S10 and S10 Plus.
Also Read

Pre-Requisite:
- Supported by Samsung Galaxy S10 and S10 Plus only.
- Your device must have 70% Of battery.
- You need a Laptop or PC to perform this Action.
- Download the right firmware for your device.
- Back Up your Data to make sure you have data’s in case if something Wrong (This Process won’t lose your data)
- Make sure you have followed the steps properly. Don’t Skip and Read! – We are not responsible for any damage that you make to your Phone.
Required Files and Drivers
- Download and Install the Samsung Kies Software
- Download and Install the Samsung USB Drivers
- Download and Extract the ODIN Software on Desktop
- Download Galaxy S10 Stock Firmware
- Download Galaxy S10 Plus Stock Firmware
Steps For How To Install Stock Firmware for Samsung Galaxy S10 and S10 Plus using ODIN
- If you have downloaded and installed the file from above then you are good to Go – Read from Step 2
- First of all, enable the USB Debugging
- To Enable the USB Debugging you need also active the developer option, Now Go to your Settings -> About Phone -> Now Tap on the Build Number 7-8 Times until you see a toast message “Developer option enabled“
- Once your developer option is active, Go back to your settings -> Open developer option -> Enable USB Debugging
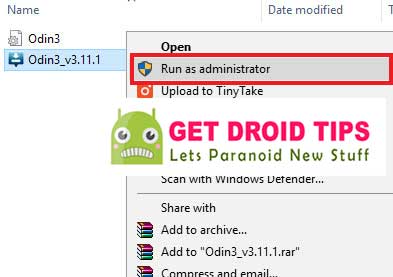
- Open the Extracted ODIN File called ODIN v3.11.1 exe file using the Administrator – Right Click your mouse and Open using Administrator
- Now Reboot your Phone into Download Mode
- So First Turn your Phone off -> press and hold Home + Power + Volume Down buttons Until you see a download mode.
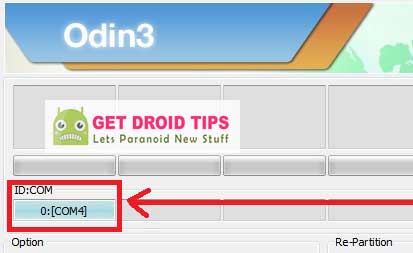
- Now Connect your Phone to PC using the USB Cables
- When you connect the USB cable you will see a blue sign in Odin
- Now Go back again Odin and Add the firmware which you downloaded from Above by Clicking AP/PDA Button

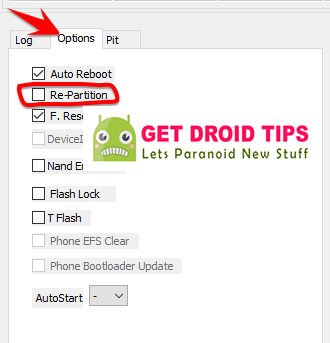
- Now Make sure re-partition is NOT ticked – Go to Option and see (Let the Auto Reboot and F-Reset Time be ticked)
- Click the start button, sit back and wait a few minutes until you see a message pass. Once you see PASS then you can remove your Phone from the part. Don’t Panic if you see your Phone restarts while updating.
That’s ALL! When you restart your Phone you will have the new stock firmware installed on Galaxy S10 and S10 Plus. I hope you learned the procedure on How to Install Stock Firmware for Samsung Galaxy S10 and S10 Plus using ODIN.