Minecraft is by far one of the best in class sandbox-type video games by Mojang where players can explore gaming adventures, accessories, merchandise to build, mine, battle, and explore the limitless possibilities in an open-world scenario. However, each and every game do come with a fair amount of issues or bugs whatsoever. Recently, Minecraft players are encountering the Black Screen Issue on the PC.
If you’re also one of them and facing the black screen or blank screen issue quite often then you can follow this troubleshooting guide completely. According to several reports, the particular issue happens whenever the players try to log into the game and the game will eventually become useless until you fix the problem manually. Although restarting the game or the computer may fix the issue, it comes back again.
Also Read
Fix: Minecraft Server Java Version Errors
Fix: Minecraft Stuck on Loading Screen
Fix: Minecraft lags on Nintendo Switch After An Update
Fix: Minecraft Stuttering, Lags, or Freezing constantly
20 Best Minecraft Building Ideas 2022
Fix: Minecraft We Were Unable to Verify What Products You Own Error
How to Cancel Minecraft Realms Subscription
Best Minecraft Prison Servers (February 2023)
Fix: Minecraft “You Need To Authenticate to Microsoft Services” Error
Minecraft Villager Not Restocking: What’s The Reason?
Fix: Internet Exception java.net.SocketException Connection Reset
Page Contents
- How to Fix Minecraft Black Screen Issue
- 1. Uninstall Third-Party Programs
- 2. Run Minecraft as an administrator
- 3. Update Graphics Driver
- 4. Update Windows OS Build
- 5. Run Minecraft using integrated GPU
- 6. Run Minecraft in the Compatibility Mode
- 7. Disable Antivirus and Firewall Program
- 8. Disable 3D Display Mode
- 9. Disable the SLI Mode
- 10. Disable Stereoscopic 3D Feature
- 11. Try Using Ctrl+Alt+Del Shortcut
- 12. End Unnecessary Background Tasks
- 13. Reinstall Graphics Driver
How to Fix Minecraft Black Screen Issue
There are a couple of possible reasons behind such an issue like any third-party program is conflicting with the game process or even system resources in the background, maybe an antivirus program is blocking the game files to connect servers, etc.
While some reports are also coming out that corrupted or outdated graphics drivers, issues with the 3D display mode, changes in the graphics settings, SLI mode, etc can cause issues.
Luckily, here we’ve shared a couple of possible workarounds below that you should perform one by one until the black screen issue gets fixed. So, without further ado, let’s jump into it.
1. Uninstall Third-Party Programs
It may possible that some of the third-party applications are troubling you by always running in the background that you can’t understand. Most of the security software, cloud-based software, etc can cause several issues with the system performance that you can’t deny.
If any of such software is installed on your computer then try uninstalling the program and check for the issue again. To do so:
- Press the Windows + I keys to open Windows Settings.
- Now, click on Apps from the left pane > Head over to Apps & features.
- Search for the installed third-party apps that are unnecessary or you don’t use them enough.
- Click on the app to select it and choose to Uninstall.
- Once done, make sure to perform the same steps for every app that you want to uninstall.
2. Run Minecraft as an administrator
Sometimes running the Minecraft game without having admin access on your Windows computer may cause multiple issues with the UAC (User Account Control). Make sure to give it admin access to run the program properly. To do this:
- Right-click on the Minecraft exe shortcut file on your PC.
- Select Properties > Click on the Compatibility tab.

- Make sure to click on the Run this program as an administrator checkbox to checkmark it.
- Click on Apply and select OK to save changes.
- Finally, run the game to check for the issue.
3. Update Graphics Driver
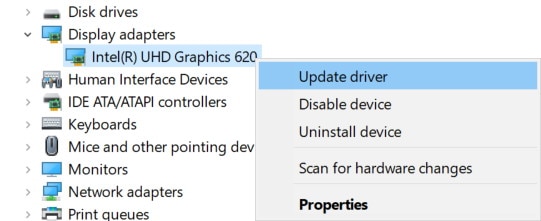
An outdated graphics card driver can occur several issues with the game launch on your Windows computer. Sometimes a corrupted graphics driver can also cause issues with the black screen or blank screen. To update GPU driver:
- Press Windows + X keys to open the Quick Start Menu.
- Click on Device Manager from the list > Double-click on Display adapters.
- Right-click on the dedicated graphics card that you’re using.

- Now, select Update driver > Choose to Search automatically for drivers.
- If there is an update available, it’ll automatically download & install the latest version.
4. Update Windows OS Build
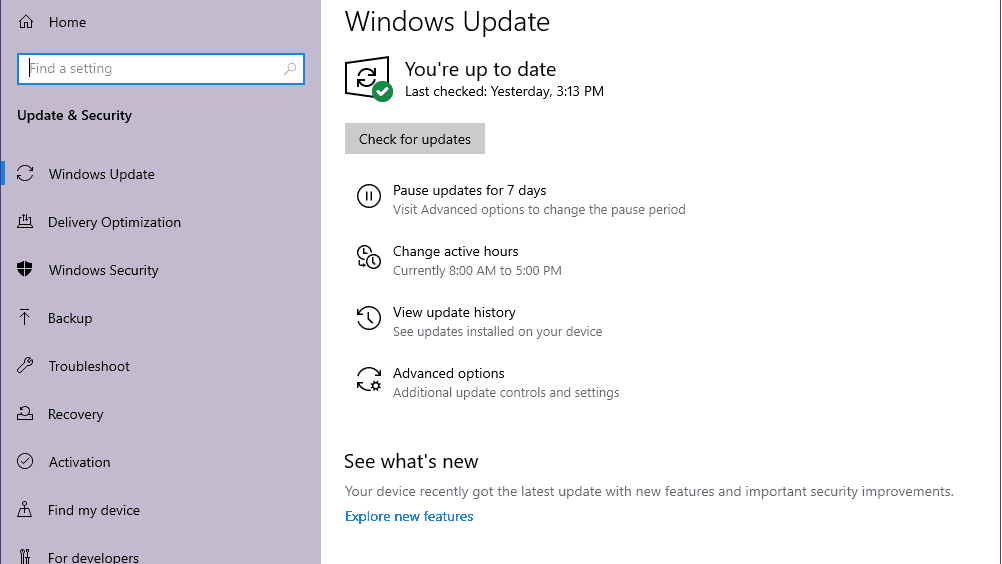
An outdated Windows OS build or any buggy build may cause some issues with the system processes and the game files will also get affected. It’s always a better idea to keep your Windows OS build up-to-date. To do so:
- Press Windows + I keys to open up the Windows Settings menu.
- Next, click on Update & Security > Select Check for updates under the Windows Update section.

- If there is a feature update available, select Download and install.
- Wait for some time until the update gets completed.
- Once done, make sure to restart your PC to apply changes immediately.
5. Run Minecraft using integrated GPU
If the Minecraft game is still having a black screen or starts freezing quite often then make sure to run the Minecraft game using the dedicated graphics card that you’re using on your computer.
Most of the computers do have an inbuilt or integrated GPU that is powerful enough to run fewer graphics games like Minecraft. So, if you’re using the inbuilt HD graphics then it may fix issues like the black screen on games.
If the black screen issue continuously pops up due to inbuilt graphics, then try running the Minecraft game using the integrated graphics card that you’ve purchased and installed on your computer. Just right-click on the Minecraft game exe shortcut > Select the “Run with graphics processor” option to do so.
6. Run Minecraft in the Compatibility Mode
Sometimes the game files may not run properly in the latest version of Windows OS. In that scenario, you should try running the game in a previous version of Windows OS which is compatible enough. Luckily, you can do the same by following the steps below:
- Right-click on Minecraft exe file > Select Properties.
- Now, click on the Compatibility tab > Click to checkmark the “Run this program in compatibility mode for” checkbox to enable it.
- Make sure to select the specific Windows OS version which is available from the drop-down menu.
- Finally, click on Apply and then OK to save changes.
- Run the Minecraft game to check for the black screen issue.
7. Disable Antivirus and Firewall Program
If you’re using the antivirus program and the Windows Firewall software on your PC then try disabling them temporarily to check for the issue. To do that:
- Click on the Start menu > Type Control Panel and click on it.
- Now, type firewall in the search box > Click on Windows Firewall.
- From the left pane, click on Turn Windows Firewall on or off.
- Make sure to select Turn off Windows Firewall for the Private and Public Network Settings.
- Finally, reboot the PC to apply changes, and try checking the issue.
Now, you’ll have to turn off the anti-virus protection (Windows Defender) as well by following the steps below:
- Head over to the Windows Settings > Privacy and Security.
- Now, go to Windows Security > Virus & threat protection.
- Click on Manage settings >Then turn off the Real-time Protection option.
- Once done, make sure to reboot your PC to apply changes.
8. Disable 3D Display Mode
- Press the Windows + I key shortcut to launch Windows Settings.
- Head over to System from the left pane > Go to the Display section on the right pane.
- Now, scroll down the page and click on Advanced display settings.
- Here you’ll have to look for the 3D Display Mode.
- Just click on the toggle to turn it off.
- Once done, make sure to restart your computer, and try running the game again.
Please Note: The 3D Display Mode doesn’t support every computer. If this option isn’t available on your PC then head over to the next method.
9. Disable the SLI Mode
By disabling the SLI Mode, you’ll be able to enhance the system performance on your Windows computer. However, it can occur multiple bugs and when you use more than one graphics card in the SLI mode, it may cause Minecraft’s black screen issue. Therefore, disabling the SLI mode is necessary if you’re using it.
10. Disable Stereoscopic 3D Feature
Well, disabling the Stereoscopic 3D feature on the Windows computer should come in handy to prevent the Minecraft game from having the black screen issue. To do this:
- Go to Control Panel from the Windows Start menu.
- Check for the installed graphics card on your computer.
- Once found, disable it.
- Try running the Minecraft game again.
11. Try Using Ctrl+Alt+Del Shortcut
If in case, the Minecraft black screen issue still continues to bother you then make sure to try using a shortcut key trick to get rid of it. To do so:
- Launch the Minecraft game > Once the black screen issue appears, just press the Ctrl + Alt + Delete key shortcut.
- Once prompted, click on the Cancel button to go back to the Windows desktop screen.
- Now, go back to the game again and start playing.
12. End Unnecessary Background Tasks
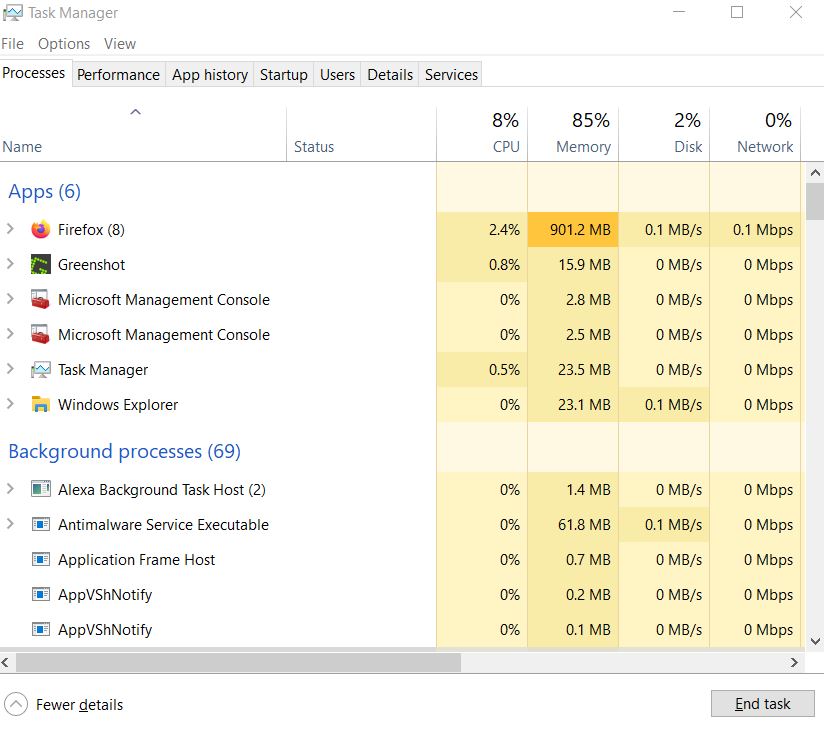
In most cases, a few unnecessary third-party backgrounds running tasks can also conflict with the system resources and that’s why the game starts crashing or lagging or even stuck in the black screen issue. It’s highly recommended to close background running tasks by following the steps below:
- Press Ctrl + Shift + Esc keys to open up the Task Manager.
- Now, click on the Processes tab > Click to select the task that’s unnecessarily running in the background and consuming enough system resources.

- Click on End Task to close the task.
- Do the same thing for every unnecessary task to close. [Do not close system-related tasks which are important]
- Once all is done, restart your computer to check for the issue.
13. Reinstall Graphics Driver
- Press Windows + X keys to open the Quick Start Menu.
- Click on Device Manager from the list > Double-click on Display adapters.
- Right-click on the dedicated graphics card that you’re using.
- Select Uninstall device > If prompted, click on Uninstall again.
- Once the graphics driver is successfully removed, click on the Scan for hardware changes option.
- Go to the official website of the motherboard/graphics card manufacturer. Search for the latest graphics driver according to your particular GPU model and architecture.
- Download and install the graphics driver on your PC > Restart the computer.
That’s it, guys. We assume this guide was helpful to you. If you’ve any queries, you can comment below.
Also Read
