In this tutorial, we will show you how to flash the TWRP Recovery on any Android device. One of the biggest USPs of having an Android device is its open-source ecosystem. The customizations and tweaks that it brings with it are virtually endless. Well, we aren’t only talking about installing custom launchers and icon packs. These are just the tip of the iceberg; beyond all these, your device is capable of much more. There is a certain restriction that the OEMs have put forward. Every device now has a locked bootloader to prevent device modification beyond a certain limit. But once you have unlocked the same, you have opened the gates to a plethora of tweaks.
Also Read
Some of these include flashing Magisk and gaining administrative rights (aka root), flashing Custom or GSI ROMs, installing different mods, ZIPs, and IMG files or even creating an entire device backup (including the partition). But for all of these activists, a pretty important requirement is that your device should have a custom recovery like TWRP installed. In this guide, we will show you how to do just that. But before we list out the steps to flash TWRP on any Android device, let’s check out more about this recovery and the benefits and risks that it brings with itself. Follow along.

Page Contents
What is a TWRP Recovery:
Team Win Recovery Project, or more popularly known as TWRP is a custom recovery that users could install on their device to carry out high-end tasks. Although every Android device does have its recovery, that is a stock recovery with limited functionalities. More often than not, it only allows you to reset the device or install OTA updates. That is all. But a custom recovery like TWRP offers a plethora of other features, much beyond what a stock recovery is capable of. Let’s check out all the full feature list of the TWRP Recovery.
TWRP Functionalities:
Here are some of the noteworthy features that the TWRP is capable of:
NANDroid Backup:
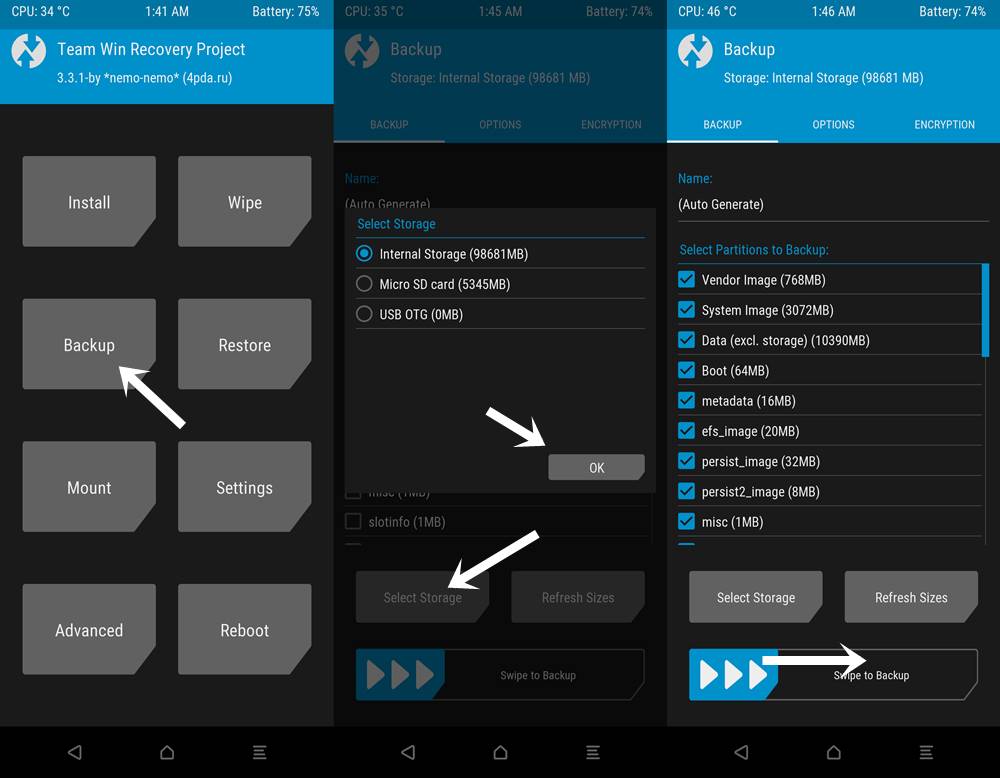
While a normal backup only creates a backup of your data and some device partitions, a NANdroid backup creates a backup of all the device partition. Furthermore, once your device ends up in a bootloop, accessing the restore feature of your device is of no use. However, you could still access the TWRP Recovery and hence restore the last created NANDroid backup. Doing so will bring your device back to normal working condition.
Flashing Files:
You could easily flash any ZIP or IMG files onto your device right from this recovery itself. These include the GSI system files, Magisk ZIP files, or even your Custom ROMs.
Wipe:
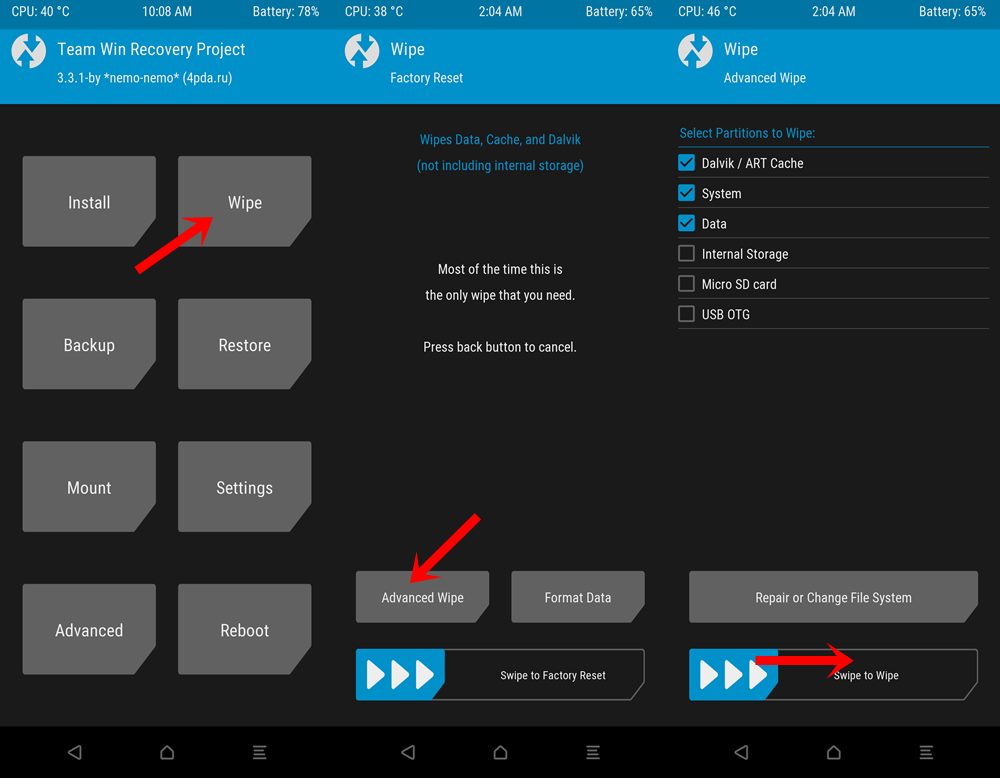
TWRP also allows you to wipe various partitions on your device with just a right swipe. This is needed when you are about the flash a Custom ROM, or wiping of Dalvik and Cache partition are usually done after each flashing.
Mount:
You could even mount an external USB Drive and directly flash any file right from that storage. This eliminates the need to transfer the file to your device beforehand.
Advanced Functionalities:
There also exist some advanced features in the recovery. For example, you could use the Terminal Command, File Manager, Flash Recovery Ramdisk, and Fix Bootloop among others. All these aren’t needed for everyday usage but only once a while, but still, their usefulness cannot be ignored.
These are some of the most important usages of TWRP Recovery. But there are some downsides to its as well. Make sure to go through the below section before you end up flashing the TWRP Recovery on your Android device.
Risks in Flashing the TWRP Recovery
First and foremost, the entire process of flashing this recovery is quite dangerous. A single error and it might lead to bootloop or even worse a bricked device. Sometimes, even flashing an older version of TWRP might throw in an error or two. Likewise, there exist many modded and unofficial TWRP builds which itself might be buggy and unstable. Not to forget the point that the process requires an unlocked bootloader, doing which might make the device warranty null and void.
By going through the perks and risks of installing this recovery, you might have made up your mind. So if you wish to flash the TWRP Recovery on your Android device, then proceed with the below steps.
How to Flash TWRP on any Android Device:
To begin with, make sure to go through the below requirements section. Your device should meet all the below-mentioned points.
Prerequisites:
- Flashing TWRP requires an unlocked bootloader. Make sure you have done so, refer to our guide on how to unlock bootloader on Android devices via Fastboot.
- Also, we would advise you to create a complete device backup beforehand. If you are about to unlock the bootloader as well, then it becomes a necessity if not, then also count is among a requirement.
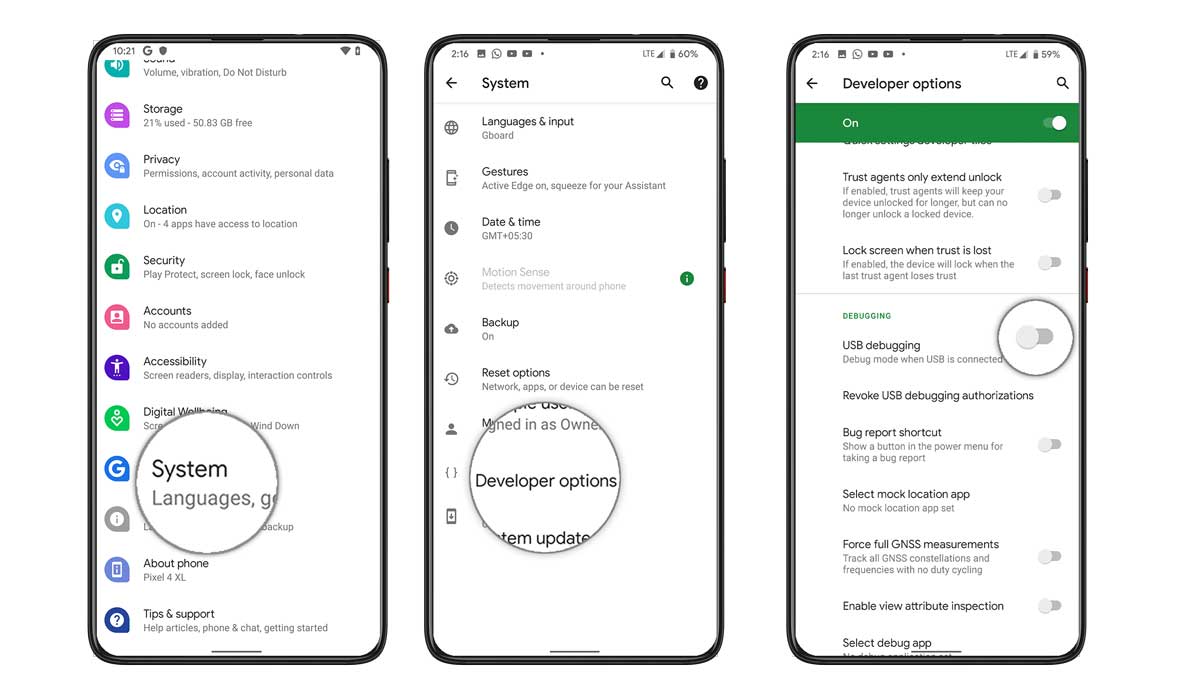
- Next, enable USB Debugging on your device so that a successful ADB connection gets established between your device and PC. To do so, head over to Settings > About Phone > Tap on Build Number 7 times > Go back to Settings > System > Advanced > Developer Options > USB Debugging.
- Finally, download and install the Android SDK Platform Tools on your PC. This is needed to execute ADB commands to boot your device to fastboot mode.
Download TWRP for your Android device:
Head over to the TWRP official site and download the TWRP build corresponding to your device. Regarding this, there is a pretty important point worth discussing. While there might be only a single IMG file for some devices, others might be having two different files- ZIP and IMG. The thing is the first one (only IMG file) is for those devices that still have a recovery partition.
In these devices, we could directly flash the TWRP.IMG to the recovery partition. On the other hand, the devices without the recovery partition fall in the latter bracket. Hence in those cases, we will first boot the TWRP.IMG to the boot partition and then permanently flash the TWRP.ZIP file. Here are all the required instructions in this regard.
Steps to Flash TWRP on Android:
First off, make sure to rename the recovery files to twrp. Hence the complete names should be twrp.zip (if available) and twrp.img. Furthermore, transfer these recovery files to the platform-tools folder. Also, transfer the twrp.zip to your device’s internal storage.
- Connect your device to PC via USB cable.
- Head over to the platform-tools folder, type in CMD in the address bar, and hit Enter. This will launch the Command Prompt.
- Execute the below command to boot your device to Fastboot mode:
adb reboot bootloader
- Your device will now be booted to TWRP. Now follow the steps as per the TWRP files available for your device
Devices with only TWRP.IMG
- If your device only has the IMG file, then execute the below command:
fastboot flash recovery twrp.img
- Now execute the below command to boot your device to the TWRP recovery.
fastboot boot twrp.img
- Once it boots to TWRP, you could then boot it to the OS, via the Reboot > System option in TWRP.
Devices with both TWRP.ZIP and TWRP.IMG
- If you are having both the ZIP and IMG files, then, first of all, boot your device to TWRP via the following command:
fastboot boot twrp.img
- Your device will now be booted to the TWRP Recovery. But it is a temporary install. For permanent installation, head over to Install, and then navigate to the twrp.zip file, and perform a right swipe to install it.
- You can now reboot your device to OS. For that, head over to Reboot > System.
Conclusion:
Android’s open-source nature allows for a wealth of customization and modifications. Among the most significant tweaks is the flashing of TWRP Recovery, which acts as a gateway to various advanced tweaks like rooting, flashing custom ROMs, and backing up device partitions. While TWRP provides a pathway to unlock the full potential of an Android device, it’s essential to understand the benefits and potential risks involved. Unlocking bootloaders and installing custom recovery can void warranties and may introduce vulnerabilities. Therefore, users should proceed with caution, ensure they’re informed, and always back up their data before venturing into such modifications. Rounding off, here are some iPhone Tips and Tricks, PC tips and tricks, and Android Tips and Trick that you should check out as well.
Salaam bro, I’ve tried to follow this and it is not working for me. Actually, all of the steps work successfully and using ADB, I can install TWRP, the process goes through fine. But, when I try and boot my phone into recovery mode, it boots into the standard Xiaomi recovery options and not TWRP.
The phone is unlocked and I have followed all of the instructions correctly.
Any ideas?
Could you please tell me which phone ?
Lenovo a7000 many times failed
I have a old mt6572 Intex aqua i4 .I followed the above procedure with every command but it says remote partition recovery does not support flash.please help.
Hi, although I am a little late on this discussion but I have a problem.
My phone is Micromax canvas 2 Q4310.
I installed magisk and rooted it.
Now, I am not able to open recovery mode and I want to install twrp on my phone.
The adb detects my phone as long as it does not enter bootloader mode.
After that, orange state comes and phone automatically boots back to normal.
I tried twrp app, flashify but none helped.
PS. Help me
Hi. I can´t root my BL7000. In the last step, put the message: FAILED (remote: not allowed in locked state).
When updating recovery I get:
C:\adb>fastboot flash recovery recovery.img
target reported max download size of 536870912 bytes
sending ‘recovery’ (13134 KB)…
OKAY [ 0.443s]
writing ‘recovery’…
(bootloader) Image not signed or corrupt
OKAY [ 0.243s]
finished. total time: 0.694s
Any help?
From where you downloaded Recovery? Can you please link to that or comment on that ?
Bro can u send me Micromax Canvas Unite 4 pro twrp pls
My contact +918894257816
Please whatsapp me
Update karna hai
target reported max download size of 536870912 bytes
sending ‘recovery’ (17936 KB)…
OKAY [ 0.658s]
writing ‘recovery’…
FAILED (remote: unknown command)
finished. total time: 0.673s
it was failing
I got the message FAILED (remote size too large)
Conseguiu resolver?
Apparently XPERIA devices work differently. Here’s an explanation:
https://twrp.me/sony/sonyxperiaz1.html
Unfortunately, my knowledge is not enough to overcome this barrier :-(
Thanks man!
for those having problems, i found this, http://en.miui.com/thread-1245132-1-1.html
“Note many devices will replace your custom recovery automatically during first boot. To prevent this, use Google to find the proper key combo to enter recovery. After typingfastboot reboot, hold the key combo and boot to TWRP. Once TWRP is booted, TWRP will patch the stock ROM to prevent the stock ROM from replacing TWRP. If you don’t follow this step, you will have to repeat the install.”
Thanks for this info.
hi dear.
i use redmi 6a with android pie where i can download realised recovery for this rom
Thank you very much, dude, this worked for me.
I was having trouble installing TWRP in a Redmi 7A phone.
1. fastboot flash recovery twrp.img
2. fastboot reboot
3. Keep pressed down the Volume Up key while rebooting
it says failed(remote :cimmand not allow
ed
i got the same problem with my h631 6.0
Are you using the latest TWRP Recovery? Which phone? which ROM did you try?
Parceiro sera que voce pode me ajudar tenho o celular Cagabi One, estou tentando fazer root porem o programa flashtools aceita arquivos em .TXT e no recovery que baixei esta .IMG assim o flashtools não reconhece e nao consigo instalar de jeito nenhum.
It says error :cant load ‘ recovery.img’
PS C:\adb> fastboot flash recovery recovery.img
target reported max download size of 536870912 bytes
sending ‘recovery’ (14712 KB)…
OKAY [ 0.467s]
writing ‘recovery’…
(bootloader) Image recovery failed validation
(bootloader) Preflash validation failed
FAILED (remote failure)
finished. total time: 0.484s
May be you have corrupted TWRP file or you must try to download the latest ADB fastboot tool.
Get same error as Mauri above.
Have Ulefone Power 5. In the last step, get the message: FAILED (remote: not allowed in locked state). However I already unlocked bootloader in developer options.
You need unlocking oem to fix your issu.
1. Go to fast boot mode on your phone and connect with PC
2. Open PowerShell or CommandPrompt and type “fastboot oem unlock”
Then you should try installing. I think it makes you happy.
hellow sir i have c5 ultra how to make root ya twrp solution
you cant flash twrp mi6x, anti-rollback 4 block flash twrp
you must open twrp in adb and flash rom.
Assalamualaikum Brother
I installed twrp in XA1 dual {3116} running android 8.0
I installed recovery.img without first installing boot.img.
I have sseveral times now installed boot.img and then secovery.img but when I try to boot into system it return to twrp recovery. My phone is not booting into system now.
either it stuck on sony logo or twrp.
I am in a big problem please help me flash orange fox recovery for my device Asus Zenfone max pro m2 (X01BD) Android pie I uge decrypt file oreo for flash now my Device some app not working I can’t make a call not play YouTube not work camera how to fix it
Model: Blu Studio G2 HD
Hello, i’ve done everything like the tutorial, the problem is when i get the fastboot screen and i need to press volume up to continue “after typing fastboot oem unlock” i can’t press any button, i just don’t accept any input.
first type fastboot devices to see if your device is connected properly.
It is listed, but i can’t press up or down in the smartphone, it don’t receive any input.
Not working twrp error why
hi i can’t reboot to fastboot , the shell just reboot my phone normaly
C:\Program Files (x86)\Minimal ADB and Fastboot>fastboot flash recovery TWRP-H300-3.0.2.0.img
target reported max download size of 134217728 bytes
sending ‘recovery’ (10208 KB)…
OKAY [ 0.346s]
writing ‘recovery’…
FAILED (remote: failed to get download permission for partition ‘recovery’
)
finished. total time: 0.371s
Please reply from the appropriate article to examine your device and TWRP Recovery that you downloaded. This article is just to guide on how to install.
Can you tell me how to unlock bootloader and how to install twrp in Zte Nubia m2
Hi, my Vernee Mix 2 has died. I cant even turn on. Can u help me Please?
Facing a problem that I boot to my boot loader its showing frp unlock on my honor Holly 2 plus plz help ne to install twrp
i have followed the above stated but when i open the recovery mode it is my stock recovery mode . what can i do?? Help me!!
Device: OPPO realme1
After step:
fastboot flash recovery recovery.img
————————————————–
type command:
fastboot boot recovery.img
————————————–
so device will automatically boot to newly installed TWRP Recovery
from where can i download TWRP for motorola g5s plus, i have searched whole internet and the file i found was corrupt.
Can a Nokia 2 V be rooted? The OEM unlocking toggle in developer settings is grayed out not allowing me to turn on??? What should I do?
all bullshit recovery installed or not on phone
How to fix corrupted twrp img file
Successfull TWRP install requires patched boot.img and unlocked bootloader trough fastboot by this command https://i.imgur.com/FYjTRnI.jpg
I need help please when i run fastboot flash recovery i said failed my phone is asus rog 2
In my tecno in 1 pro the twrp img file is showing mount problem in cmd and outside.What should i do????
How can I do this on the Meizu Note 9 in infinite loop if I don’t have access to the desktop to enable USB debugging? Can you help me? Is there a way to install twrp without knowing if debugging is active?
Hello,i can’t find the right twrp recovery file for the blackview bv9000 pro. recovery file is invalid. Can you help me please?
Hi bro my phone is not listening to adb devices but in portable devices it is displaying my phone is realme 3i
I have an Alcatel Idol 3, 6045Y, 5.5″ I press Volume Up + Power to enter Recovery Mode. The options I get are: Reboot system now, apply update from ADB, apply update from sdcard, apply update from phone storage, wipe data/factory reset, wipe cache partition, power down, view recovery log. If I choose: apply update from ADB, it tells me: Now send the package you want to apply to the device with “adb sideload “…. If I choose apply update from phone storage, it says there is no update (despite I have copied the recovery.img)
How do I continue?
Thank you very much in advance
oppo a3s bagaimana broew ada ngak
knp ngak bisa
Please help me regarding backup from an unresponsive device. My Android 12 OS is fully corrupted and stucked on “HiOS launcher is setting your desktop” screen. I have performed dozens of solutions but all in vain. Device is also not showing in PC on connecting with cable. Please support me and share method to backup and flash ROM in this.