In this tutorial, we will show you how to root Android 11 via Magisk Manager. One of the biggest perks of having an open-source OS like Android is the ability to carry out a plethora of tweaks. Some of the noteworthy ones including unlocking the bootloader and flashing custom ROMs or recovery like TWRP. However, the icing on the cake is the ability to gain administrative privileges or access to the system partition. And this only possible once you have rooted your device.
With a plentitude of perks involved, rooting is generally on top of the priority list for the tech enthusiasts. For example, you could flash tons of mods, Magisk Modules, Xposed Framework, and other files. Likewise, you could even theme your device via Substratum. However, with the latest iteration of Android, there have been some underlying changes, hence users might find it difficult to carry out the aforementioned task. But fret not. In this guide, we will be listing out detailed instructions steps that will help you to easily root your Android 11 device via Magisk Manager.

Page Contents
- How to Root Android 11 With Magisk Manager
- 1. Unlock the bootloader
- 2. Download and extract Android 11 Factory Images
- 3. Transfer the boot.img to the internal storage
- 4. Download and install Magisk Manager (Canary)
- 5. Use Magisk Manager to patch the Boot Image
- 6. Transfer the Patched Boot Image to your PC
- 7. Setup Google’s Platform-Tools
- 8. Switch to Bootloader Mode on your phone
- 9. Flash the Patched Boot Image file
How to Root Android 11 With Magisk Manager
Rooting your Android 11 device with Magisk is pretty straightforward. Although, if you’re new to rooting and flashing firmware, it may seem tricky. Before you go ahead with the steps, here are a few pre-requisites that are required for rooting your Android 11 device.
- Access to a Windows, Linux, or Mac computer.
- Android phone with an unlockable bootloader.
- USB cable to connect your phone to your PC.
Important: Another critical thing to keep in mind is that once you root your device, it will no longer pass the SafetyNet check. This means that you will not be able to use most payment and banking applications. Additionally, games such as Pokemon Go will also not be able to run on the device.
With that out of the way, it’s time to check out the steps to root your Android 11 device with Magisk.
1. Unlock the bootloader
To root your phone running Android 11 via Magisk, you will first need to unlock the device’s bootloader. This step is important since it allows the program to access the OS-level partition in the device. Unlocking the bootloader will completely wipe all data and files on the phone. So you will have to back up all the data on your phone before you unlock the bootloader.
You can check out our detailed guide on how to unlock the bootloader of your Android phone. Make sure to follow the guide carefully to avoid bricking your Android phone.
2. Download and extract Android 11 Factory Images
Factory images are basically fresh software for your device. These images contain all the OS files and partition information and let users install fresh firmware on their devices. Some OEMs that give the option to unlock the bootloader on their devices also have the factory images to download on their site.
Thus, you will have to visit your smartphone manufactures website to see if the factory images are available for your device. The file will most likely be a .ZIP file with the boot.img compressed. So pay attention to the file you download. You will have to download this file to your computer.

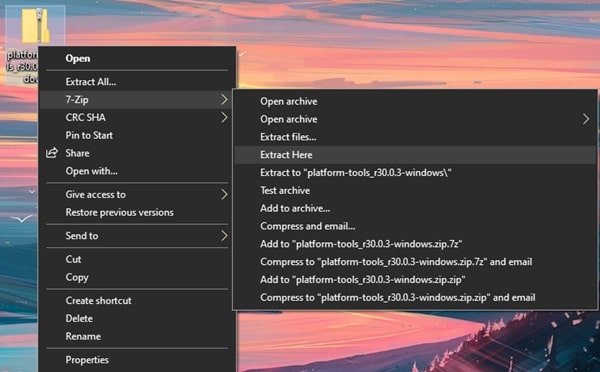
Once downloaded, you will have to extract the .ZIP file. This can be done via the systems in-built extractor or via third-party apps such as 7-Zip. The extracted file should be named as boot.img. For OnePlus owners, this process is slightly more complicated. You must follow our guide on how to extract payload.bin from OTA or firmware. When you have the extracted file(s) ready, proceed to the next step.
3. Transfer the boot.img to the internal storage
The boot.img file that you extracted by following the 2nd step now has to be placed in the phone’s internal storage. Transfer the file from your PC to your phone and place it in the ‘Root Directory‘ or any folder where you can find it easily.
4. Download and install Magisk Manager (Canary)
At present, only the pre-beta or canary build of Magisk Manager supports rooting Android 11. Download the Magisk Manager from this official repository by topjohnwu. So after downloading the APK file, you will have to install it on your Android phone. Since this is an APK file and you will be required to give permission to install unknown apps.
5. Use Magisk Manager to patch the Boot Image
After installing Magisk Manager on your Android device, you need to launch it and tap on the Install button. You will see a pop-up asking for storage permissions. Tap on Allow to grant the storage permissions. You will then be greeted to the install screen. Here, you will see 3 options. Out of these three, enable both options that mention “Preserve” and make sure that the “Recovery Mode” option is toggled off. Then tap on Next to proceed.
In the Method section, tap on “Select and Patch a file” and then navigate to the location of the Boot.img file that you have extracted and placed in the phone’s internal storage earlier. Select the Boot.img file and then tap on Next. Now tap on Let’s go and wait for the program to finish its work. It should say “All done” when completed.
6. Transfer the Patched Boot Image to your PC
You will now have to transfer patched boot image file to your PC. This file will be located in the same folder/directory in which you placed the Boot.img file in Step 3. The file should be named as follows: magisk_patched.img.
7. Setup Google’s Platform-Tools
Google Platform-tools will allow you to enter the commands to root your smartphone. Download the files for Windows | Mac | Linux. These files will be in a .ZIP format as well. Therefore, you will have to extract the files and you will be left with a platform-tools folder.
Open the ‘platform-tools‘ folder and then open a command prompt window in the folder. On Windows, you can press and hold the Shift key and then Right-click to bring up the context menu. From the menu, click on Open command window.

For Mac and Linux users, open the Terminal and then enter the following command:
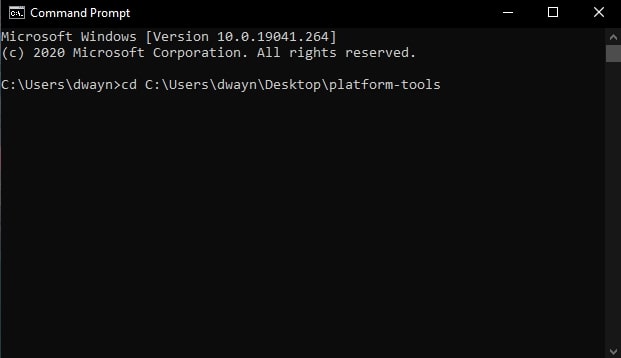
- cd “platform-tools location”
You can get the location by simply dragging and dropping the platform-tools folder into the Terminal window. As an example, the command will be similar to this if the folder in on the desktop: “cd “C:\Users\dwayn\Desktop\platform-tools”. Hit the Enter Key once you have the command ready.
8. Switch to Bootloader Mode on your phone
First off, you will have to enable USB debugging on your phone. Head over to the Settings > Developer options > Enable USB debugging. This will allow you to send the command from your PC to your phone. In case you aren’t familiar with this, check out: What is USB Debugging, and how to enable it on any Android phone?
Once enabled, switch over to your PC and bring up the command prompt window you opened in Step 7. Make sure your phone is connected to the PC via a USB Cable. Proceed by entering the following command:
- adb reboot-bootloader
Your device will reboot into bootloader mode.
9. Flash the Patched Boot Image file
To make sure that your device has been recognized by your system, enter the following command: fastboot devices. If there are no issues, your device will be recognized.
If your device is recognized, proceed by entering the following command:
- fastboot flash boot “patched_magisk.img file location“
To get the location, simply drag and drop the patched_magisk.img file to the command prompt or terminal window. Users on Linux or Mac may have to enter ./ preceding the file location. Here’s an example:
- ./fastboot flash boot patched_magisk.img
When the process is completed, you have to enter the following command:
- fastboot reboot
In case this does not work, enter this command:
- ./fastboot reboot
That’s it. You have successfully rooted your Android device running Android 11. You can verify if the root has been successful by opening the Magisk Manager app. Once opened, you will see the Status as Normal and you will also be able to see the Installed version. This confirms that your device is indeed rooted. And you can now install any root application and tap on “Grant” to give the app root access. If you run into any issues while rooting your Android 11 device, drop a comment.
