In the world of Android customizations, it’s really necessary for users to have full access to the device system and its data. Here rooting on Android comes into the light because it allows users to do the task whatever they want to. Changing UI, icons, themes, fonts, other visual elements, functionalities, and more becomes easy. If you’re one of the Tecno mobile users, you can follow How to Root Any Tecno Smartphone Using Magisk Patched Root.
Tecno devices are getting so much popular due to their commitment to providing better hardware and improved skin. However, if you’re an Android fan, and don’t want to compromise any of the functionalities or customization options then rooting is the only way. There are a couple of options to root your Android device but when it comes to systemless rooting, nothing is better than Magisk as of now.
Also Read
What is Rooting?
Rooting your Android device means giving an admin or superuser access to yourself for an unlimited customization option rather than stuck into the stock bootloader and recovery. It basically offers you the privilege or root access to unlock the operating system on your device and then you’ll be able to do plenty of tasks that weren’t possible before.
Rooting on an Android device offers you to simply edit or delete system files, uninstalling bloatware, upgrading or downgrading OS, replacing the stock firmware with a custom one, overclocking or underclocking the performance, improving battery life, installing third-party customization modules, using custom fonts/themes/icons, using other visual elements, using rooted apps directly, performing system tweaks, and more.
Advantages of Rooting Tecno Devices
One of the biggest advantages of having root access on your Tecno devices is that you can get out of its stock UI (HiOS). Plenty of Tecno device users have reported that they’re not happy with the performance or stability of the HiOS whatsoever. That can actually make a huge difference in the day-to-day usage experience. There are a couple of advantages that are mentioned below.
- Rooting with Magisk offers systemless root access that doesn’t mess with system partitions
- Hide online security measures like using SafetyNet or banking apps
- Overlock or underclock the system performance
- Increase battery life
- Uninstall bloatware (pre-installed apps)
- Use the Ad-Blocker tool to its full extent
- Use plenty of rooted apps to further control over subsystem
- Install Xposed Framework and Xposed Module
- Hibernate background running apps that you’re not using
- Change or tweak system user interface and its items
- And more…
Pre-Requisites:
Here we’ve mentioned all the requirements that are required before getting into the root installation steps.
1. You Need PC or Laptop
First of all, you need a PC/Laptop in order to connect your Tecno device via a USB cable. It’s necessary because the bootloader unlocking process requires a computer for giving commands.
2. Charge Your Device
Keep in mind that your handset should be charged more than 50% at least in order to prevent your device from occasional shutdowns during flashing files.
3. Install ADB and Fastboot Binaries
ADB is necessary to allow you to root or modify your device system files by using the commands properly. While the Fastboot is required to modifying the phone’s firmware by sending commands to it. You can download ADB Fastboot tools here.
4. Install USB drivers
USB Drivers basically connect and create a communication bridge between the mobile device and a computer once it’s connected via the USB cable. While flashing files or transferring data, the connectivity remains stable. Make sure to download the Tecno USB Drivers for your device.
5. Use Original USB cable
Using an original USB cable usually helps users to connect and receive stable communication between PC and device. While using a third-party USB cable can cause issues with connectivity in most cases.
6. Enable USB Debugging / Enable OEM Unlock
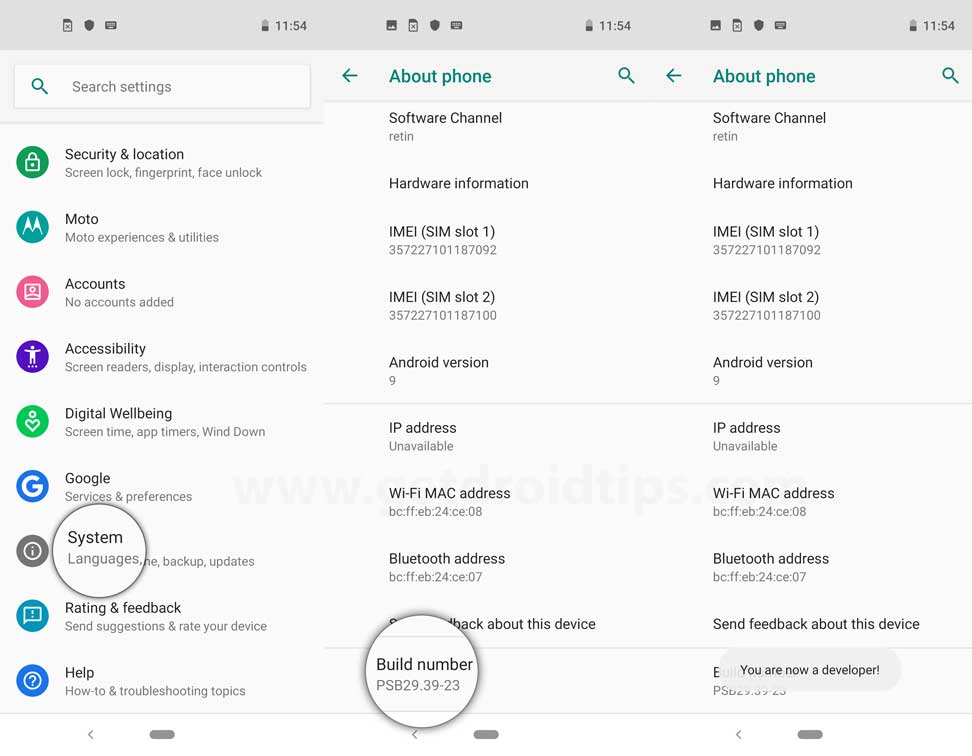
- Open the Settings menu on your device.
- Head over to About Phone.

- Scroll down to the bottom > Tap on Build number for 7 times quickly and the Developer Options will be enabled on your phone.
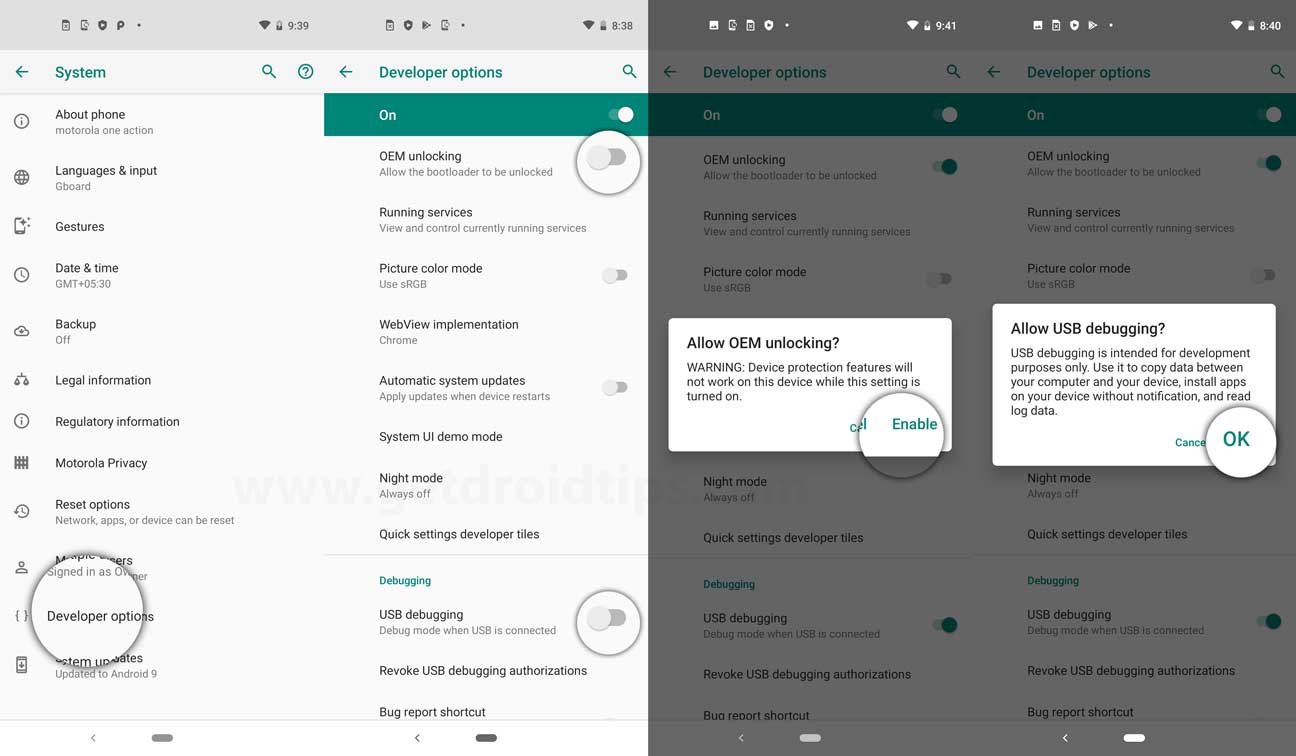
- Go back to the Settings menu again and open Developer Options.
- Enable USB Debugging.

- Next, enable Allow OEM Unlocking too.
7. Backup Data
Make sure to take a full data backup of your device before unlocking the bootloader or rooting it. The bootloader unlocking method will completely wipe out the internal storage data.
8. Unlock The Bootloader
Unlocking the device bootloader is most important and the entry gate for the world of customizations on Android. OEMs offer the locked bootloader due to several security concerns. So, if you want to flash a custom firmware or custom recovery or enable root access, you’ll have to unlock the bootloader first. Here you can find out an in-depth bootloader unlocking guide for Tecno devices.
Steps to Root Your Tecno Smartphone
Once you’re done with all the pre-requirements and downloads, you can now follow the steps below one-by-one.
Disclaimer: GetDroidTips won’t be responsible for any kind of issue that may appear on your device after following this guide. You should know what you’re doing and proceed at your own risk. If you don’t follow the steps properly, you may end up with bootloop or bricking your device. Additionally, rooting your device may void the manufacturer’s warranty (if applicable).
1. Extract and Patch Boot.image using Magisk
- First of all, you need to extract the boot image using the MTK Droid Tool.
- Attach your device via USB cable and copy only the boot.img file from the extracted folder to your device storage
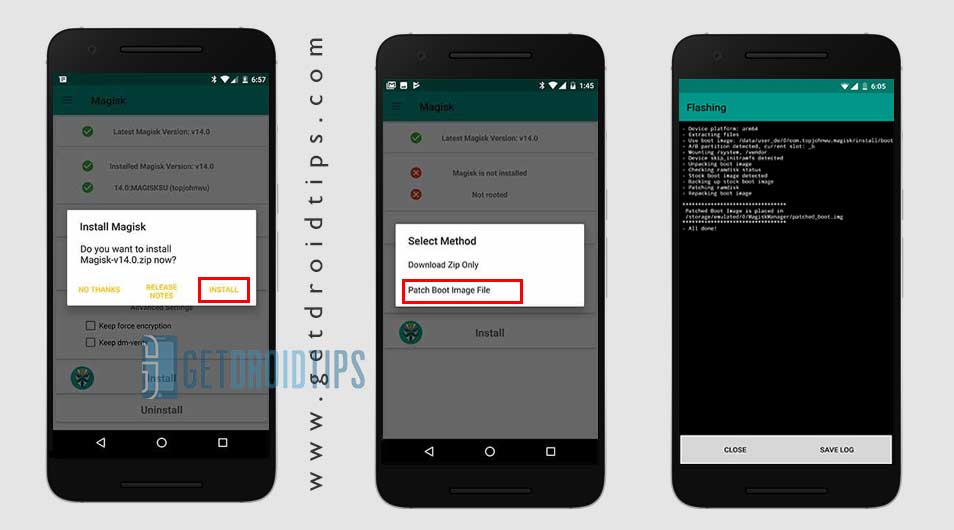
- Launch Magisk Manager. When a popup appears asking to install Magisk, select INSTALL and choose install again.
- Tap on “Patch Boot Image File”.

- Go to internal storage > Select your phone’s boot image that you’ve transferred earlier.
- Magisk will start patching the boot image. Have some patience.
- Once the boot image has been patched, copy the “patched_boot.img” from the internal storage and replace it in the same extracted ROM folder on your PC.
Here you can check out the steps to Install Patched Boot Image on any MediaTek Device. If the above method doesn’t work on your Tecno device, then try using the ADB & Fastboot method.
- Now, extract the ADB & Fastboot tool, then move the patched boot image file to the same folder.
- Press and hold down the Shift key + right-mouse-click to open the command window/PowerShell.
- Next, enter the following command in order to flash the “patched_boot.img” to install Magisk and root your Android device:
fastboot flash boot patched_boot.img
- For devices with an A/B partition system, you have to use the following commands:
fastboot flash boot_a patched_boot.img

fastboot flash boot_b patched_boot.img
Please replace [patched_boot.img] with the name of the boot image file you downloaded followed by the .img extension.
- Wait for the flashing process to complete.
2. Boot Into Fastboot Mode
- Make sure to open the command prompt window inside the ADB and Fastboot (Platform-tools) folder.
- Type in the command below to reboot your device.
fastboot reboot
- Your device will boot into the Fastboot mode.
3. Disable DM Verity
- Download the stock firmware of your Tecno model from the official website.
- Extract the firmware zip file using WinRAR or 7zip.
- Here you’ll get the stock boot image file for your handset.
- Open Magisk Manager on your phone > Tap on Advanced Settings > Uncheck Preserve AVB 2.0/dm-verity.
- This method will disable Preserve AVB 2.0 > Now, you can flash the patched boot image file.
4. Flash Patched Boot Image
Now, in order to disable DM Verity or Android Verified Boot (AVB) without TWRP Recovery, we will have to flash the Patched boot img file using Fastboot commands.
- Make sure to connect your Tecno device to the PC via a USB cable and the USB Debugging mode should be enabled.
- Go to the platform-tools (ADB and Fastboot) folder. Press the Shift key + Right-click on the mouse then select Open command window here.
- Now, execute the below command to boot your device to Fastboot mode:
adb reboot bootloader
- Finally, execute the following command to flash the patched boot.img file:
fastboot flash boot magisk_patched.img
- Wait for the process to complete. Once done, you can now reboot your device to the system by executing the command below:
fastboot reboot
- You’re done.
5. Verify Systemless Root on Your Device
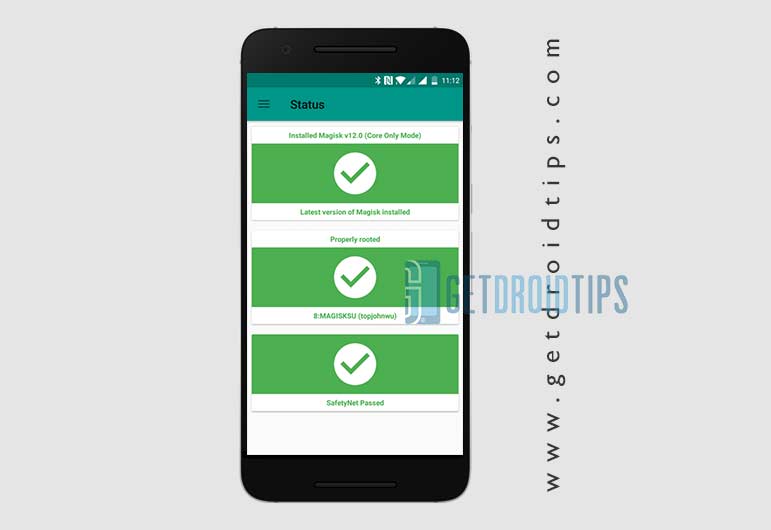
- Open the Magisk Manager app on your Tecno device.
- Now, you’ll see the green status on the screen that’ll indicate that you’ve enabled systemless root access on your device. All the options should be in green ticked.
- So, you’ve successfully rooted your Tecno handset and bypassed Google’s SafetyNet measure too.
- Enjoy!

Conclusion
It’s quite useful for most Android device users to enable root access using Magisk. Due to Android’s customizations, Android lovers or geeks are always eager to do something extraordinary. One of the best parts is that if you don’t like rooting or don’t find it useful in your case, you can always flash the stock firmware to remove the root completely.
That’s it, guys. We assume this guide was helpful to you. For additional queries, let us know in the comment below.
