Halo Infinite is 2021’s one of the first-person shooter video games that has been developed by 343 Industries and published by Xbox Game Studios. It’s the sixth main entry in the Halo series and received quite positive reviews on Steam. However, it seems that plenty of users are reporting High Ping Usage in Halo Infinite while getting into the lobby or flight across several region servers. If you’re also one of the victims, make sure to follow this guide.
The multiplayer early access does have some issues with getting the very high ping which is really unbearable. Sometimes players are receiving the error message “No ping to our data centers detected” which means there are some issues with the server connectivity as well. It eventually leads players unable to join the multiplayer mode. Luckily, we’ve provided a couple of possible workarounds that should gonna help you out.
Also Read
Fix: Halo Infinite FPS Drop, Stutter, and Lagging Issue
How to Fix Halo Infinite Crashing on PC
Fix: Halo Infinite Stuck on loading screen
Best Halo Infinite Mods For PC
Fix: Halo Infinite Unable to Start Dedicated Server Error
Fix: Can’t Purchase Credits in Halo Infinite
FIX: Halo Infinite Controller Not Working on PC
Page Contents
Users are Reporting High Ping Usage in Halo Infinite
So, without wasting any more time, let’s jump into the guide below.
1. Check the Server Status
Make sure to check out the Halo Support Twitter handle to ensure there is no server-side issue appearing to you. If there is an outage with the server or downtime then make sure to wait for a couple of hours and then try again.
2. Test your Internet Connection
You should also check out the internet connection at your end whether it has some issues with the speed or stability. If you’re using Wi-Fi then try switching it to wired (ethernet) connection or vice versa to cross-check the internet issue. If there is no issue with the network connectivity then make sure to follow the next methods one by one until the problem gets fixed completely.
3. Verify Game Files
If in case, you’re facing issues with the corrupted or missing game files then make sure to follow the steps below.
- Open the Steam client > Go to Library.
- Right-click on Halo Infinite from the list of installed games.
- Then click on Properties > Navigate to Local Files.
- Click on Verify Integrity of Game Files > Now, wait for the verification process to be completed.
- Once done, make sure to reboot the PC to apply changes.
4. Update Networking Driver
The chances are also high that your graphics driver is outdated for a while or somehow gets corrupted. So, it’s always better to update the network driver on your Windows computer to ensure there is no issue with the internet connectivity whatsoever.
- Press Windows + X keys to open the Quick Start Menu.
- Now, click on Device Manager from the list > Double-click on Network adapters.
- Right-click on the dedicated graphics card that’s active.
- Click on Update driver > Select Search automatically for drivers.
- If there is an update available, it’ll automatically download & install the latest version.
- Once done, make sure to manually reboot the system to change effects immediately.
Also Read
5. Flush DNS
Sometimes issues with the IP configuration or DNS server can cause several problems on the Windows computer whatsoever. It’s worth mentioning that flushing the DNS server on your PC to fix the issue. To do this:
- Click on the Start menu > Type cmd in the search bar.
- Right-click on Command Prompt from the search result.
- Click on Yes if prompted by UAC and the command prompt window will open.
- Type the following command line and hit Enter to flush the DNS server configuration on your PC:
ipconfig /flushdns
- This method will successfully flush the DNS Resolver Cache on your computer.
- Reboot the PC and try connecting to the Halo Infinite game server again.
6. Use Google DNS Server
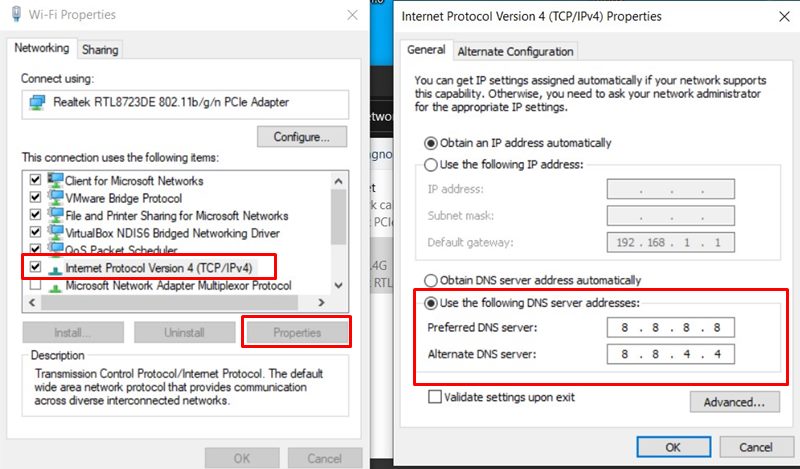
It seems that there is some issue with your DNS server that has been provided by your ISP. Try changing it to the public DNS (Google DNS) to get it fixed.
- Press the Windows + R keys to open up the Run dialog box.
- Type ncpa.cpl and click on OK to open the Network Connections page.
- Now, right-click on your active network adapter > Click on Properties.
- Select Internet Protocol Version 4 (TCP/IPv4) > Click on Properties.

- Click to select Use the following DNS server addresses.
- Now, enter 8.8.8.8 for the Preferred DNS server and 8.8.4.4 for the Alternate DNS server.
- Once done, click on OK to save changes.
- Make sure to restart your computer to apply changes and then check for the High PING issue in Halo Infinite.
Also Read
7. Use VPN service
If none of the methods worked for you, try using a VPN service on your PC to play the Halo Infinite game. Sometimes connecting to the game from a different region server can fix the ping-related issues whatsoever.
That’s it, guys. We assume this guide was helpful to you. For further queries, you can comment below.
