Virus and threat protection is one of the most important aspects of a Windows operating system. It not only helps in keeping your system secure from viruses but is also helpful in downloading the latest security updates rolled out by Microsoft. Considering its importance, have you ever wondered what will happen if this particular section becomes inaccessible? The answer is quite simple; you won’t be able to keep your system secure from intruders. Unfortunately, many users have reported Virus and threat protection are not working on Windows 11 problems. So, is there any way to fix this problem?
Thankfully, there is, and this post is all about that. Here we will see a bunch of effective fixes to resolve the problem. So, without any further ADO, let’s get started.
Also Read
Quarantine, Delete, or Clean: Which Option is Best to Remove Virus?
Fix: USB Detected But Not Accessible Issue in Windows 11, 10
Fix Windows 11 Random Shutdown Issue
Fix: Windows 11 Clipboard History Not Working
Fix: Miracast Not Working on Windows 11 and 10
How To Fix External Hard Drive I/O Device Error in Windows 11/10
Fix: Windows 11 Taskbar Not Hiding in Full Screen
How to Fix If Alt+Tab Shortcut Not Working on Windows 11
TranslucentTB Windows 11 Not Working, How to Fix?
Fix: Mouse Scroll Wheel Jumps Up and Down on Windows 10, 11
Page Contents
- Reason Behind Virus and Threat Protection Not Working on Windows 11
- How to Fix Virus and Threat Protection Not Working On Windows 11?
- Fix 1: Restart Your PC
- Fix 2: Download the Latest Windows Update
- Fix 3: Remove Any Third-party Antivirus Program
- Fix 4: Enable Real-time Protection
- Fix 5: Repair App
- Fix 6: Adjust Date and Time
- Fix 7: Perform SFC Scan
- Fix 8: Restart Security Center
- Fix 9: Change Registry Settings
- Fix 10: Enable Windows Defender Manually
- Final Words
Reason Behind Virus and Threat Protection Not Working on Windows 11
Before getting into the fixes, it’s important to know the reasons causing the problem. So, the next time any such problem occurs, you will already know which place to look out for. Nevertheless, below mentioned are some of the core reasons causing the problem.
- Corrupted registry, or system files
- Outdated Windows 11 version.
- Third-party protection application.
- Infected system.
Now that you are aware of the different culprits causing the problem, let’s check out different workarounds to get over it.
Also Read
How to Fix Virus and Threat Protection Not Working On Windows 11?
Here are different workarounds you can try to fix virus and threat protection not working on Windows 11.
Fix 1: Restart Your PC
Let’s begin with a very basic workaround, i.e. restarting your PC. The chances are very high that the problem you are currently facing is a temporary bug, and you are just a restart from fixing it. So, restart your PC, and check whether the problem is fixed or not.
Fix 2: Download the Latest Windows Update
The next workaround you can try this to download the latest windows version for the PC. It might be the case that the developers are already aware of the problem, and they have fixed it in the latest Windows 11 update. So, make sure you have the latest Windows 11 version installed on your PC.
Here are the steps you need to follow to download the latest Windows 11 version.
- Press the Windows + I shortcut key to open the settings menu on your Windows 11 PC.
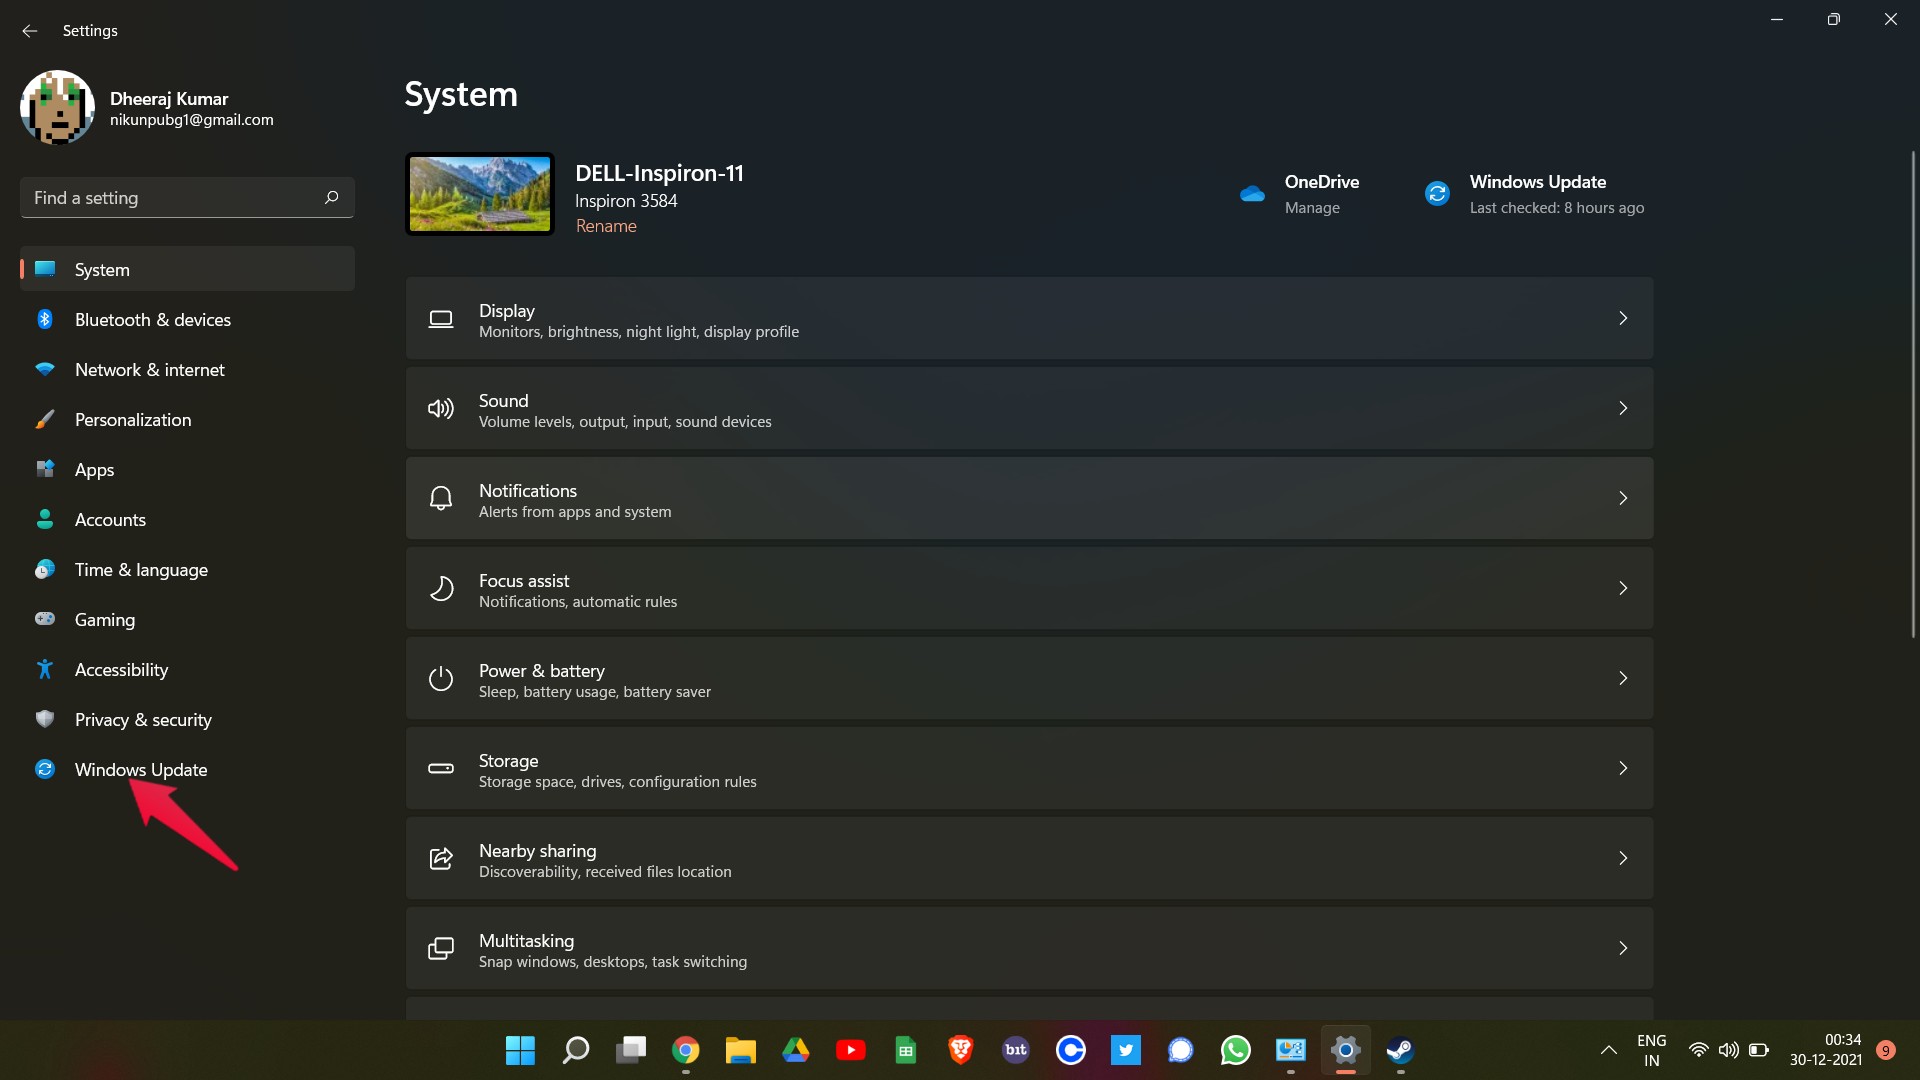
- Click on the “Windows Update” option present at the left panel of the screen.
- Press the “Check for updates” to see if there is any available update or not.
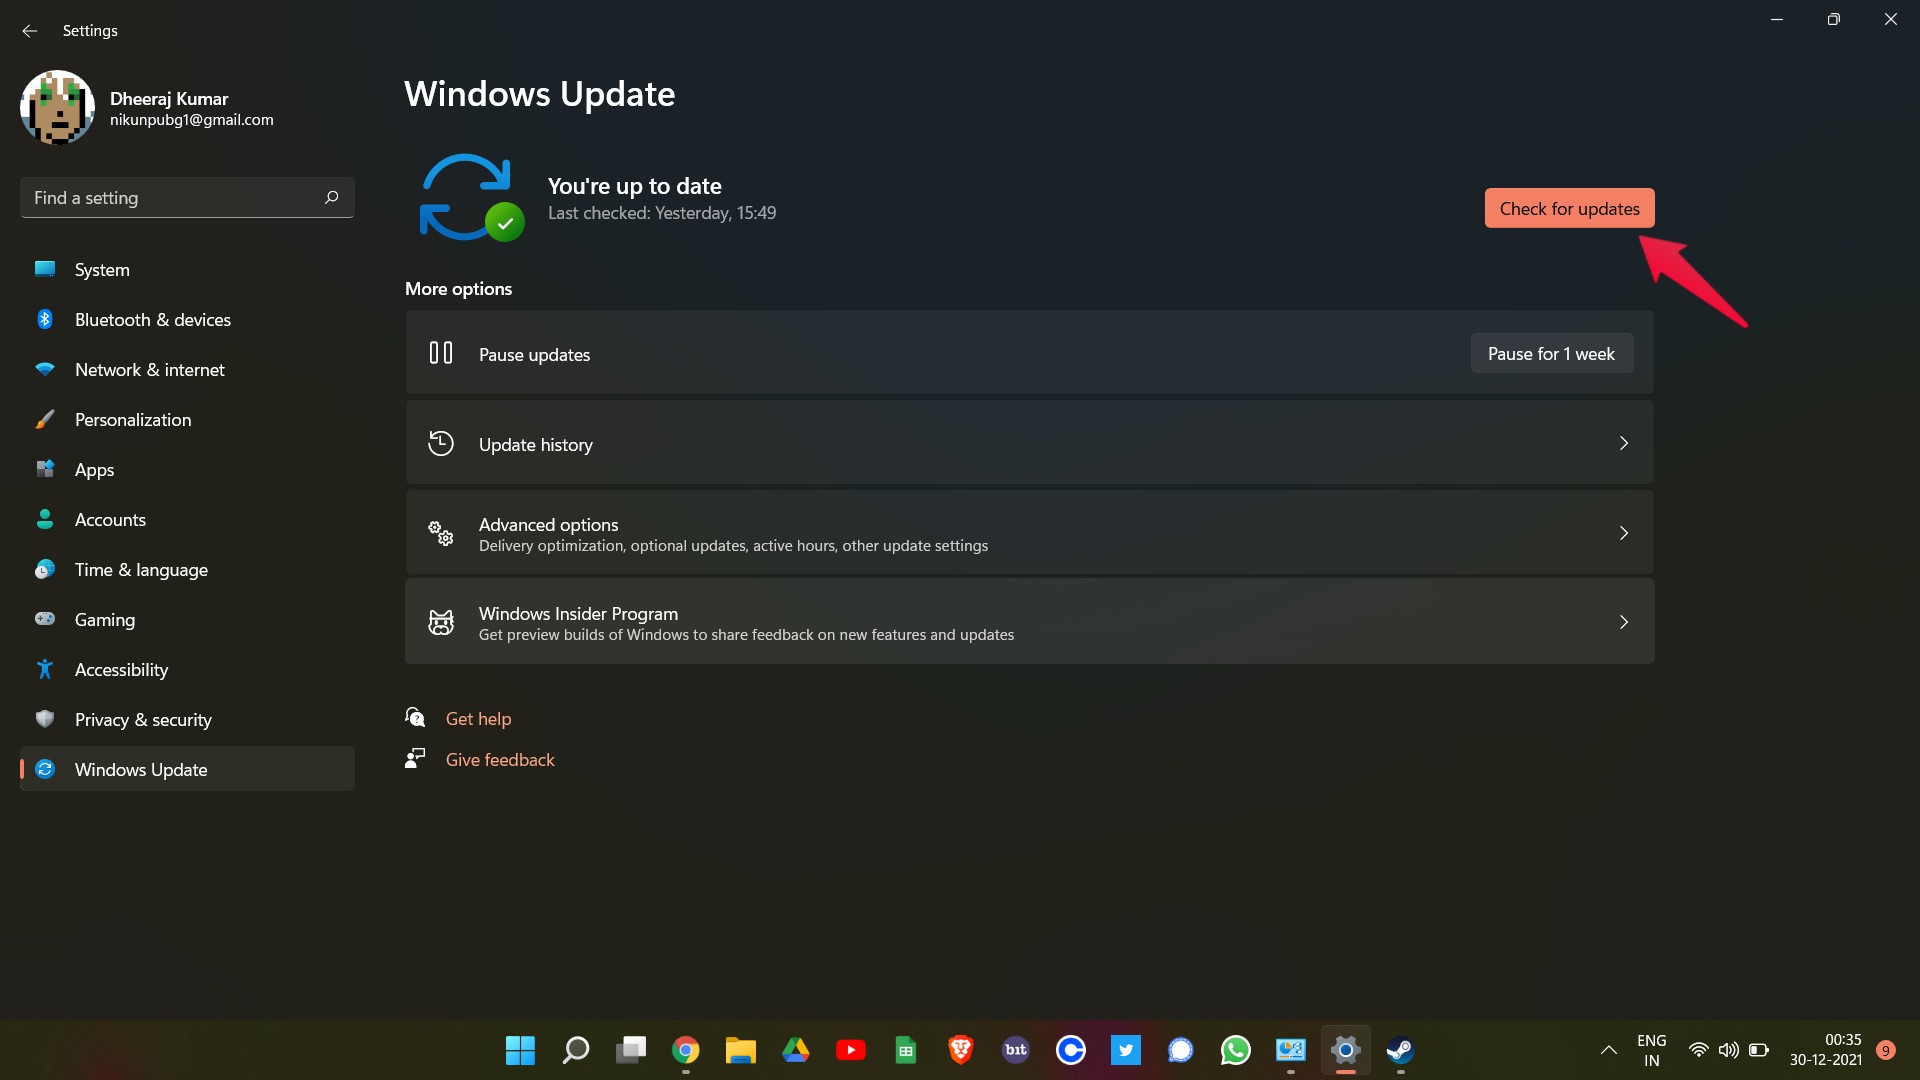
Windows with automatically start downloading the update. Once done, restart your PC and check whether the virus and threat protection not working on Windows 11 problem.
Fix 3: Remove Any Third-party Antivirus Program
As mentioned in the reasons, a third-party anti-virus program can act as a barrier for virus and threat protection. Furthermore, in Windows 11, you don’t even need a dedicated anti-virus program. Virus and threat protection is enough to keep your system secure. So, to fix the problem, uninstall the third-party antivirus program. Here are the steps you need to follow to do so.
- Visit Control Panel on Windows 11 PC.
- Click on “Uninstall a program”.
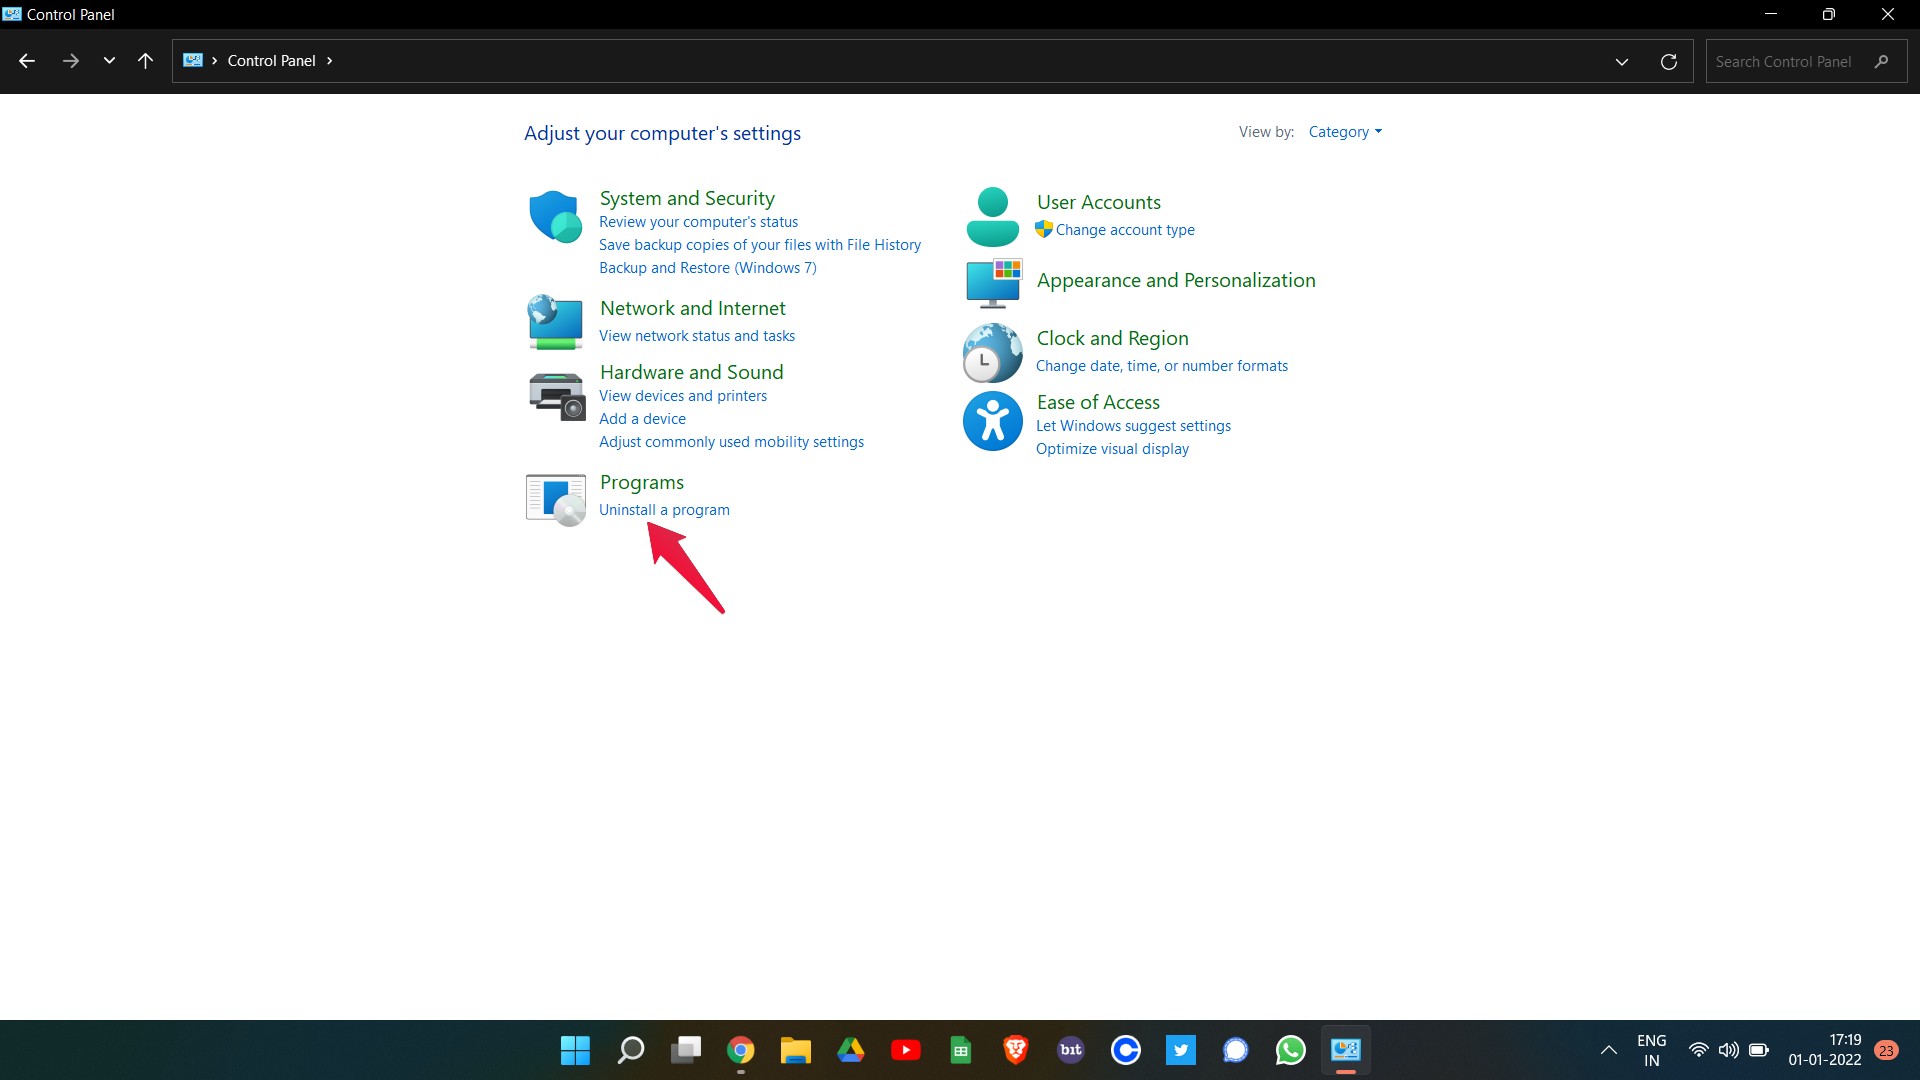
- Here you will find a list of all the applications installed on your system.
- Right-click on the third-party antivirus program that you have installed and then select “Uninstall”.
That’s it. Restart your PC and check if the problem is solved or not.
Fix 4: Enable Real-time Protection
Enabling real-time protection and uninstalling any third-party antivirus program, these two fixes are related to each other up to many extents. If you have disabled the real-time protection, then also you can face virus and threat protection not working on Windows 11 problems. This option can also be disabled by Windows itself, in case if you have any third-party antivirus program installed on your system.
Nevertheless, here are the first steps you need to follow to enable real-time protection on Windows 11.
- Press the Windows key to launch the Start menu.
- In the search bar, type Windows Security and press enter.
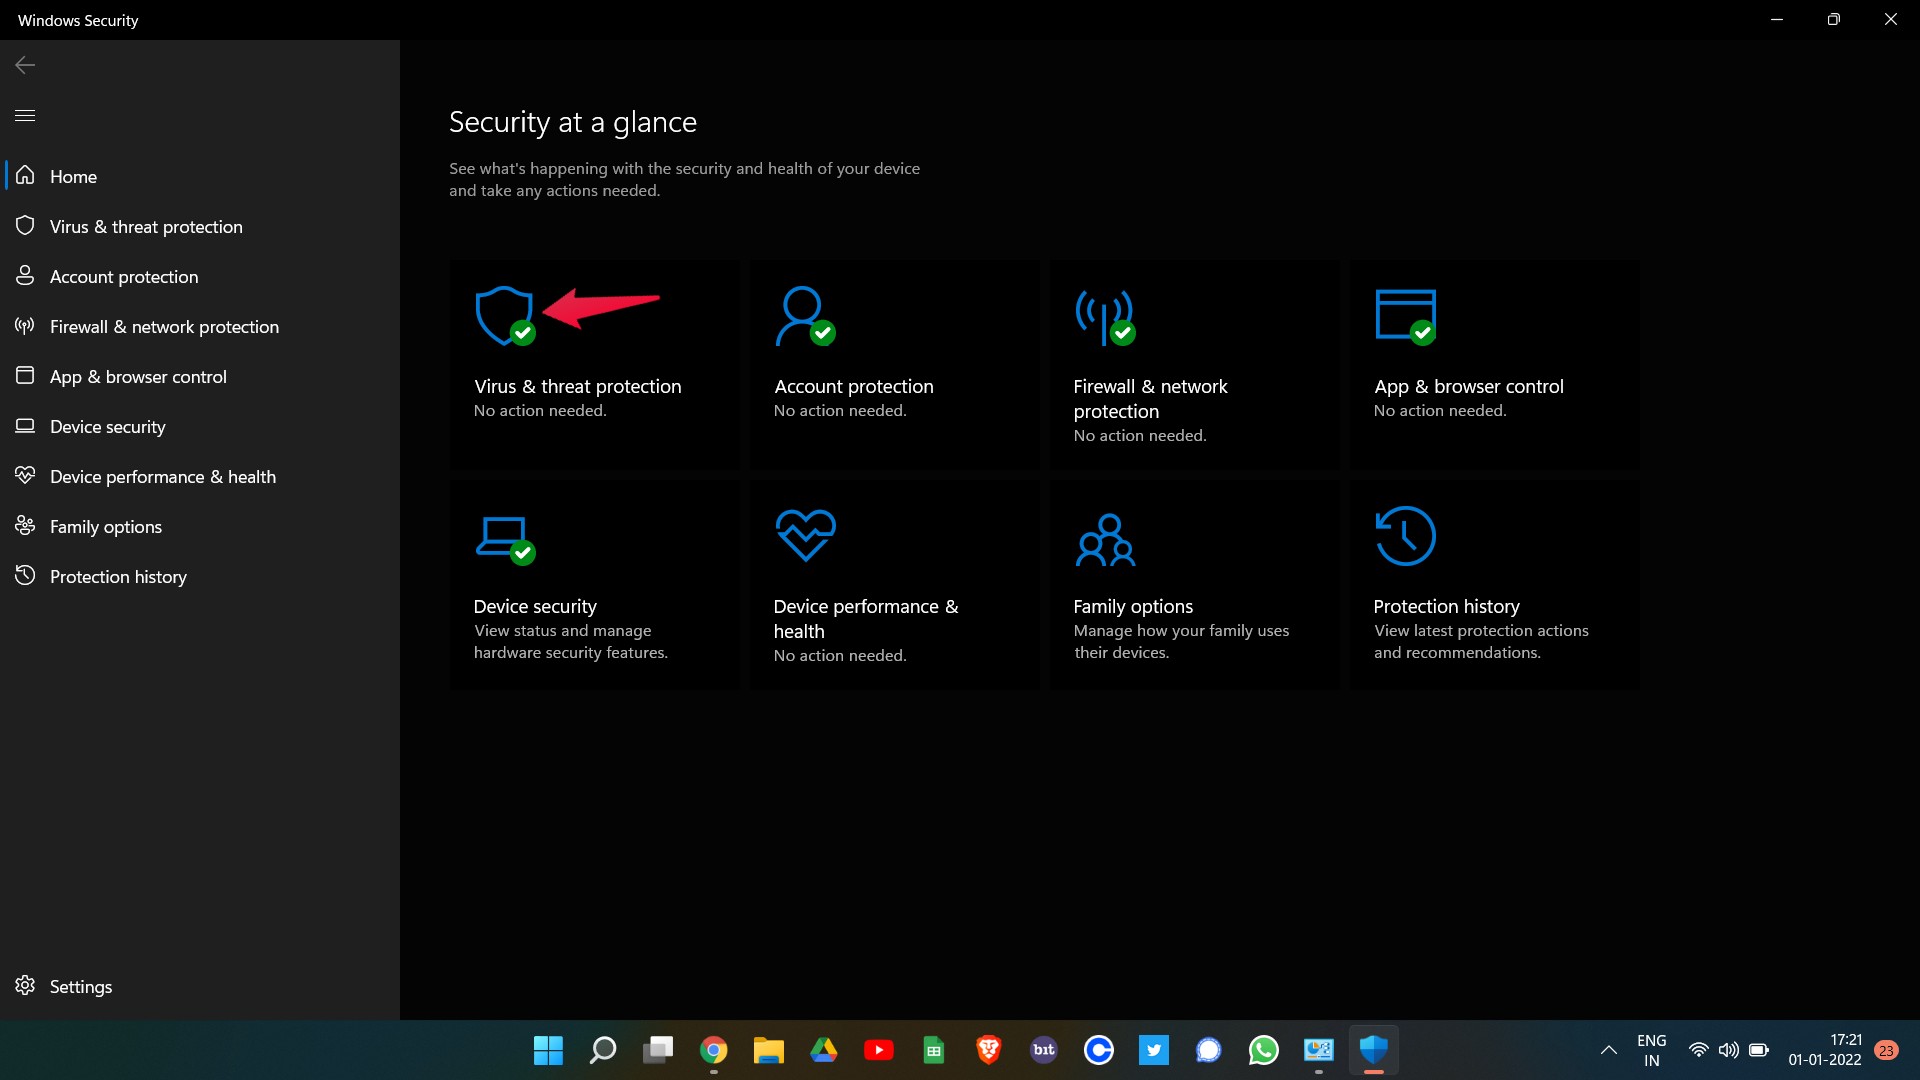
- Click on the “Virus and threat protection” option.
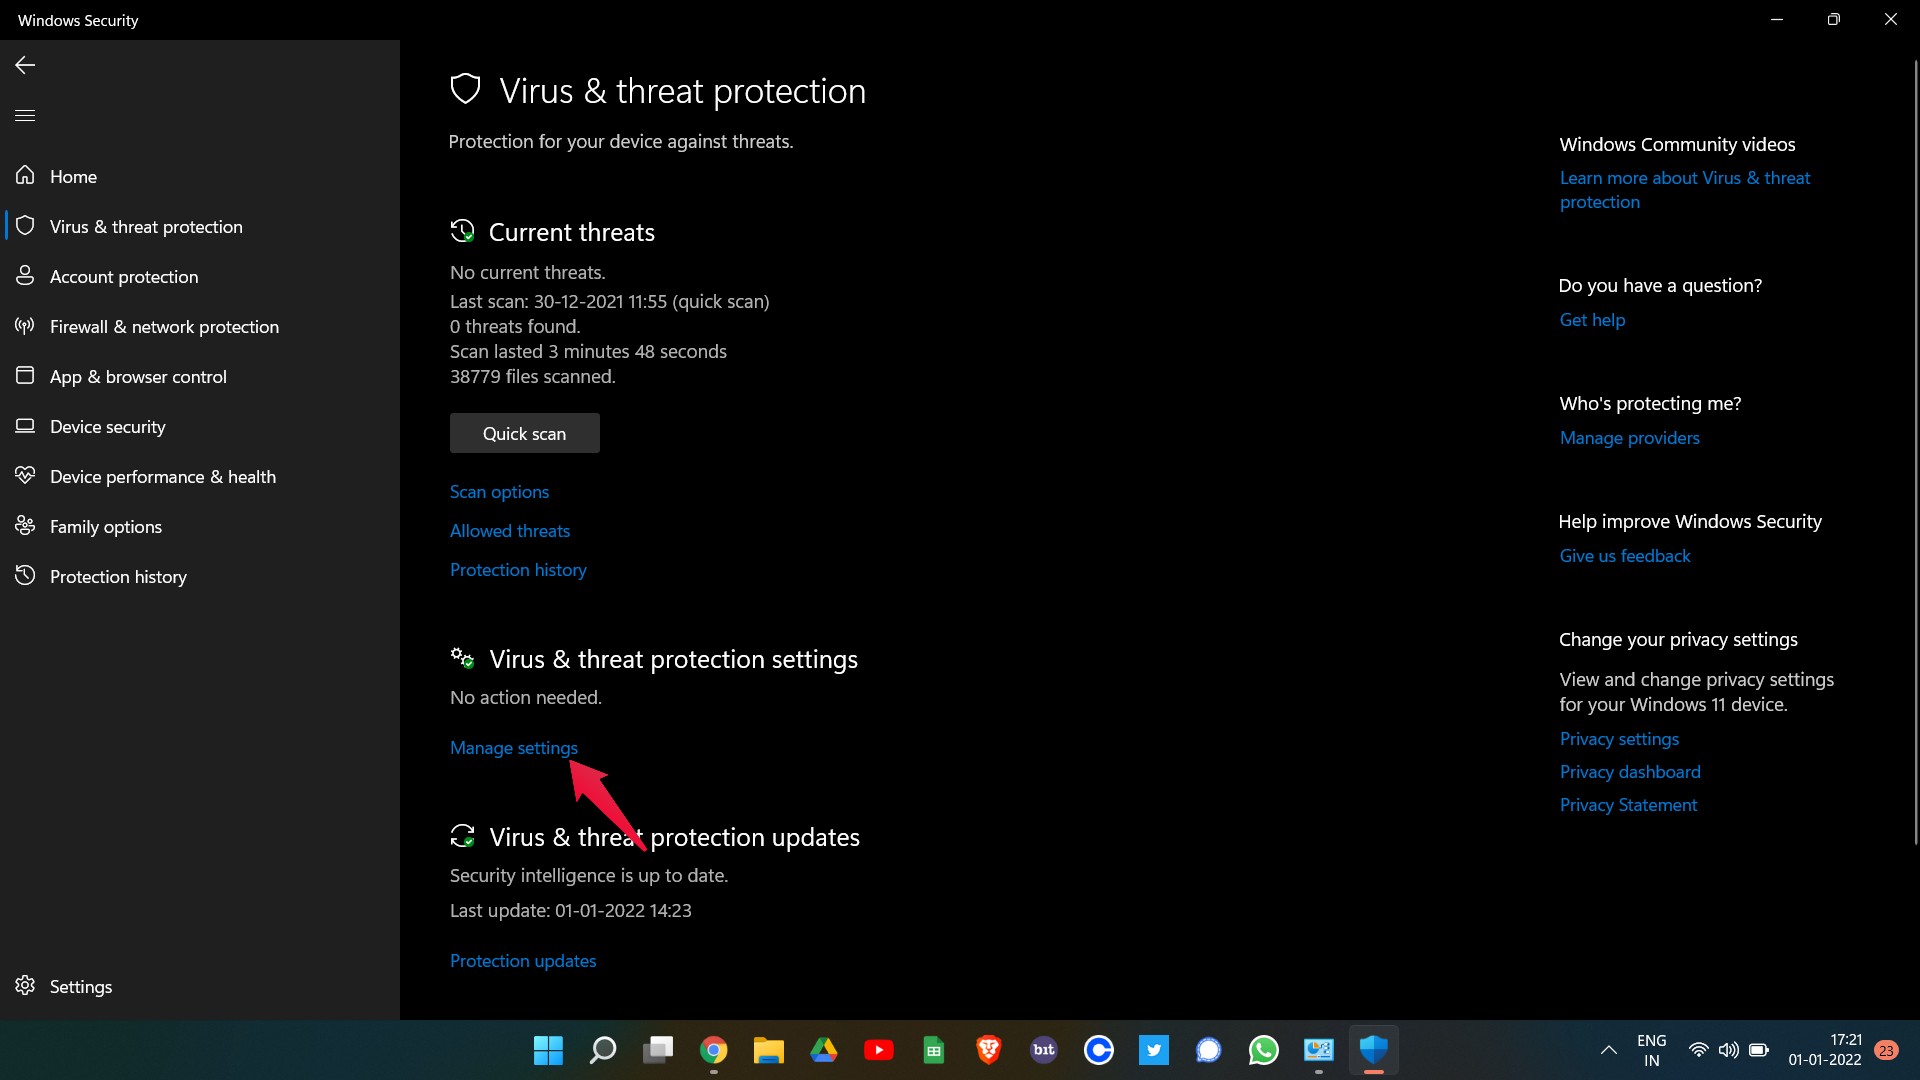
- Now, select the “Manage Settings” option present under your Virus and threat protection settings.
- The virus and threat protection settings for Microsoft defender antivirus will pop up. Here, make sure the Real-time protection option is turned on.
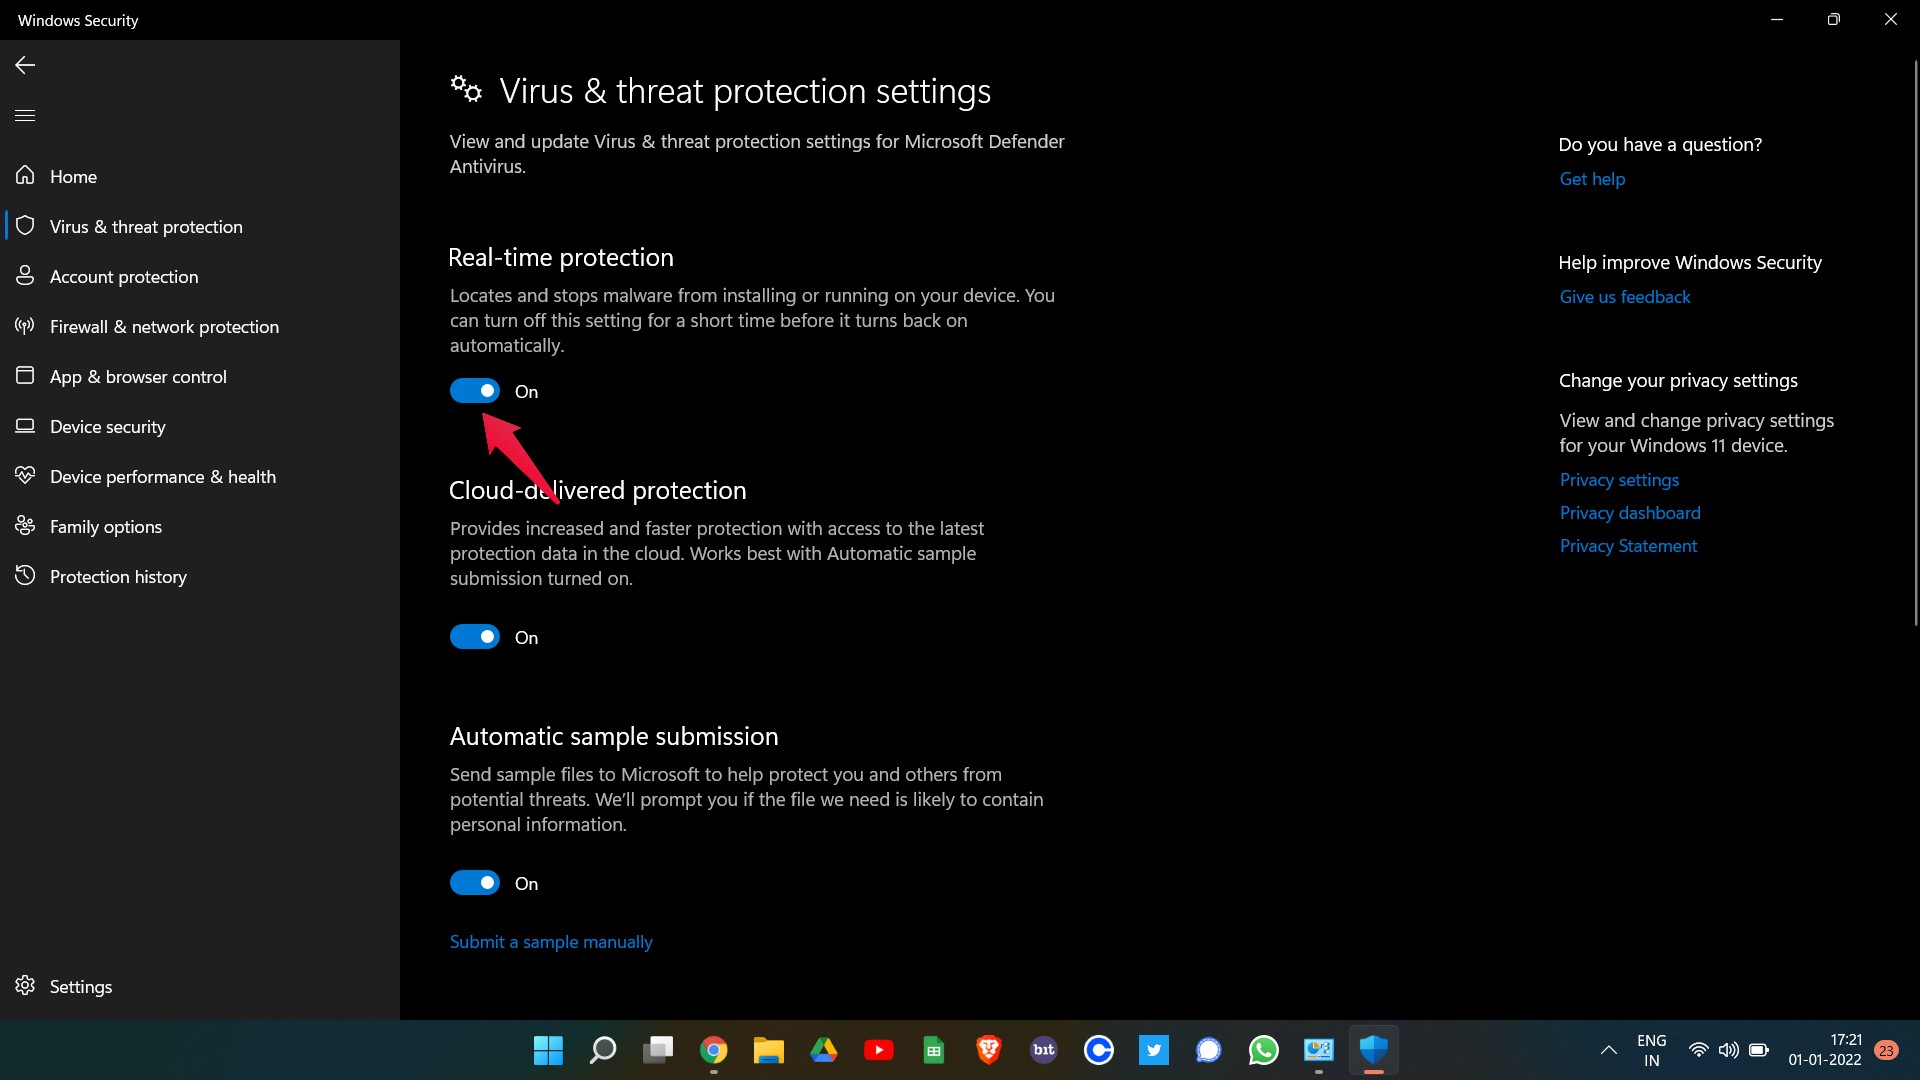
If the option is disabled, turn it on to fix the problem you are currently facing on your Windows 11 PC.
Fix 5: Repair App
Repairing the Windows Security app is another effective workaround you can try to get over the problem currently facing. So, here are the steps to follow to repair the Windows Security app on Windows 11.
- Go to the Settings menu Windows 11.
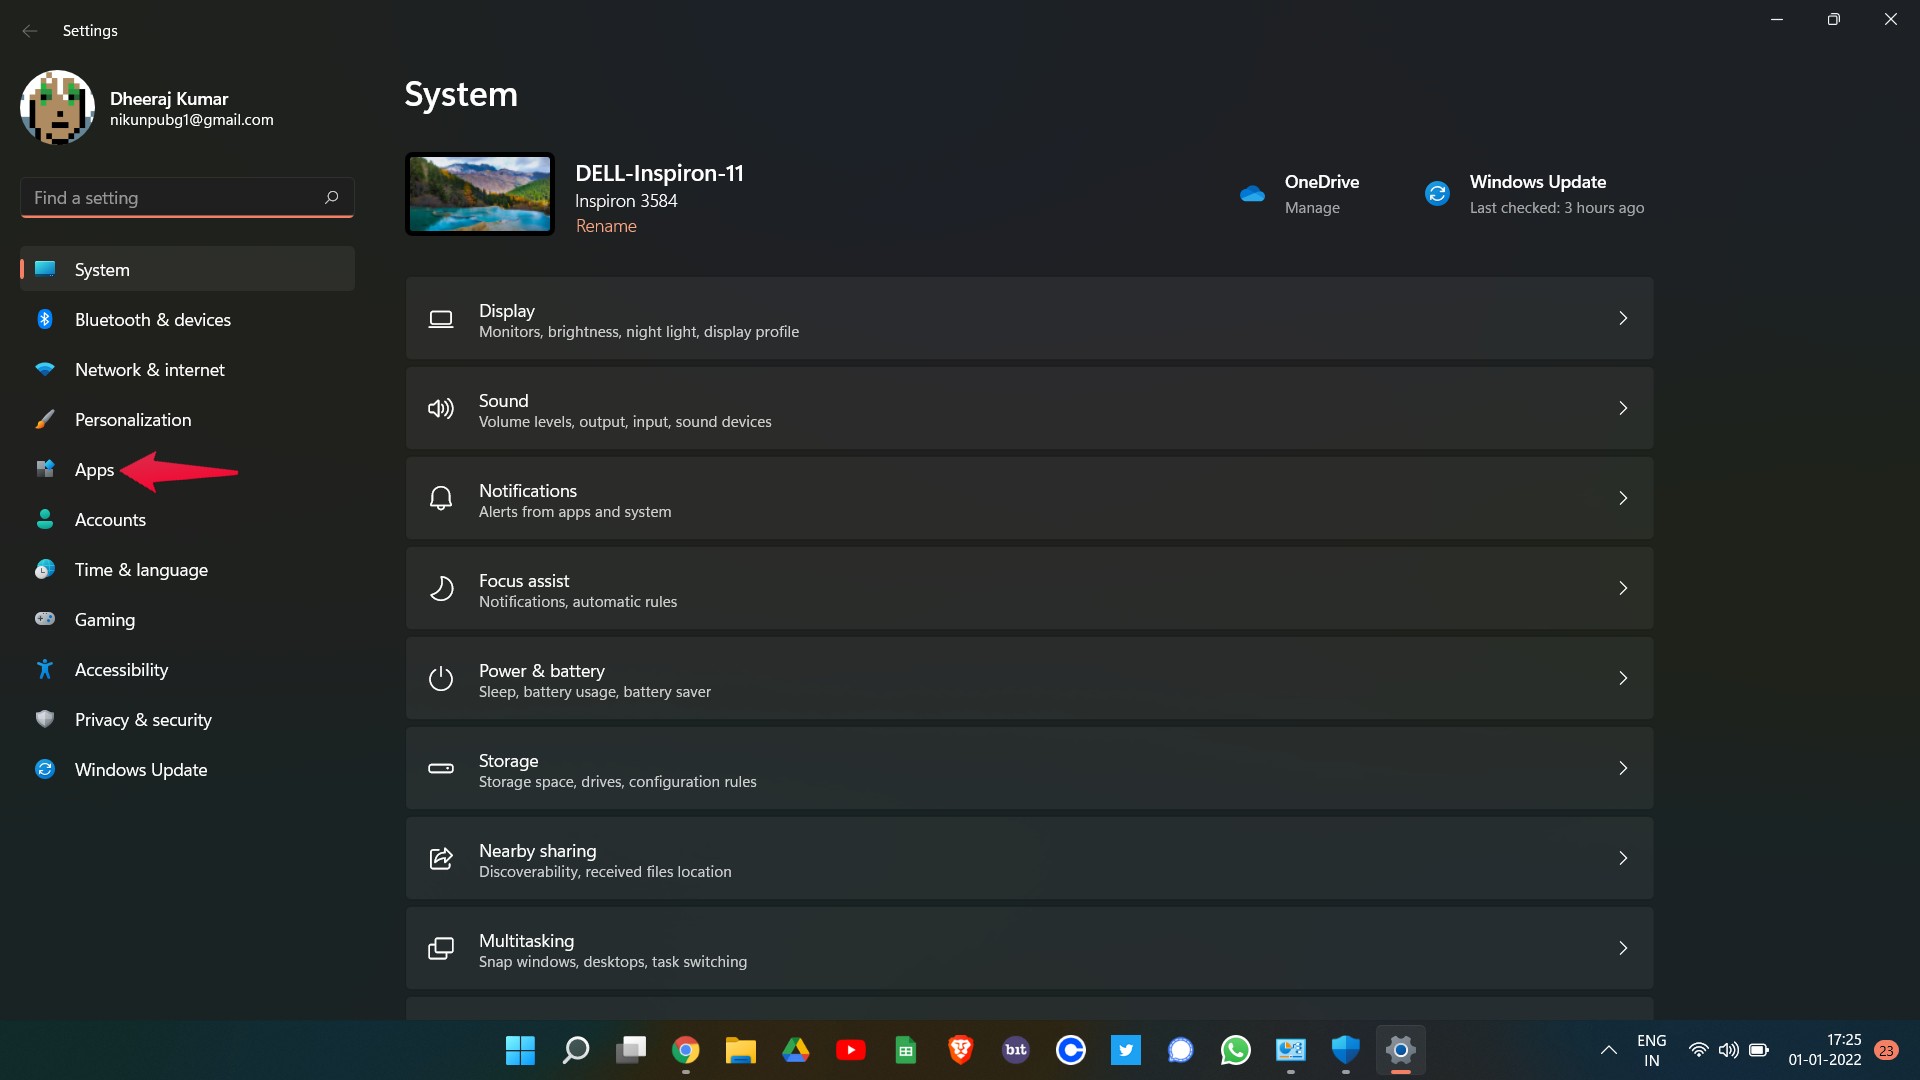
- Click on the “Apps” option present in the left panel of the screen.
- In the Apps window, choose Apps and Features.
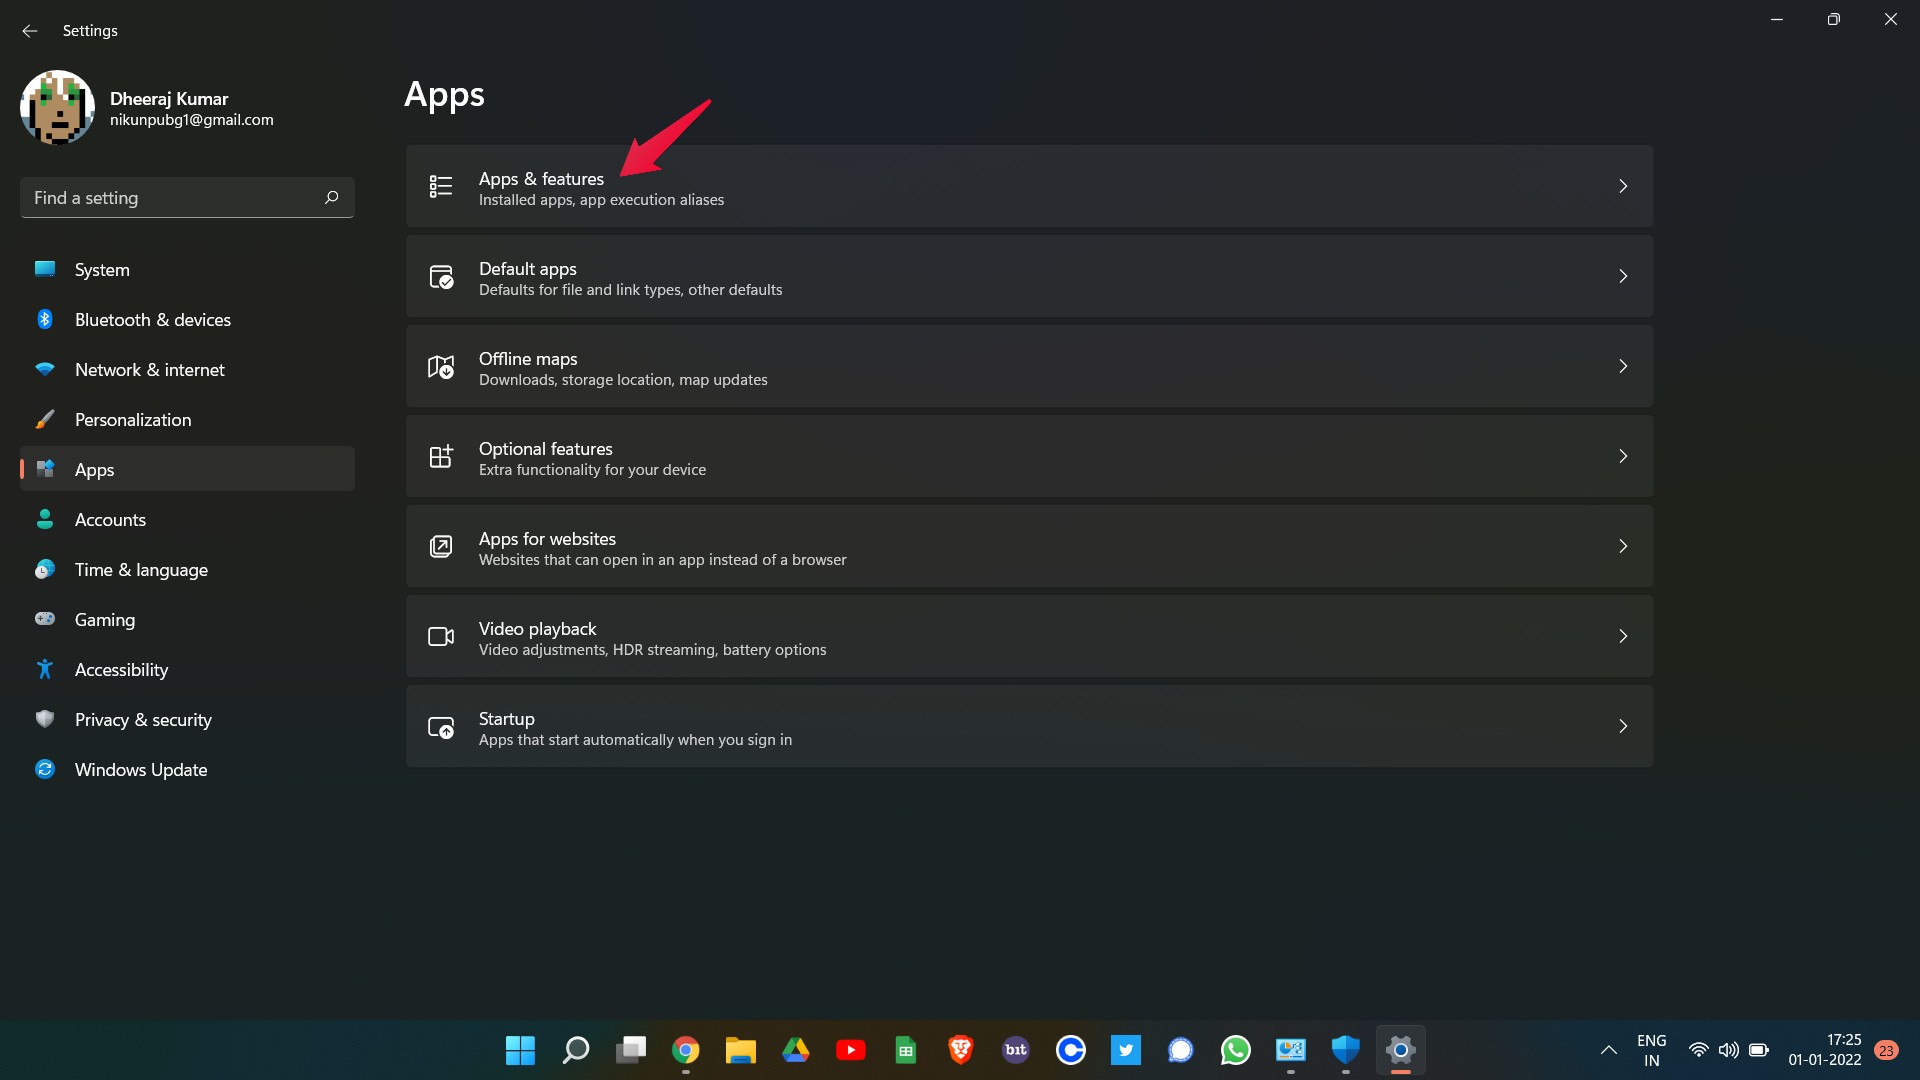
- This section contains all the applications available on your device.
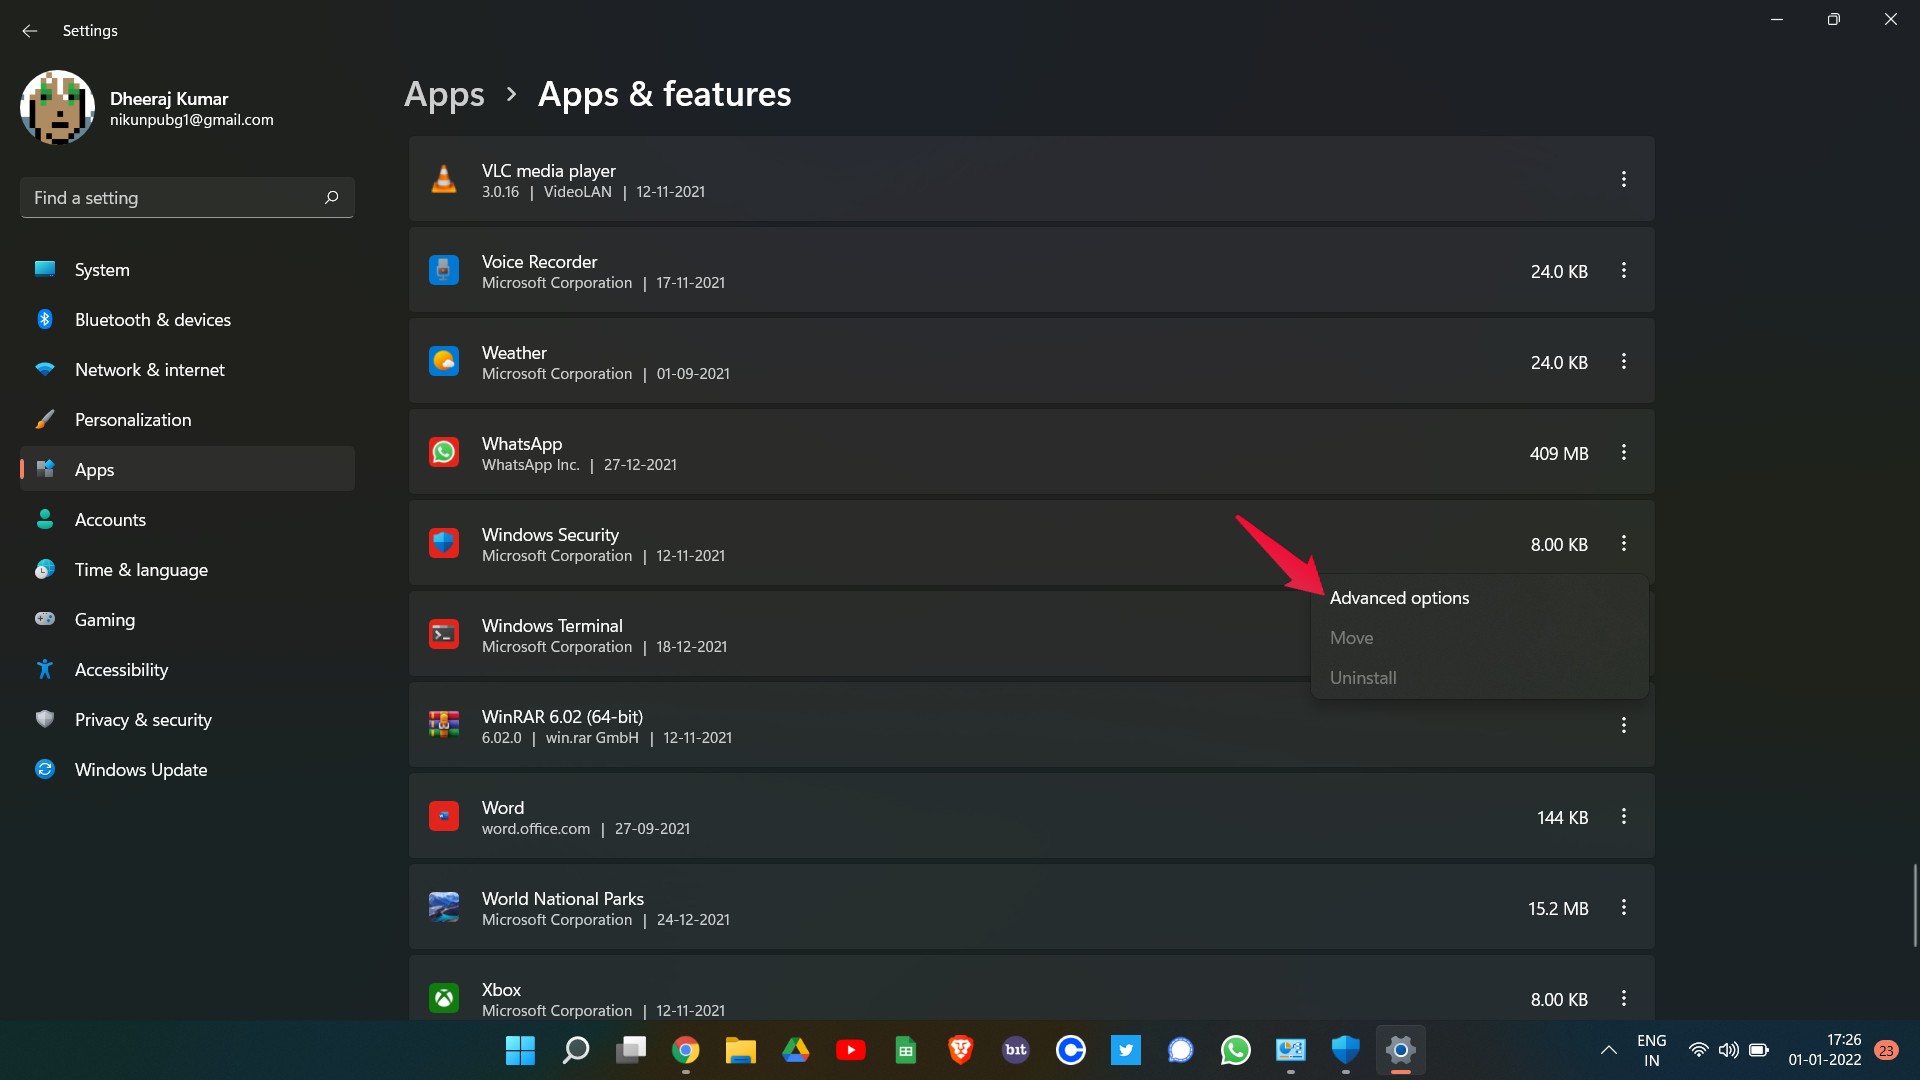
- Navigate to the Windows Security app.
- Tap on the three dots present next to the option, and select Advanced options.
- In the Advanced options window, scroll down and tap on the repair option.
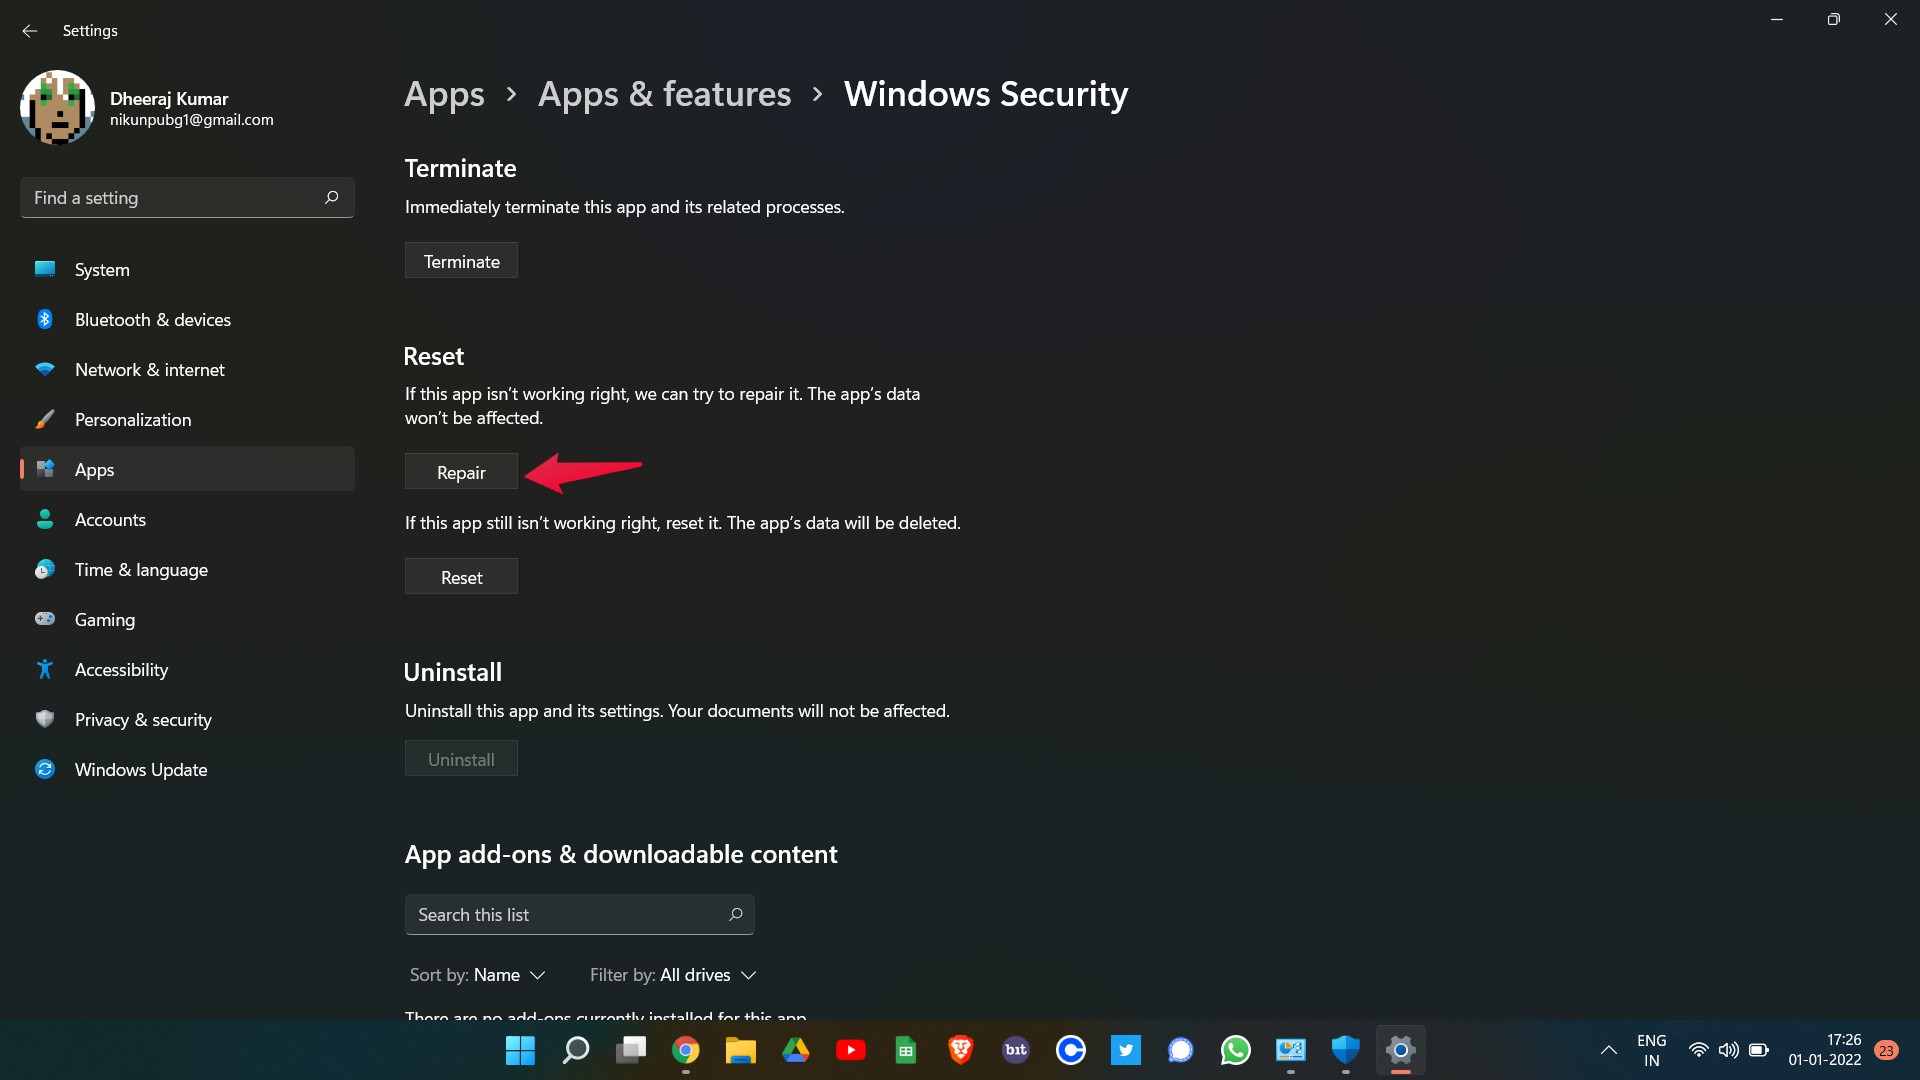
Now, wait for a few minutes until the repair process is completed. Once done, restart your PC and check for the problem. You can use the repair method on any app that is displaying some kind of error on launch during its functioning.
Fix 6: Adjust Date and Time
It might sound surprising, but if your system doesn’t have the correct date and time then many applications will start to malfunction including Virus and threat protection. So, make sure your system has the correct date and time. Here are the steps you need to follow to adjust it.
- In the Windows 11 settings menu, select the Time and language option present at the left panel of the screen.
- Select “Date and Time”.
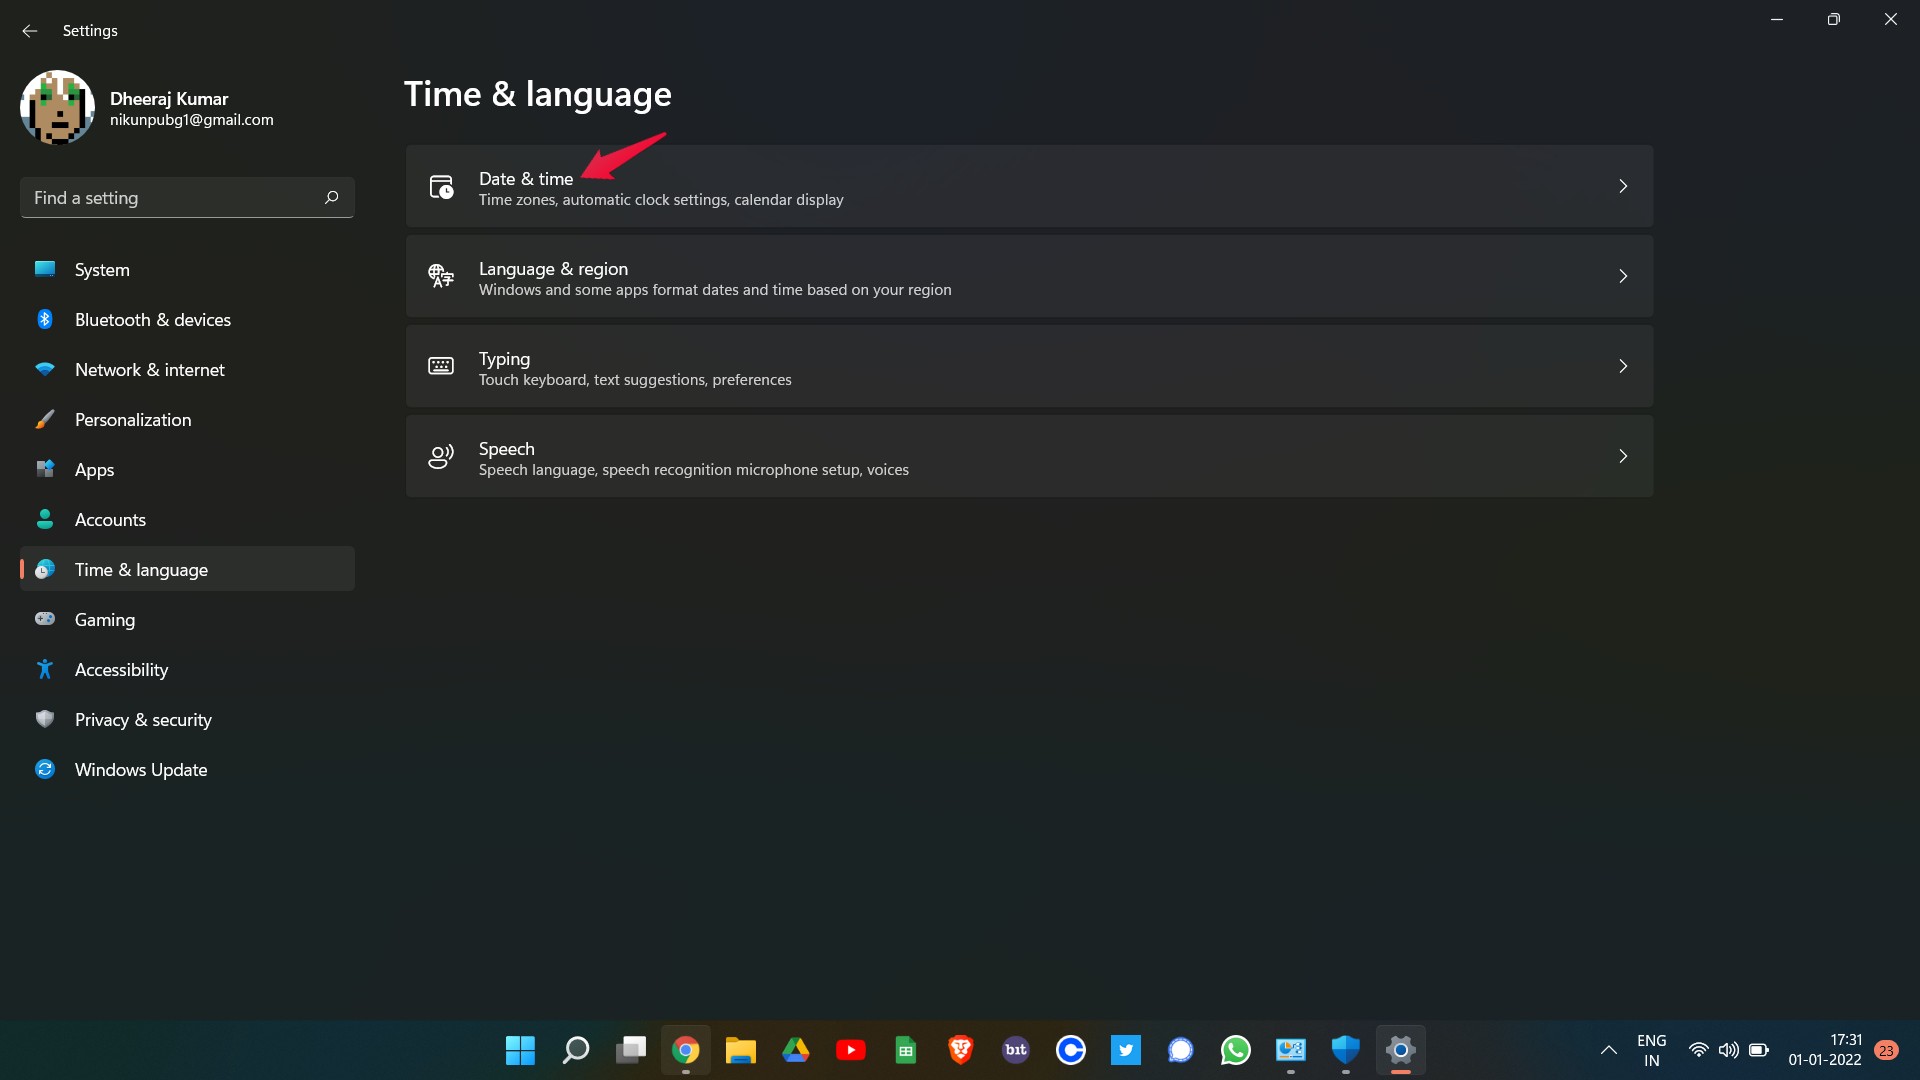
- In the new window that pops up, make sure you have the “Set time automatically” option is disabled.
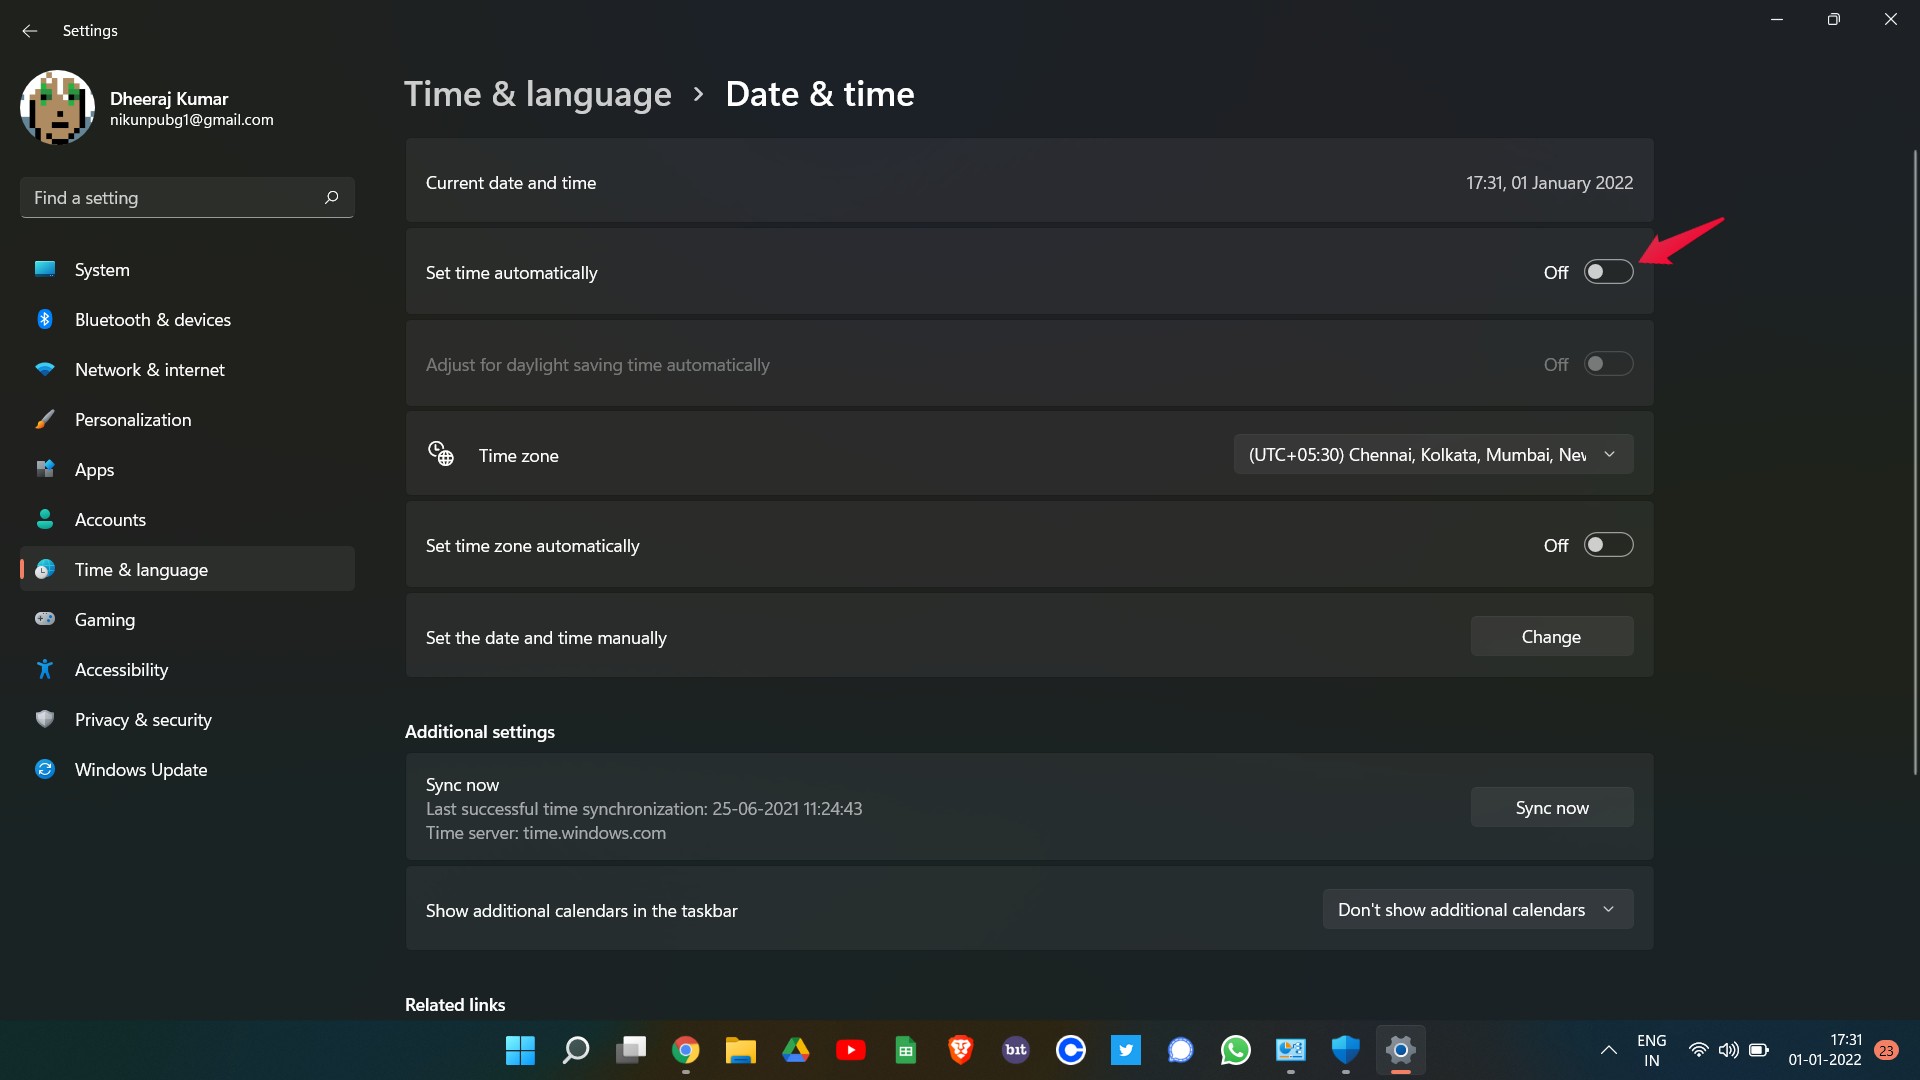
- Now on the same window, click on the “Change” option present next to “Set the time and date manually”.
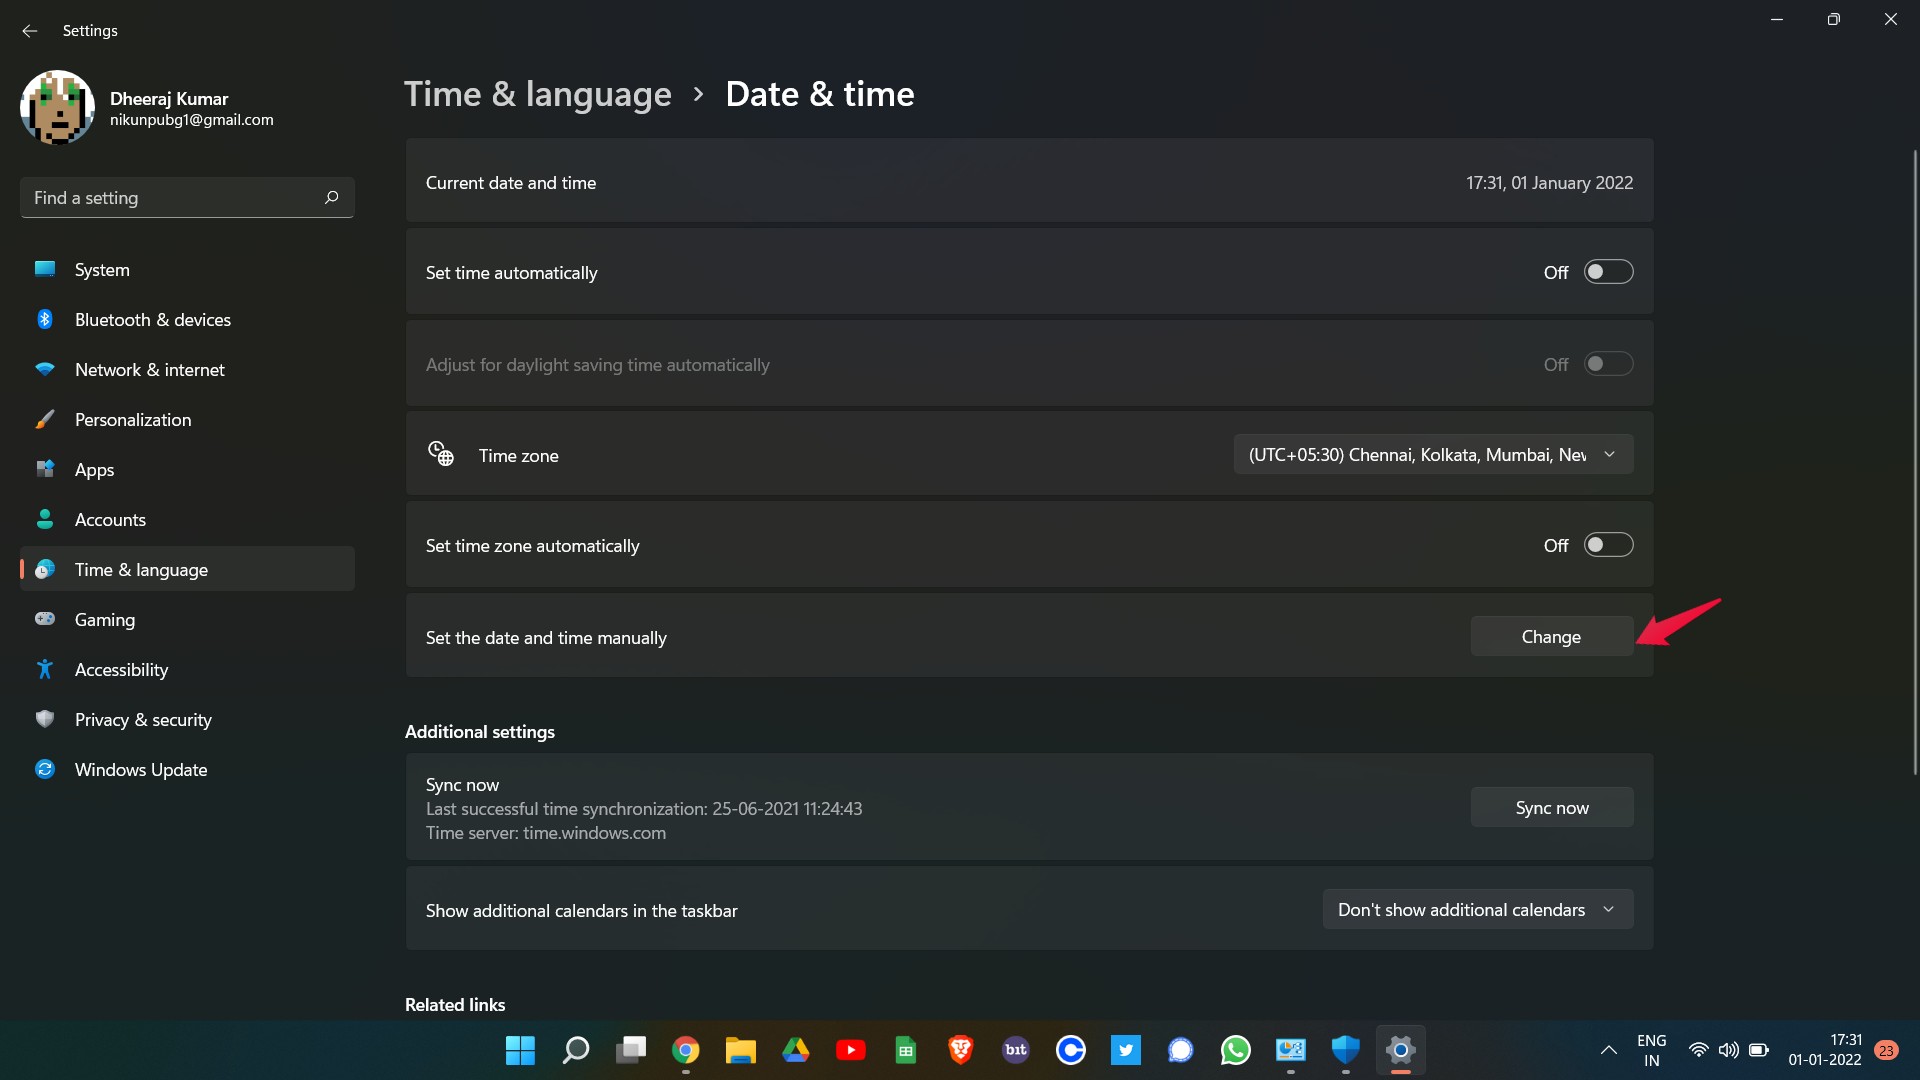
Enter the date and time according to your time zone and click on change. Once done, check if the problem you were facing is fixed or not.
Fix 7: Perform SFC Scan
System file checker or popularly known as SFC Scan is one of the best ways to fix any problem that revolves around a Windows operating system. So, here are the steps you need to follow to turn an SFC scan on Windows 11.
- Open Command Prompt in the administrator mode.
- Now type the code “SFC /scannow” in the space provided in press enter.
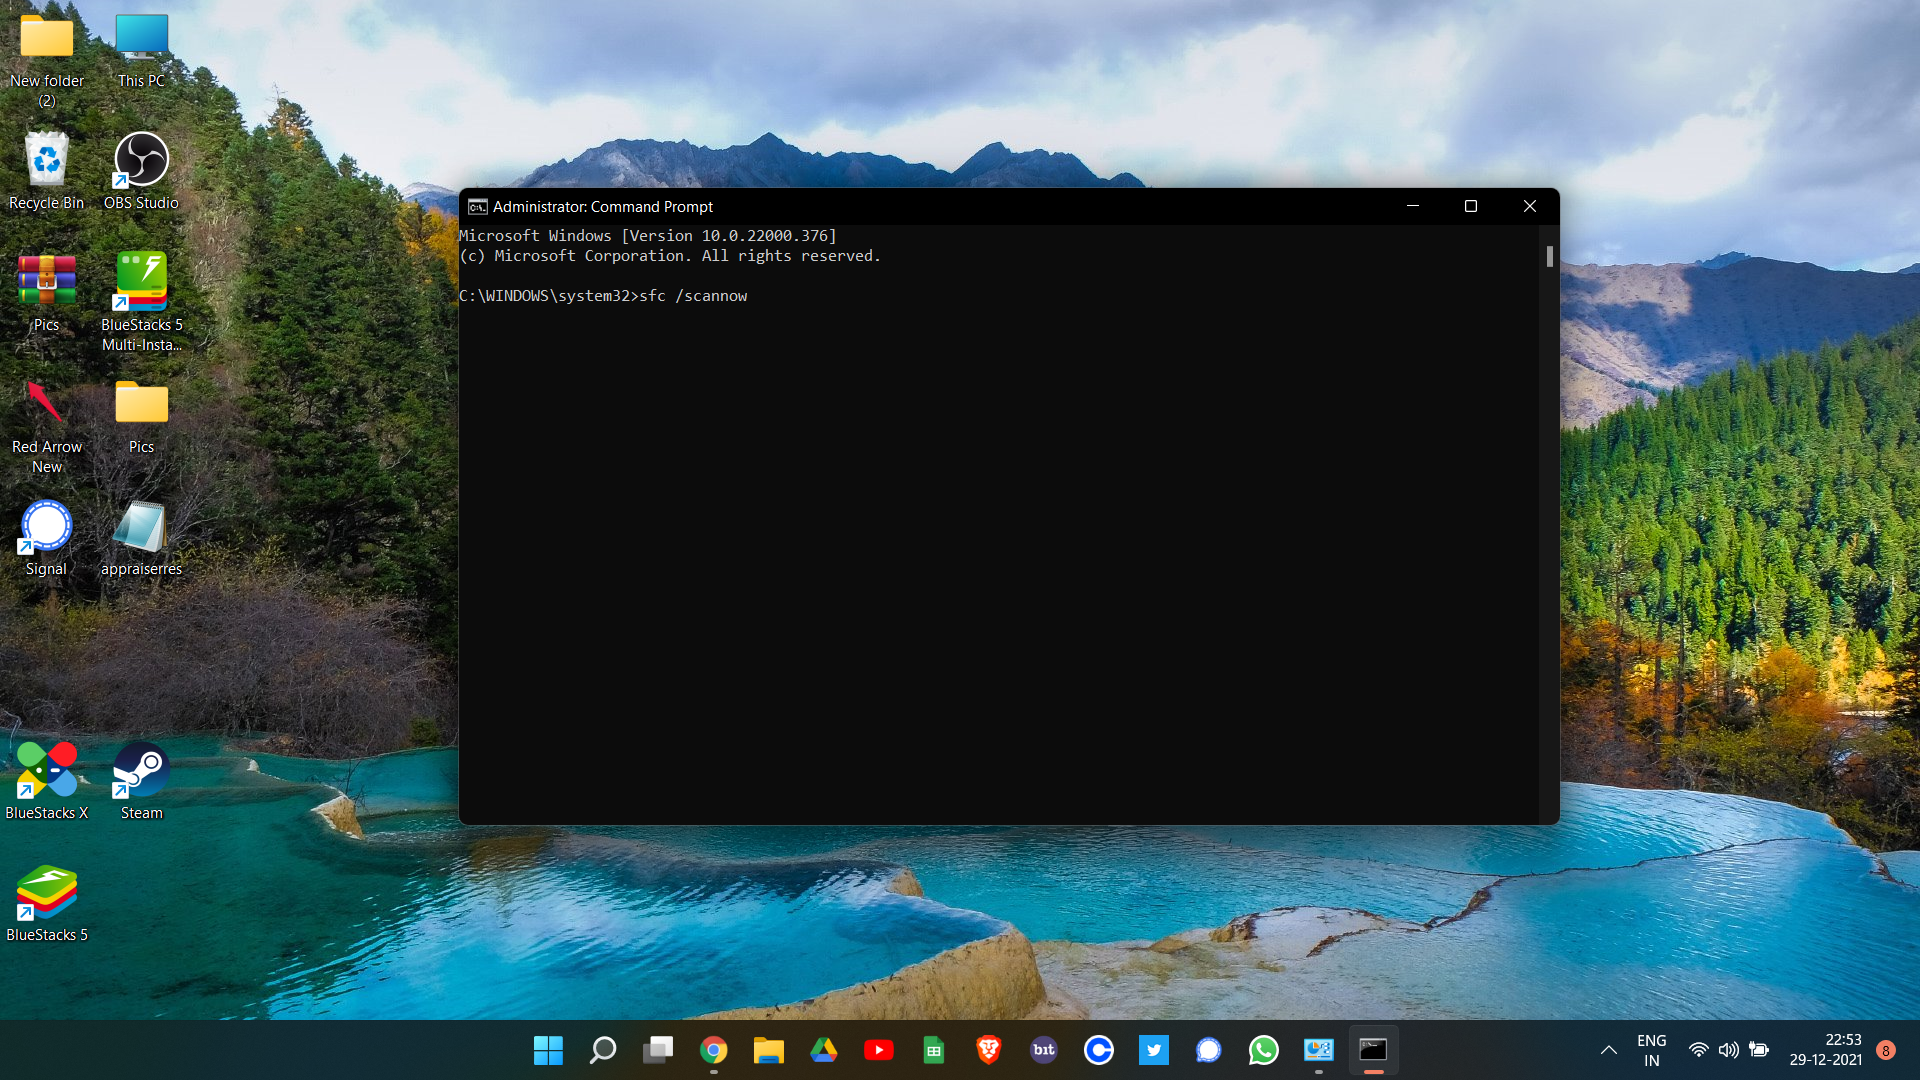
The system will take a few minutes to run the SFC scan. It was looking for any corrupted system files on your PC. And if found, it will replace it with its respective cached copy available on the device memory.
Fix 8: Restart Security Center
Restarting the security center is quite similar to restarting the complete system, but with a catch. Here, you will only restart the Security Center of Windows 11 instead of the entire system. So, here are the steps you need to follow to restart the security center on Windows 11.
- Open the Run dialogue box by pressing Windows + R shortcut key.
- In the search bar, type “services. msc” and press enter. This command will lead you to the Services window.
- From all the services available on your system, look for “Security Center”.
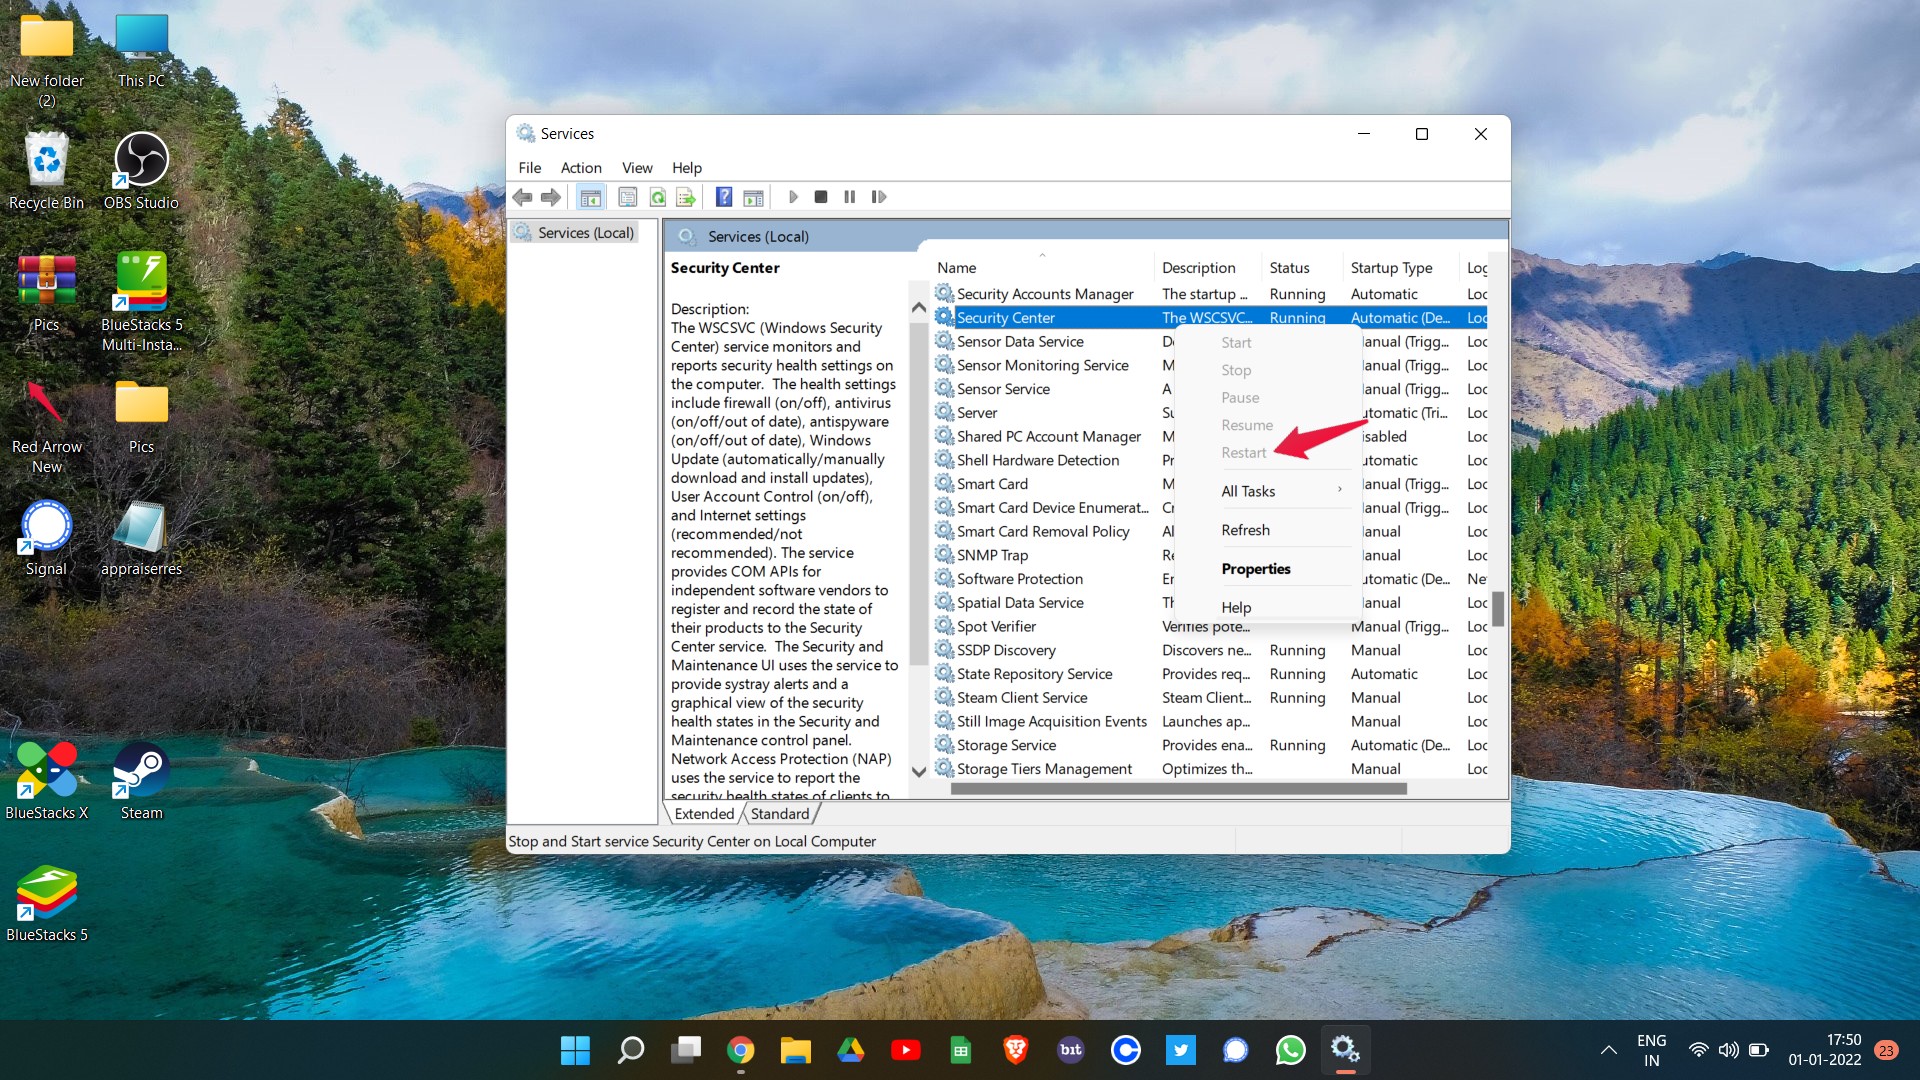
- Once found, right-click on it and select restart.
Now, restart your system, and check whether the virus and threat protection not working on Windows 11 problem is solved or not. If yes, you are good to go. However, if the problem continues, move on to the next workaround.
Fix 9: Change Registry Settings
Changing registry settings can be an effective way to get rid of the problem that is troubling you. So, here are the steps you need to follow to get the work done.
- Open the Run dialogue box, and in the search bar type “regedit” and press enter.
- The Registry Editor window will pop up.
- Head towards the “Image File Execution Options”. For your convenience, here’s the direct path to it. Just paste it in the path section and press enter.
HKEY_LOCAL_MACHINE\Software\Microsoft\Windows NT\CurrentVersion\Image File Execution Options
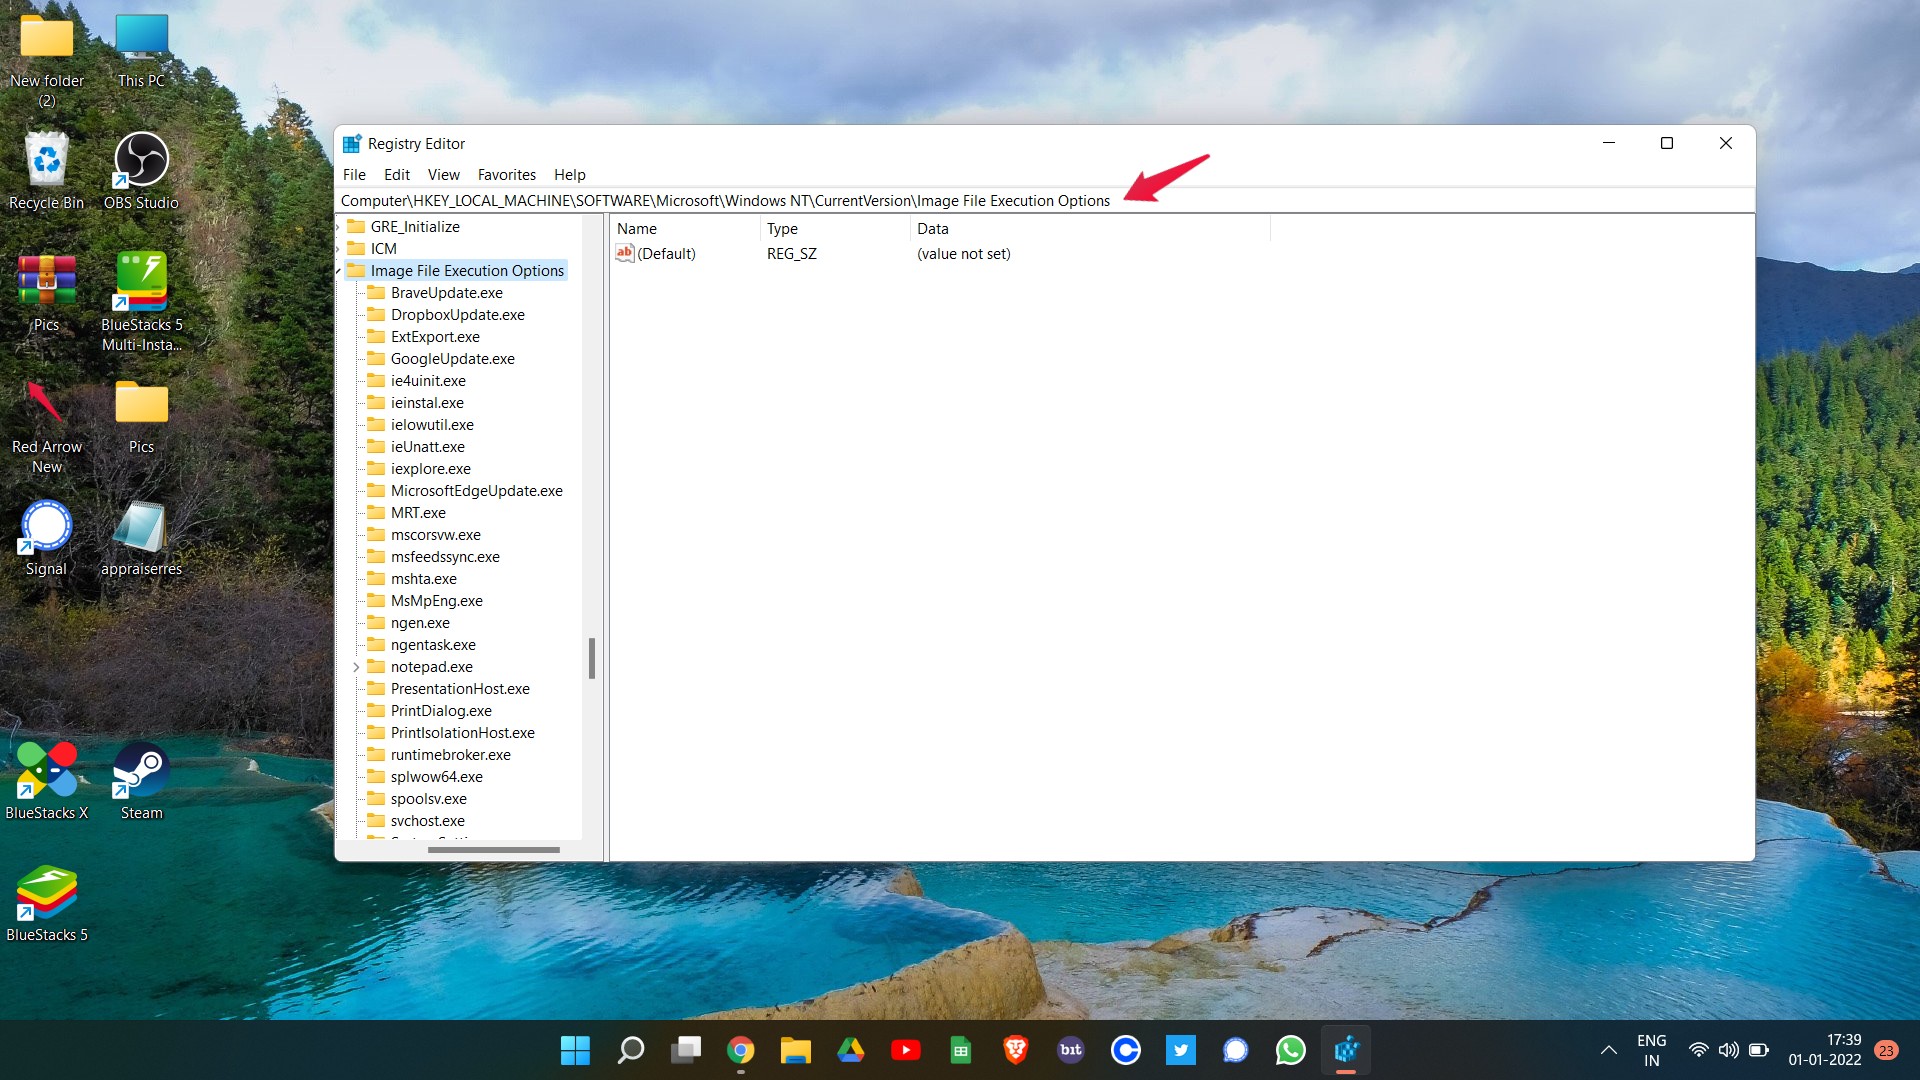
- In the folder that pops up, make sure MSASCui.exe, MpCmdRun.exe, and MsMpEnd.exe, neither of these options are present.
- If found, right-click on them and select delete.
These are different viruses that had managed to enter your system. So, it’s very important to delete them as soon as possible.
Fix 10: Enable Windows Defender Manually
You should only go with this workaround if none of the above worked for you. As it revolves around editing the registry. And if there is even a small mistake from your end, your system can become completely unstable. So, make sure you go through the below-mentioned steps very carefully.
Nevertheless, here are the steps you need to follow to enable Windows Defender manually.
- Open Registry Editor on your PC.
- Head towards the Windows Defender folder, by entering the below-mentioned path in the address bar.
HKEY_LOCAL_MACHINE\SOFTWARE\Policies\Microsoft\Windows Defender - Here, right-click on the blank space and tap New > DWORD (32-bit) value.
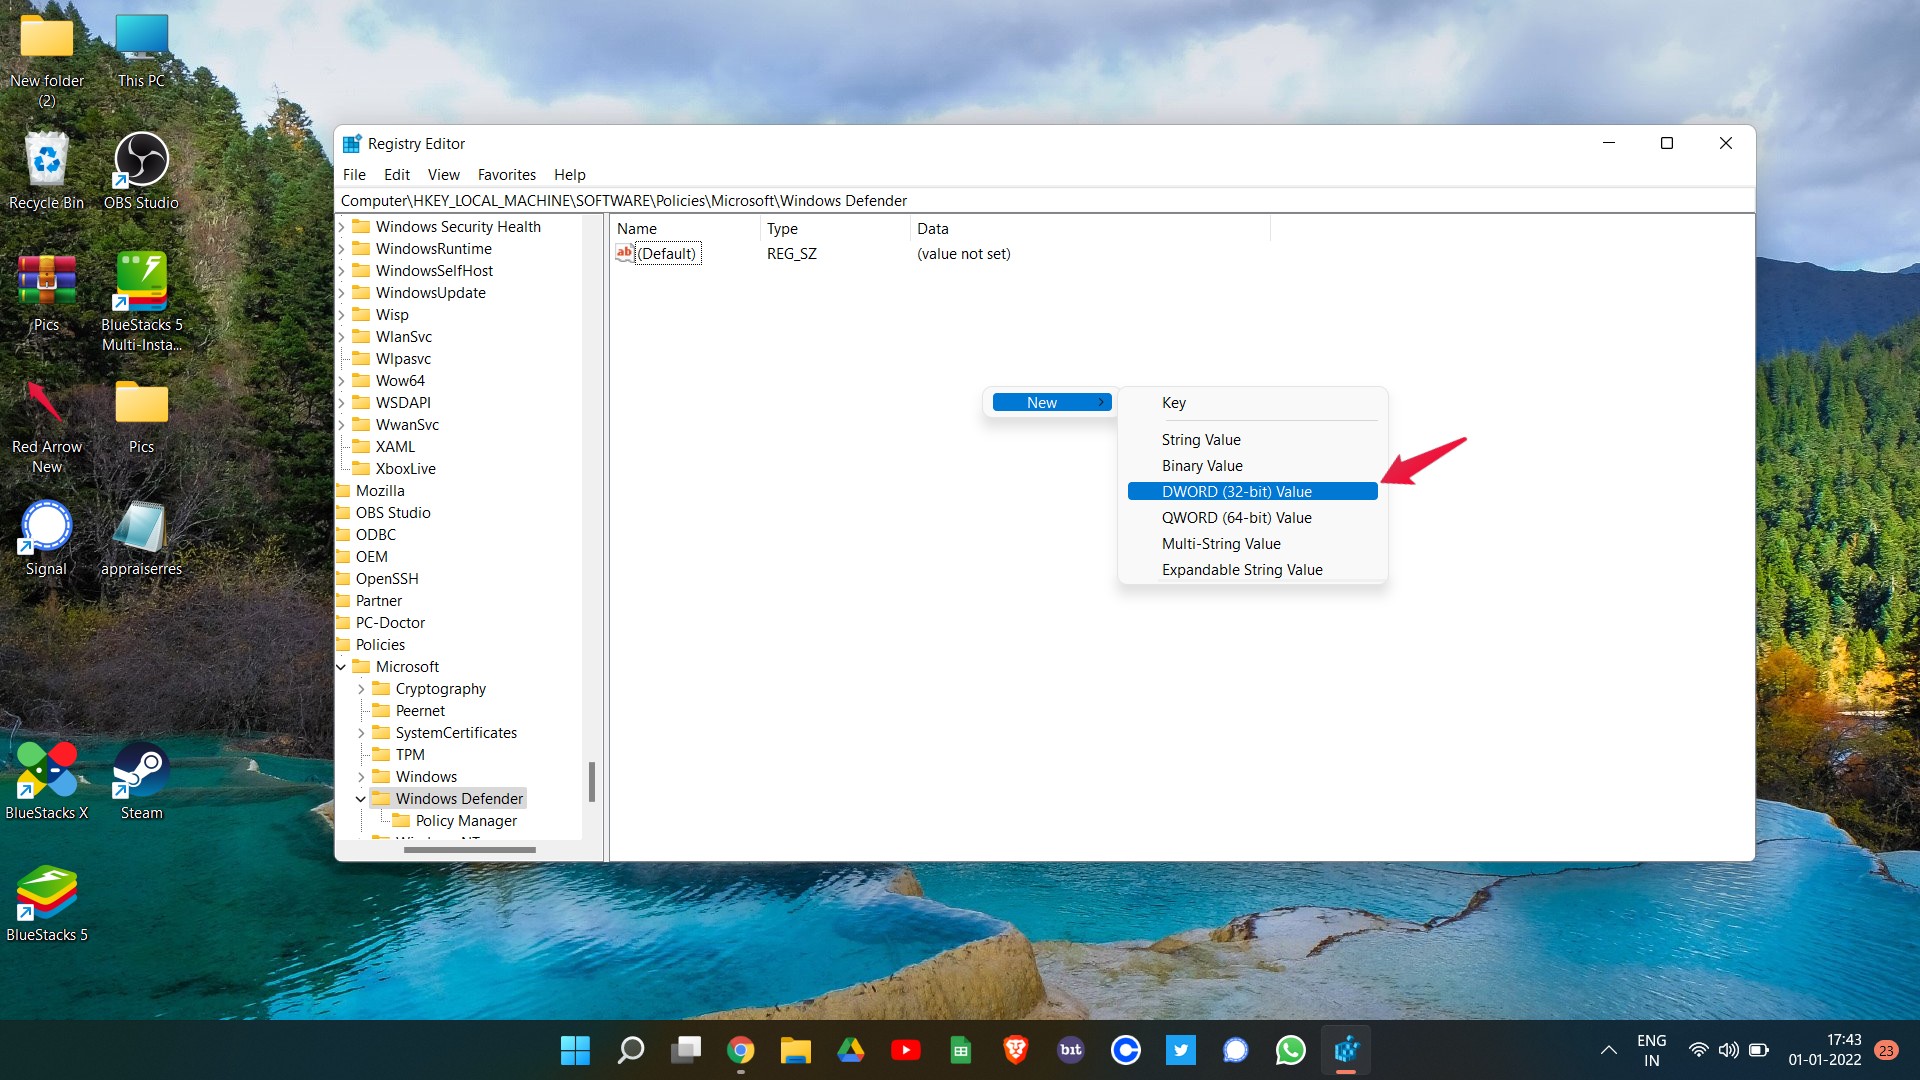
- Name the file ” DisableAntiSpyware”.
- Right-click on the newly created file, and select “Modify”.
- In the value data type 0 and press enter.

Once you are done with the changes, restart your PC. You will be surprised to see that you are no longer facing virus and threat protection not working on Windows 11 problem.
Final Words
This was how to fix virus and threat protection not working on Windows 11 problem. Let us know in the comments whether the above-mentioned steps were helpful or not. You can also share any other workaround that will help in the situation.

Unfortunately, it’s not working for me. I went through this whole list, and still unable to switch on real-time protection.
It’s as if something there is blocking it.
All non-solutions, the only real working solution is this: open powershell as admin, and then type the following string,
Set-MpPreference -UILockdown 0
press enter and you’re done.