Windows 11 is the fully-featured operating system from Microsoft as a successor of Windows 10 OS, released in October 2021 initially. Then it became publicly available which PC builds are compatible with few hardware requirements to run the next-gen Win11 OS. But the chances are high that somehow your Windows 11 Second Monitor is Not Detected for some unexpected reason. Though it’s quite frustrating, there are a couple of solutions too.
A dual monitor or screen setup on the Windows PC looks pleasant to the eyes aesthetically and the productivity in gaming or work becomes on another level. Having more than one display setup, users can enhance their multitasking experience during using multiple apps whatsoever. Windows OS offers a pretty basic and plug-n-play kind of external display connectivity to the users. But if the secondary display/monitor isn’t connecting then what to do?
Also Read
How to Fix if 4K Videos Not Playing on Windows 11
How to Fix If Brightness Slider Missing on Windows 11 and 10
TranslucentTB Windows 11 Not Working, How to Fix?
Fix: Windows 11 Multi Display Not Working
Fix: Mouse Scroll Wheel Jumps Up and Down on Windows 10, 11
Fix: Windows 11 Won’t Wake Up From Sleep With Keyboard or Mouse
How to Enable New CoPilot AI in Windows 11 23493
Page Contents
- Fix: Windows 11 Second Monitor Not Detected
- 1. Check VGA or HDMI Connectivity
- 2. Check the Monitor is Power On
- 3. Reboot the PC
- 4. Update Graphics Drivers
- 5. Change the Display Device
- 6. Check Display Scale and Resolution
- 7. Choose a Default Screen Refresh Rate
- 8. Downgrade the Display Driver
- 9. Manually Detect External Display
- 10. Update Windows 11 Build
- 11. Try Connecting to a Wireless Display
- 12. Project Connected Screen
- 13. Try Changing the Display Port
- 14. Try Connecting to Another Display
- 15. Reinstall Graphics Drivers
- 16. Try Disconnecting Other Peripherals
Fix: Windows 11 Second Monitor Not Detected
Well, sometimes as a Windows 11 user you might gonna encounter multiple issues at your end that can be fixed by following this troubleshooting guide completely. No matter whether your PC software or hardware is conflicting with something else or has some individual issues, you can always perform all the possible workarounds that are mentioned below. Now, without wasting any more time, let’s jump into it.
1. Check VGA or HDMI Connectivity
First of all, you should try checking out the VGA or HDMI cable connectivity with your PC and the external display device because mostly the physical connection can trigger multiple issues whatsoever. You can also try using another VGA or HDMI cable to cross-check the issue.
2. Check the Monitor is Power On
The second thing you can do is simply check out the monitor whether it’s connected to the power source (if it’s required) and whether the device is turned on or not. If the monitor’s adapter isn’t connected to the power source or the monitor isn’t powered on manually then the chances are high that your Windows 11 computer won’t detect the external display whatsoever.
Also Read
3. Reboot the PC
Make sure to restart the computer manually by pressing the Windows key and clicking on the Power menu then selecting the Restart option. Sometimes a temporary glitch or system cache issue can eventually trigger performance-related problems on the computer.
4. Update Graphics Drivers
It’s highly recommended to check for the graphics driver update at your end on the Windows 11 computer to ensure there is no update pending. If any latest update is available then make sure to install the update by following the steps below:
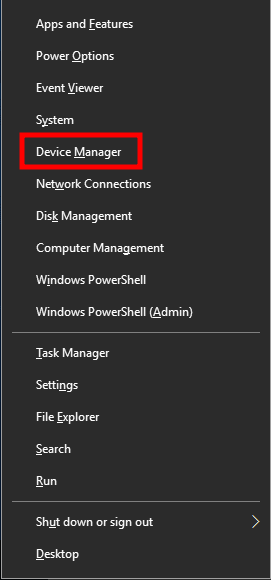
- Right-click on the Start Menu to open up the Quick Access Menu.
- Click on Device Manager from the list.
- Now, double-click on the Display adapters category to expand the list.
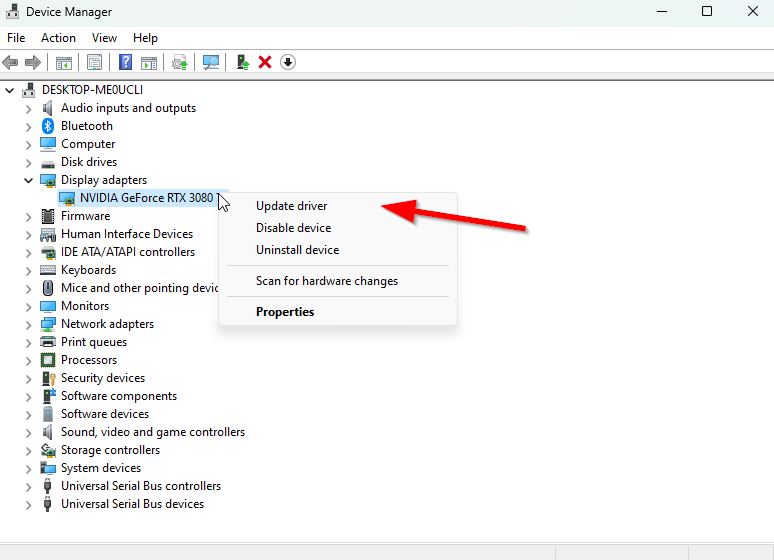
- Then right-click on the dedicated graphics card name.
- Select Update driver > Choose Search automatically for drivers.
- If there is an update available, it’ll automatically download and install the latest version.
- Once done, make sure to reboot your computer to change the effects.
Alternatively, you can manually download the latest version of the graphics driver and install it directly from the official website respective to your graphics card manufacturer. Nvidia graphics card users can update the GeForce Experience app via the Nvidia official site. Meanwhile, AMD graphics card users can visit the AMD website for the same, and Intel graphics users can also install the latest driver.
5. Change the Display Device
Make sure to change the connected display device manually on the PC settings menu by following the steps below. Mostly the Windows system might not gonna detect external display devices automatically. To do that:
- Press the Windows + I keys to open up the Windows Settings menu.
- Click on System from the left pane > Click on Display.
- Now, click on Advanced Display > Select the specific display device from the drop-down menu.
6. Check Display Scale and Resolution
You should also check for the accurate display resolution and scaling on the Windows 11 PC manually to ensure the basic configuration is set up properly. To do so:
- Press the Windows + I keys to open up the Windows Settings menu.
- Click on System from the left pane > Click on Display.
- Here you can find out the Scale option > Click on the drop-down menu and select 100% (Recommended). [Whatever percentage is recommended for your display size, it’ll be mentioned there. Simply select that one.]
- Now, make sure to choose the correct Display Resolution on the PC which is recommended by the system. [For example, if your monitor is Full-HD 1080p supported, you should select 1920 x 1080]
7. Choose a Default Screen Refresh Rate
Another thing you can do is simply select a default refresh rate value of your connected display device such as 60Hz. Even if the monitor supports a higher refresh rate, set it to the default one so check if the Windows 11 system is able to detect the monitor or not.
- Press the Windows + I keys to open up the Windows Settings menu.
- Click on System from the left pane > Click on Display.
- Click on Advanced Display > Choose a refresh rate of 60Hz from the drop-down list.
- If prompted, click on Keep Changes to apply it.
8. Downgrade the Display Driver
Sometimes issues with the corrupted or missing graphics driver on your Windows computer can eventually trigger multiple conflicts with the external display devices. If in case, the above methods didn’t help you then make sure to simply downgrade or roll back the graphics driver on the PC by following the steps below:
- Right-click on the Start Menu to open up the Quick Access Menu.
- Click on Device Manager from the list.
- Now, double-click on the Display adapters category to expand the list.
- Then right-click on the dedicated graphics card name.
- Select Properties > Click on the Driver tab.
- Click on Roll Back Driver and follow the on-screen instructions to complete the downgrade process.
- Once it’s done, make sure to reboot the PC to apply changes immediately.
9. Manually Detect External Display
Sometimes a temporary system glitch or the cache data issue on the Windows 11 PC can occur detection issues with the external display device. If in case, you’re also feeling the same thing then make sure to manually detect the external display which is already connected to the PC by following the steps below.
- Press the Windows + I keys to open up the Windows Settings menu.
- Click on System from the left pane > Click on Display.
- Click on the Multiple displays setting option > Click on the Detect button.
- Now, follow the on-screen instructions to complete the process. Your Windows 11 computer should now detect the connected external display.
However, if you’re seeing the same issue, and there is only one monitor connected to the PC, then the multiple displays option or detect other display options may not be present in some scenarios.
10. Update Windows 11 Build
Make sure to check for the Windows 11 build updates on your computer because an outdated build can trigger some issues or it may not have the latest features whatsoever. Issues with the stability or system bugs may trigger multiple conflicts with the clipboard history function not working on Win11. To do that:
- Press Windows + I keys to open up the Windows Settings menu.
- Next, click on Update & Security > Select Check for updates under the Windows Update section.
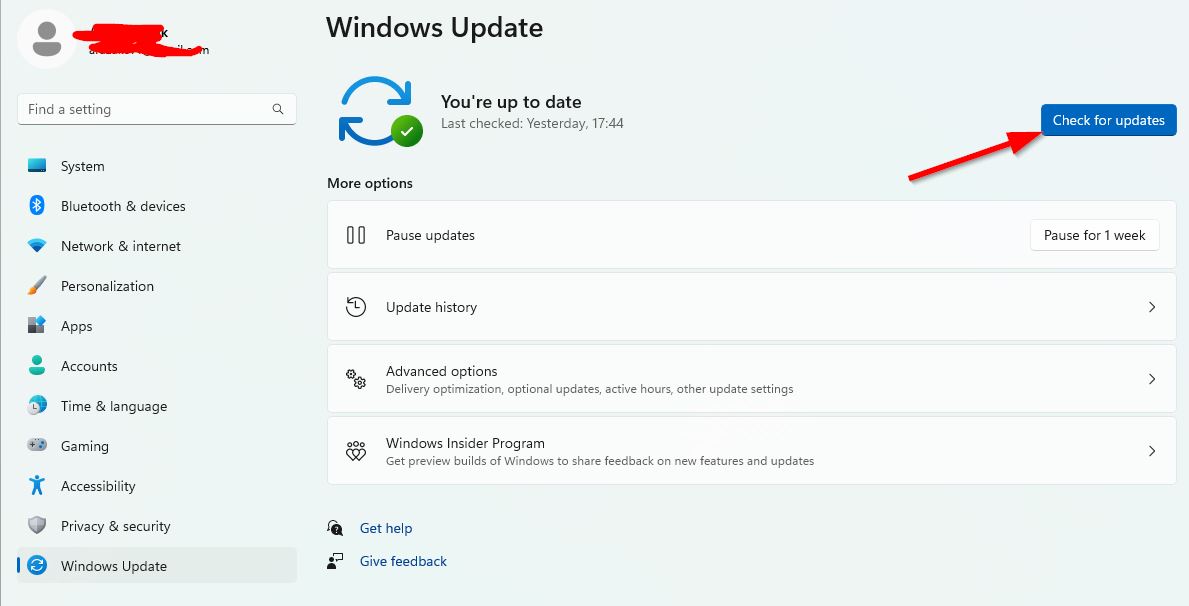
- If there is a feature update available, select Download and install.
- It may take a while to complete the update.
- Once done, restart your computer to install the update.
It’s also recommended to check for optional updates on Windows 11 because not every update will gonna appear on the Windows update page. The optional updates option can offer additional driver or software updates for your specific PC build. You can follow the steps below to check the same:
- Click on the Start menu and open Windows Settings.
- Click on Windows Update > Click on Advanced options.
- Now, head over to Optional updates (under Additional options) > Click on Driver updates to expand the list.
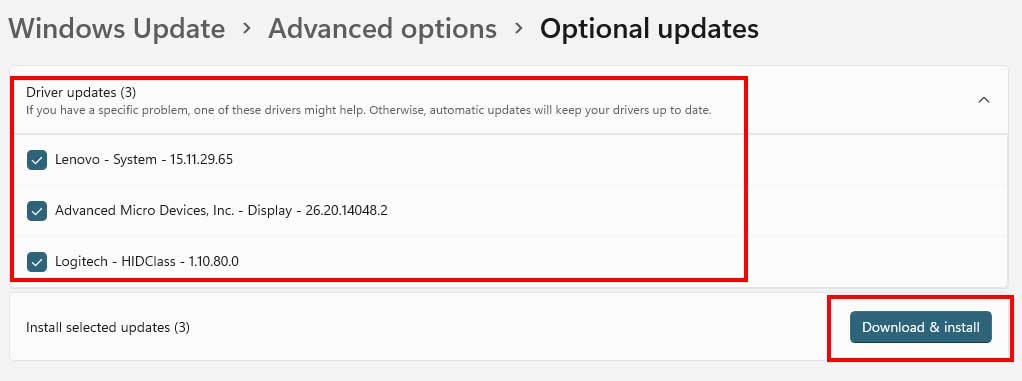
- If there is an update available for any drivers or applications, simply select the necessary ones.
- Finally, click on Download & install then wait for the update process to be completed.
- Once done, make sure to reboot your PC to apply changes.
11. Try Connecting to a Wireless Display
If in case, you’re trying to connect a wireless monitor with the Windows 11 PC then you can follow the steps below.
- Press the Windows + I keys to open Settings.
- Click on Bluetooth & devices > Turn on the Bluetooth toggle.
- Now, click on the Add device button > Select the Wireless Display or Dock option.
- Ensure to confirm the wireless display by turning it on and making it discoverable.
- Select the wireless display (wireless monitor, TV, or PC with Miracast support) from the list.
- Next, continue with the on-screen instructions (if applicable) to complete the process.
- Once the wireless display device is connected to the PC, you should be able to use it.
12. Project Connected Screen
The chances are high that while you’re using a second/external monitor with your Windows 11 PC, somehow the system might not detect or allow you to switch easily. In that scenario, it’s always a better idea to project the screen and select one option that suits you. To do so:
- Press the Windows + P keys shortcut on your keyboard to open the Project Screen popup window.
- Now, you can select one screen projection option from the list according to your preference. Here we’ve mentioned a brief idea of all the modes.
Note: PC screen only option will allow you to only see the one single display whatever you use. [For example, if you’ve connected a monitor with your laptop, and select this option then either the laptop display or the monitor screen will be displayed once at a time. So, if you close the laptop lid then the connected monitor will work as a single PC screen or vice versa.
Duplicate or Extend screen projection mode allows you to use both the connected displays together like the main PC screen and the other connected display devices for better multitasking.
While the Second screen only feature allows you to see the external display as the primary screen. [For example, if you’ve connected a second display to the laptop and selected the second screen only mode, the laptop display will be turned off and only the external monitor will be visible.]
13. Try Changing the Display Port
You should also try changing the display port on the PC to connect the external monitor because the existing port might have some connectivity issue that you’re not aware of. Sometimes this simple trick can help you a lot.
14. Try Connecting to Another Display
Make sure to try connecting another display device to the PC to ensure there is no problem with the existing monitor. If another monitor is working fine then you should get the problematic monitor checked or repaired by a professional (if required).
15. Reinstall Graphics Drivers
It’s better to manually download the latest version of the graphics driver and install it directly from the official website respective to your graphics card manufacturer. Nvidia graphics card users can update the GeForce Experience app via the Nvidia official site. Meanwhile, AMD graphics card users can visit the AMD website for the same, and Intel graphics users can visit the Intel webpage. Now, follow the steps below to uninstall and reinstall the driver.
- Right-click on the Start Menu to open up the Quick Access Menu.
- Click on Device Manager from the list.
- Now, double-click on the Display adapters category to expand the list.
- Then right-click on the dedicated graphics card name.
- Select Uninstall device > If prompted, click on Uninstall again to confirm the task.
- Wait for the uninstallation process to be completed.
- Once done, make sure to reboot the PC to apply changes.
- Finally, head over to the downloaded graphics driver file and install it manually.
16. Try Disconnecting Other Peripherals
If none of the methods worked for you then make sure to try disconnecting other peripherals from your Windows 11 computer to ensure no other external devices are conflicting with the Win11 system or its operations with the external display connectivity. Here the peripherals mean printer, keyboard, mouse, webcam, any USB hub, USB flash drives, audio devices, etc. Once all peripherals are disconnected except for the second monitor, check for the issue again.
That’s it, guys. We assume this guide was helpful to you. For further queries, you can comment below.

Hello
After many hours your tip 10 fixed it. I searched for an other update. I downloaded it and is now working as it should.
You would have thought the Microsoft team would have had this fixed in their software in the first place.
Thanks