In this tutorial, we will check out the steps to fix the “Failed to Write Core Dump” Minecraft error on Windows 10. This sandbox survival game is probably the best-selling video game of all time. With a blocky, procedurally generated 3D world, there are a plethora of things that you could try out. Well, most of you might already be aware of its gameplay and feature, but what many of you might not be aware of is how to deal with a particular type of error.
Also Read
Minecraft Error: Fix Failed to Authenticate your connection
How To Download and Install Optifine in Minecraft
Fix: Minecraft Stuck on Loading Screen
Fix: Minecraft lags on Nintendo Switch After An Update
Fix: Minecraft Stuttering, Lags, or Freezing constantly
20 Best Minecraft Building Ideas 2022
Fix: Minecraft We Were Unable to Verify What Products You Own Error
How to Cancel Minecraft Realms Subscription
Fix: Minecraft “You Need To Authenticate to Microsoft Services” Error
How to Fix You Are Not White-Listed on This Server! Error on Minecraft
Minecraft Villager Not Restocking: What’s The Reason?
Fix: Internet Exception java.net.SocketException Connection Reset
We are talking about the Fail to Write Core Dump error in Minecraft that users are reportedly facing. So in this guide, we will be listing out various fixes related to the said error. There isn’t any universal solution for the same. Different methods might work out for different users, therefore try the below fixes and check which one does the job for you.

Page Contents
Fix Failed to Write Core Dump Minecraft Error
There could be many reasons why you are facing the said error. While for some, the error might stem out from the Intel graphics card, for others the error might be related to the Nvidia or AMD graphics card. Therefore we will be giving out all the instructions that rectify the above issues and hence fix the “Failed to Write Core Dump” Minecraft error on Windows 10. Let’s begin.
Fix 1: Update Intel Graphics Card
In some cases, the error might be associated with the Dynamic Link Library file (ig9icd64.dll) file. This is an important component of the Intel graphics card and belongs to the OpenGL Driver for Intel Graphics Accelerator. To correct it, you might have to update the graphics card to the latest version. To do so, follow the below steps:
- First of all, head over to the Intel Update Assistant site and click on Get Started.

- Next up, click on the Download Now button and wait for the process to finish.

- Once it does, launch the setup and follow the on-screen instructions to complete the installation steps.
- Now, as soon as you have updated all the important components of the Intel graphics driver, restart your PC.
- When it does, launch the Minecraft game and see if the “Failed to Write Core Dump” error has been fixed or not. If not, try the next method mentioned below.
Fix 2: Enable VSync and Triple Buffering (Nvidia)
If you are using the Nvidia graphics card, then it might happen the graphics card is not enforcing the Triple Buffering sector or the Vsync feature isn’t enabled. You could enable the same from Minecraft’s in-game settings as well, but it is better if you try it out using the Nvidia settings menu. Here is how it could be done:
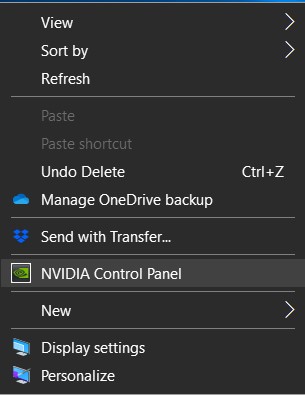
- Right-click on the desktop and select the Nvidia Control Panel option.

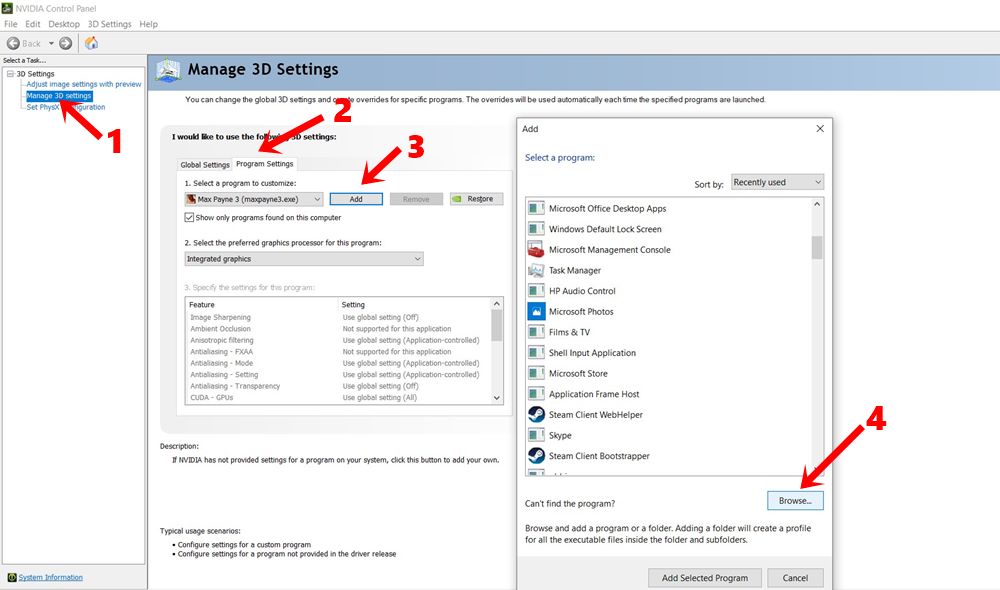
- Next, from the left menu bar head 0ver to the 3D Settings option and click on Manage 3D settings.
- Now from the right-hand side menu, go to the Programs Settings tab.
- Under Select a Program to Customize, click on Add. Then click on Browse and navigate to the location where you have installed Java. Select the javaw.exe file from the list and click on Open.

- If you are having trouble finding the said file, here is the default installation location for Java 6 and Java 7:
Java 7- C:/Program Files/Java/jre7/bin/ OR C:/Program Files (x86)/Java/jre7/bin/
Java 6 – C:/Program Files/Java/jre6/bin/ OR C:/Program Files (x86)/Java/jre6/bin/ - Once you have selected the Java file, scroll and find the Vertical Sync. Select the file and from the bottom right menu, choose ON. Do the same for Triple Buffering as well.
- Once you have done that, click on Apply to save the changes. Now close the dialog box and launch the game. See if the Minecraft “Failed to Write Core Dump” error has been rectified or not.
- If you are still facing this error, then there’s one more thing to try out, as mentioned below.
Fix 3: Reinstall the AMD Catalyst Utility
If you using an AMD GPU, then one or two of its files could be corrupt. This will then lead to “Failed to write core dump. Minidumps are not enabled by default on client versions of Windows”. And this, in turn, might throw up the said Minecraft error. Therefore it is advisable to reinstall the AMD drivers on your Windows 10 PC. This is how it could be done:
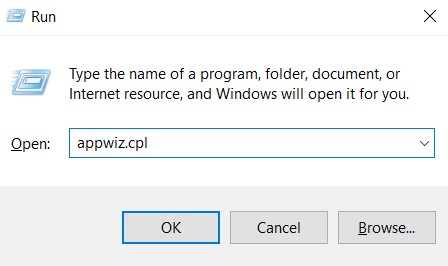
- Head over to Control Panel and open the Program and Features menu. Or you could also do the same from the Run dialog box by typing in appwiz.cpl.

- Now, in the Uninstall or change a program, select the AMD Software program and click on Uninstall.
- Once the installation has been finished, restart your PC. Now, go online and download the latest version of AMD Catalyst.
- Open the setup file and follow the on-screen instructions to complete the process.
- Finally, reboot your PC and launch the game. The error should be fixed by now.
Conclusion
So with that, we conclude the guide on how to fix the Minecraft “Failed to Write Core Dump” error. We have mentioned three different methods to rectify this error. Do keep us informed which one managed to correct this issue. On that note, here are some iPhone Tips and Tricks, PC tips and tricks, and Android Tips and Tricks that you should check out as well.
