Windows 11 has the ‘Night Light’ feature that basically helps you to reduce blue light using warmer colors on the screen to minimize eye strain and improve sleep quality at night. This feature is best for low light or dark environments while using your Windows 11 computer for a while. It’s worth mentioning that the Night Light feature is available in Windows 10 also. But if in case, Windows 11 Night Light Not Working for you, try following this guide.
Also Read
Fix: Windows 11 Command Prompt Pops Up and Closes Randomly
How to Fix Black Screen of Death in Windows 11?
Fix: Miracast Not Working on Windows 11 and 10
How To Fix External Hard Drive I/O Device Error in Windows 11/10
TranslucentTB Windows 11 Not Working, How to Fix?
Fix: Mouse Scroll Wheel Jumps Up and Down on Windows 10, 11
How to Enable New CoPilot AI in Windows 11 23493
Although this is a great feature, the consistency or stability of this feature is still a hit or miss even on Windows 11 because sometimes it doesn’t work or simply doesn’t turn on whatsoever. Whereas some users are also reporting that even if it gets turned on, the warmer tone doesn’t get applied automatically. Yes! Sometimes it needs a manual turn on/off or dragging the warmer tone slider can work.

Page Contents
- Fix: Windows 11 Night Light Not Working
- 1. Enable Night Light Mode
- 2. Enable Schedule Night Light
- 3. Set the Correct Date & Time on the PC
- 4. Turn on Location Services
- 5. Update Graphics Driver
- 6. Check for pending Windows Updates
- 7. Reset Night Light via Registry Editor
- 8. Disable HDR in Display Settings
- 9. Reset Windows 11
- 10. Contact Microsoft Support
Fix: Windows 11 Night Light Not Working
It’s also reported that the Night Light feature doesn’t work well with the sleep mode in some cases. You may find that the Night Light feature gets turned off automatically after waking up your computer from sleep mode for a while. The option to turn on/off in the Action Center for Night Light can also be found greyed out which means you’re not able to use it temporarily which is really weird. These issues are quite common among users.
Also Read
To be precise, sometimes your recently installed Windows build update or the display driver issue can cause such conflicts with the Windows 11 Night Light Feature whatsoever. Meanwhile, Night Light settings or scheduled timing configuration can also cause several problems. But don’t fret as we’ve provided a couple of possible workarounds below.
1. Enable Night Light Mode
Make sure that the Night Light mode is turned on completely on the computer before jumping into any other workaround. To do so:
- Click on the Start menu (Press the Win key) > Go to Settings (Directly press Win+I keys).
- Now, click on System from the left pane > Select Display.
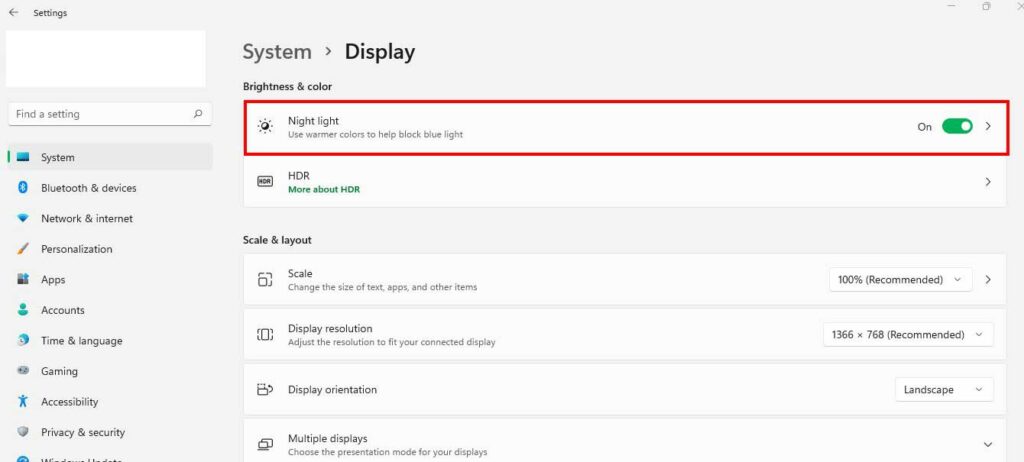
- Turn on the Night Light toggle > Once enabled, click on the same block, and adjust the Strength slider to check how much warmer tone you need or what’s soothing to your eyes.
- Close the window and start enjoying Night Light.
2. Enable Schedule Night Light
Well, it may also be possible that the Night Light option automatically gets turned on/off according to the selected timezone on the computer. You can try scheduling the Night Light mode by adjusting a specific timeline whenever you require it most such as from evening or during the night or even before going to sleep. To do so:
- Press the Win+I keys to open Windows Settings.
- Click on System from the left pane > Select Display.
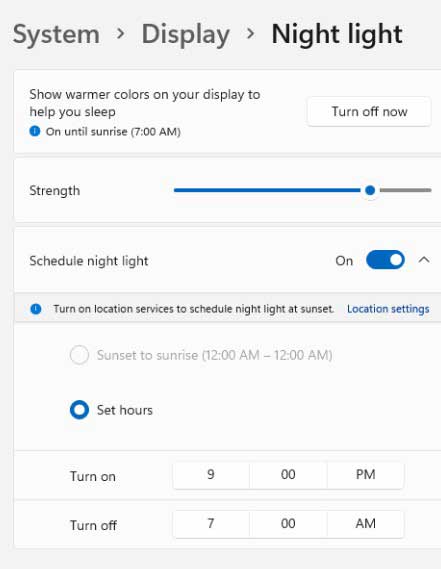
- Turn on the Night Light toggle > Enable the Schedule night light toggle.
- Now, you’ll see two options like Sunset to sunrise or Set hours.
- If you’re not comfortable with the Sunset to sunrise option then click on Set hours.
- next, click on Turn on / Turn off > Adjust the time according to your preference.
- Once done, click on the tick mark to save changes.
- Finally, reboot the system to apply changes immediately.
3. Set the Correct Date & Time on the PC
It’s also worth mentioning to set the correct date and time on the PC by following the steps below. Sometimes an incorrect time or date or even the timezone settings can cause several issues. To do that:
- Press the Win+I keys to open Windows Settings.
- Click on Time & language from the left pane > Select Date & time from the right pane.
- Both the ‘Set time automatically’ and ‘Set time zone automatically’ options should be turned on. [If not turned on yet]
- If both are already turned on then make sure to turn them off and configure the correct timezone properly. Then turn on both the above options again.
- Now, click on Sync now from the Additional settings option to successfully synchronize date & time with the Windows server.
Must Read: Windows 11 printer not working after update; How to Fix?
4. Turn on Location Services
The Night Light feature can also depend on the location services on your Windows 11. You should also turn on the location services on your computer by following the steps below:
- Press the Win+I keys to open Windows Settings.
- Click on Privacy & Security from the left pane > Scroll down the right pane window a bit.
- Click on Location under App permissions > Turn on the Location services toggle.
- Make sure to reboot the system to apply changes immediately.
5. Update Graphics Driver
It seems that somehow the graphics driver on your Windows computer becomes outdated or missing. In that scenario, it’s always better to check for graphics driver updates via the steps below:
- Press Windows + X keys to open the Quick Link Menu.
- Now, click on Device Manager from the list > Double-click on Display adapters.
- Right-click on the dedicated active graphics card that you’re using.
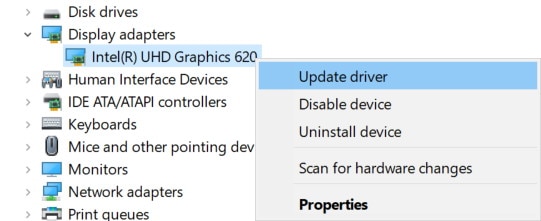
- Next, select Update driver > Choose to Search automatically for drivers.
- If there is an update available, the system will automatically download & install it.
- Once done, restart the computer to apply changes immediately.
Otherwise, you can also visit the official graphics card manufacturer website such as Nvidia or AMD to grab the latest driver version for your specific GPU card model.
6. Check for pending Windows Updates
It seems that you haven’t updated your Windows OS build for a while. If it’s true then make sure to check for the latest patch update and install it right away. Sometimes a buggy or older build version can cause several issues with the system performance and programs.
- Press Windows + I keys to open up the Windows Settings menu.
- Click on Windows Update from the left pane.
- Click on Check for updates from the right pane window.
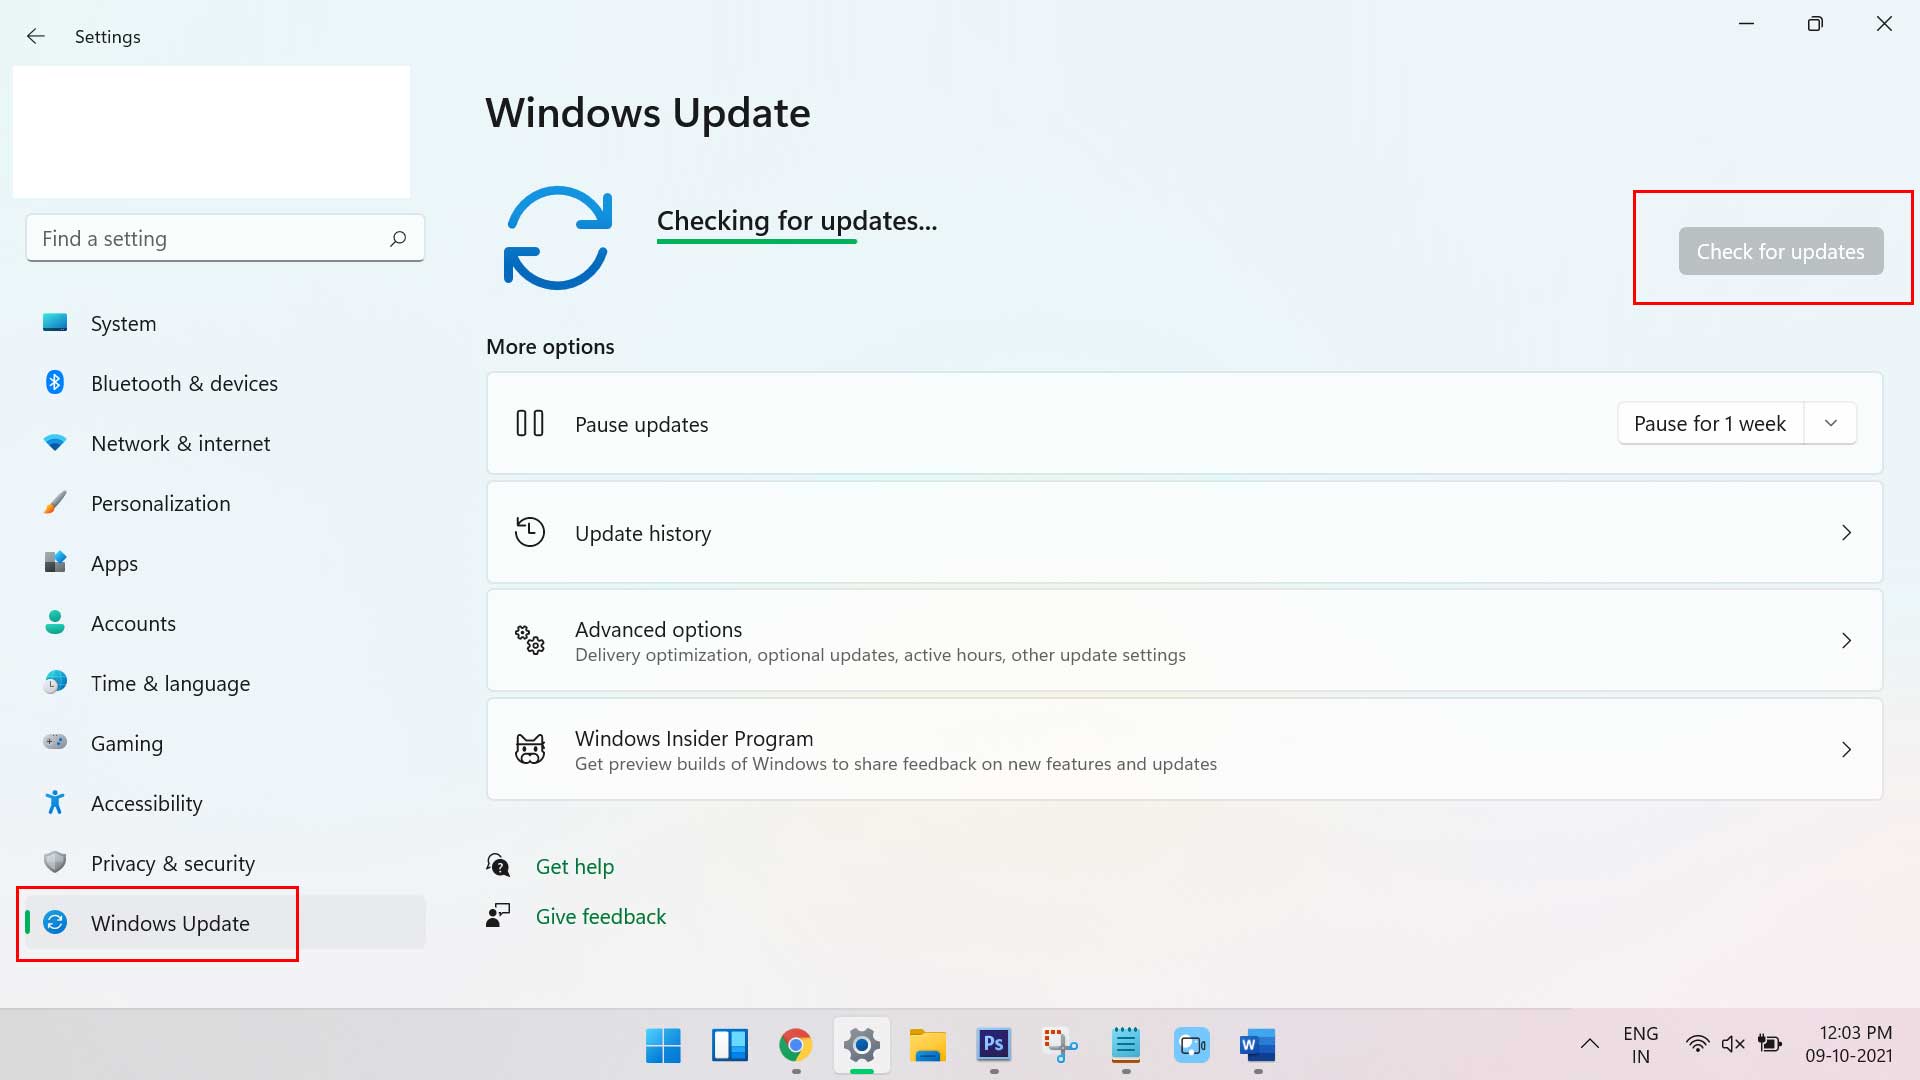
- If there is an update available, just click on Download and Install.
- You may have to wait for some time to install the update completely.
- Finally, restart the computer to apply changes.
Read More: Fix: Keyboard Not Working in Windows 11
7. Reset Night Light via Registry Editor
If the above methods didn’t help you out, try resetting the Night Light feature via Windows Registry Editor. To do that:
- Press the Win+R keys to open the Run dialog box.
- Type regedit and hit Enter to open Registry Editor.
- Once Registry Editor opens, head over to HKEY_CURRENT_USER > Software > Microsoft > Windows > CurrentVersion > CloudStore > Store > DefaultAccount > Cloud from the left pane.
- Now, you’ll see the default$windows.data.bluelightreduction.bluelightreductionstate folder in the left pane.
- Just right-click on the folder > Click on Delete.
- Once removed, make sure to close all the windows, and restart your PC to apply changes.
This method should gonna help you out of the Night Light not working issue on your Windows 11 computer. If not, try following the next method.
8. Disable HDR in Display Settings
You can also try disabling the HDR mode on the Display Settings by following the steps below. If in case, your computer hardware or display monitor isn’t compatible with the HDR mode then the option will be greyed out and you don’t need to follow this method.
But if the HDR mode is visible to you and there is an option to turn it on/off then we’ll recommend you to turn off HDR in the Display Settings menu on Windows 11 (if already turned on).
- Press Windows + I keys to open up the Windows Settings menu.
- Click on System from the left pane > Select Display.
- Click on HDR > Turn off the toggle straightaway.
9. Reset Windows 11
Make sure to reset your Windows 11 from the Settings menu by following the steps below. By resetting the system on the computer, you’ll be able to resolve multiple system glitches or temporary cache data issues whatsoever.
Note: It’ll delete the user data and manual configuration from the PC. So, take a backup of the C: drive documents, media files, etc where you’ve installed the OS.
- Press Windows + I keys to open up the Windows Settings menu.
- Click on System from the left pane > Scroll down a bit on the right pane window.
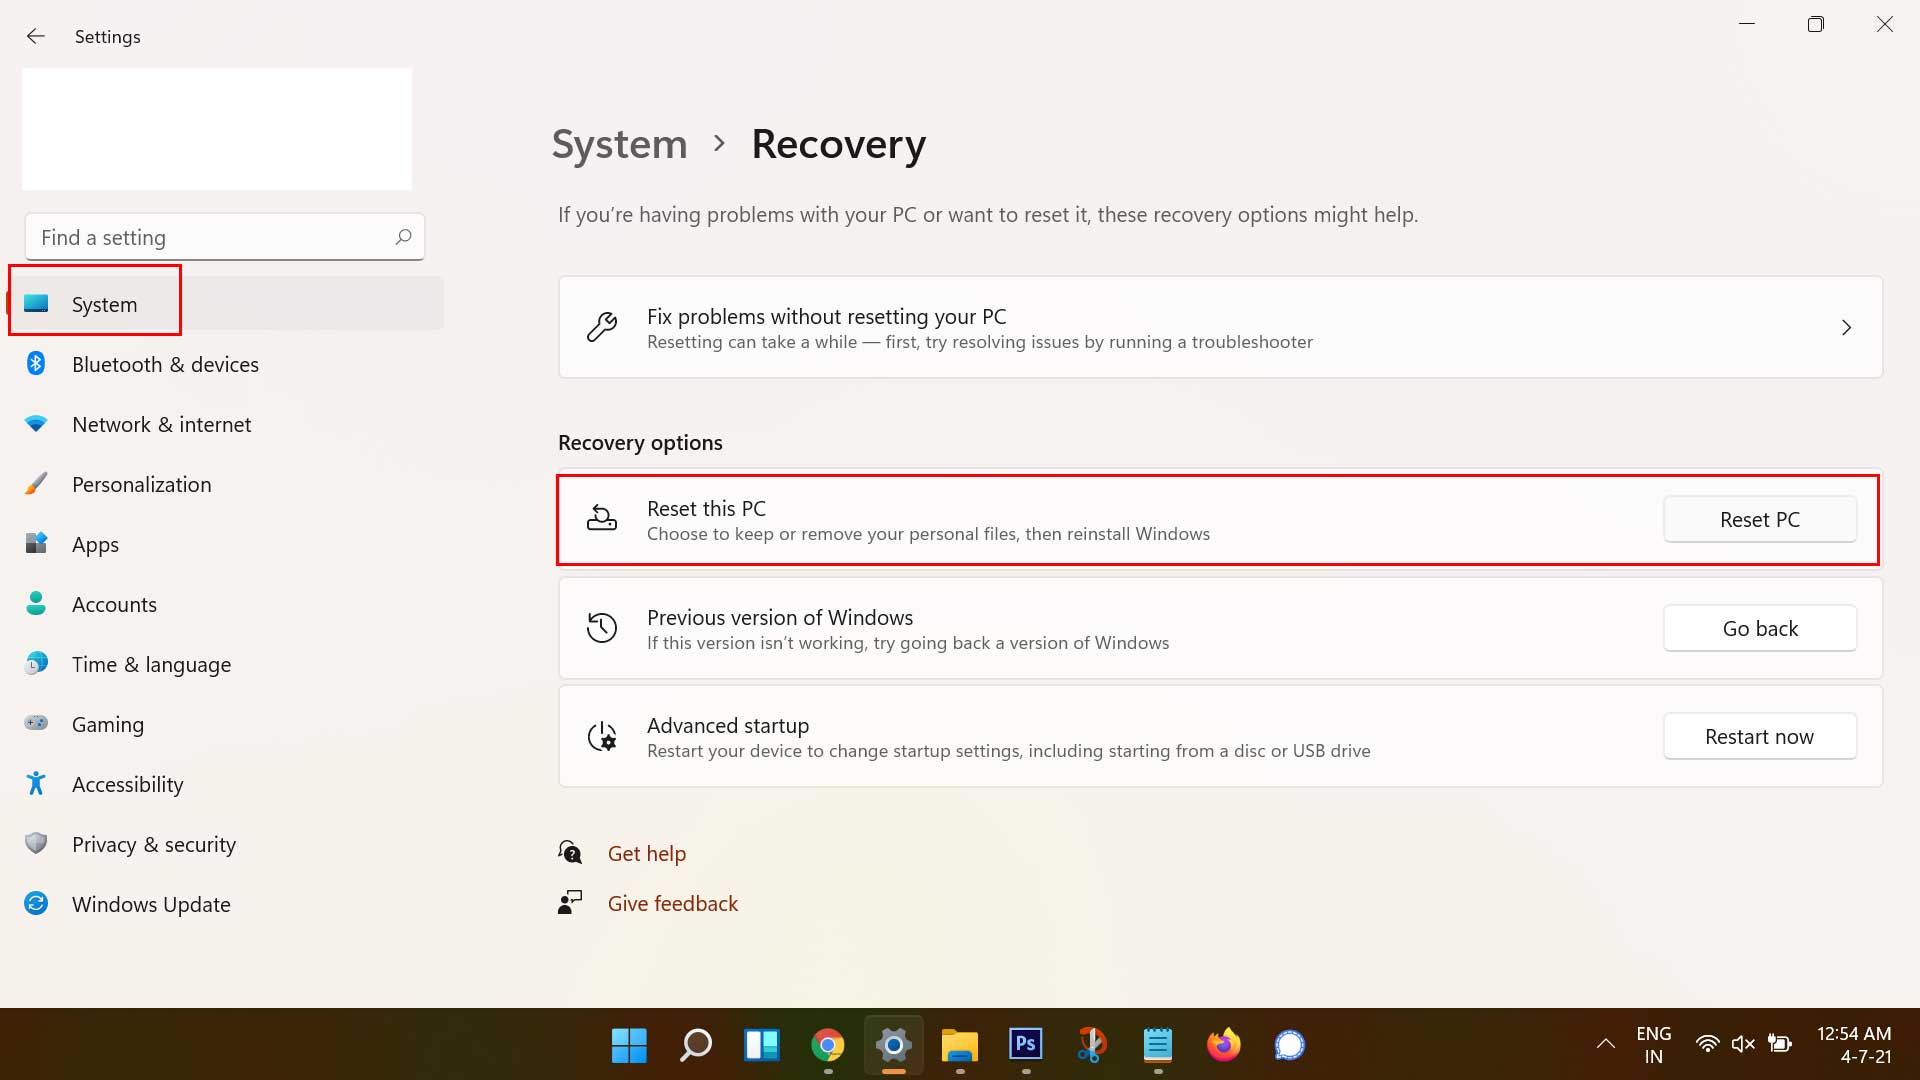
- Click on Recovery > Click on Reset PC from the ‘Reset this PC’ option.
- If prompted, allow the task, and follow the on-screen instructions to complete the resetting process.
- Make sure to choose the ‘Delete everything’ option to reset the Windows features and settings to the factory default.
10. Contact Microsoft Support
If none of the methods worked for you then try contacting Microsoft Support for further assistance. Sometimes a professional individual or team can only fix your specific issue with the software or any kind of conflict with the hardware. Just provide a detailed elaboration with screenshots or diagnostic data so that the support team can take a look closely.
That’s it, guys. We assume this guide was helpful to you. For further queries, you can comment below.
