Microsoft has recently released the much-anticipated Windows 11 via the Windows Insider Program for those who’ve opted for Dev Channel. Interested Windows 10 users can easily upgrade to Windows 11 build 22000.51 co_release via Dev Channel. Although Windows 11 brings a complete design overhaul with improved features, some users are experiencing a Slow Startup issue.
It’s worth mentioning that those waiting for a stable public build may have to wait for a couple of months. Additionally, the PC configuration compatibility apart from the UEFI Secure Boot and TPM Version 2.0 requirement, is one of the trending topics right now among the Windows users community. Now, coming to the main topic, there may be several reasons behind the slow boot of Windows 11 on your desktop or laptop.
Also Read
Page Contents
- What are the possible reasons for Windows OS Slow Boot?
- How to Fix Windows 11 Slow Startup
- 1. Disable Startup Programs
- 2. Update Your Windows OS Build
- 3. Update Graphics Drivers
- 4. Run Windows Update Troubleshooter
- 5. Reinstall Windows 11 on an SSD
- 6. Delete WDI directory files
- 7. Delete Temporary Files
- 8. Enable Storage Sense
- 9. Clear Background Running Tasks
- 10. Optimize Drives
- 11. Scan for Virus & Threats
- 12. Turn Off Fast Startup
- 13. Reset This PC
- 14. Go Back to the Previous Version of Windows
What are the possible reasons for Windows OS Slow Boot?
It seems that a PC with a lower specification is one of the primary reasons behind a slow system boot in most scenarios. Even though the latest Windows OS version is compatible with your computer, the system requires additional resources or hardware performance to boost the user experience always.
Whereas issues with the hard disk or not using an SSD, outdated graphics card drivers, outdated Windows OS build, issues with the background running startup tasks, conflicting with security programs, wrongly installed or corrupted Windows software, not having enough RAM, etc are also applicable for a slow start of Windows 11.
Also Read
How to Fix Windows 11 Slow Startup
As we’re now aware of multiple reasons behind this issue, let’s jump into the troubleshooting guide below.
1. Disable Startup Programs
It’s tried and tested that plenty of unnecessary startup apps/programs may eventually decrease the load time while booting up the Windows computer. So, it’s highly recommended to disable all the unnecessary apps/services at startup to reduce the overall boot-up time.
- Press the Ctrl + Shift + Esc keys to open Task Manager.
- Now, go to the Startup tab > Click on the individual app/service that you want to close.
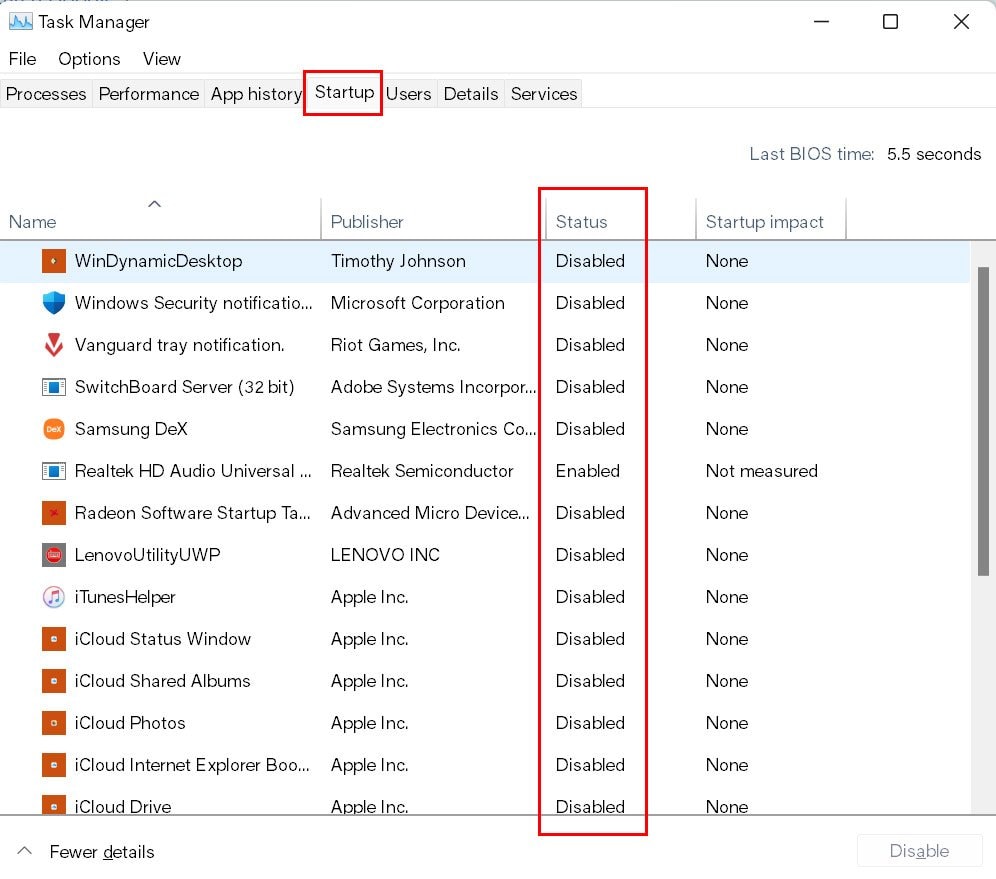
- Then click on the Disable button.
Do the same task for each and every unnecessary app or service to clear all. Once done, make sure to restart your computer to check whether the startup time is improved or not.
2. Update Your Windows OS Build
In some cases, if your Windows OS build hasn’t updated for a while then the chances are high that may be the outdated Windows OS build is causing performance issues and so the startup time has also increased over time. In another way, it’s better to keep your Windows OS build up-to-date to improve the system performance and stability.
- Press Windows + I keys to open Windows Settings.
- Click on System from the bottom of the left pane.
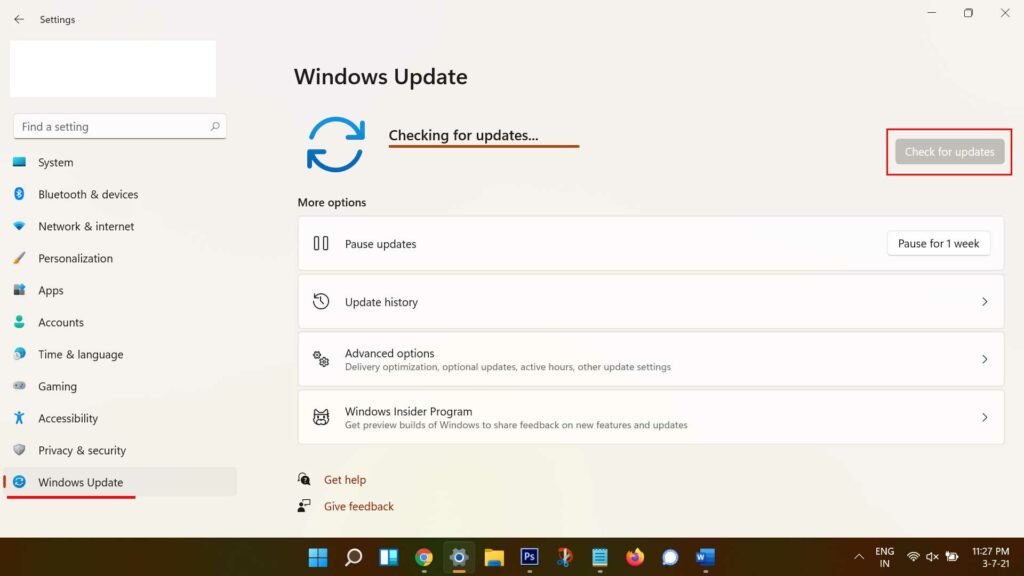
- Now, click on Check for updates > If there is an update available, it’ll automatically start downloading and install the update.
- It may take some time to complete the installation process.
- Finally, restart your computer to change effects quickly.
3. Update Graphics Drivers
An outdated graphics card driver on your Windows PC can also cause multiple issues with the gameplay such as lags or crashes. If you’re still facing such issues, make sure to keep your GPU drivers up-to-date by following the steps below.
- Press Windows + X keys to open the Quick Start Menu.
- Now, click on Device Manager from the list > Double-click on Display adapters.
- Right-click on the dedicated graphics card that you’re using.
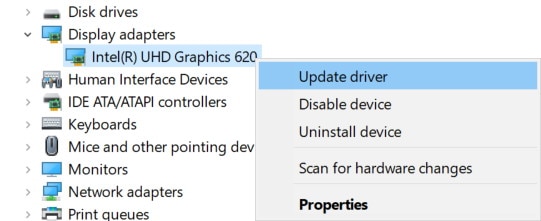
- Next, select Update driver > Choose to Search automatically for drivers.
- If there is an update available, it’ll automatically download & install the latest version.
- Once done, restart the system to apply changes immediately.
4. Run Windows Update Troubleshooter
If you’re still having issues with the Windows 11 Slow Startup then make sure to run Windows Update Troubleshooter to check whether anything is wrong with the update or not. To do so:
- Press Windows + I keys to open Windows Settings.
- Click on System from the bottom of the left pane.
- Now, click on Troubleshoot from the right pane.
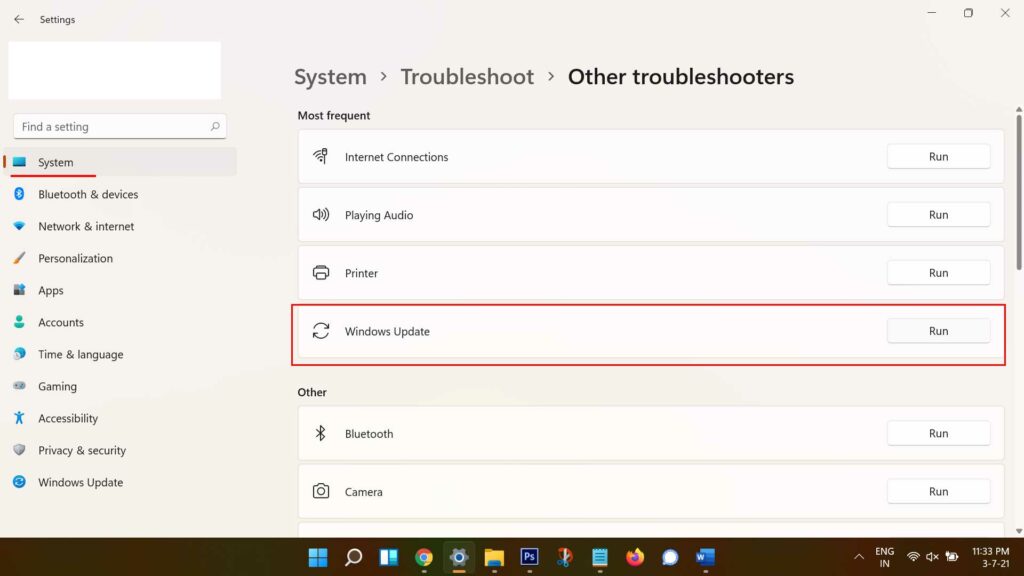
- Click on Other troubleshooters > Click on the Run button next to Windows Update.
- Let the system automatically initiate diagnostics and check several items on the computer. If there is an issue detected then make sure to search for proper troubleshooting online and fix it.
- Otherwise, you can follow the next method.
5. Reinstall Windows 11 on an SSD
It’s highly recommended to reinstall Windows 11 freshly on your computer but on an SSD (Solid State Drive) rather than HDD (Hard Disk Drive) to get optimized performance and improved app loading time, faster system boot-up, performing tasks, gaming, etc. If you haven’t used an SSD then don’t waste more time.
This is one of the best chances to install Windows 11 on an SSD and feel the difference in every aspect. But if in case, you’re already on an SSD and still facing slower boot up then follow the next one.
6. Delete WDI directory files
Please Note: Be careful while deleting these system files because deleting other system files by mistake may trouble you with Windows boot up or system services.
- Press the Windows + E keys to open This PC (File Explorer).
- Now, head over to the C: drive where you’ve installed the Windows 11 OS. [If you’ve installed the OS on another drive partition then head over there]
- Then open the Windows folder > Search for the System32 folder and open it.
- Next, open the WDI folder > If prompted by the system, then click on Continue to open it.
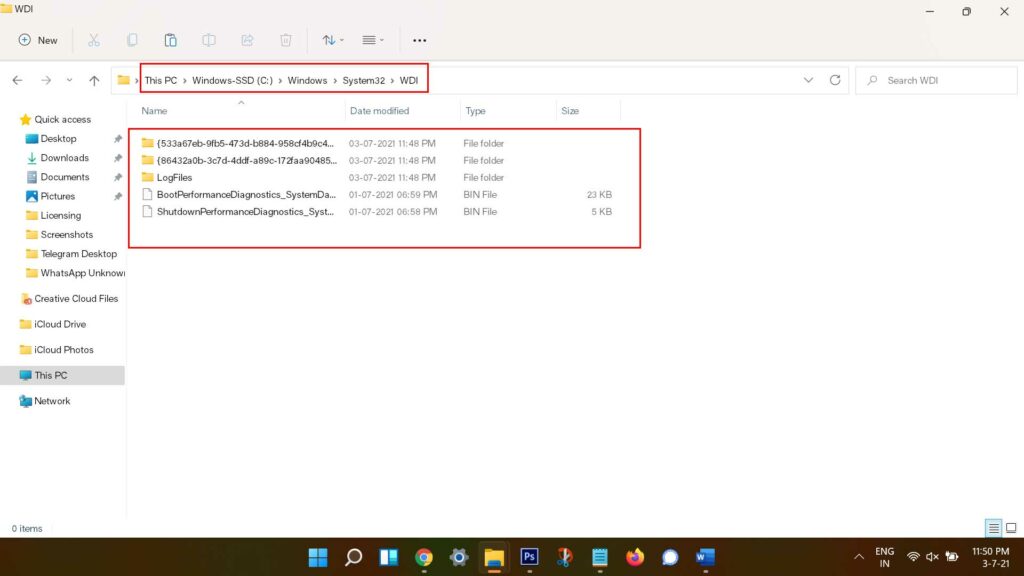
- Then press the Ctrl + A keys to select all files inside the folder. [Once selected, ensure to copy and paste these files to another drive as a backup, if anything goes wrong]
- Press the Delete key or right-click on it and select Delete from the context menu. [If you don’t find the WDI folder, then type wdi from the System32 folder]
- If you’re unable to delete the LogFiles folder then make sure to open it and if prompted again then click on Continue > Now, select all files and delete them.
- Go back to the previous page and now delete the LogFiles folder.
- Once done, make sure to close the window, and restart your computer to check the boot time.
7. Delete Temporary Files
Well, as the name suggests, Temporary files are basically created automatically by the Windows system in the memory during performing any task for a while to keep things smoother and faster whenever a user performs the same task again. However, older temporary files or corrupted ones may cause issues with the system performance and boot sequence.
- Just press the Windows + R keys to open the Run dialog box.
- Now, type %temp% and hit Enter to open the Temp folder from C: drive where Windows is installed.
- Then press the Ctrl + A keys to select all temp files > Press the Delete key to initiate the removal process.
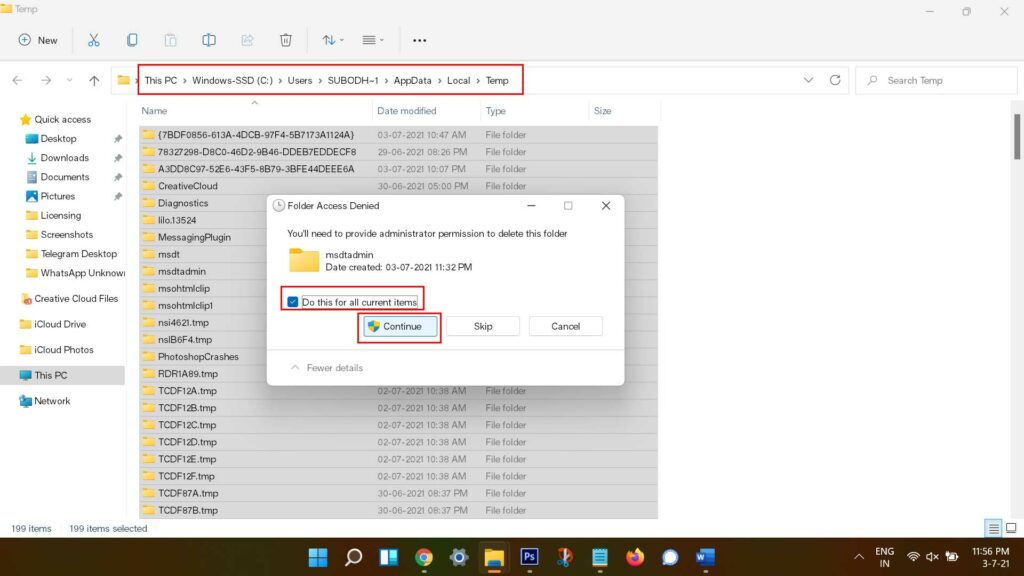
- If it prompts then click on the ‘Do this for all current items’ and select the Continue button.
- Let the process complete and if some temp files aren’t deleting then skip those items.
- Once done, make sure to restart your computer to check the boot time.
8. Enable Storage Sense
The chances are also high that somehow your Windows 11 system isn’t running with the Storage Sense feature enabled by default. If that’s the case, you can follow the steps below:
- Just turn it on from the Windows Settings menu > System > Storage > Enable Storage Sense.
- Additionally, click on the Storage Sense option > Make sure that the “Keep Windows running smoothly by automatically cleaning up temporary system and app files” checkbox is enabled.
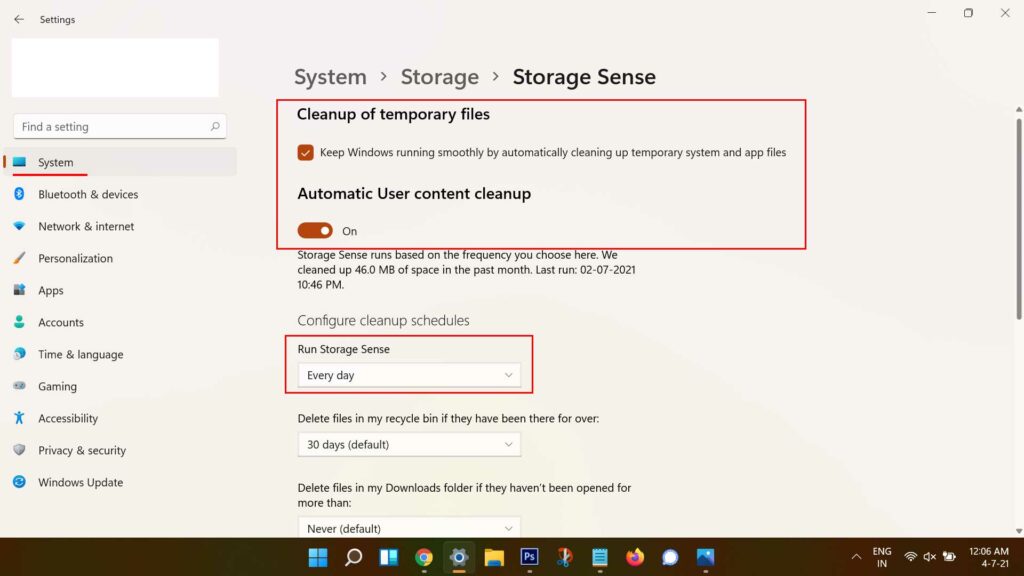
- Whereas you should also turn on the “Automatic User content cleanup” toggle.
- Next, configure running Storage Sense Schedule either for every month or every week (recommended).
- Finally, make sure to scroll down the page to the bottom, and click on the Run Storage Sense now button to manually clean up unnecessary files for the first time.
- Once done, try rebooting your computer, and check if that helps or not.
9. Clear Background Running Tasks
There are a couple of unnecessary tasks running in the background most of the time that eventually make your system laggy or slows down the performance. Obviously, that’ll also affect the startup timing and day-to-day tasks.
- Press Ctrl + Shift + Esc keys to open up the Task Manager.
- Now, click on the Processes tab > Click to select tasks that are unnecessarily running in the background and consuming enough system resources.
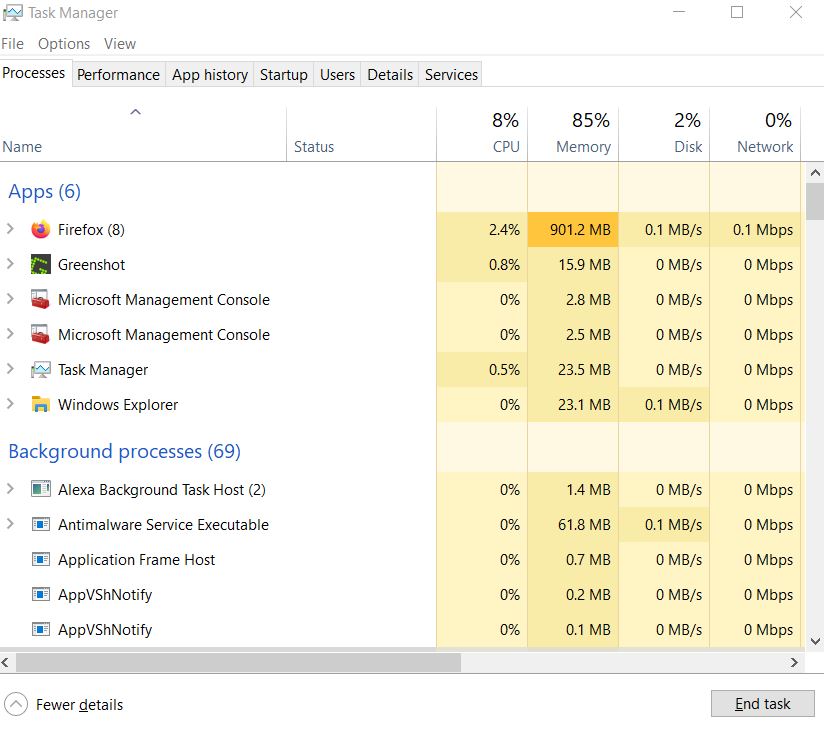
- Click on End Task to close it individually.
- Once done, restart your system, and check for the Windows 11 Slow Startup issue again.
10. Optimize Drives
It’s worth mentioning that each and every Windows PC creates some temporary files and data which gets fragmented over time. All of these fragmented files get stored on your PC and may start causing issues with the drive optimizations or performance. Therefore, analyzing and optimizing all those fragmented disk drive partitions will come in handy.
- First of all, press the Windows + I keys to open Windows Settings.
- Click on System from the left pane > Click on Storage from the right pane.
- Now, click on Advanced storage settings > Scroll down a bit and select Drive optimization.
- A new pop-up window will appear on the screen where all the available drive partitions will be shown.
- Just click on the Advanced View option to expand the list completely.
- Next, click on Analyze to check for the drives whether any of the drives have some fragmented items or not.
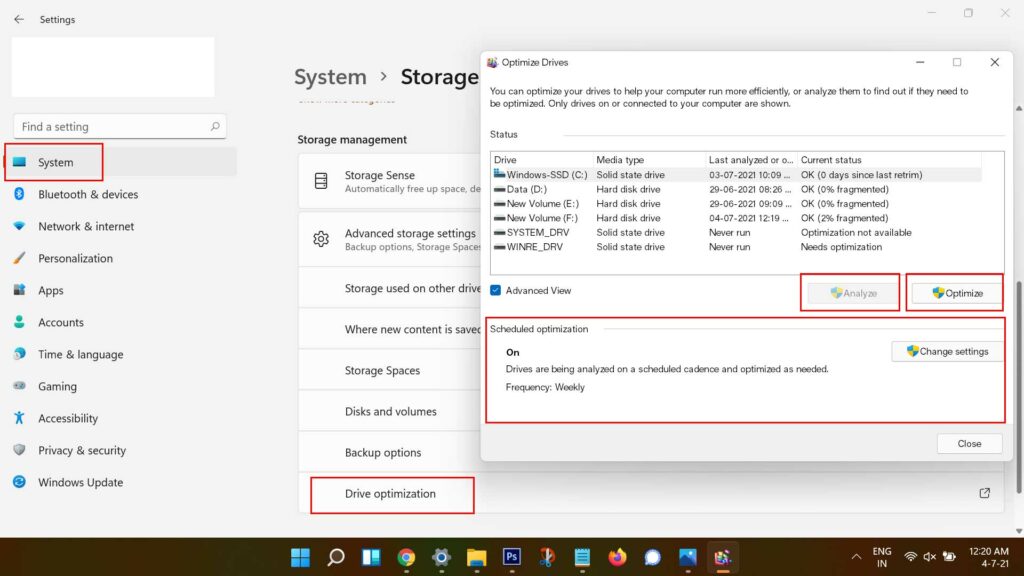
- If any drive shows a fragmented percentage, then click on that particular drive.
- Then click on Optimize and wait for some time until it shows the 0% fragmented status.
- Additionally, you should check whether the Scheduled optimization is turned On or not. If not then click on Change settings > Enable the weekly optimization schedule as well as turn on ‘Increase task priority’ > Click on OK to save changes.
- Finally, restart your computer to apply changes, and you should see a slight improvement in the startup time.
11. Scan for Virus & Threats
Potential viruses or malware can enter into your computer via data transfer or downloading or even installing files from any third-party source/platform. So, we can’t basically prevent them from entering into our computer 100% all the time but we can definitely scan and remove all the potential risks or vulnerabilities that can easily affect the system or personal data.
It’s highly recommended to scan for viruses & threats from the Windows Defender program as it comes by default on Windows 10 and 11. However, if you’re using any other third-party antivirus program then run that tool and scan for the C: drive to check possible issues.
So, if you’re using the default Windows Defender program, then make sure to follow the steps below:
- Just open Windows Settings by pressing Windows + I keys.
- Now, click on Privacy & Security from the left pane.
- Click on Windows Security from the right pane.
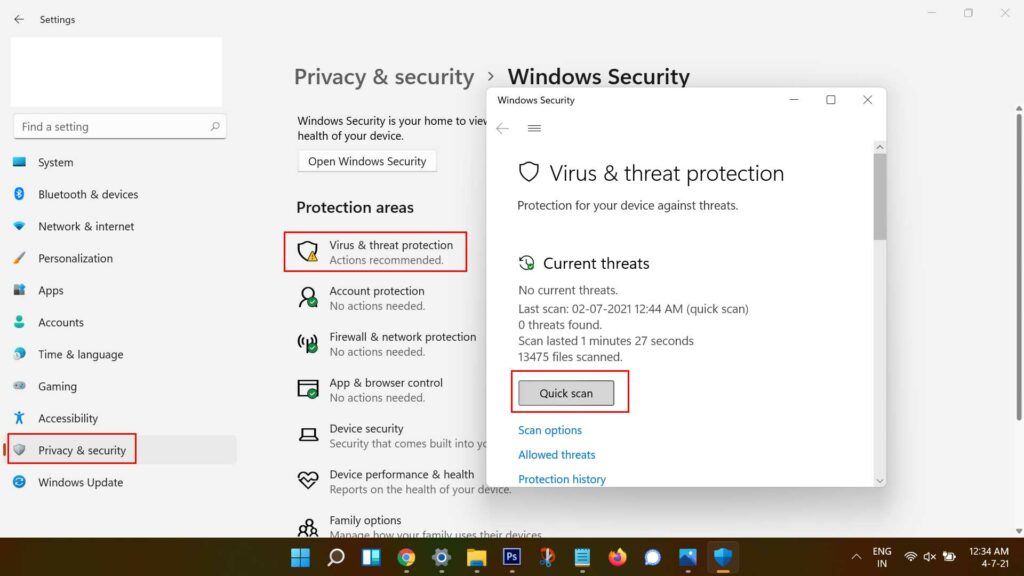
- Next, single-click on Virus & threat protection > Click on Quick scan.
- Wait for the scanning process to be completed.
- If there is a potential vulnerability found then the Windows Defender software will automatically remove it from your computer or ask you to choose whatever you want.
- But if there is no malware or virus found then make sure to follow the next method.
12. Turn Off Fast Startup
Well, Windows 10 and Windows 11 operating systems do come with an inbuilt Turn on fast startup feature to automatically improve the system boot-up timing. But that’s not the case for everyone. It seems that most of the users have experienced slower boot-up time than usual if they enable this option.
So, turning off the Fast Startup option may dramatically improve the boot-up time than before. To turn it off:
- Click on the Search icon from the taskbar > Type Control Panel and click on it from the search result.
- Now, click on Hardware and Sound > Select Power Options.
- However, if you don’t find power options then directly type Power Options from the Control Panel search bar.
- Then click on Choose what the power button does from the left pane.
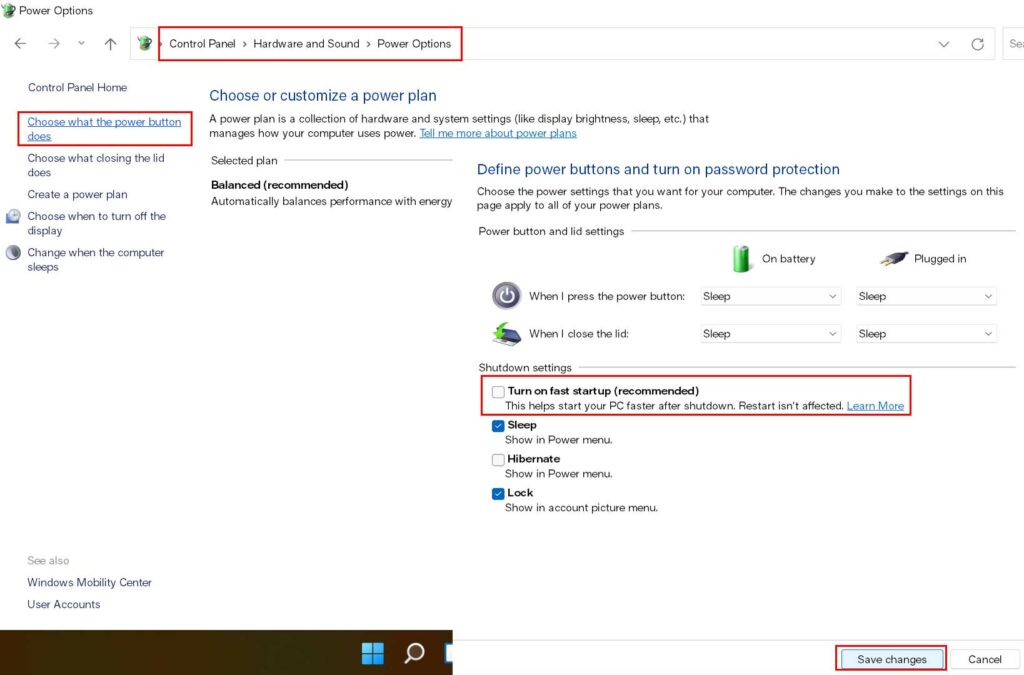
- Next, click on Change settings that are currently unavailable.
- If the ‘Turn on fast startup’ is already enabled then uncheck it to turn off.
- Click on Save changes and restart your computer to check if the boot time is improved.
13. Reset This PC
If you’re still experiencing the slow startup issue on your Windows 11 then make sure to use the Reset This PC option that’ll basically perform the factory reset to defaults. If some of the programs or other third-party files are causing issues with the system or boot file then performing the factory reset method may fix it.
- Just open Windows Settings by pressing Windows + I keys.
- Click on System from the left pane > Select Recovery from the right pane.
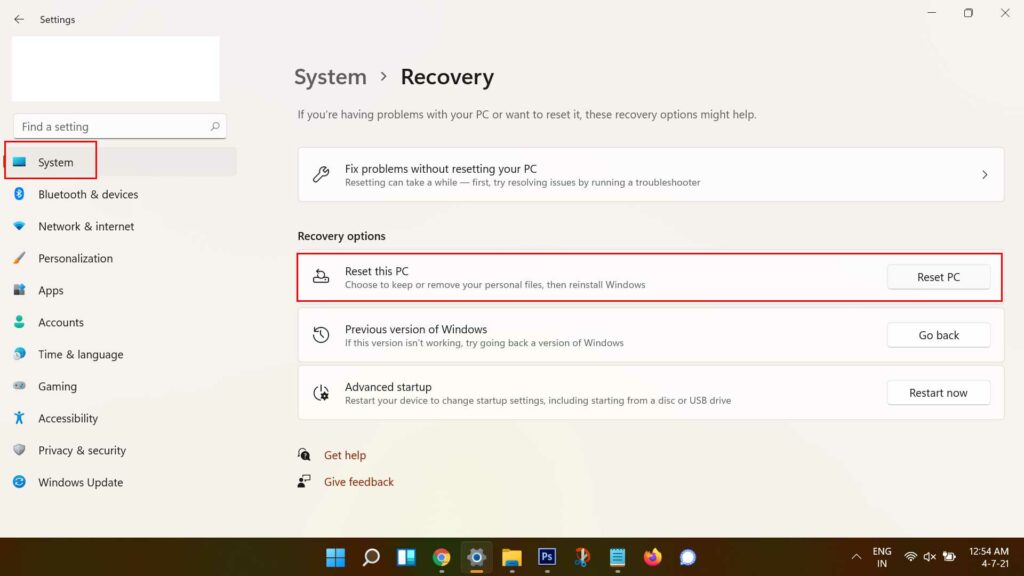
- Click on the Reset PC button next to the “Reset This PC” option.
- When prompted, make sure to perform a full fresh factory data. It means you don’t need to choose to keep previously installed apps or other internal data.
- Follow the on-screen instructions and wait for the process to be completed.
- Once done, make sure to restart your computer, and go through the initial setup process for the first time (if any).
14. Go Back to the Previous Version of Windows
If none of the workarounds come in handy then you should go back to the previous Windows OS version as a final resort. To do so:
- Just open Windows Settings by pressing Windows + I keys.
- Click on System from the left pane > Select Recovery from the right pane.
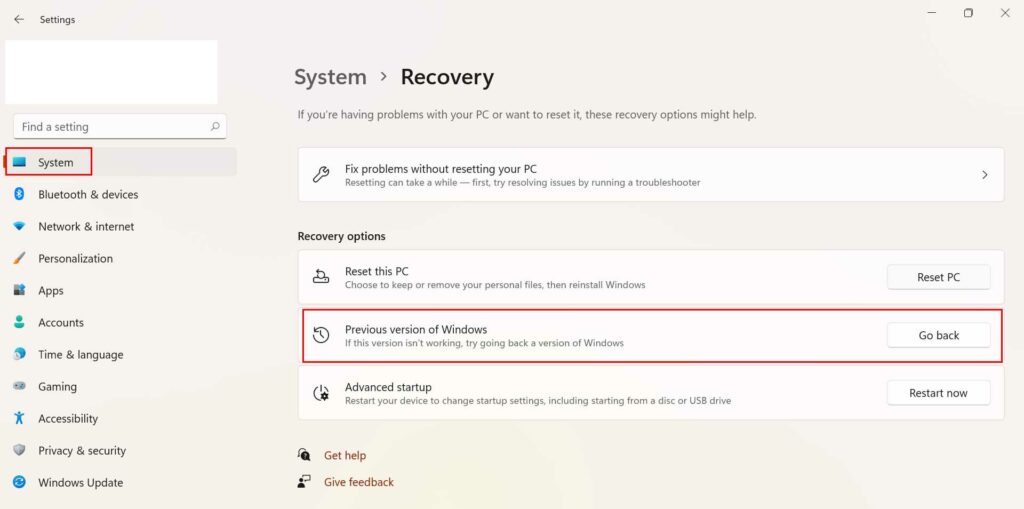
- Click on the Go back button next to the “Previous version of Windows” option.
- This process may also take some time. So, please be patient, and follow the on-screen instructions to complete the downgrading method.
- Once completed, restart your computer a couple of times to see if the Windows 11 slow startup issue is still bothering you or not.
You can check our video tutorial to fix this issue:
Conclusion
This is how you can easily improve the startup time of your Windows computer on both the HDD and SSD drives. However, as we’ve already mentioned, having an SSD drive with smaller storage space as a system (Windows) drive is much superior to having an HDD drive with higher storage space. Whereas all other possible aspects are also applicable respective to the individual scenarios.
That’s it, guys. We assume you’ve found this guide helpful. If you’ve any queries, you can comment below.
