BlueStacks is the go-to platform if you want to enjoy android games and applications on your Windows PC. In fact, it is considered the best Android Emulator ever released for Windows. Most of the basic features of BlueStacks are free to use. But if you want to have more control over your Android applications you can go for the premium plan. What makes BlueStacks the best of its kind is that similar to Android smartphones, BlueStacks also has the Google Play Store from where you can download your favorite applications.
But like anything else on the internet, BlueStacks also has its own set of problems. Among these, BlueStacks’ crashing on Windows 11 PC has been a source of concern for users recently. In fact, users are experiencing two types of crash issues with BlueStacks. First, BlueStacks is crashing with an “unexpected error occurred” message. whereas in another case, it shows a blue screen of death followed by a complete crash.
Although there can be different reasons behind the problem, most of the time, corrupted software or an outdated version of the platform is causing the crash. So, if you are also facing BlueStacks crashing problems on Windows 11, then this is the place where you need to be. Here, we are going to share different workarounds on how to fix BlueStacks crashing on your Windows 11 PC? So, without any further ado, let’s get started.
Also Read

Page Contents
Reasons Behind BlueStacks’ Crashing on Windows 11
As mentioned, there can be multiple reasons why you are experiencing BlueStacks crashing problems on Windows 11. However, some of the most common ones are listed below.
- A corrupted or outdated version of BlueStacks can act as a catalyst in the crashing problems.
- BlueStacks will crash on a Windows 11 PC if you have kept the Hyper-V option enabled.
- Third-party antivirus applications like Norton and AVG can act as a barrier between BlueStacks and Windows 11. As a result of it, you might have to deal with the crashing problem.
- Not only BlueStacks, but any graphics-oriented application will crash on Windows 11 if you haven’t updated the graphics drivers for a long time.
- BlueStacks needs a good amount of space to run seamlessly. If not provided, you might have to face different problems with the application including the crashing issue.
Now that you are aware of the core reasons that are responsible for BlueStacks crashing problem, it’s time to check out how to fix them.
Also Read
Best Lightweight Android Emulators for PC in 2022
How to Fix Bluestacks Error 2318 While Installing and Uninstalling
Fix Windows 11 Random Shutdown Issue
How To Fix External Hard Drive I/O Device Error in Windows 11/10
How to Fix if 4K Videos Not Playing on Windows 11
How to Fix If Brightness Slider Missing on Windows 11 and 10
How to Fix Scanner Not Working Issue on Windows 11
How to Enable New CoPilot AI in Windows 11 23493
How to fix BlueStacks Crashing on your Windows 11 PC?
As mentioned, there are multiple reasons that can cause BlueStacks to crash on Windows 11. Thus, you will have to fix those problems if you want to get rid of the glue stick scratching issue. So, here are different workarounds you can try to fix BlueStacks crashing on your Windows 11 PC problem.
Fix 1: Reinstall BlueStacks With Latest Version
As mentioned in the causes, an outdated driver can act as a catalyst to initiate BlueStacks problems including the crashing issue. If you haven’t updated the BlueStacks application for a long time, then it’s very likely that you are going to face the crashing problem. As a solution to it, reinstall BlueStacks with the latest version.
Even though you already have the latest BlueStacks version, we still recommend that you re-install it at least once. Reinstalling an application removes any corrupted file that was causing the issue. Nevertheless, these are the steps you need to follow to reinstall BlueStacks with the latest version of Windows 11.
- Press the Windows key to open the start menu.
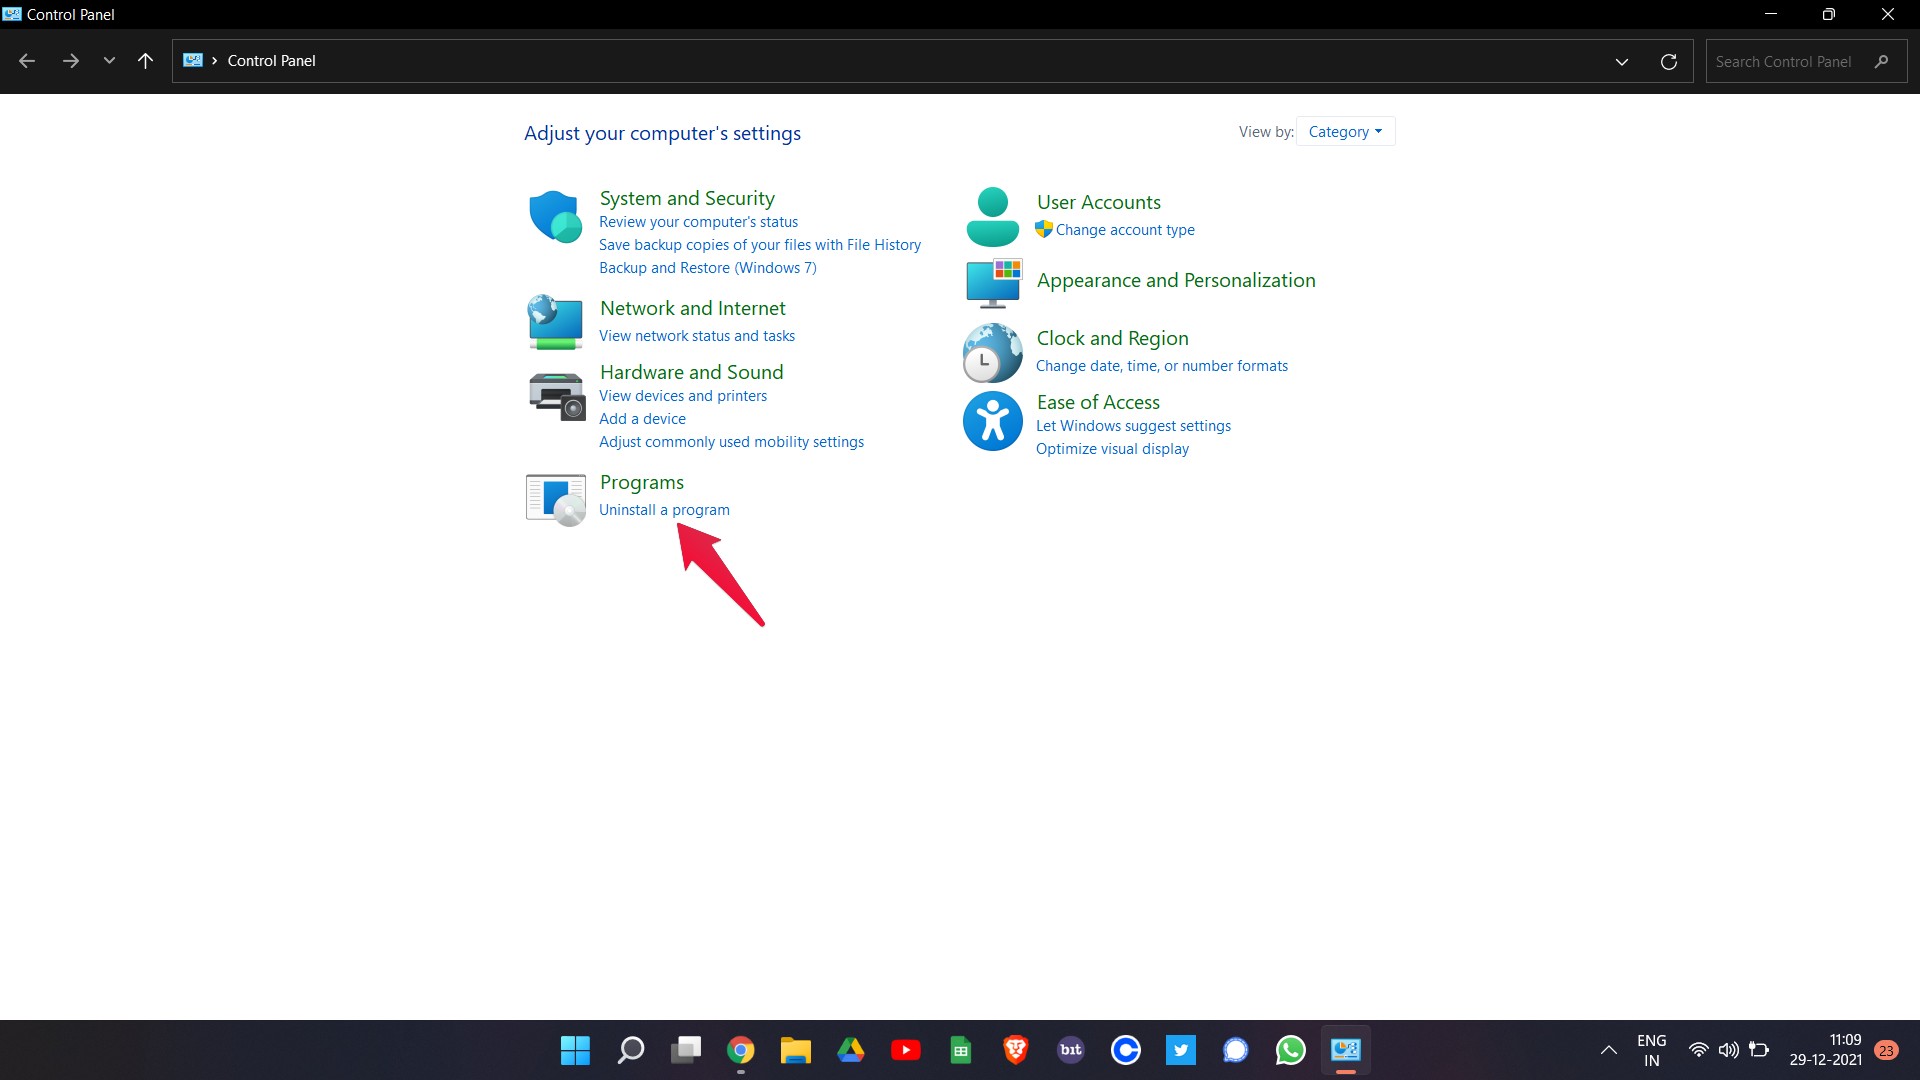
- In the search bar, type Control Panel and press enter.
- Click on “Uninstall a Program”.
- Here, you will find a list of all the applications installed on your Windows 11 PC. Right-click on BlueStacks and select uninstall.
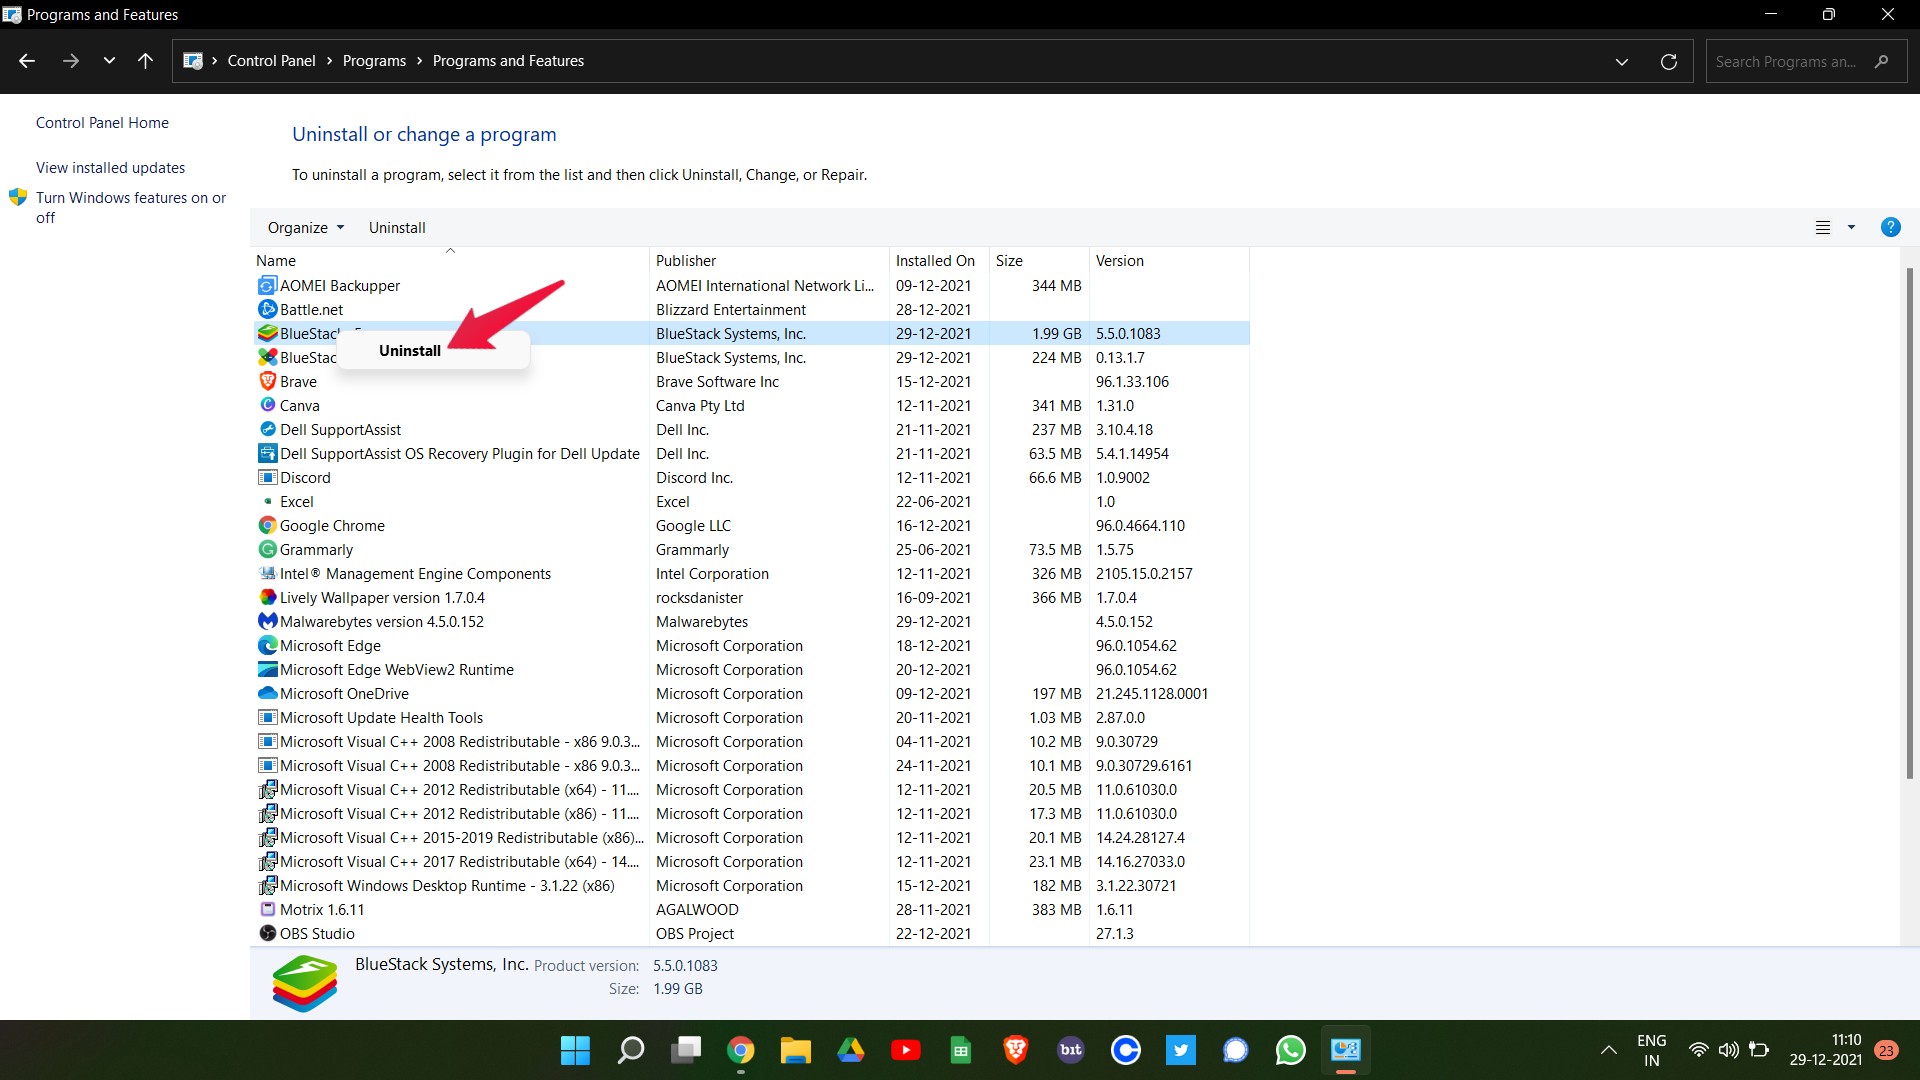
You have finally uninstalled BlueStacks from your Windows 11 PC. Now, it’s time to download the latest version, BlueStacks 5 (at the time of writing the article). So, here’s what you need to do.
- Open Google Chrome and type BlueStacks 5 and press enter.
- Go to the very first link, i.e., the BlueStacks official website.
- Click on “Download”.

Once downloaded, install it on your system, and check if you are still facing the BlueStacks crashing issue. If not, you are good to go. However, if the problem continues, it’s time to get into the technical aspects of the workarounds.
Also Read
Fix 2: Change BlueStacks Settings
BlueStacks is a graphics-oriented application, that’s why it’s only recommended to use it on a high-end PC. But what if it’s crashing on a high specification Windows 11 PC as well?
If this is the case, then it indicates that you haven’t allocated enough RAM and CPU cores for the application. The RAM and CPU cores ensure that BlueStacks offers the best performance that automatically rules out the crashing problem. So, here’s what you need to do to adjust BlueStacks settings.
- Open BlueStacks application on Windows 11.
- Press the Ctrl + Shift + I shortcut key to open the settings menu on BlueStacks.
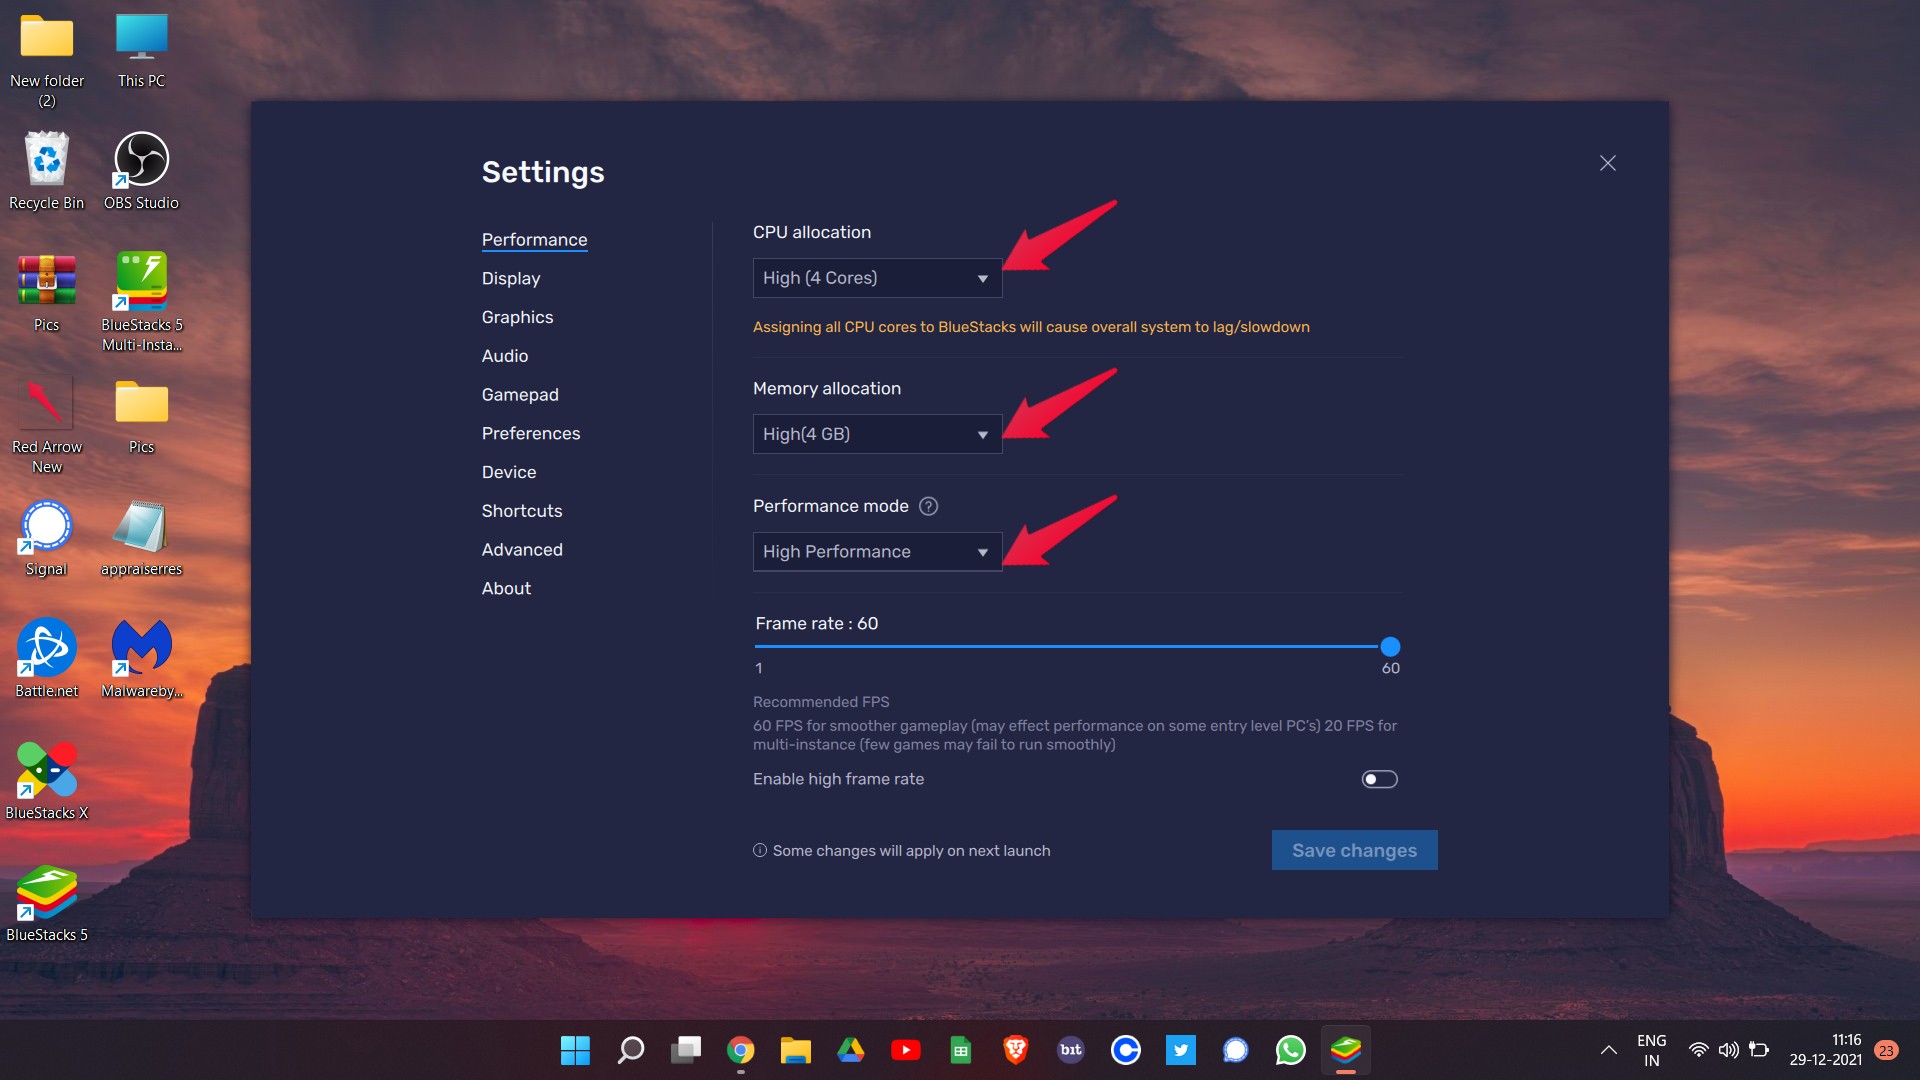
- Now, you will have to change some numbers of different options present under the “Performance” section.
- Change the “CPU allocation” to 4 cores.
- Change memory allocation to “High” (4GB).
- In the Performance mode, choose “High Performance”.
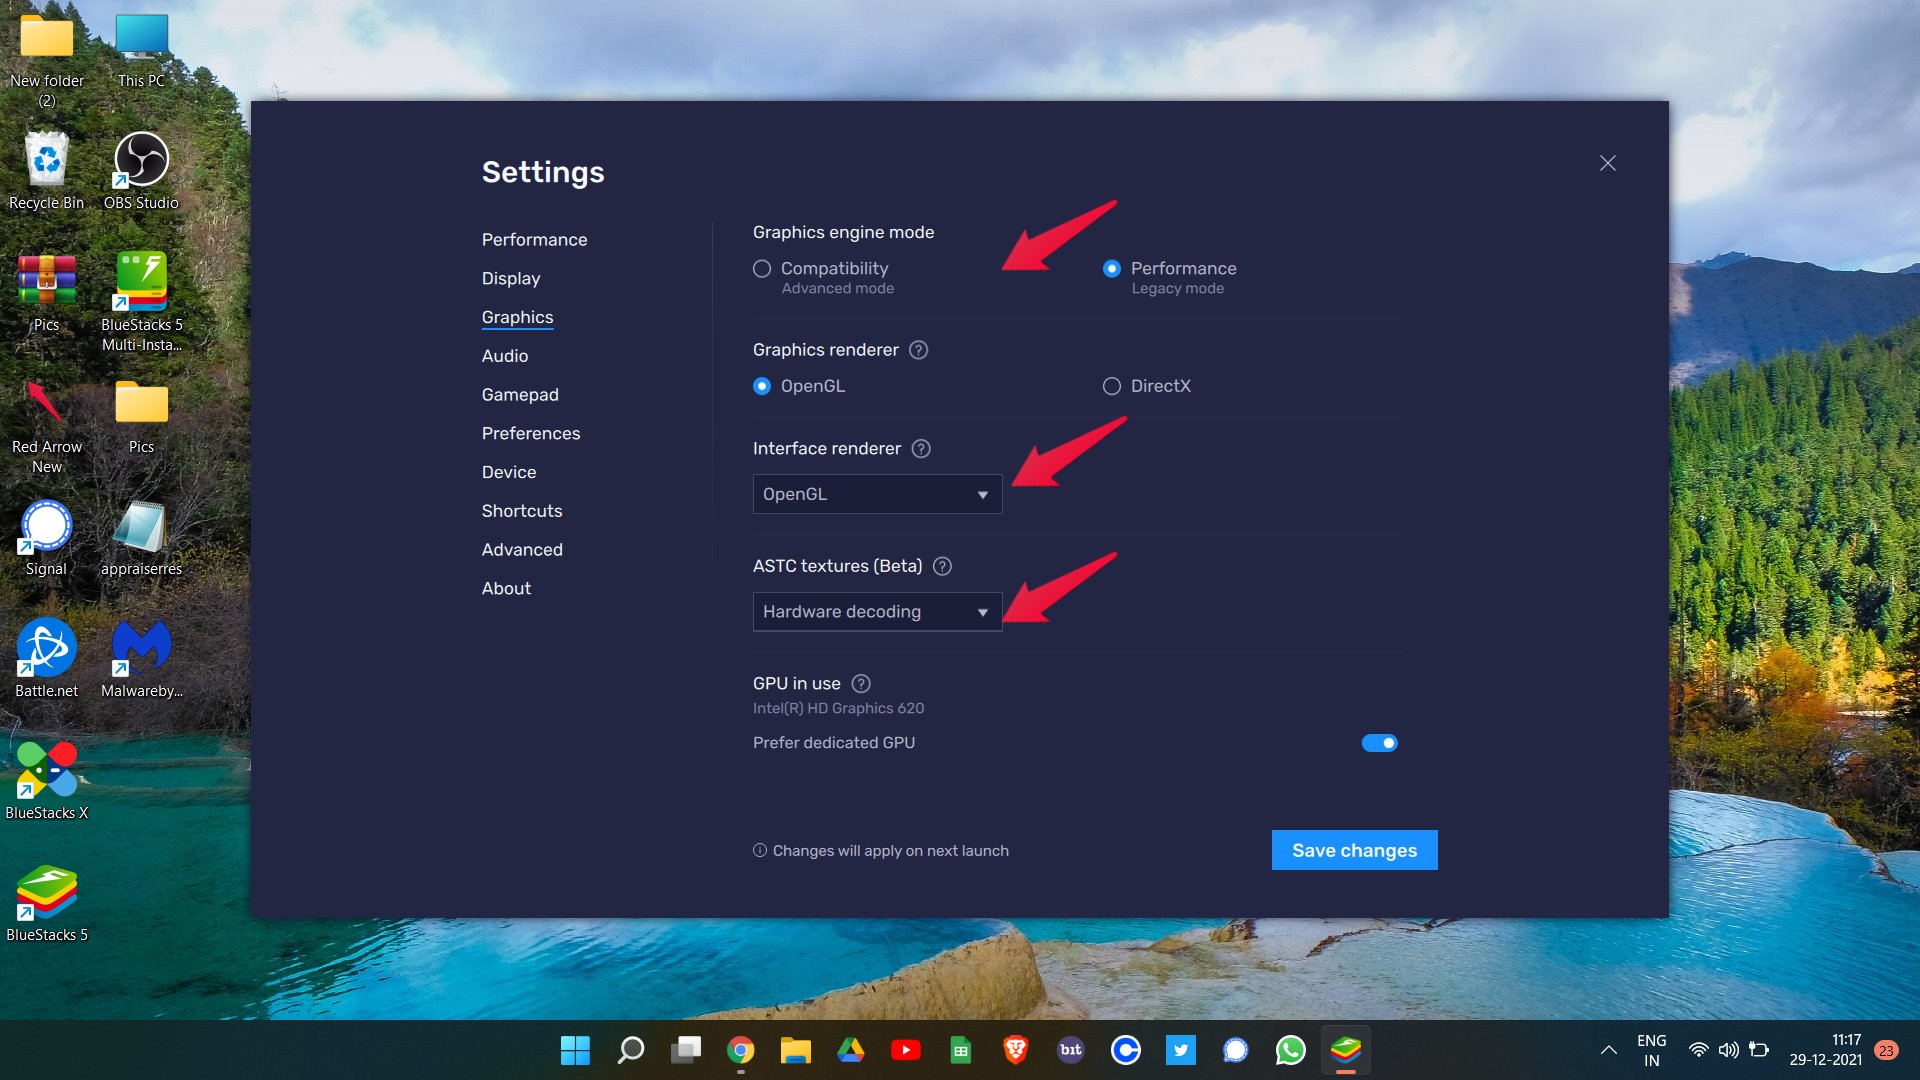
Now come to the “Graphics” section of the settings.
- Make sure the graphics engine mode and graphics renderer is set to “Performance” and “OpenGL” respectively.
- Change the Interface renderer to “OpenGL” and ASTC textures (Beta) to “Software decoding”.
Once done, click on “Save Changes”. Now restart BlueStacks and see if you are still facing the crashing problem.
Fix 3: Download the Latest Graphics Engine
An outdated graphics Driver can cause BlueStacks to crash on your Windows 11. It has been noticed in many cases that BlueStacks crashing problem was solved just by updating the graphics driver. So, if your system has Nvidia GPU installed in it, you can click this link to visit Nvidia’s official website and download the update as per your GPU model. The same is the case with AMD Ryzen. Just visit the official website through this link, download the update as per your model.
But what if your Windows 11 features just a dedicated graphics card? In such a case, you should let windows decide which update is useful for your system. So, follow the below-mentioned steps to find out what is that you need to do.
- Press the Windows key to open the Start Menu.
- In the search bar, type “Device Manager” and press enter.
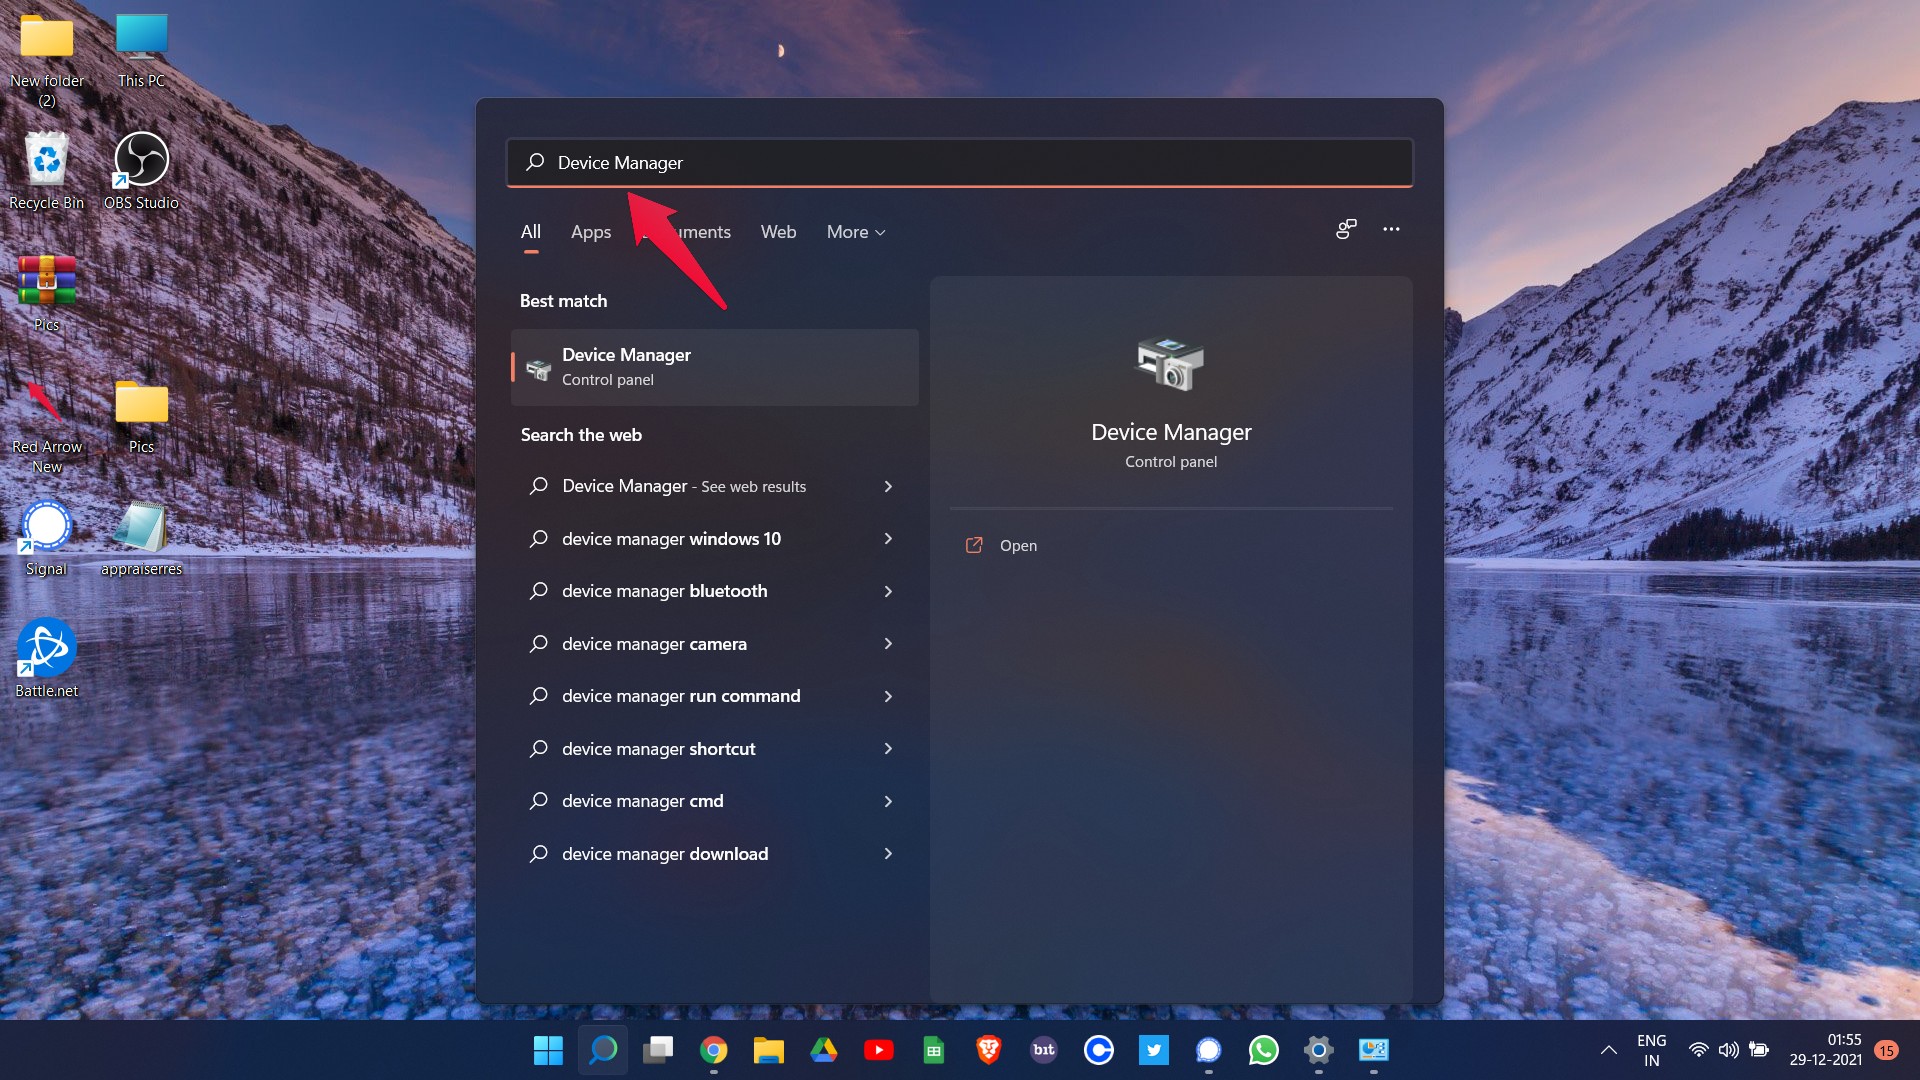
- The device manager window will pop up.
- Expand the “Display Adaptor” option by double-tapping on it.
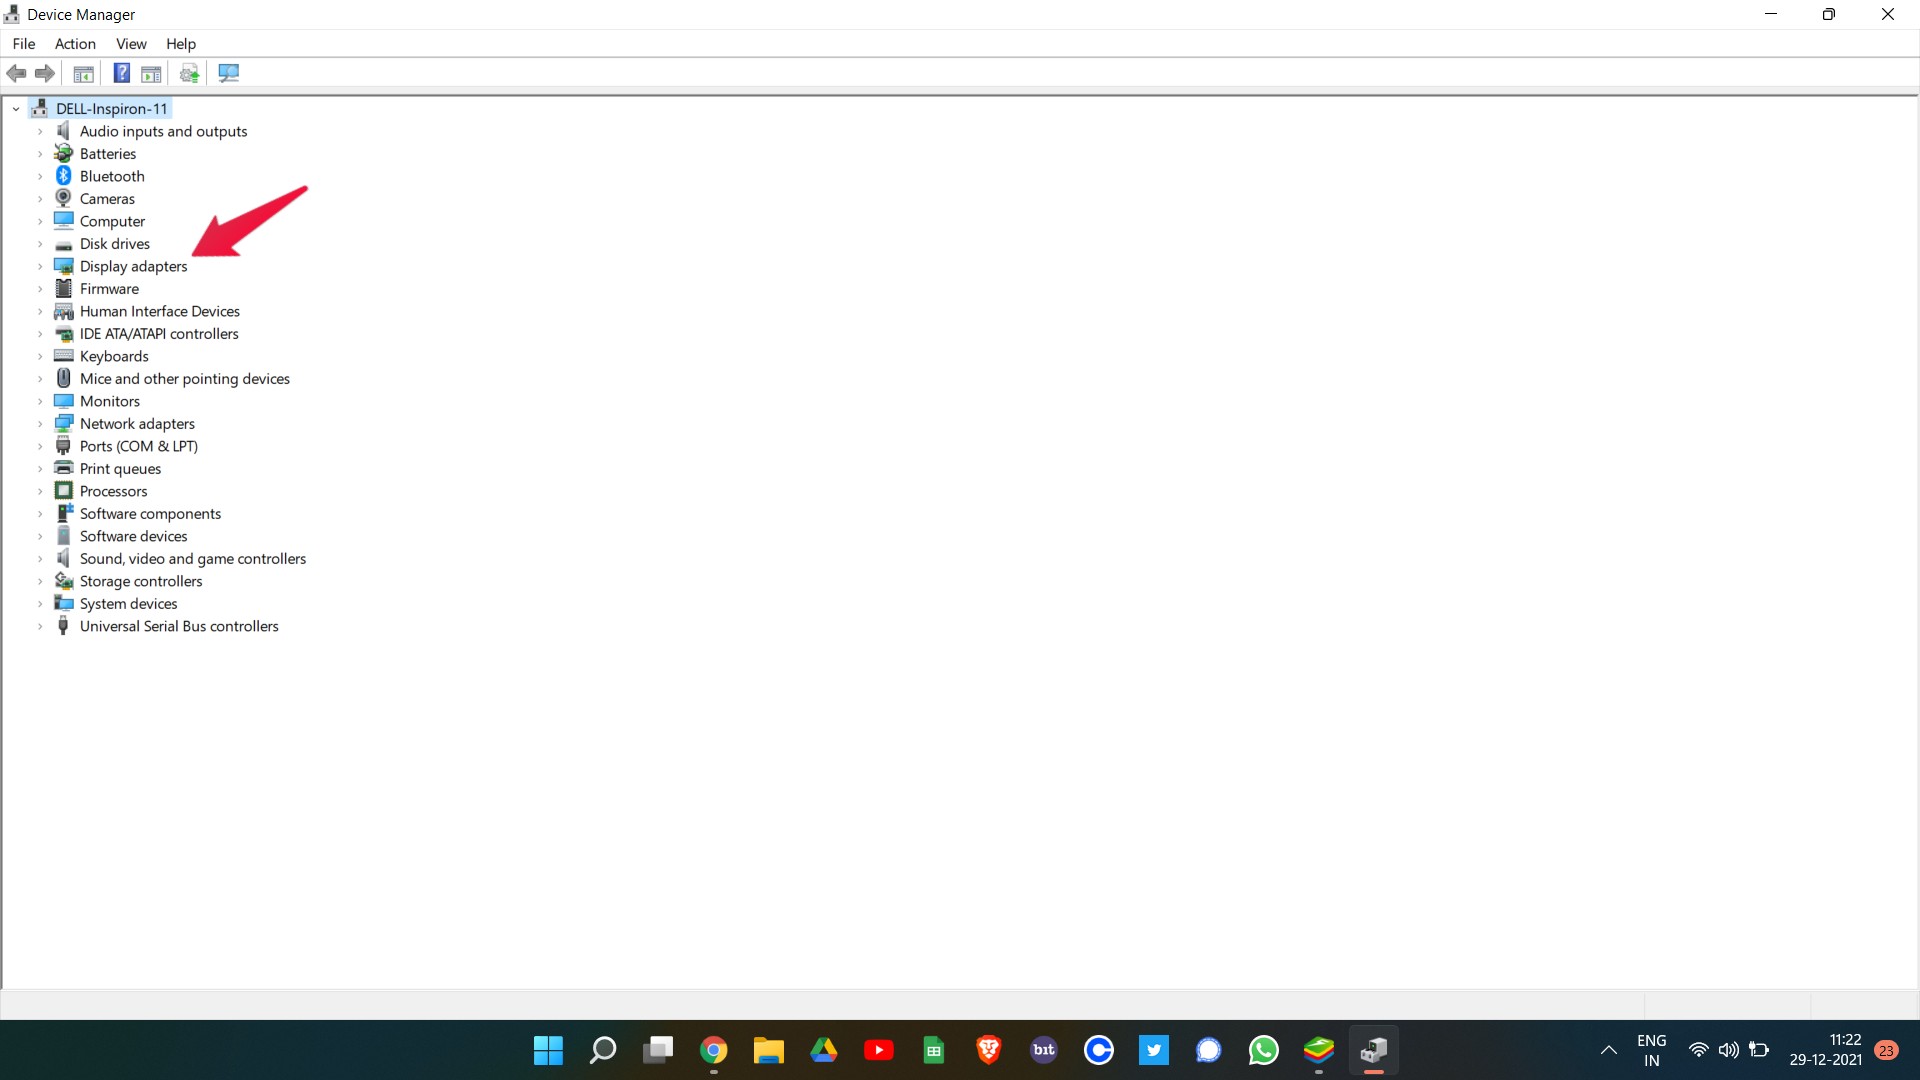
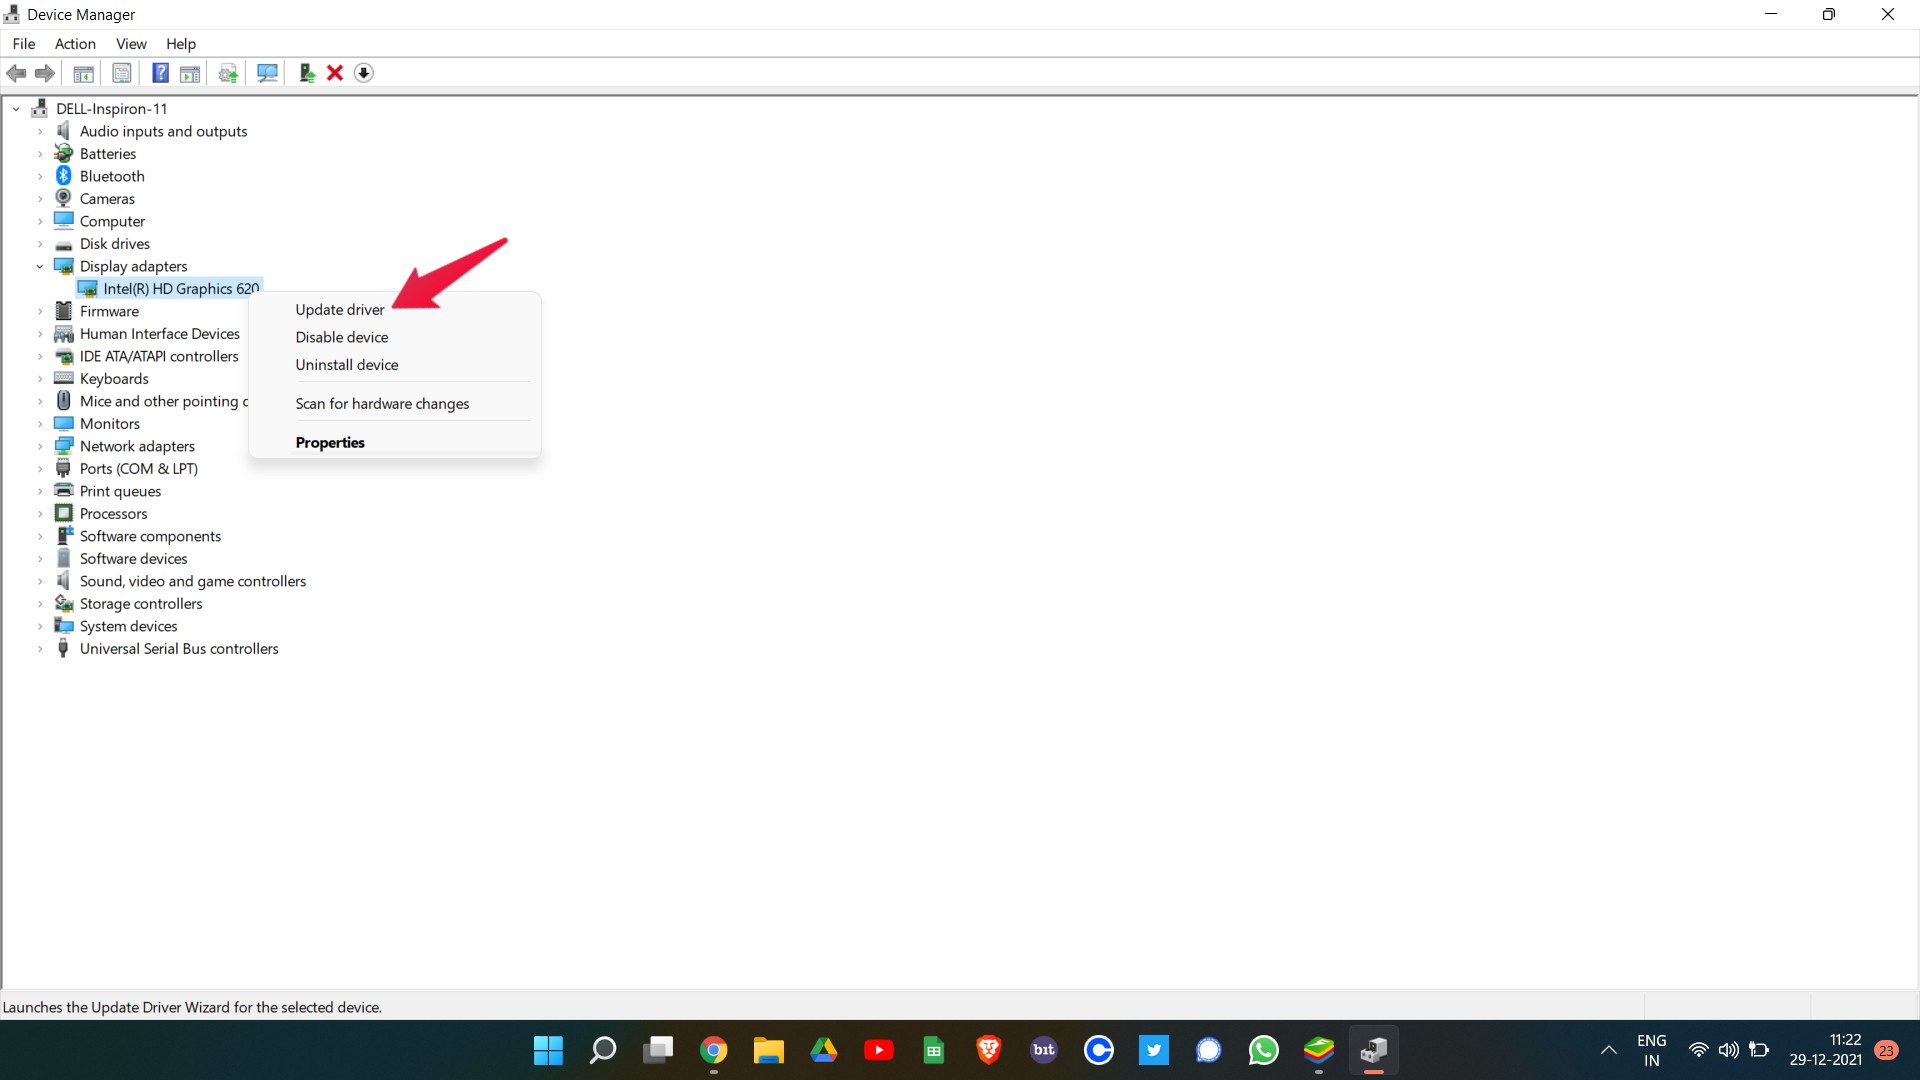
- Now, right-click on the Intel HD Graphics, and select Update Driver.
- Lastly, choose the “Search automatically for driver” option to initiate the update process.
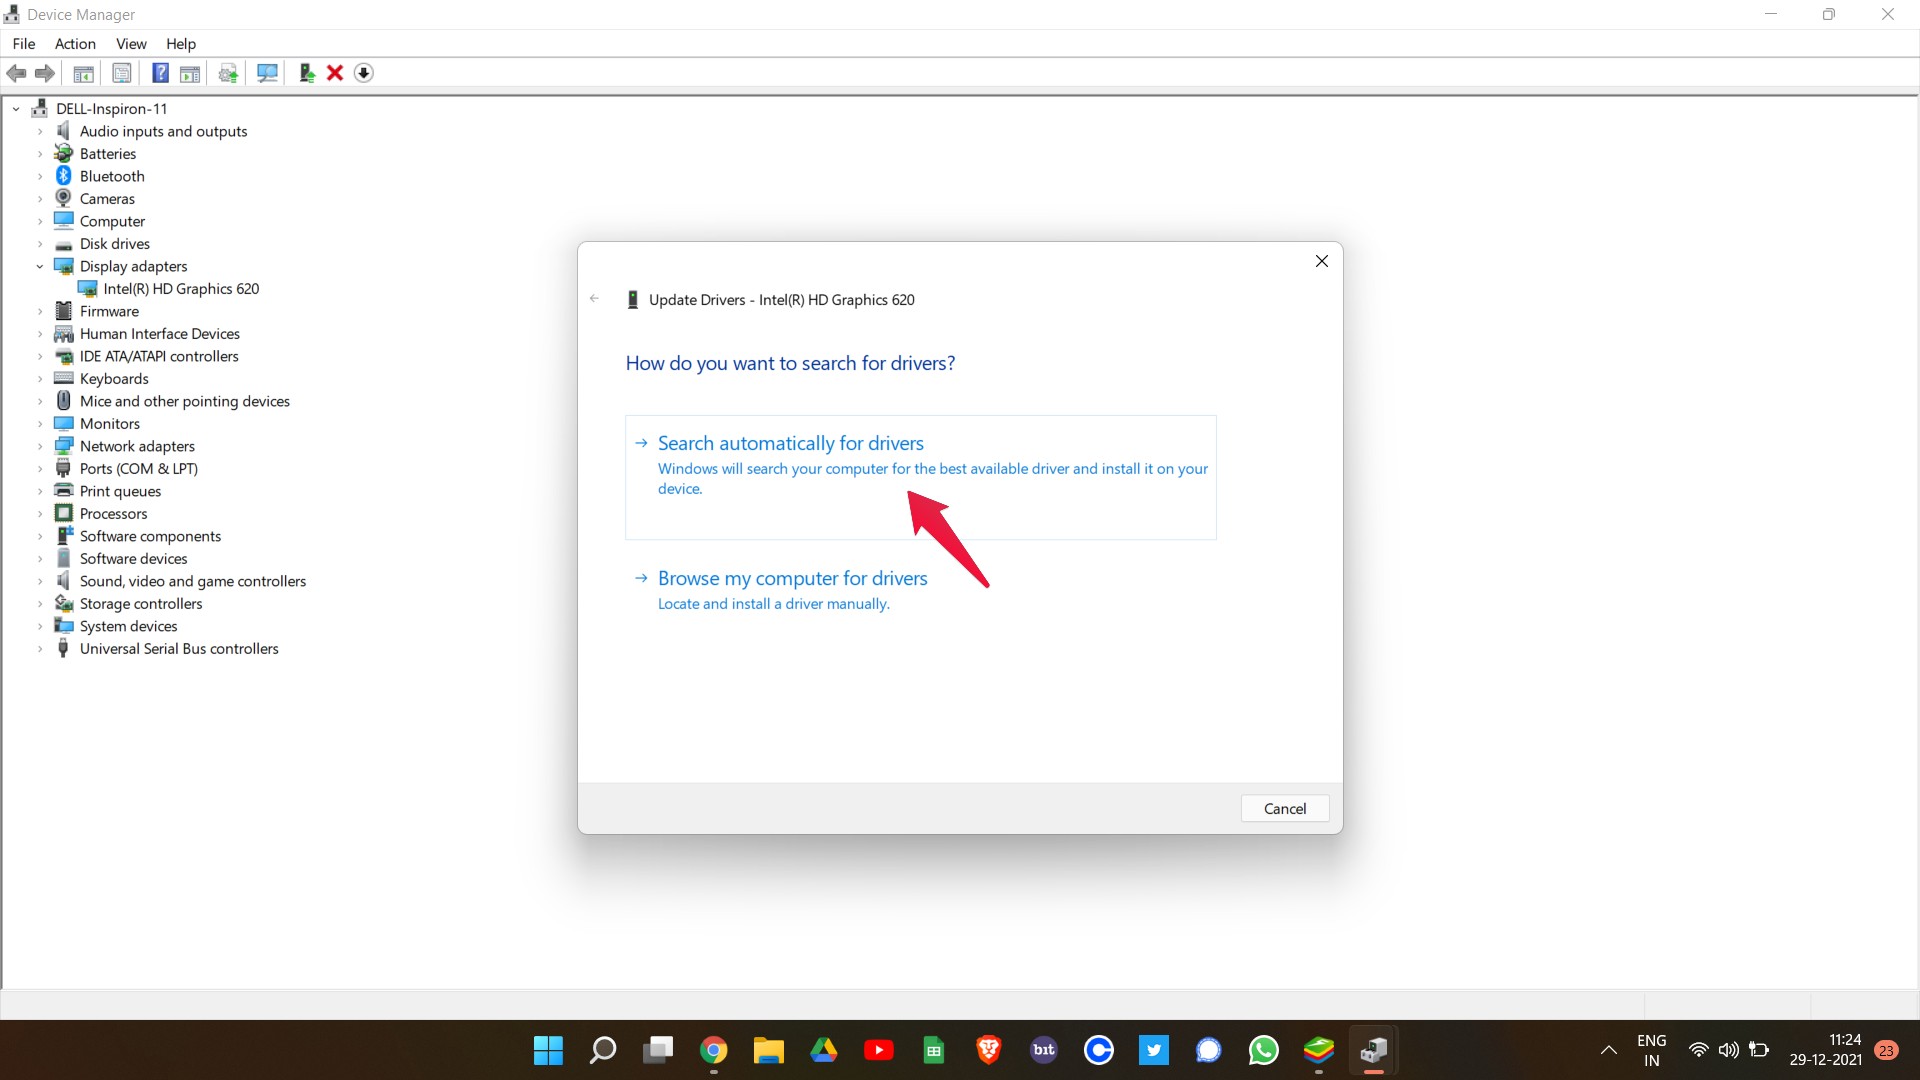
Once updated, restart BlueStacks, and check if the problem is fixed or not. If not, move on to the next workaround.
Fix 4: Remove a 3rd-Party Antivirus
Third-party antivirus and BlueStacks have a long history of rivalry. Most of the issues that originate in BlueStacks are caused by a third-party antivirus. Any antivirus program like Avast, Norton, Malwarebytes, or anything else that you have installed on your Windows 11 PC can cause the problem. So, if you want to get rid of BlueStack’s crashing problem you will have to uninstall these anti-virus programs.
Note that, you should only go with this method if you think BlueStacks is more important for you than having an antivirus program installed on your system. So, here are the steps that you need to follow.
- Go to Control Panel > Uninstall a Program
- In the Progress and Features window, right-click on any third-party antivirus program that you have installed on your PC. And then select uninstall.
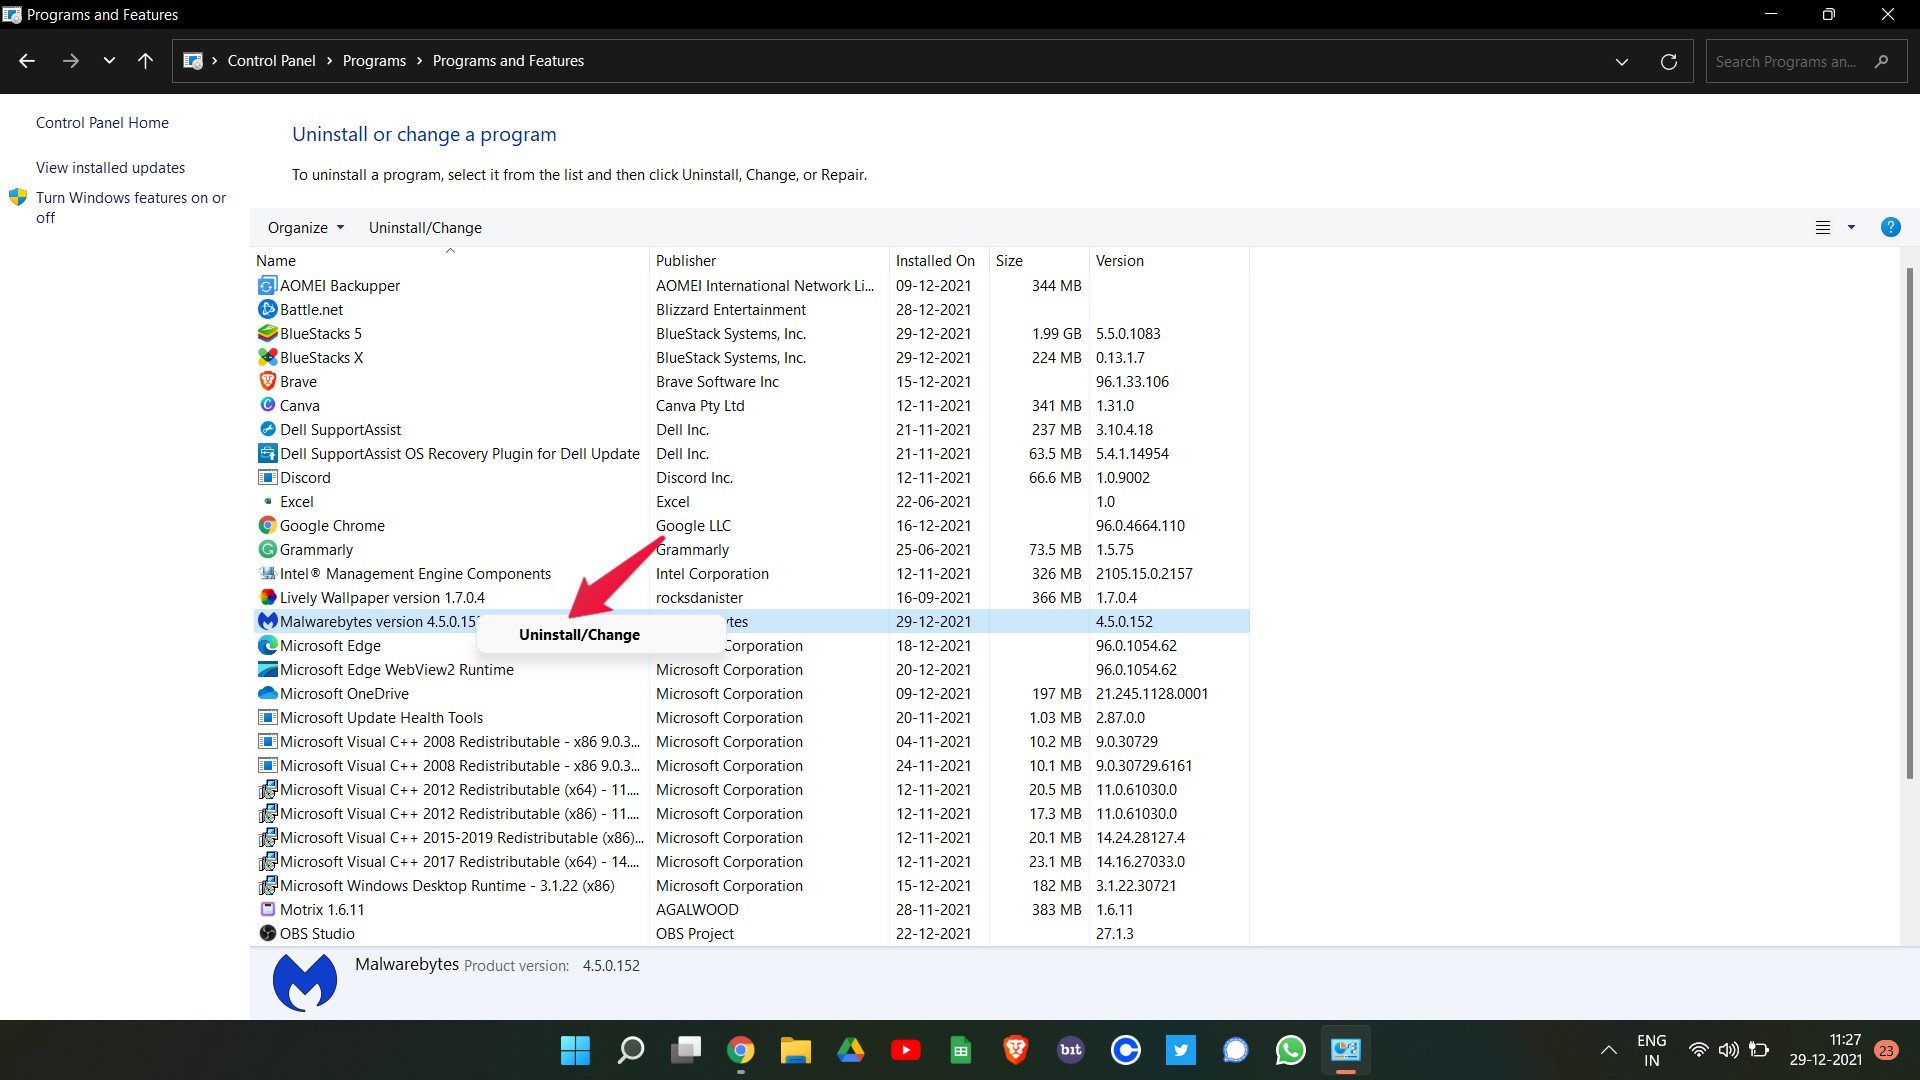
Once the uninstallation process is complete, reboot your system. Now launch BlueStacks and check if the problem is fixed or not.
Fix 5: Turn Off Hyper V Service
If you have been using an Android emulator for a long time, then you must be aware of the Hyper-V service, and how it is responsible for different issues that originate in them. Turning off Hyper V services is one of the best ways to fix BlueStacks crashing on your Windows 11 PC problem. Note that, disabling this service will degrade your system performance. But the trade sounds fair as you will get non-stop BlueStacks entertainment in return for a slight degradation in the system performance.
There are a couple of ways to disable the Hyper V service on Windows 11 PC. We will be sharing both methods so that you can go with the one that you find easier to operate.
- Open the Start menu by pressing the Windows key.
- In the search bar type CMD and click on open as administrator.
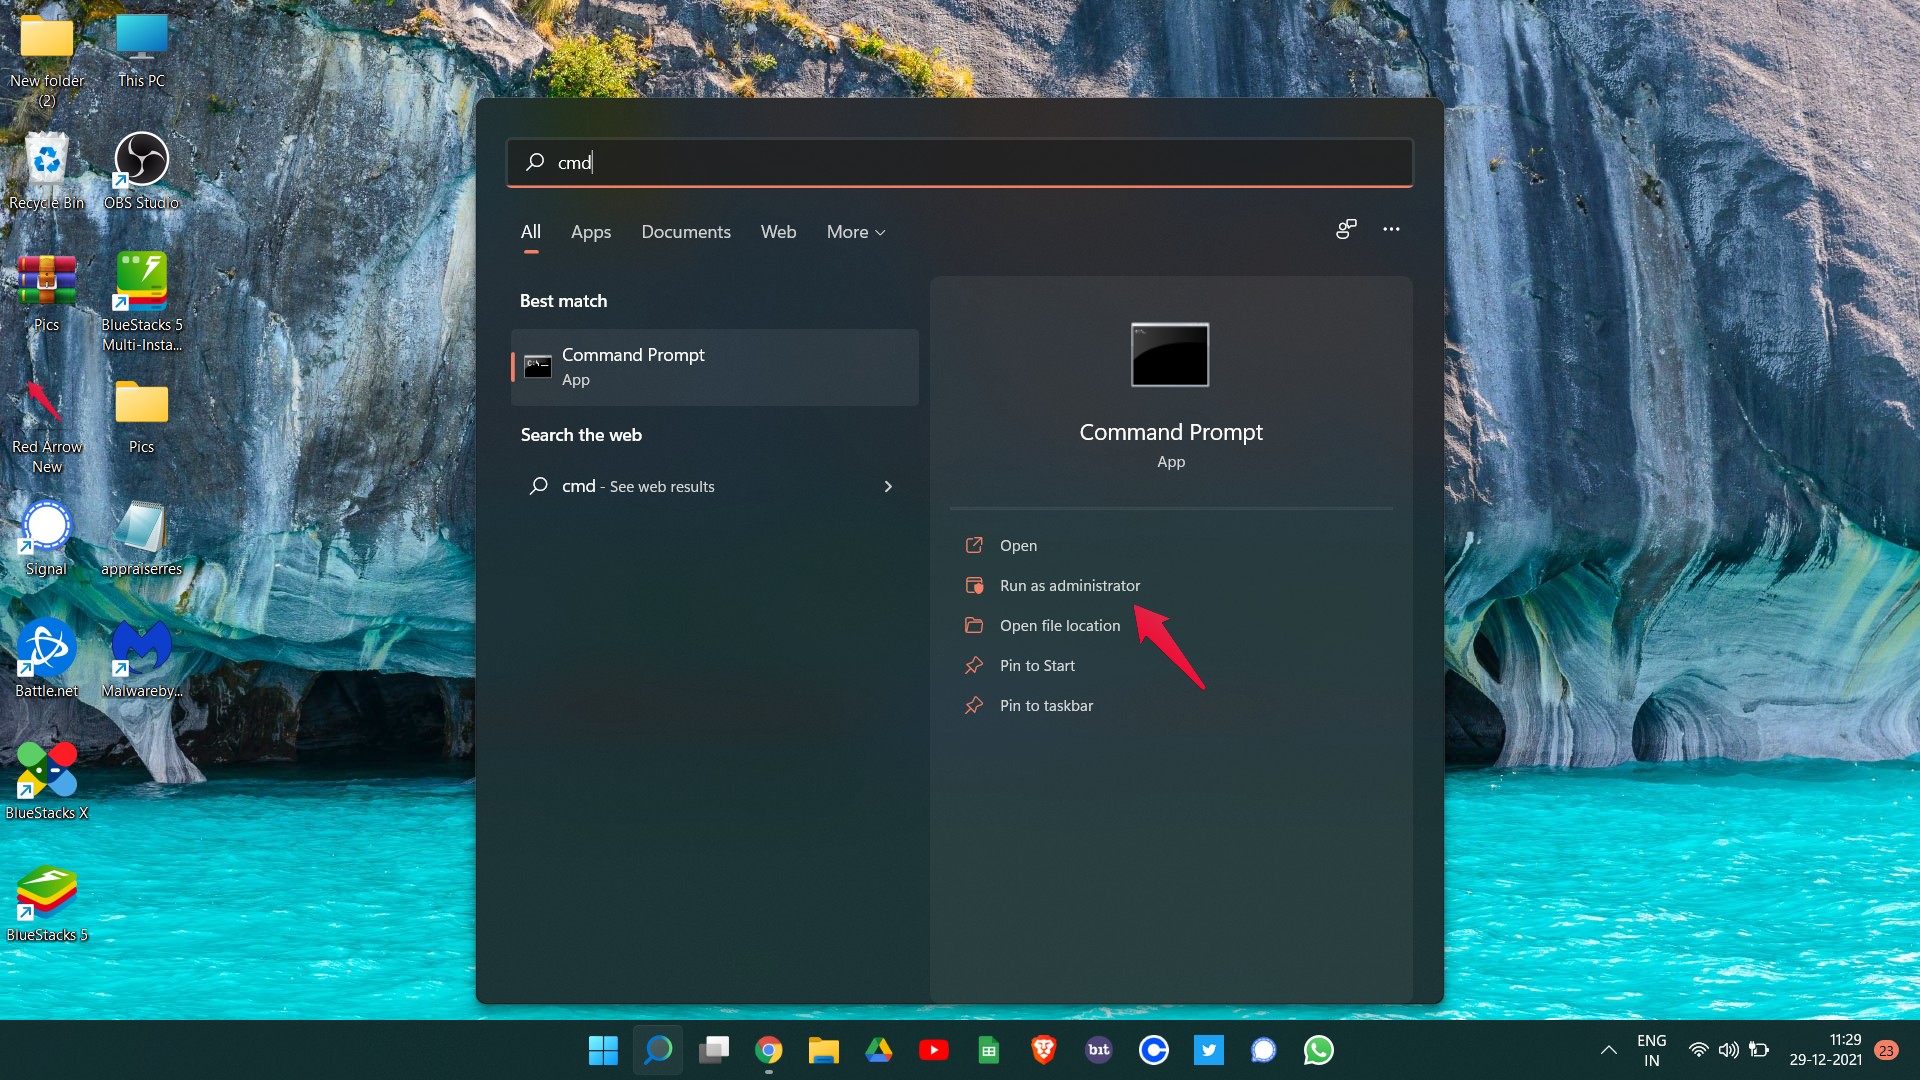
- Now, in the space provided, type the below-mentioned code and press enter.
bcdedit /set hypervisorlaunchtype off
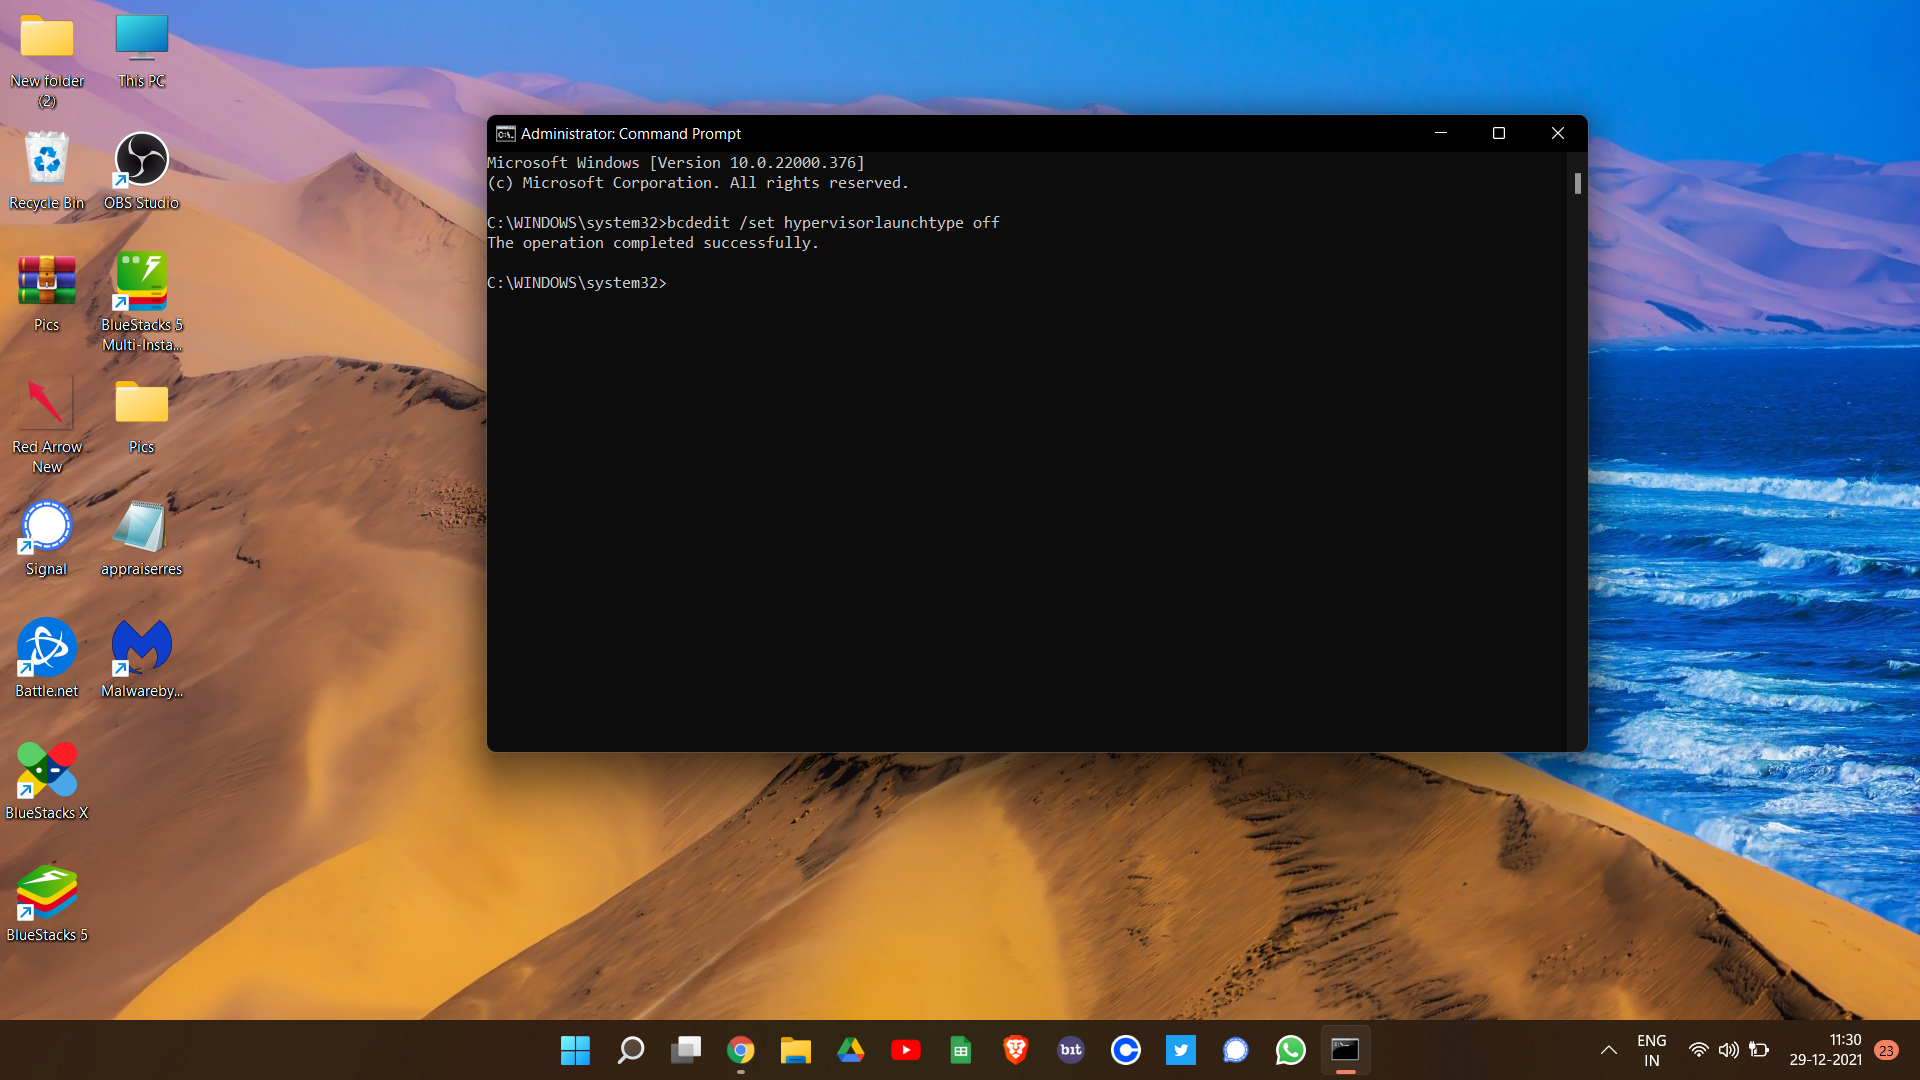
It will take a few seconds to disable the Hyper-V service. Now let’s check out the second method that you can use to disable this service.
- Go to Control Panel > Uninstall a Program.
- Click on “Turn Windows features on or off”.
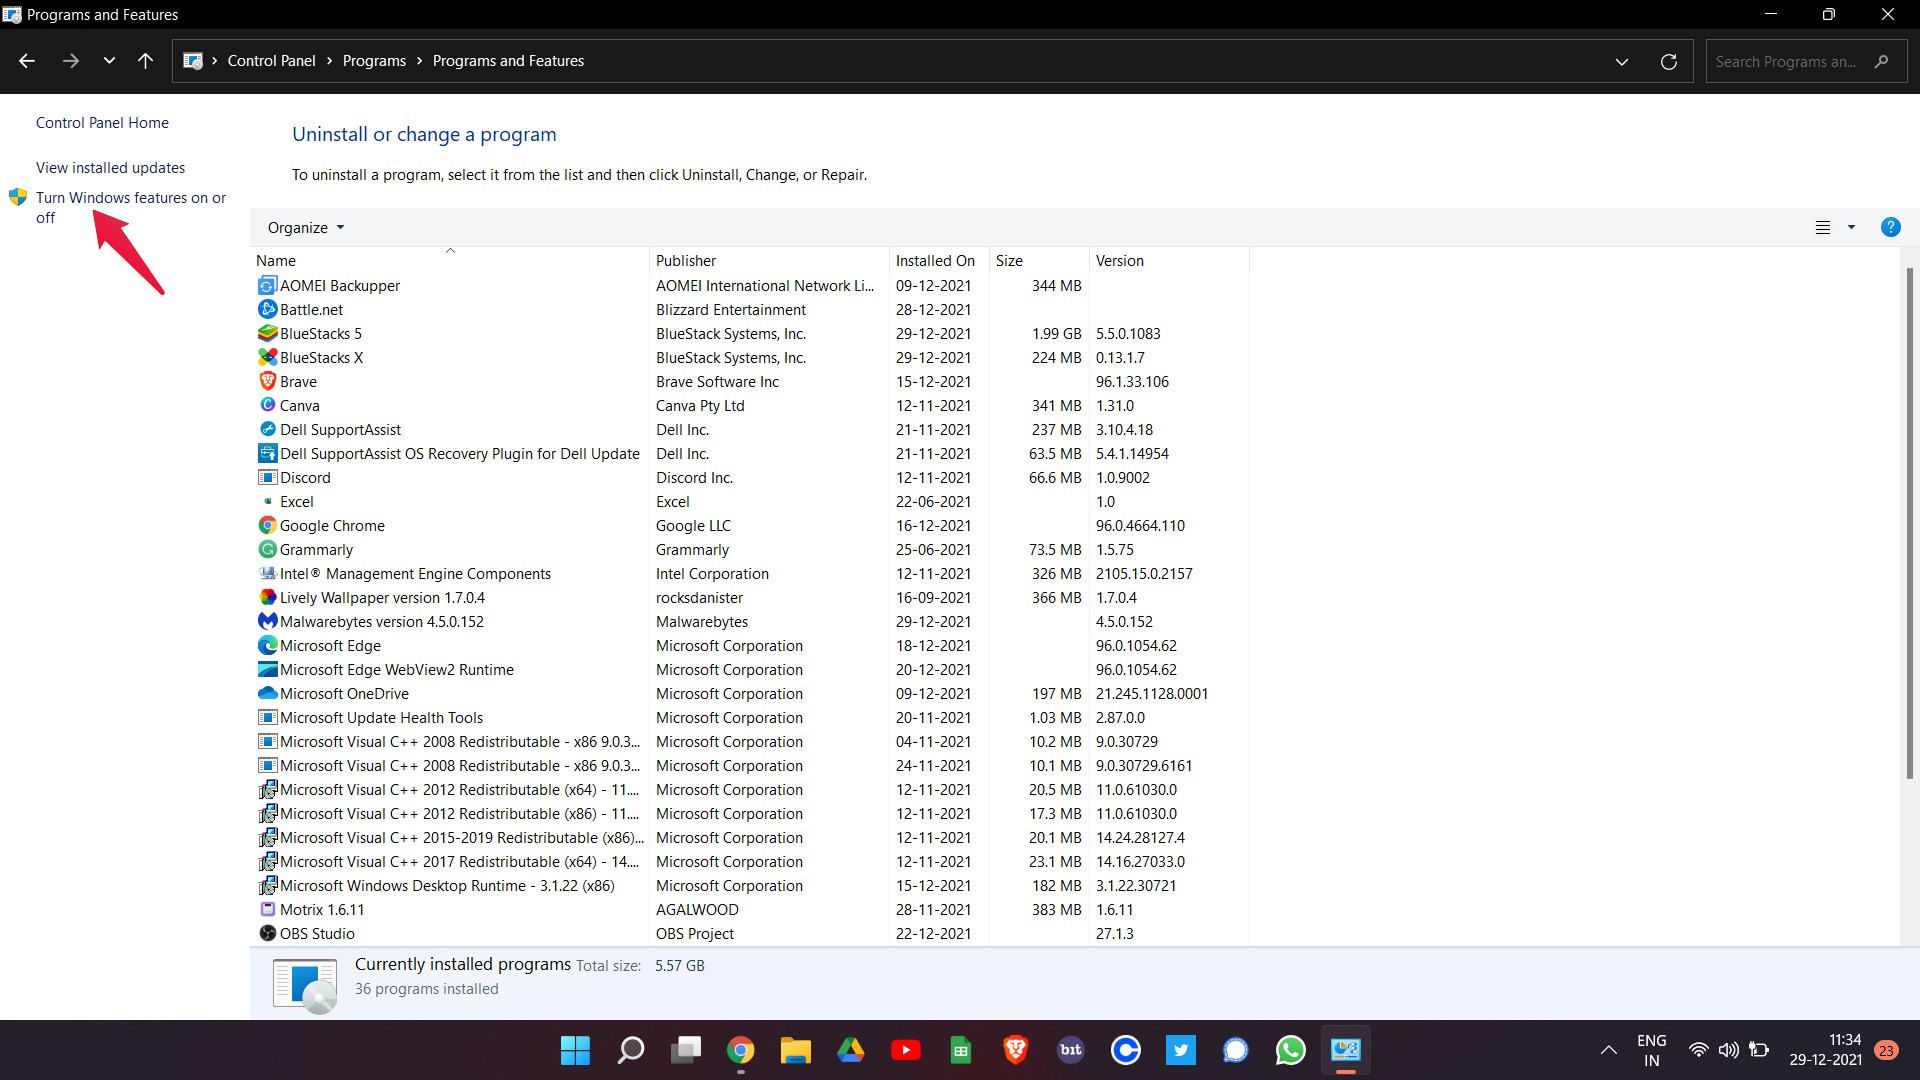
- Uncheck the “Windows Hyperversion Platform”, and click on OK.
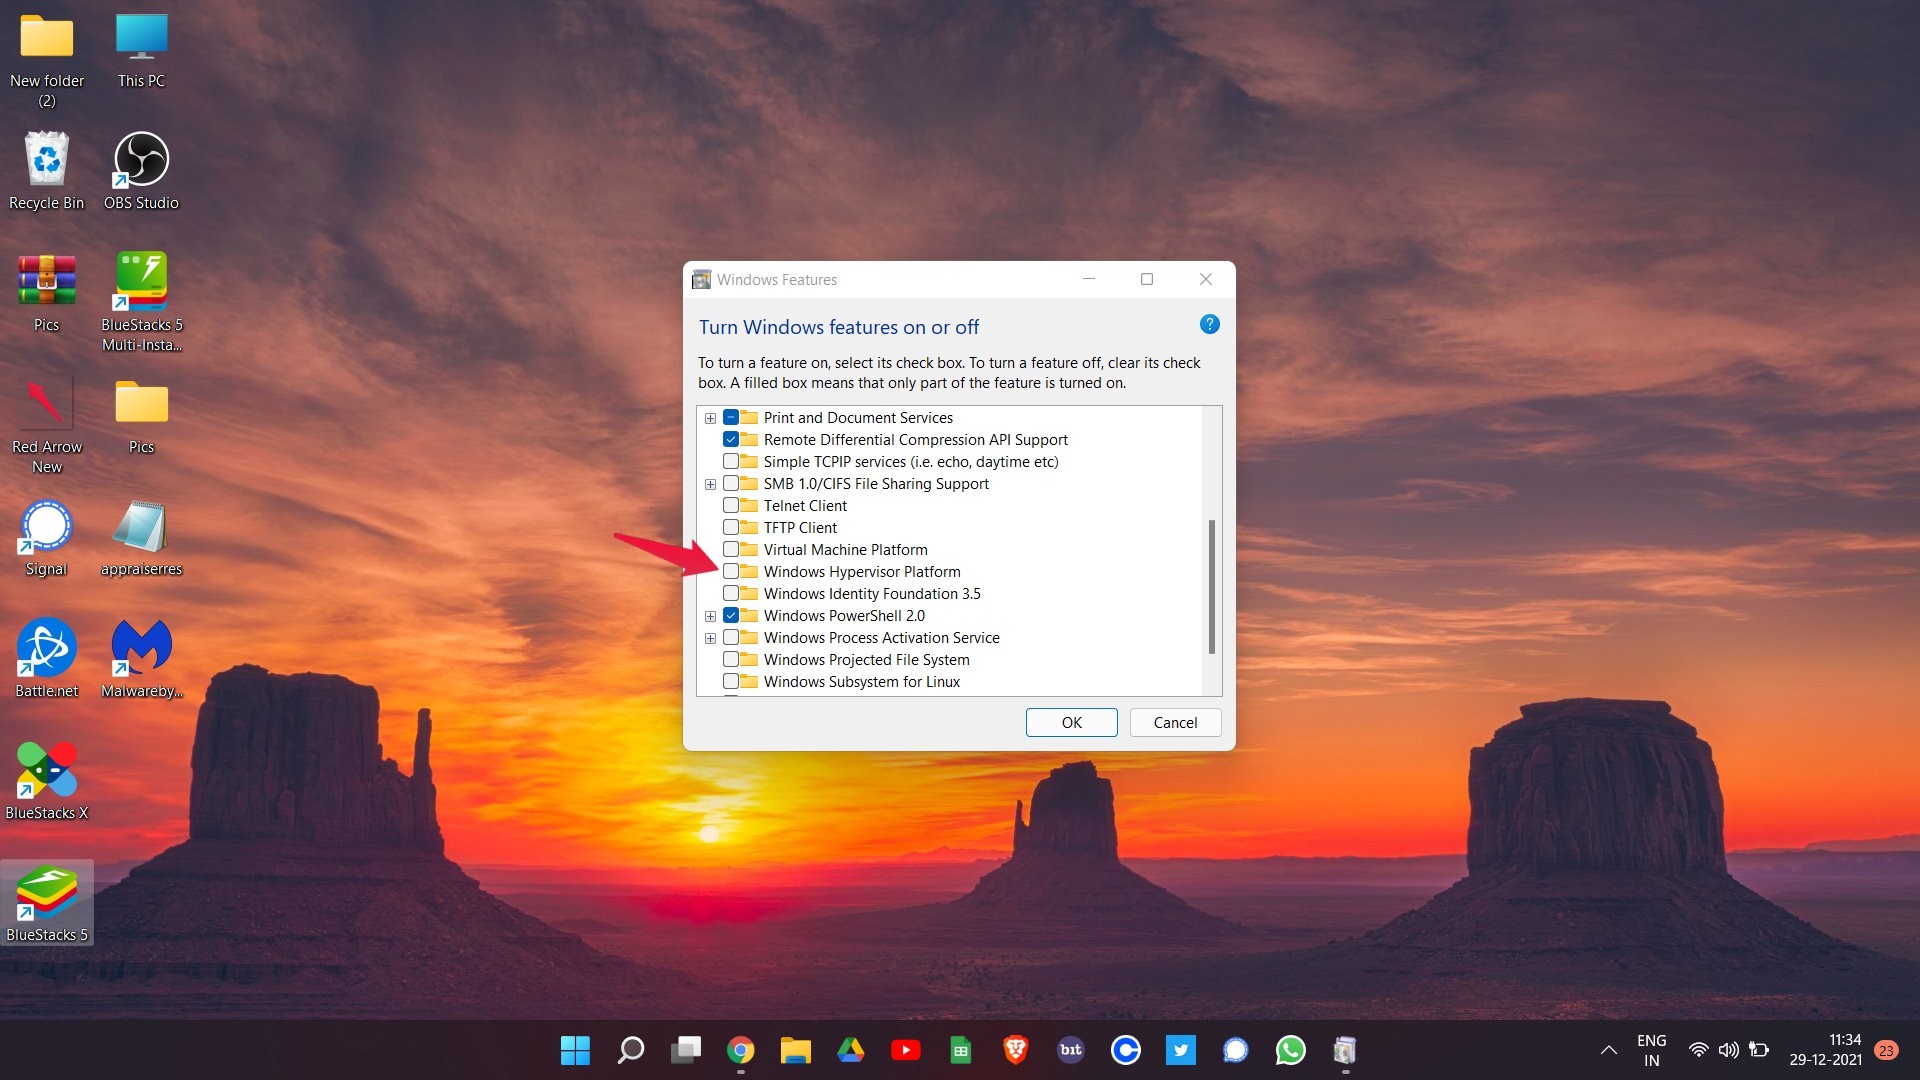
That’s it. You have finally disabled the Hyper-V service on your Windows 11 PC. Now, relaunch BlueStacks on your system. You will be surprised to see that you are no longer facing BlueStacks crashing on your Windows 11 PC.
Final Words
These were some of the steps using which you can fix BlueStacks crashing on your Windows 11 PC problem. As there isn’t any specific workaround released by Windows or BlueStacks developers for the crashing issue, you might have to go through all the workarounds to get rid of it. Nevertheless, let us know in the comments whether you were benefited from the above-mentioned workarounds or not. You can also share any other fixes that you think will be helpful in the situation.
