Microsoft Remote Desktop is a client application that allows Windows computer users to access and control the files or documents remotely of a computer via an internet connection without being physically in front of a specific computer. Now, this can be done for both your own and others’ computers. Now, if you’ve upgraded to Windows 11 OS recently and you want to Enable Remote Desktop in Windows 11, you can follow this guide.
Basically, it uses the Remote Desktop Protocol (RDP), so that you or someone else can easily help or assist or even get access to any necessary items on a computer remotely. For instance, you may have experienced sometimes that you need support on something and the technical agent has remotely accessed your computer to check the issue live or fix it.
Also Read
How to Dual Boot Windows 11 with Windows 10?
FIX: Windows Defender Crashing in Windows 11/10
Fix: Windows 11 Clipboard History Not Working
Fix: Miracast Not Working on Windows 11 and 10
How To Fix External Hard Drive I/O Device Error in Windows 11/10
Fix: Mouse Scroll Wheel Jumps Up and Down on Windows 10, 11
Although most of us prefer to use the third-party remote desktop connection, it’s always better to use the default Microsoft Remote Desktop connection directly from your computer with the help of an internet connection.

Page Contents
How to Enable Remote Desktop in Windows 11
It’s worth mentioning that Windows 11 OS offers you to easily access remote desktop connection via the Settings menu, command prompt, control panel, and using a Windows PowerShell terminal too. So, let’s get started.
Please Note: Microsoft Remote Desktop service is only available on Windows 11 Pro and Enterprise editions. That means if you’re using Windows 11 Home edition, then you won’t be able to use this feature officially. It’s better to check out some of the popular and reliable third-party remote desktop apps for your Windows 11 Home edition. We’ll recommend you to check out TeamViewer or Chrome Remote Desktop or AnyDesk app.
Also Read
1. Enable Remote Desktop from Windows 11 Settings
It’s always better and handy to enable or disable features on your Windows computer from the Settings menu directly. To do so:
- Press the Windows + I keys to open Windows Settings.

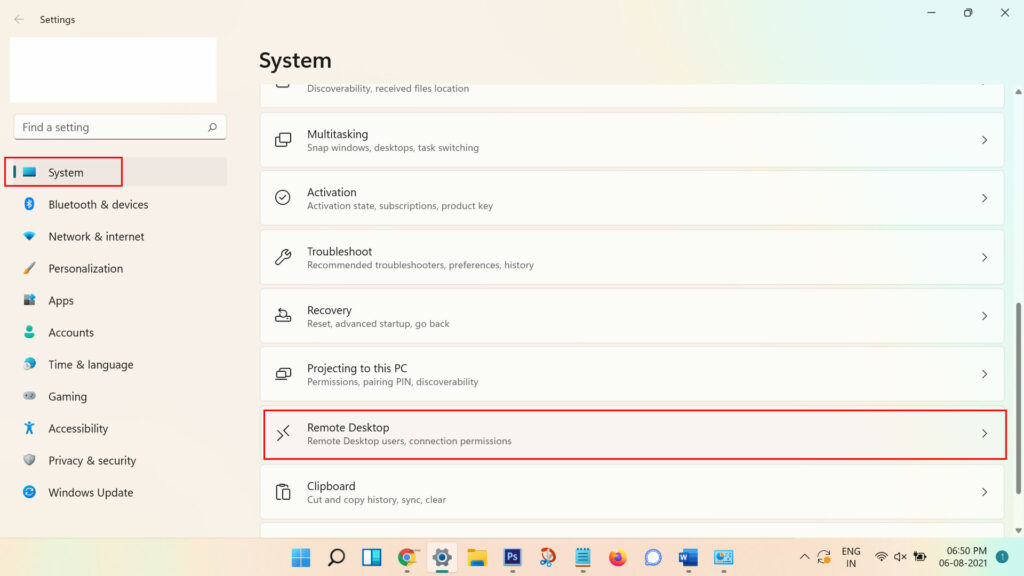
- Click on ‘System’ from the left sidebar > Select ‘Remote Desktop’ from the right pane.
- Now, turn on the ‘Remote Desktop’ toggle > Click on ‘Confirm’ to save the changes.
- Finally, you can access the remote desktop function for free on your Windows computer.
Also Read
2. Enable Remote Desktop via Control Panel
- Click on the Windows Start menu > Search for Control Panel and open it.
- From the Control Panel interface, make sure to select the ‘Category’ view from the top-right side.
- Now, select the ‘System and Security’ option > Click on ‘Allow remote access’ under the System menu.
- Here a new popup window will appear called ‘System Properties’.
- Head over to the ‘Remote’ tab > Select ‘Allow Remote Assistance connections to this computer’.
- Next, choose the ‘Allow remote connections to this computer’ option.
- Also, you’ll need to select the checkbox of ‘Allow connections only from computers running Remote Desktop with Network Level Authentication (recommended)’.
- Once done, click on ‘Apply’ and then ‘OK’ to save changes.
3. Enable Remote Desktop via Command Prompt
If you’re comfortable using the command prompt window to enable the remote desktop connection on your Windows 11 computer then you can follow the steps below:
- First of all, click on the Windows Start menu > Type cmd and click on Command Prompt from the search result.
- If prompted by UAC, click on Yes to proceed.
- Now, copy/paste any of the following command lines inside the command prompt window, and hit Enter to execute the command.
reg add “HKEY_LOCAL_MACHINE\SYSTEM\CurrentControlSet\Control\Terminal Server” /v fDenyTSConnections /t REG_DWORD /d 0 /f
OR,
netsh advfirewall firewall set rule group=”remote desktop” new enable=Yes
- Finally, you’ve enabled the remote desktop connection.
Also Read
4. Enable Remote Desktop via PowerShell Terminal
The final method to enable the remote desktop feature by using the Windows PowerShell terminal. To do that:
- Press the Windows + X keys to open the Quick Access Menu.

- Here click on Windows PowerShell (Admin) to open it.
- Now, copy/paste the following command and press Enter to enable the remote desktop connection:
Set-ItemProperty -Path ‘HKLM:\System\CurrentControlSet\Control\Terminal Server’ -name “fDenyTSConnections” -value 0
- Additionally, keep in mind that the Windows Firewall security isn’t blocking the remote desktop connection on your computer. To allow it, run the following command:
Enable-NetFirewallRule -DisplayGroup “Remote Desktop”
- You’re done.
Steps to Add Users to Remote Desktop Users group
If you want to add users to the Remote Desktop Users group then follow the steps below:
- Head over to Windows Settings > System > Remote Desktop.
- Scroll down the page and click on the ‘Remote Desktop users’ link.
- A new popup window will appear. Just click on Add to start adding users who want to connect to the computer remotely.
- You’re good to go. Enjoy!
That’s it, guys. We assume this guide was helpful to you. For further queries, feel free to ask in the comment below.

Make sure you have Windows 11 Pro. the Home Edition doesn’t support remote desktop, if you have the Home version, you can upgrade to win 11 Pro version on keyingo.com, then you can access the RDP