2009’s League of Legends is an online team-based with over 140 champs battle arena video game that has been developed and published by Riot Games. It’s one of the most played online games that has been played across the globe but it has some bugs or issues for sure. Some players are unable to launch this game on their PC and if you’re also one of them, check How to Fix League of Legends Won’t Open Issue?
Also Read
How to Fix High PING in League of Legends
Fix: League of Legends Audio Not Working | Sound Cutting Out
Fix: League of Legends Crashing or Not Opening in Mac
Fix: League of Legends Screen Flickering or Tearing Issue on PC
League of Legends Packet Loss Fix
Fix: League of Legends Tutorial Not Working
Fix: League of Legends Unable To Connect To Server
According to the multiple reports online, the game does not launch even after running the executable file. Some players have also reported that the game shows up in the task manager for a while and then suddenly disappears. The most irritating part is no error notice appears so that players can easily find out the reason behind such an issue. Luckily, we’ve shared a couple of possible fixes below.

Page Contents
- What’s blocking League of Legends from launching?
- 1. Directly launch the game executable
- 2. Run the game as admin
- 3. Close Background Tasks
- 4. Verify and Repair Game Files
- 5. Replace the ‘Projects’ folder
- 6. Force Client Update
- 7. Change Config file
- 8. Delete Lockfile from LOL folder (Mac only)
- 9. Update Graphics Drivers
- 10. Reinstall DirectX (Latest)
- 11. Disable Windows Firewall or Antivirus Program
- 12. Reinstall Microsoft Visual C++ Runtime
- 13. Remove Temporary Files
What’s blocking League of Legends from launching?
Well, there are a couple of possible reasons behind such an issue that may happen at your end in most scenarios. It means either some of your installed game files are missing or corrupted, or you’re not running the game executable file with admin access, or there is an issue with the graphics card driver on your PC, or some of the programs are running in the background that can occur issues, etc.
Now, you may have a rough idea about the issue, and you can follow the troubleshooting steps properly.
1. Directly launch the game executable
Make sure that you’ve headed over to the installed game folder on your PC and then double-click on the lol.launcher.exe file to launch the game directly. If the UAC (User Account Control) prompts to run as an administrator, then simply click on Yes to proceed. As simple as that.
Also Read
2. Run the game as admin
If you’re not running the game as an admin then make sure to do it. Most of the PC users don’t run the game files or launchers via admin access and the program file starts crashing or even prevents from launching. To do so:
- Right-click on the lol.launcher.exe file from the installed game folder directly as mentioned in the previous method.
- Now, go to Properties > Click on the Compatibility tab.
- Select Run the program as an administrator > Click on Apply.
- Then click on OK to save changes and try running the game again.
3. Close Background Tasks
- Press the Windows + X keys to open the Quick Link Menu.
- Click on Task Manager from the list > Click on the Startup tab.
- Make sure to select Disable programs that you need to close.
- Once you disabled all the required programs, restart your computer to apply changes.
- Finally, you can try running the League of Legends game on your PC.
4. Verify and Repair Game Files
Some missing or corrupted game files can cause several issues with the game launching or startup on the computer. Make sure to verify the game files directly from the game launcher that you’re using. To do so:
- Go to the game installation folder > Run the lol.launcher.admin executable file.
- If prompted by UAC, click on Yes to grant the admin privilege.
- Click on the cogwheel icon > Select Initialize Full Repair.
- Wait for the process to be completed.
- Once done, try running the game again to check for the issue.
5. Replace the ‘Projects’ folder
- Go to the game installation folder > Open the RADS folder.
- From the RADS folder, just right-click on the ‘Projects’ folder.
- Select Cut and right-click on the desktop then select Paste.
- Now, launch the game executable file > The game will automatically start downloading all the missing files on your computer.
- Move the ‘Projects’ folder back into the ‘RADS’ folder again without closing the download process.
- Select the ‘Overwrite’ option, if prompted.
- Once done, launch the game and wait until the download process is finished to check for the issue again.
6. Force Client Update
Sometimes corrupted or missing .dll files from the game installation folder can also cause several issues with the game launching. It’s always better to force client update to easily redownload the missing or corrupted .dll files.
Please Note: Delete the ‘aps_ms_win….dll’ files only. Do not delete other DLL files.
- Go to the game installation folder > Open the RADS folder.
- Open the Projects folder > Make sure to delete the lol_launcher and lol_patcher folders.
- Go back to the main installation folder of the game again > Delete all the ‘aps_ms_win….dll’ files.
- Once done, double-click on the lol_launcher to open the League of Legends game.
- You may have to wait for some time to launch the game this time.
- Now, the client will automatically start downloading the update.
- Make sure to wait for the process to complete and then check if the problem persists or not.
7. Change Config file
- Go to the game installation folder > Open the RADS folder.
- Open the System folder > Right-click on the ‘user.cfg’ file.
- Select ‘Open With’ > Click on Notepad from the list.
- Scroll down and locate the following command entered into the ‘.cfg’ file:
leagueClientOptIn = yes
- Next, change the command with the following one:
leagueClientOptIn = no
- Once done, save changes in the Notepad.
- Finally, try launching the League of Legends game to check for the crashing or not opening issue.
8. Delete Lockfile from LOL folder (Mac only)
Sometimes, the issue with the lockfile from the installed game folder on the Mac (macOS) can also cause several issues whatsoever. You should delete the lockfile from the game folder. For that:
- Open Finder on Mac > Click on Applications.
- Right-click on ‘League of Legends’ > Select ‘Show Package Contents’.
- Open the ‘LOL’ folder > Make sure to delete the ‘LockFile’.
- Launch the League of Legends Client and this file will be automatically downloaded again.
- Now, launch the League of Legends game without deleting the lockfile this time.
9. Update Graphics Drivers
It’s always required to update graphics drivers on your Windows system to run all the programs smoothly. To do this:
- Right-click on the Start Menu to open up the Quick Access Menu.
- Click on Device Manager from the list.
- Now, double-click on the Display adapters category to expand the list.
- Then right-click on the dedicated graphics card name.
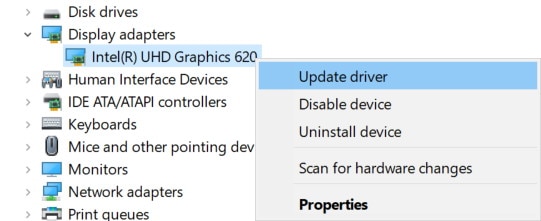
- Select Update driver > Choose Search automatically for drivers.
- If there is an update available, it’ll automatically download and install the latest version.
- Once done, make sure to reboot your computer to change effects.
Alternatively, you can manually download the latest version of the graphics driver and install it directly from the official website respective to your graphics card manufacturer. Nvidia graphics card users can update the GeForce Experience app via the Nvidia official site. Meanwhile, AMD graphics card users can visit the AMD website for the same.
10. Reinstall DirectX (Latest)
You should try reinstalling the latest version of DirectX from the official Microsoft website on your PC/Laptop. You just need to download and install the DirectX installer package and run it. Keep in mind that you’ll require DirectX 11 or above to run the League of Legends game properly.
11. Disable Windows Firewall or Antivirus Program
The chances are high enough that maybe your default Windows Defender Firewall protection or any third-party antivirus program is preventing the ongoing connections or game files to run properly.
So, make sure to temporarily disable or turn off the real-time protection and firewall protection. Then you should try running the game to check if the League of Legends Keeps Crashing on PC issue has been fixed or not. To do this:
- Click on the Start Menu > Type firewall.
- Select Windows Defender Firewall from the search result.
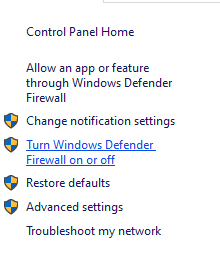
- Now, click on Turn Windows Defender Firewall on or off from the left pane.
- A new page will open > Select the Turn off Windows Defender Firewall (not recommended) option for both the Private & Public Network Settings.
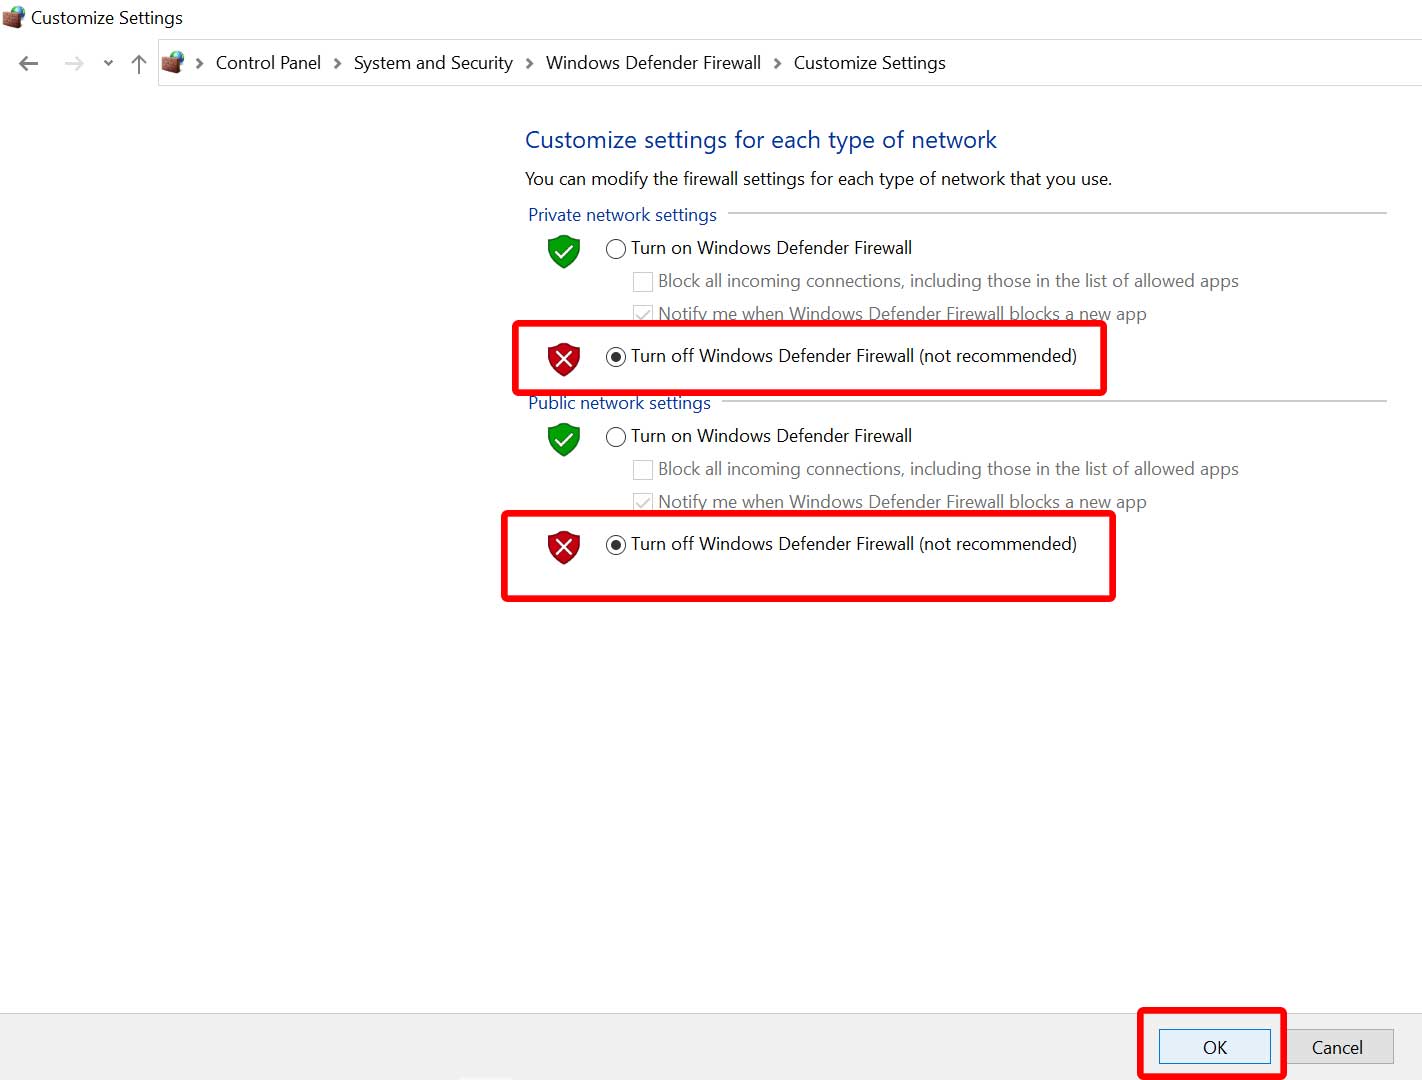
- Once selected, click on OK to save changes.
- Finally, restart your computer.
Similarly, you have to turn off the Windows Security protection too. Just follow the steps below:
- Press Windows + I keys to open the Windows Settings menu.
- Click on Update & Security > Click on Windows Security from the left pane.
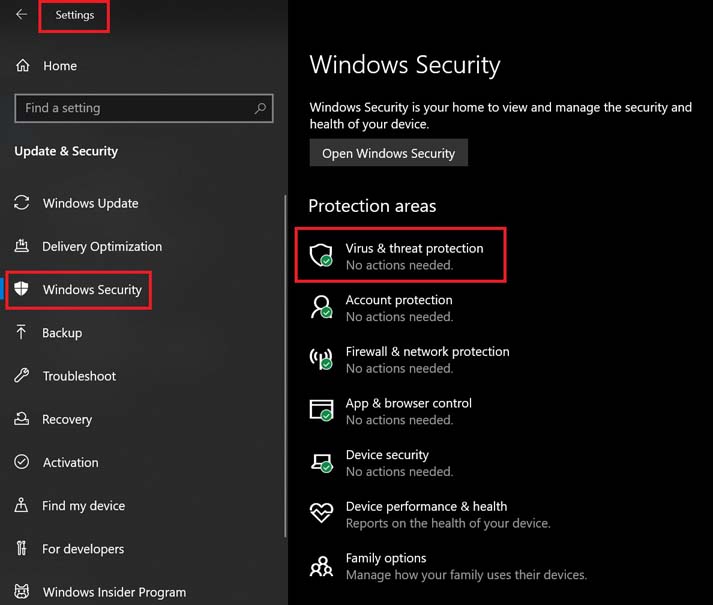
- Go to Virus & threat protection > Click on Manage settings.
- Next, you’ll need to simply turn off the Real-time protection toggle.
- If prompted, click on Yes to proceed further.
- Additionally, you can also turn off cloud-delivered protection, Tamper protection if you want.
12. Reinstall Microsoft Visual C++ Runtime
Make sure to reinstall the Microsoft Visual C++ Runtime on your computer to fix multiple gaming issues or errors completely. To do that:
- Press the Windows key from the keyboard to open up the Start Menu.
- Type Apps & Features and click on it from the search result.
- Now, locate the Microsoft Visual C++ program(s) in the list.
- Select each program and click on Uninstall.
- Visit the official Microsoft website and download the latest Microsoft Visual C++ Runtime.
- Once done, install it on your computer, and restart the system to change effects.
13. Remove Temporary Files
- Press Windows key + R on your keyboard to open the RUN program.
- Now, type %temp% and press enter.
- You will get a bunch of temporary files on a page.
- Select all files by pressing Ctrl + A on the keyboard.
Next, press Shift + Delete on the keyboard to remove all the files. - Sometimes some of the temporary files can’t be deleted. So, leave them as it is and close it.
That’s it. We hope this guide was useful to you. You can comment below for any queries.
