With its Beta launch in 2019, Oculus Link has seen a lot of ups and downs. From the Black screen of death to update issues, the beta version has always found itself in some kind of problems. In October 2020, Oculus Link surpassed the Beta State by launching Oculus Quest 2. However, this definitely doesn’t mean that the device became free from different issues.
To date, Oculus has released 14 versions of the software, however, none is bugs free. With the launch of every update, users are introduced to new types of problems with the device. But thankfully each of these problems is curable.
That said, if you are looking for a guide featuring all the Oculus Link common problems along with their respective solutions, then this is the place where you need to be. In this post, we are going to talk about some of the most common issues that surround Oculus Link followed by their respective workaround. So, without any further delay, let’s get straight into the topic.
Also Read
Oculus Link Not Detecting Quest or Quest 2, How to Fix?
How to Connect and Cast Oculus Quest 2 to TV
Fix: Oculus Air Link Not Working or Pairing to Windows 7, 10, or 11
How to Install SideQuest on Oculus Quest 2
Fix: Oculus Quest Software Update Stuck on Downloading
Fix: Oculus / Meta Quest 2 Not Working After Update or Factory Reset
Page Contents
Oculus Link Common Problems and Solutions
Below are some of the most common problems which Oculus Link can run into, along with their respective solutions.
Oculus Link Connection Issue
Many users have reported that the Oculus Quest or Oculus Quest 2 automatically gets disconnected from the connected PC, followed by navigating to the Oculus Quest home screen. This problem mainly occurs during the first boot of the system. But thankfully, it’s quite easy to get rid of this issue.
At the time of connecting the cables of Oculus Link to the PC or vice versa, you must have seen the device asking for storage permission. So, in order to fix the connection issue, you will have to deny storage permission. Just go with the “Deny Storage Permission” option, anytime you see the dialogue box on your Quest 2 asking for storage access.
In layman’s terms, if you have given the storage access, the headset will automatically get disconnected every time Windows finds a new file in the device. This feature has been with Windows ever since its inception and works incredibly well with other devices like cameras or smartphones. It helps to transfer pictures or videos from different devices. However, this feature hasn’t been so kind with many other devices including Oculus Quest.
In case, you are still dealing with the connection problem, even if you have denied the storage permission, the probability is high that you are using a low-quality or slow USB cable. As a solution to it, the first thing you can consider is to try a different USB port. Similar to cables, USB ports can also run into different problems. Thus, trying a different port can be an effective workaround in the situation.
Outdated drivers can be another reason triggering the connection issue. If you haven’t downloaded the latest drivers on your Windows PC then you are most likely to deal with the mentioned problem. Plus, an outdated motherboard is also a considerable culprit. As a solution to it, make sure you download the latest display drivers update on your PC. To do so, here are the steps you need to follow.
- Open the Start menu by pressing the Windows key.
- Now in the search bar, type Device Manager and press enter.
- The Device Manager window will pop up.
- Double click on the Display Adaptors option to expand it.
- Right-click on the installed graphics and select update driver.
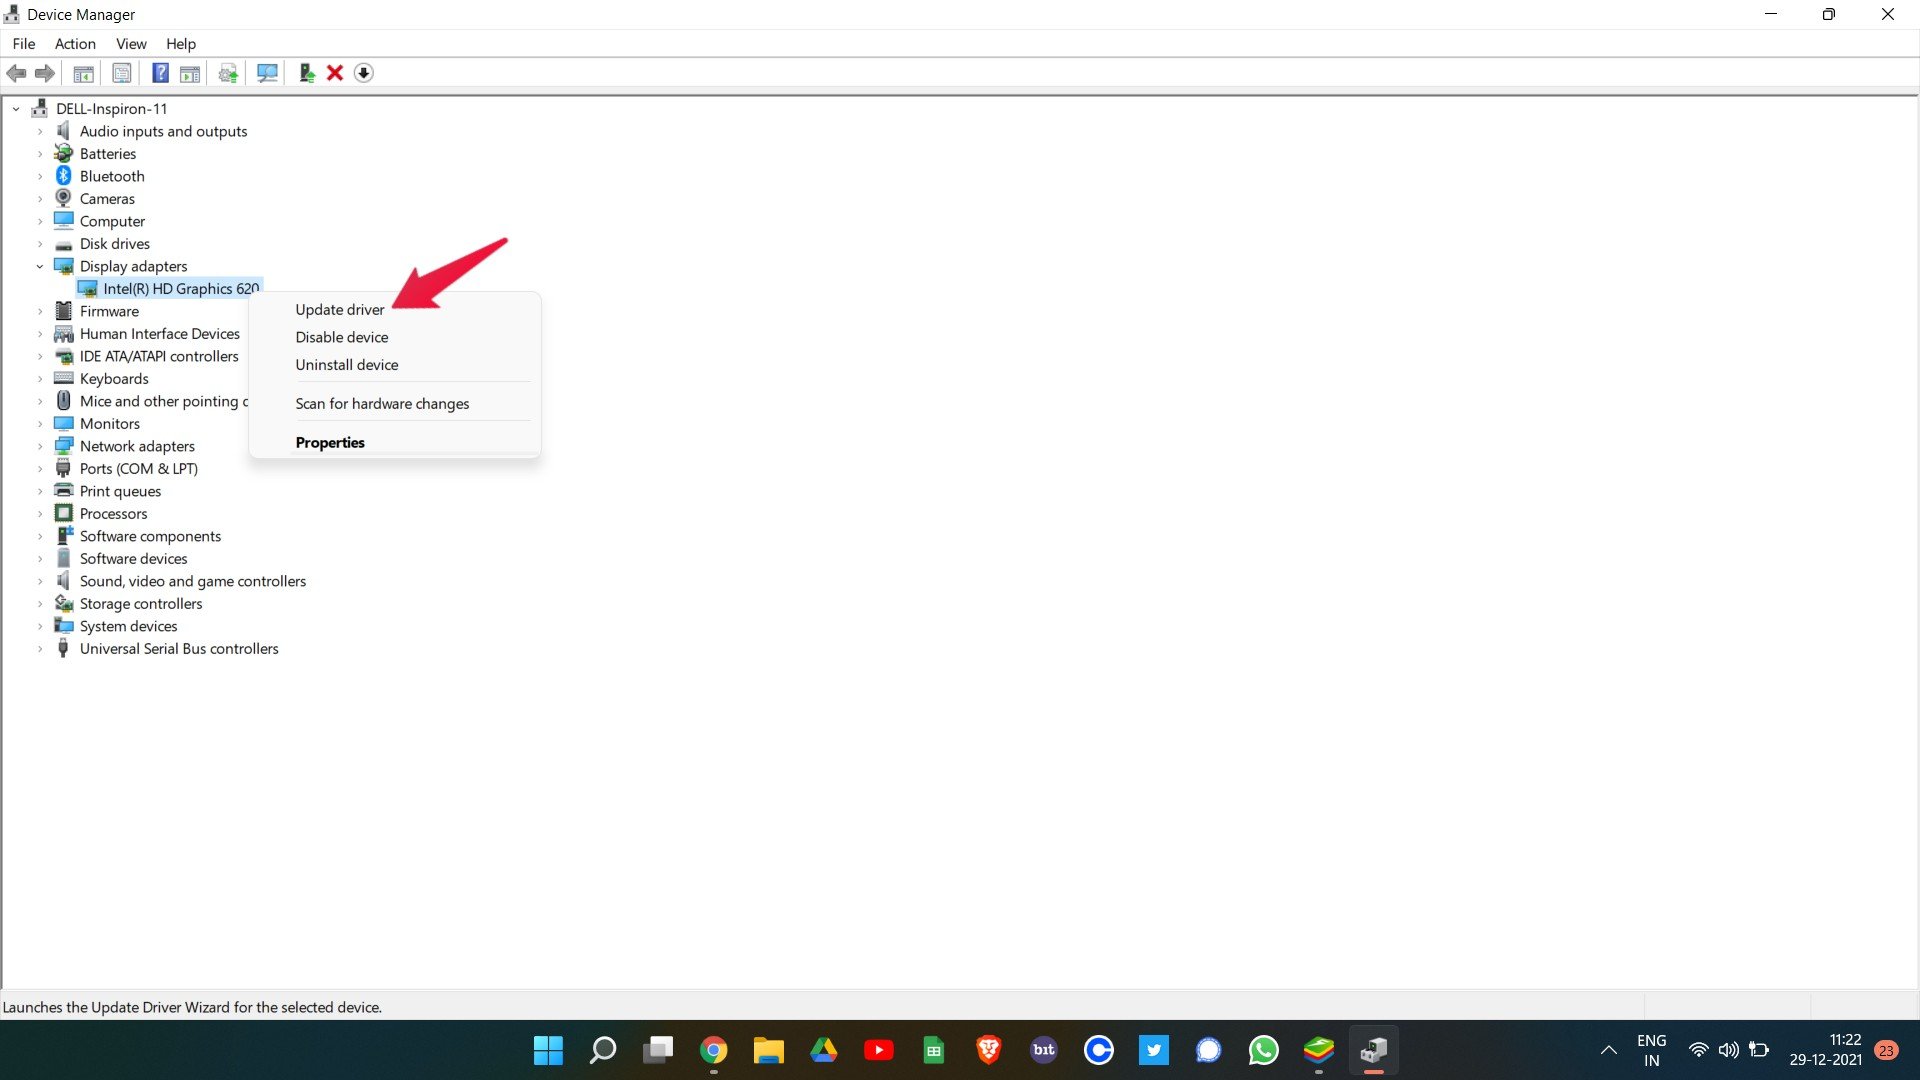
- In the confirmation that pops up, select “Search automatically for drivers”.
Windows 11 will look for any available graphics driver update. If found, it will automatically download it.
In case, none of the above-mentioned workarounds helped you in solving the connection issue, the last thing you can try is to go for a new USB cable. We recommend you purchase the official Oculus Link cable. It is made of sturdy materials, making sure that doesn’t get damaged easily. Plus, it is 15 feet long, thus, you are never going to face the length problem.
The only downside of the official Oculus Link cable is its price. To be more precise, you will have to pay completely 2 to 3 times more price than the normal USB cable. However, considering the quality you get, the price seems manageable.
Incorrectly Calibrated Height
While connecting to the PC, you must have noticed that the device shows comparatively different heights. This problem is not permanent and occurs randomly from time to time. To be more precise, whenever you are dealing with this problem you will find your height either too tall or too short in the VR.
To fix the issue, the first thing you can work with is the in-game calibration options. But in the worst-case scenario, if the collaboration option doesn’t make any difference, the last option you can try is the restart process. Disconnect the headset from the PC, followed by reconnecting it. After that, launch the game and you will see that you are no longer facing the incorrect height problem.
USB Connection Issue
Sometimes the PC fails to recognize the Oculus Quest that is connected via the USB cable. This problem occurs even if you are using the official Oculus Link cable, or even the third party recommended cable, Anker USB 3.0. However, this can easily be cured. Just try the below workarounds and stick with the one that does the job for you.
The very first thing you can try is to disconnect the USB cable from Oculus and PC. This step will be helpful if the problem was being caused due to some connection stability. Another thing that can cause the USB connection issue is outdated or miss-matching software. The Oculus software and its official application installed on your PC must have the same version number. If not, you are most likely to deal with the mentioned problem. So, here’s how you can check the version number on both Oculus and PC.
For PC
- Launch the Oculus app on your PC.
- Click on Settings followed by choosing the OS version option. Here, you can see the installed OS version of the Oculus app.
- Now download the latest update, navigate to Library > Updates. Click on “Install the latest developer updates”. Plus, don’t forget to disable the Public Test Channel option.
For Quest
- On your quest, head towards the “Settings” menu.
- Click on “See all” followed by tapping on the “About” section.
- Now, click on the “Version” option. Here, you can check the installed application version.
If case of any available update, click on the update option in the downloading process.
Once you are sure that the Oculus software and its official application installed on your PC are having the same version number, then power cycle the Oculus Quest. The power cycle is nothing but a simple restart. Thus, first, turn the device off followed by turning it on.
Now, restart the official Oculus Software installed on your PC. Once it’s done, try to connect with them via USB cable. If everything goes fine, a popup will appear on the Oculus Quest PC software requesting to add Quest as a device. There will also be a dialogue box asking to “Set Link” as your connected headset.
However, if you see none of the above options, try the below steps.
- Log out of your PC Oculus software and close the application.
- Reopen the app and login into your account.
- In the Oculus Quest Settings look for the “Enable Link” option.
- In case, a dialogue box appears asking you to give permission to access the data, click on the “Deny” option.
That’s it. Your USB connection issue with Oculus would have been fixed by now.
Crashing Issue
The crashing problem has been with the device ever since its inception. It can occur even if you have gone through the above steps perfectly. As per users, the program crashes as soon as they connect Quest to their PC. There can be multiple reasons causing the problem, but mainly it is caused by some PC hardware issue. In order to fix it, follow the below steps.
- On your Windows PC desktop, right-click on “This PC” and choose the “Properties” option.
- Here, check the specification of your PC. From GPU, CPU, memory, OS to USB ports, note down everything about your Windows PC.
- Now, navigate to the Oculus Link compatibility page.
- Here, check the PC requirements, and compatible GPUs for Oculus Quest.
Now, compare the installed specification of your PC with the minimum requirement of the Oculus Quest. If you are using a laptop instead of a PC, the probability is very high that it won’t be compatible with the device, as most of the laptops aren’t PCVR ready.
Nevertheless, in the Oculus compatibility list, if you can’t find the name of the installed GPU on your PC. Or, the GPU name is followed by a “Not currently supported” message, then in either case you can’t do anything. Just wait until Oculus becomes compatible with the installed GPU.
Poor Game Quality
What if you have finally managed to connect the device with your PC, but now struggling with the in-game poor image quality in graphically intensive games. Facing poor image quality is something that can’t be related to the Quest hardware. It is mainly caused by some technical problem going on with the connected PC. There can be some problems with the power, software, or even with the connected USB cable.
In either case, the very first step that you should check is to visit the Oculus link compatibility page. Ensure that the installed GPU on your system is supported by VR. If your PC passes the compatibility test, try plugging the Quest into a different USB slot. A damaged USB port can cause the mentioned issue. In case, swapping the USB ports doesn’t make any difference, you can try turning off the power saving mode from your PC. To do so, here are the steps you need to follow.
- Open the Start menu by pressing the Windows key.
- Now in the search bar, type Device Manager and press enter.
- The Device Manager window will pop up.
- Double click on Universal Serial Bus Controllers option to expand it.
- Right-click on USB Root Hub, and choose the “Properties” option.
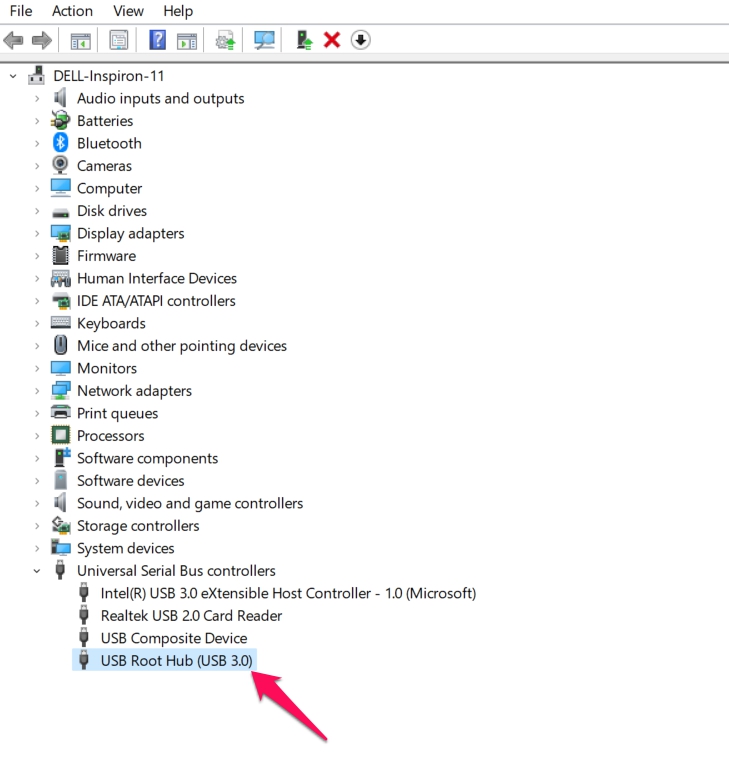
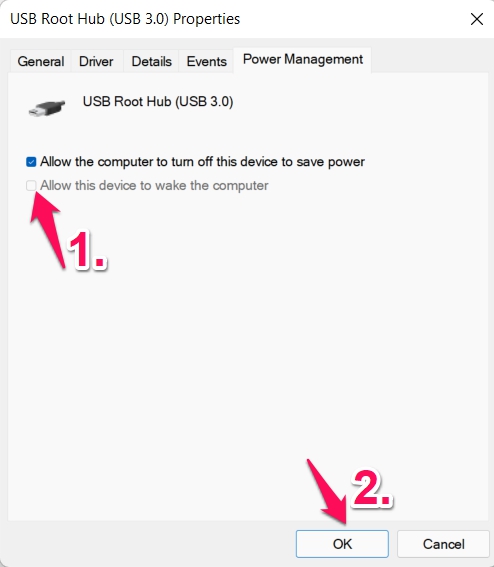
- Click on the “Power Management” section.
- Checkmark the “Allow this device to wake the computer” option, followed by “OK” to save the settings.
That’s it. But in the worst-case scenario, if you are still dealing with the poor game quality issue then you will have to enhance the VR performance, which we will talk about in some other guide.
Audio or Mic Issue
The device has been in the headlines due to its bad relationships with mics and headphones. The problem was been existing since beta, and unfortunately, it is troubling users till now. However, there are reports that the mic or audio problem has been resolved in the latest update. Thus, the very first step that you should take whenever you come across any audio or Mic issue is to check whether you have the latest OS version or not.
But what if you are dealing with the same problem in the latest OS update? In such a situation, follow the below-mentioned steps to get rid of the problem.
- Open the Run dialogue box on your PC by pressing Windows + R shortcut key.
- In the search bar, type “mmsys.cpl” and press the enter key.
- In the “Sound” section, locate the “Oculus Virtual Audio Device“.
- Right-click on the option and choose the “Properties“.
- Now, navigate to the “General” tab and name the device “Headphones“.
- Tap on the “OK” button.
- Now, in the recording section, locate the microphone icon, that says “Oculus Virtual Audio Device“.
- Once found, right-click on it and choose the “Properties” option.
- Again, under the “General” section, name the device to “Headset Microphone” followed by tapping on the “OK” button.
- Lastly, choose the “Oculus headphones and microphone” as your default audio device.
Now, to be on the safe side, restart your PC, and you will notice that you are no longer facing the audio or mic issue.
Bad Image Quality
If you have set the bitrate to a comparatively lower level then you are most likely to deal with the bad image quality. If you have a low bitrate then the connected PC will first compress the image, before transferring it via the cables of Oculus Quest. Surprisingly the default bitrate of Oculus is 150 Mbps which is way higher than other streaming applications like YouTube.
Although the bitrate is comparatively higher, still it somehow produces compressed images. You can easily notice the difference while viewing the color red or watching an image very finely. Oculus has gone with a 150 Mbps connection to maintain the compatibility balance between different types of PCs available in the market. But, if you have a higher-end PC, you can easily increase the bitrate, to get a better image quality. To do so, here are the steps you need to follow.
- To begin with, make sure you have the Oculus Debug Tool. Don’t go with the name, it’s quite easy to use the application.
- Now, launch File Explorer on your Windows PC.
- Head towards the below mentioned location.
C:\Program Files\Oculus\Support\oculus-diagnostics
- In the location, open the OculusDebugTool.exe file.
- The Oculus Debug tool will pop up.
- Now, set the “Encode Dynamic Bitrate” to “Disabled”.
- Change the Encode Bitrate (Mbps) to 250. By default, the number is 150. But thankfully, you can change it if you have a high-end PC.
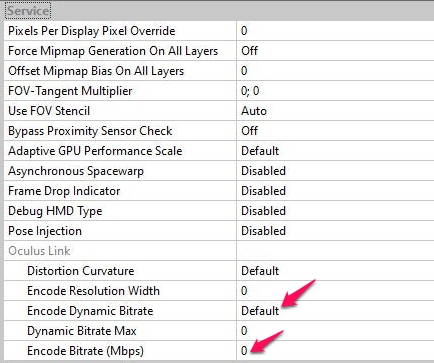
That’s it. Close the Oculus Debug Tool window followed by unplugging the Oculus Quest. Wait for a few minutes, before plugging the device back again to the PC and restarting the Oculus Link.
You will notice that you are getting a better picture quality than before. You can take the number up to 500 Mbps, but as per Facebook, you should not go higher than 250 Mbps. However, it’s worth mentioning that we noticed a slight degrade in the performance beyond 350 Mbps.
Stuttering Issue
It’s quite easy to fix the Stuttering issue that you are encountering in Oculus Link. The very first thing you should check is whether the room has enough lighting or not. If not, you are most likely to deal with the mentioned issue as cameras need light to see the environment surrounding them.
If you are facing a problem even if the room has enough lighting, the next thing you can try is to adjust the bitrate. You can try enabling the Encode Dynamic Bitrate (look at the above method to find out how it’s done). If the option is enabled, it will make sure that you get an image quality based on your bandwidth.
You can also try lowering the refresh rate and check if it makes any difference. By default, Oculus Quest is only compatible with a 72 Hz refresh rate. So, here’s what you need to do to adjust the refresh rate.
- Launch the Oculus official application on your PC.
- Click on the “Devices” option present at the left panel of the screen.
- You will now see a list of all the connected devices.
- Choose Oculus Quest from the list.
- A new window will pop up containing different kinds of stuff you can do with the selected device.
- Choose the “Graphics Preferences” option present at the right side of the screen.
- In the following window, you will have the option to choose the refresh rate. By default, it will be set to 90 Hz. However, this can affect the system’s performance.
- Choose this 70 Hz option which is the lowest refresh rate setting. After that, click on the “OK” option.
Now, check if the stuttering issue is fixed or not. If not, disable the automatic resolution option. Although by doing so you will receive a softer quality image at the same time it will enhance overall performance.
In the worst-case scenario, if you are still dealing with the problem try downloading the latest update for your motherboard and display drivers.
Final Words
These were are all the Oculus Link common problems and solutions. Let us know whether the problem you are facing has been mentioned in the post or not. If not, feel free to point it in the comments.
