Samsung has been pushing hard in the mid-range segment with its A-series and M series smartphones. These new series by Samsung are incredibly good value for money smartphones. The latest addition to the budget line-up of Samsung is the new Galaxy A21s. It has a Quad-camera setup at the rear, infinity-o display, running One UI, and is powered by a monstrous size big battery.
And if you also happen to be one of the owners of the Galaxy A21s smartphone and are looking for ways to unlock the bootloader and root your phone then, you are at the right place as in this post, we will guide you on how to unlock the bootloader and root your Samsung Galaxy A21s. In order to avoid any issues, we would advise you to follow the steps mentioned in this post. So, that being said, let us get straight into the article itself:

Page Contents
Samsung Galaxy A21s Specifications
The Samsung Galaxy A21s is having Samsung’s new Exynos 850 octa-core chipset coupled with RAM options from 3 to 6 GB. The phone has storage options to choose between 64 and 128 GB which is expandable by a MicroSD card up to 512 GB. The phone has a massive 5000 mAh of battery which can be charged using a 15w fast charger that comes in the box. It has a 3.5mm headphone jack as well.
The Samsung Galaxy A21s has a 6.5-inch HD+ 720p resolution super AMOLED display with a punch-hole camera cut out which Samsung calls its infinity-o display. The phone has an aspect ratio of 20:9 and the screen-to-body ratio is around 83%. It has a pixel density of around 270 Pixels per inches (PPI). The phone weighs around 192 grams due to its big battery and thickness is around 8.9mm.
The phone runs on Android 10 based on Samsung’s One UI 2.0. It has features like dark mode, Android 10 gestures, and better one-handed usage. Galaxy A21s features a rear-mounted fingerprint sensor along with a facial recognition system for the security of the device. It also supports DUAL nano-SIM for connectivity.
The Quad-camera setup of the Galaxy A21s consists of a 48 MP main camera with PDAF, then there is an 8 MP ultrawide sensor, followed by a 2 MP macro and 2 MP depth sensor along with LED flash. It can record videos at 1080p @ 30fps. The phone has HDR and Panorama shooting options as well. At the front, there is a 13 MP selfie shooter in a punch-hole design, it can also record videos at 1080p @ 30 fps.
The Galaxy A21s has Bluetooth 5.0, WIFI 802.11 b/g/n, and GPS. It comes in Black, White, Blue, and Red color options. The phone is said to be priced around GBP 179 (roughly Rs. 16,500).
Also Read
- Samsung Galaxy A21s A217F/M Firmware Flash File (Back to Stock ROM)
- How to Install TWRP Recovery on Samsung Galaxy A21s and Root it
- Samsung Galaxy A21S SM-A217F ISP PinOUT | EDL Test Point
- Download Google Camera for Samsung Galaxy A21s/M31s [GCam APK]
- Download and Install AOSP Android 12 on Samsung Galaxy A21s
Pre-Requisites
Now before we go ahead and root the Galaxy A21s, let us make a list of pre-requisites that are required to unlock it:
Charge your phone
You need to make sure that your Galaxy A21s is charged to about 60% before operating it for unlocking the bootloader to avoid any boot loop issues during the unlocking process.
You need a PC or Laptop
We would be running certain ADB and Fastboot commands that can be executed via PC or a laptop. So, we would need a computer in order to unlock the bootloader.
Take a complete backup
Before rooting, one of the most important things that you need to do on your phone is to take a complete backup of your phone. For that, you can follow the guide by clicking the link below:
Download USB Drivers
In order to make your Galaxy A21s get recognized by your PC, you need to have proper USB Drivers appropriate to your phone installed on your computer. And for that, you can follow the link below to download the correct Samsung USB Drivers on your PC.
Install ODIN in PC
Odin is used to flashing stock firmware file (in .tar or .tar.md5 formats) on Android-based Samsung devices and supports any Windows 10, 8.1, 8, 7, XP PC. You can install the latest Odin tool on your PC from the link given below:
Download Firmware
You can use either of the links below to download the firmware for your Galaxy A21s.
Warning
Steps to Unlock Bootloader on Galaxy A21s
Once you are ready with everything that is mentioned in the list of pre-requisites above, you can go ahead and root your Samsung Galaxy A21s by following the steps below:
Step 1: Activate the Developer option
- Enable the Developer Option on your device. To do this go to Settings>> About>> Software Information>> More.
- Tap on the Build Number 7-8 times until you see a message “Developer option enabled.”
Step 2: Enable USB Debugging, OEM Unlocking and Developer option
- Now head back to Settings>> Developer Option>>Enable USB Debugging as well as OEM unlocking.
Step 3: Unlock Bootloader on your device
- In order to unlock the bootloader on your Galaxy A21s, turn off your phone.
- Press the button combo: Hold Volume up + Volume down and plug your phone to your PC.
- Now long-press the Volume Up button to unlock the bootloader.
To Know More: Follow our guide to unlock the bootloader on any Samsung Galaxy smartphone
Steps To Root Galaxy A21s using Magisk
Before starting the rooting process, make sure to unlock the device bootloader at first. Then you can continue with the next steps.
Please Note:
- Rooting will block the official OTA updates
- After Rooting, it may void the warranty of your phone
- Supported model:
- Galaxy A21s: SM-A217F
Download Firmware
- Download Galaxy A21s Flash File
After you have downloaded the exact firmware file based on your device model number, you can extract the boot.img file to patch it via the Magisk manager app.
Guide to Extract Boot Image File and rename to .tar fileSteps to Create a Patched boot image using Magisk Manager
- First, download and install the latest Magisk Manager app.
- Next, connect your device to the PC via the USB cable.
- Copy only the boot.img file from the extracted folder to your device storage.
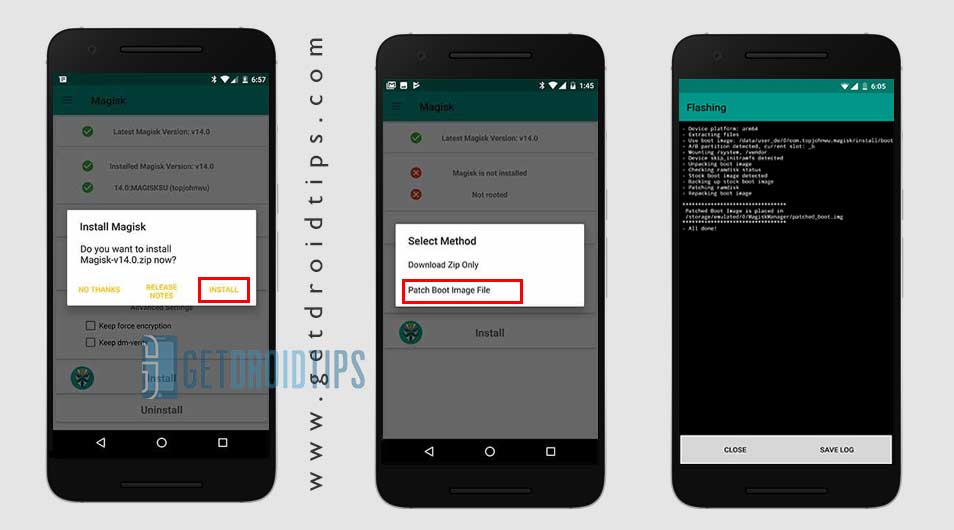
- Now, open the Magisk Manager app and select INSTALL and choose to install again.
- Then tap on “Patch Boot Image File”.

- Go to internal storage and select your device boot image that you moved earlier.
- Now, wait for Magisk to start patching the boot image.
- Once the boot image has been patched, copy the “patched_boot.img” from the internal storage and replace it in the same extracted ROM folder on your PC.
Now, follow the second step to flash the patched boot image file.
- Odin flash tool accepts files in .tar format. So, you have to use 7zip and archive it to .tar format. You can even rename the file as boot.img.tar as shown in the below screenshot.

Steps To Install the Patched Boot Image tar file on Galaxy A21s
Now, follow the final or second method to install the patched boot image file on your Galaxy handset. But first, follow the requirements.
Pre-Requirements:
- ROM Supported for – Samsung Galaxy A21s model only. Don’t try it on other devices.
- Keep your device battery charged up to 60% at least before doing anything.
- Take a full backup without the root of the device’s internal storage.
- A Windows PC or Laptop and a USB cable are required.
- Download the Latest ODIN tool and install it on your computer.
- Download and Install the latest Samsung USB Drivers on your computer.
- Copy the patched boot image file into the ADB & Fastboot directory.
Instructions to Root Galaxy A21s Using Magisk
After following the pre-requirements and unlocking the bootloader, in order to Root Galaxy A21s Using Magisk, let’s take a look at the rooting steps.
- First, reboot your device into download mode.
- Now, connect your phone to the PC via the USB cable.
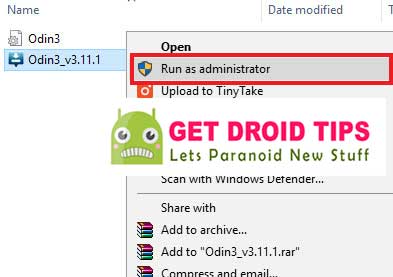
- Once you are connected, now open the downloaded ODIN.exe file.

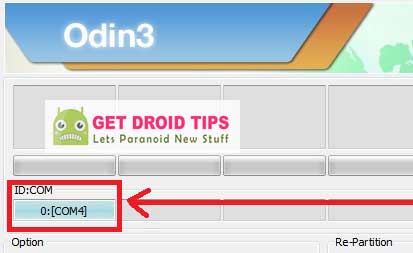
- When you connect the USB cable you will see a blue sign in Odin.

- Now, load the patched boot.tar file in the AP section.

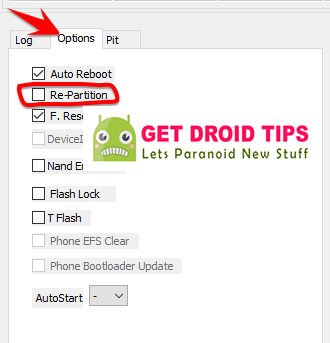
- Go to Option and see whether the Auto Reboot and F-Reset Time selected or not). If not then select these two. Don’t select re-partition.

- Now, tap on the Start button to root your device.
- Your device will reboot when the process will complete.
- Then wait for a few minutes. The first boot will take some time.
- You’re done. Enjoy!
So, there you have it from my side in this post. I hope you guys were able to successfully unlock the bootloader and root the Galaxy A21s using the guide above. Let us know in the comments below if you come across any issues while following the above-mentioned steps. Until the next post…Cheers!
