Back on April 8, Samsung has unveiled its new 5G mid-range smartphone i.e., the Samsung Galaxy A71 5G. It comes with a 6.7″ Super AMOLED Plus display, 6/8GB RAM, 128GB ROM, quad rear camera setup, 4500mAh battery, and runs on Android 10.
If you’re using the Galaxy A71 5G handset and want to enable root access on it, this guide is for you. Before rooting your device, you should unlock the device bootloader as well. In this guide, we have put up the tested method to Unlock Bootloader and Root Galaxy A71 5G using Magisk without TWRP.
Also Read
Each and every Android lover want to customize their devices by installing Custom ROMs, Custom Recovery, Rooting, and more. Rooting is the most useful part of whether you’re using Stock Firmware or Custom Firmware. It enables the superuser access on your device so that you can easily access root directory files, modify system files, uninstall system apps, tweak UI, and more.

Page Contents
- Samsung Galaxy A71 5G Specifications
- Pre-Requisites
- Steps to Unlock Bootloader on Galaxy A71 5G
- Steps To Root Galaxy A71 5G using Magisk
- Steps to Create a Patched boot image using Magisk Manager
- Steps To Install the Patched Boot Image tar file on Galaxy A71 5G
- Instructions to Root Galaxy A71 5G Using Magisk
Samsung Galaxy A71 5G Specifications
The Samsung Galaxy A71 5G sports a 6.7 inches Super AMOLED plus display with a single punch hole, and a Full HD+ resolution. That said, it has a pixel density of 393 Pixel Per Inch (PPI), an aspect ratio of 20:9, a screen to body ratio of 88.3 percent, a resolution of 1080 x 2400 pixels, and gets protected by the Corning Gorilla Glass 3.
Coming to the internals of the Samsung Galaxy A71 5G, it sports the in-house Exynos 980 SoC, which is built on the 8nm process. This octa-core setup includes two Cortex A77 cores that clocks at 2.2GHz, and six Cortex A55 cores that clocks at 1.8GHz. To the GPU side, it sports the Mali G76 MP5 GPU. Talking about the memory side, it sports 6 and 8GB of RAM. Further, it comes with only 128GB of all UFS 2.1 internal storage. Further, this is expandable via the dedicated micro SD card slot. The device runs on the latest One UI 2.0, which is based on the Android 10.
Coming to the cameras on the Samsung Galaxy A71 5G, it sports a quad rear camera setup. This includes a primary 64MP sensor with an f/1.8 aperture value, and with PDAF. It pairs with a 12MP secondary ultra wide-angle sensor with an f/2.2 aperture value. Further, it gets a 5MP macro sensor with an aperture value of f/2.4, and finally, it gets a 2MP depth sensor with an aperture value of f/2.2. It also features the LED flash, panorama, and HDR. To the front, the smartphone comes with a 32MP sensor, with an aperture value of f/2.2. The rear camera can shoot videos in 4K, while the front camera can only shoot videos in 1080p.
The Samsung Galaxy A71 5G packs a 4,500 mAh battery and gets support for 25W fast charging tech. Connectivity options include Wi-Fi 802.11 a/b/g/n/ac, dual-band, Wi-Fi Direct, hotspot, Bluetooth 5.0, A2DP, LE. GPS with A-GPS, GLONASS, GALILEO, BDS, NFC (market dependent), FM radio, and USB2.0, Type-C 1.0 reversible connector, USB On-The-Go. Sensors on board include accelerometer, gyro, proximity, compass, and ANT+. Talking about the biometric options available, it comes with an in-display fingerprint scanner, and as well as support for face unlock. The device comes in three colors i.e., in Prism Cube Black, Prism Cube Sliver, and Prism Cube Blue.
Pre-Requisites
Now before we go ahead and root the Galaxy A71 5G, let us make a list of pre-requisites that are required to unlock it:
Charge your phone
You need to make sure that your Galaxy A71 5G is charged to about 60% before operating it for unlocking the bootloader to avoid any boot loop issues during the unlocking process.
You need a PC or Laptop
We would be running certain ADB and Fastboot commands that can be executed via PC or a laptop. So, we would need a computer in order to unlock the bootloader.
Take a complete backup
Before rooting, one of the most important things that you need to do on your phone is to take a complete backup of your phone. For that, you can follow the guide by clicking the link below:
Download USB Drivers
In order to make your Galaxy A71 5G get recognized by your PC, you need to have proper USB Drivers appropriate to your phone installed on your computer. And for that, you can follow the link below to download the correct Samsung USB Drivers on your PC.
Install ODIN in PC
Odin is used to flashing stock firmware file (in .tar or .tar.md5 formats) on Android-based Samsung devices and supports any Windows 10, 8.1, 8, 7, XP PC. You can install the latest Odin tool on your PC from the link given below:
Download Firmware
You can use either of the links below to download the firmware for your Galaxy A71 5G.
Warning
Steps to Unlock Bootloader on Galaxy A71 5G
Once you are ready with everything that is mentioned in the list of pre-requisites above, you can go ahead and root your Samsung Galaxy A71 5G by following the steps below:
Step 1: Activate the Developer option
- Enable the Developer Option on your device. To do this go to Settings>> About>> Software Information>> More.
- Tap on the Build Number 7-8 times until you see a message “Developer option enabled.”
Step 2: Enable USB Debugging, OEM Unlocking and Developer option
- Now head back to Settings>> Developer Option>>Enable USB Debugging as well as OEM unlocking.
Step 3: Unlock Bootloader on your device
- In order to unlock the bootloader on your Galaxy A71 5G, turn off your phone.
- Press the button combo: Hold Volume up + Volume down and plug your phone to your PC.
- Now long-press the Volume Up button to unlock the bootloader.
To Know More: Follow our guide to unlock the bootloader on any Samsung Galaxy smartphone
Steps To Root Galaxy A71 5G using Magisk
Before starting the rooting process, make sure to unlock the device bootloader at first. Then you can continue with the next steps.
Please Note:
Please Note:
- Rooting will block the official OTA updates
- After Rooting, it may void the warranty of your phone
- Supported model:
- Galaxy A71 5G: SM-A716F
Download Firmware
- Download Galaxy A71 5G Flash File
After you have downloaded the exact firmware file based on your device model number, you can extract the boot.img file to patch it via the Magisk manager app.
Guide to Extract Boot Image File and rename to .tar fileSteps to Create a Patched boot image using Magisk Manager
- First, download and install the latest Magisk Manager app.
- Next, connect your device to the PC via the USB cable.
- Copy only the boot.img file from the extracted folder to your device storage.
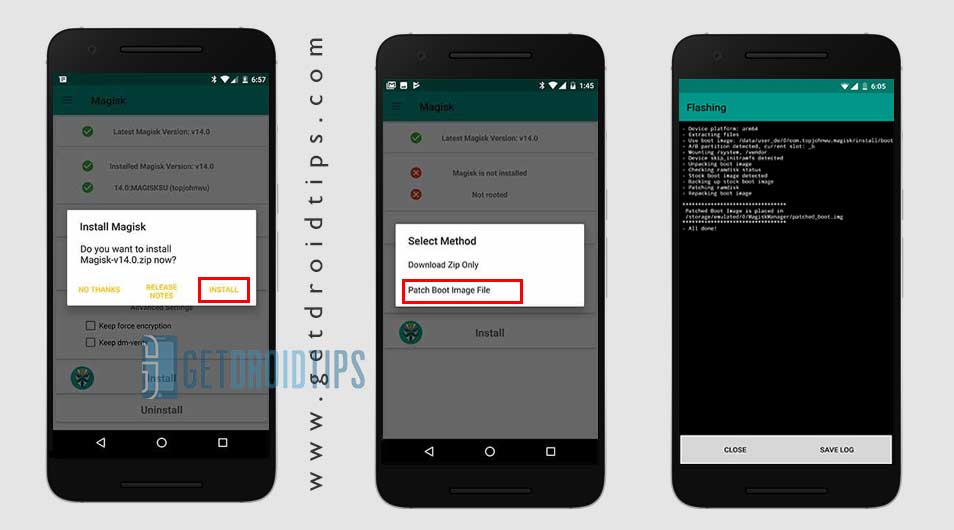
- Now, open the Magisk Manager app and select INSTALL and choose to install again.
- Then tap on “Patch Boot Image File”.

- Go to internal storage and select your device boot image that you moved earlier.
- Now, wait for Magisk to start patching the boot image.
- Once the boot image has been patched, copy the “patched_boot.img” from the internal storage and replace it in the same extracted ROM folder on your PC.
Now, follow the second step to flash the patched boot image file.
- Odin flash tool accepts files in .tar format. So, you have to use 7zip and archive it to .tar format. You can even rename the file as boot.img.tar as shown in the below screenshot.

Steps To Install the Patched Boot Image tar file on Galaxy A71 5G
Now, follow the final or second method to install the patched boot image file on your Galaxy handset. But first, follow the requirements.
Pre-Requirements:
- ROM Supported for – Samsung Galaxy A71 5G model only. Don’t try it on other devices.
- Keep your device battery charged up to 60% at least before doing anything.
- Take a full backup without the root of the device’s internal storage.
- A Windows PC or Laptop and a USB cable are required.
- Download the Latest ODIN tool and install it on your computer.
- Download and Install the latest Samsung USB Drivers on your computer.
- Copy the patched boot image file into the ADB & Fastboot directory.
Instructions to Root Galaxy A71 5G Using Magisk
After following the pre-requirements and unlocking the bootloader, in order to Root Galaxy A71 5G Using Magisk, let’s take a look at the rooting steps.
- First, reboot your device into download mode.
- Now, connect your phone to the PC via the USB cable.
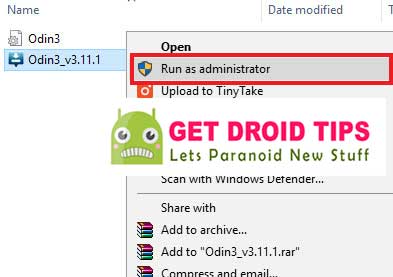
- Once you are connected, now open the downloaded ODIN.exe file.

- When you connect the USB cable you will see a blue sign in Odin.

- Now, load the patched boot.tar file in the AP section.

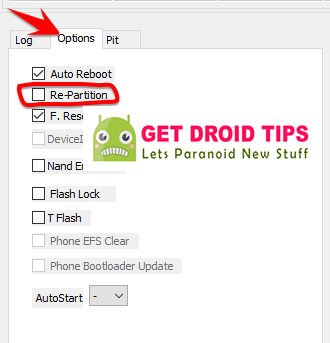
- Go to Option and see whether the Auto Reboot and F-Reset Time selected or not). If not then select these two. Don’t select re-partition.

- Now, tap on the Start button to root your device.
- Your device will reboot when the process will complete.
- Then wait for a few minutes. The first boot will take some time.
- You’re done. Enjoy!
So, there you have it from my side in this post. I hope you guys were able to successfully unlock the bootloader and root the Galaxy A71 5G using the guide above. Let us know in the comments below if you come across any issues while following the above-mentioned steps. Until the next post…Cheers!

𝗡𝗢 𝗡𝗢 𝗡𝗢
Bloody hell, there is no option to enable unlocking the oem bootloader on the T-Mobile A716U.
I have been using android phones since 2010. I know how to unlock the bootloaxer, but the option does not exist. Everyone seems to think it does. It shoud, .but it doesn’t.
This guide is not for any carrier-based smartphone.