when you create multiple accounts, all the new accounts have the same privileges as an administrator. If you wish to keep your PC secured from outside changes, then you need to change the administrator account in your Windows 11 PC. We have covered a lot of articles on Windows 11, be it enabling a feature or troubleshooting an issue; you should have administrative access for your account to do any of them.
If you are a normal user and someone has set up an account for you, the chances are that you might be a standard account. So it becomes vital to make your account an Administrator account in order to use your computer to a greater extent.
So here, in this article, we are going to show you how you can change the administrator on your PC and set it to your or any other account of your wish. Although bear in mind that an Administrative account has full access to every system resource on your computer. This could be both constructive as well as destructive. So it is wise to let access with only people who are well aware of how Windows works.
Also Read
How to Fix if 4K Videos Not Playing on Windows 11
How to Fix If Brightness Slider Missing on Windows 11 and 10
Fix: Windows 11 Context Menu Is Slow, Missing Item, and Not Working
TranslucentTB Windows 11 Not Working, How to Fix?
Fix: Mouse Scroll Wheel Jumps Up and Down on Windows 10, 11
Fix: Windows 11 Won’t Wake Up From Sleep With Keyboard or Mouse

Page Contents
How to Change Administrator in Windows 11
Depending on your work situation, you might want to change administrator access for your PC. Changing to a normal account have its set of benefits as you can lend your device to others safely without working about them changing your settings. Here are few methods by which you can change administrator account in Windows 11.
Also Read
Method 1: Using The Settings app
The new settings application in Windows has a lot of functions. It’s more like a complete replacement for the Control Panel that you could find on the older version of Windows. So you can easily change the administrator account of your Windows 11 PC directly from the settings app. To do so,
- Open the setting app in Windows 11. You can also use the shortcut Windows key + I to quickly open it.
- From the setting app, click on Account and click on Family and other users.
- Under Other users, you should be able to see the list of users on your PC.
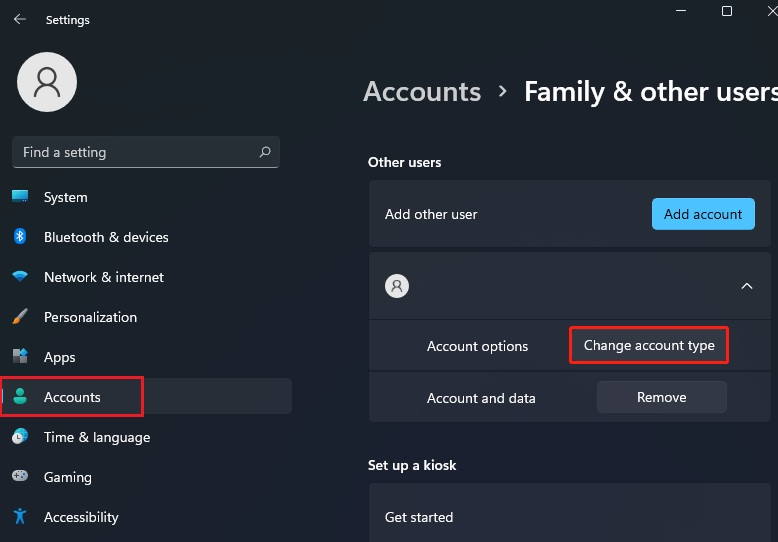
- Now click on the account and click on change account type.
- Select Administrator and hit okay.
To revert back, you have to follow the same steps and select standard users instead of administrators.
Method 2: Using the User Accounts Panel
If you have been using Windows for a while, you should recognize this. There is a User accounts control panel item that can help you to add, remove and edit Local as well as Network Users. This is a great utility that I use a lot. So here’s how you can change the Administrator using the User accounts settings:
- Open the Run box by pressing the Windows key and R key at the same time.
- Now type in netplwiz and hit enter.
- From the windows that open, you should be able to see the list of all available users in your system.
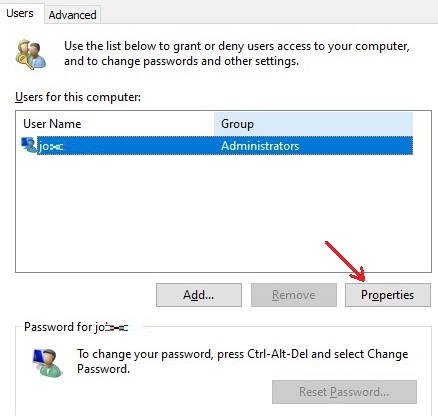
- Single click to highlight the user you wish to change and click on Properties in the list.
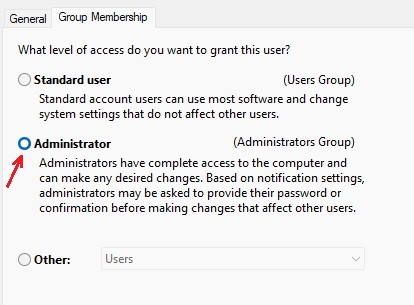
- Now, click on Group membership, select Administrator, and click okay.
That’s it. Now that account will become an administrator for your PC. To change back, you just have to select the Standard user option from the list, and you should be good to go.
Method 3: Using Local Account Manager
There is another useful utility found in the professional version of Windows called ad the Local Account manager. This tool can be used to manage local accounts created on your PC, which included changing the administrator account. So here’s how you can use the tool:
- Open the Run box as explained above, type in the following, and hit enter.
lusrmgr.msc
- Now open the Users folder and right-click on the user to whom you want to assign admin rights.
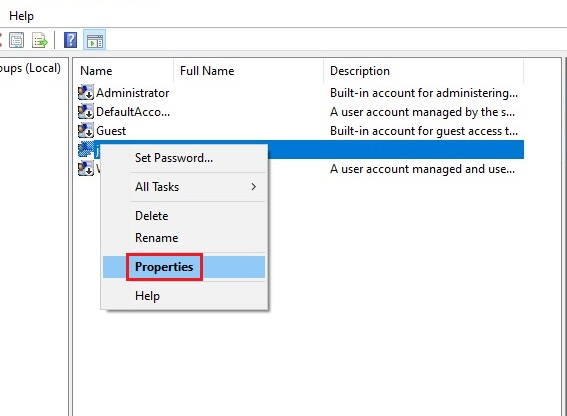
- Click on properties and open the Member of the tab from the dialogue box.
- Click on Add and type in Administrators and hit enter.
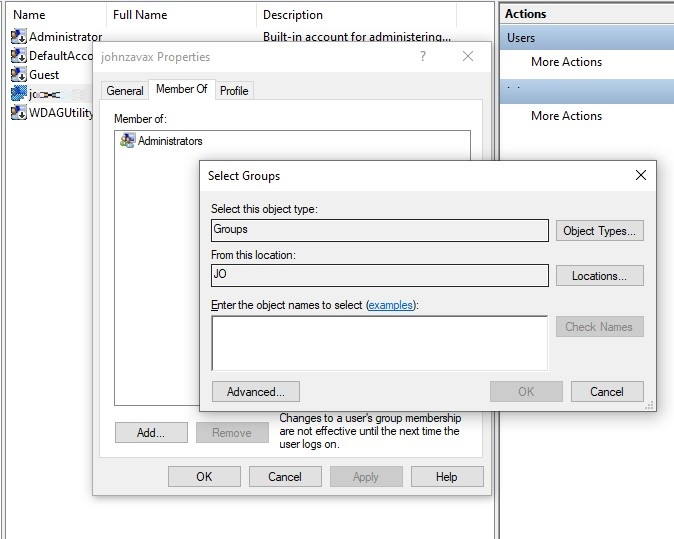
- Now Simply click on Apply and then Okay.
That’s it. Now you should be able to use admin rights on that account without any issues.
Method 4: Using the Command prompt (CMD)
If you want a two-step solution for your issue, then the command prompt is the way to go. This eliminates all hassles involved in navigating the user interface to try and find the correct button or option. So to change your account to an administrator in Windows 11,
- Click on start, type in CMD, and click on Run as Administrator.
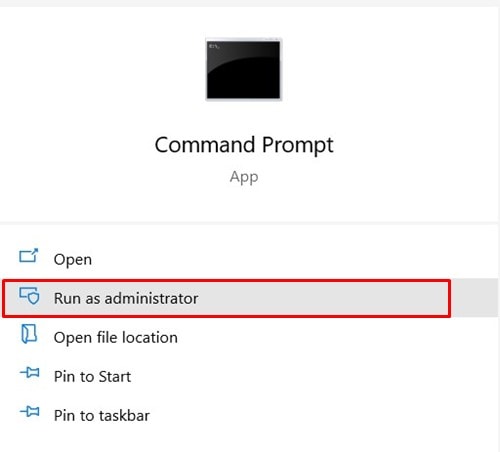
- Now, in the black window that appears, type in net user and hit enter.
- This will show you the list of all available users on your PC. Take a note of the name, or you could also select and copy it.
- Now type in the following command and make sure to replace the “account” section with the name of your account.
net localgroup Administrators "account" /Add
- Similarly, replace /Add with /Delete, and you will undo the action.
Method 5: Using PowerShell
Using PowerShell is the same as using the command line most of the time. But PowerShell can be quite useful if you are doing anything remotely or through scripts.
- Open Powershell as admin using the shortcut Windows key + X and then pressing A.
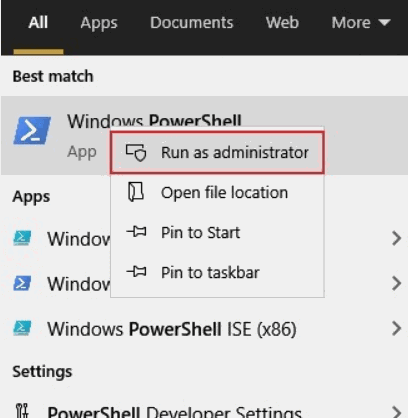
- Type in the following command and hit enter.
Get-LocalUser
- This will give you the list of all users on your PC. Take a note of your username.
- Type in the following command and hit enter.
add-LocalGroupMember -Group “Administrators” -Member “Account Name”
- To revert back and remove the admin privilege, type in:
remove-LocalGroupMember -Group “Administrators” -Member “Account Name”.
Note: In case admin rights did not work, you just have to log out and log back in. Sometimes a reboot might also be necessary depending on your use case.
Conclusion
So as you can see, changing the administrator in Windows is quite easy, and there are many methods to accomplish the same task. We have tried to mention them all so that you can choose from the list and adapt to the one that suits your need. However, that doesn’t mean that you should go ahead and give administrative access to each user on your PC. This could lead to security issues and make your device vulnerable. So you should only give access to experienced users who can use the privilege wisely.
