Microsoft recently launched its developer preview with lots of new features and upgrades in security. However, it comes with the same update procedure from Windows 10. One of the main features retain by Windows 11 is Windows update because it is the easiest way to provide an update to all users as no one wants to download the massive file of updates and then install it to their system. But this can create problems in the workflow if you don’t want your PC to update itself. For this situation, you can stop automatic updates on Windows 11 and choose your own prescribed time for Windows updates to install.
Also Read
What Is Mouse Acceleration and How to Disable It in Windows 11
FIX: Windows Defender Crashing in Windows 11/10
Fix: Windows 11 Clipboard History Not Working
Fix: Windows 11 Taskbar Not Hiding in Full Screen
How to Fix If Alt+Tab Shortcut Not Working on Windows 11
Download the Superlite Version of Windows 11 Ghost Spectre
Fix: Mouse Scroll Wheel Jumps Up and Down on Windows 10, 11
Fix: Windows 11 Won’t Wake Up From Sleep With Keyboard or Mouse
By default, the update’s installation for Windows 11 is set to automatic. Whenever the system receives a notification for the update, it asks for a restart of the system after installation. Sometimes we are in the middle of important work, and such update notifications can be distracting our workflow. Meanwhile, there is no option to stop the automatic updates in windows 10; but now there is an easy option for its user to control the automatic updates in their system in the latest version of Windows 11.
Page Contents
How to Stop Automatic Updates on Windows 11
Windows 11 don’t provide any single click or specific setting to stop the updates permanently. But you can disable the automatic update with some tricks. Go through each way to know how to disable or pause the automatic updates in Windows 11. Also, we don’t recommend you stop the updates because updates are necessary to avoid bugs and issues also provide new features to the OS.
Also Read
Method 1: Pause Windows 11 Updates
The best possible way to stop the automatic updates is by using the pause updates option. However, it is not a permanent solution as it only pauses the updates for up to 7 days. Here you find the steps to pause the automatic updates only for a week.
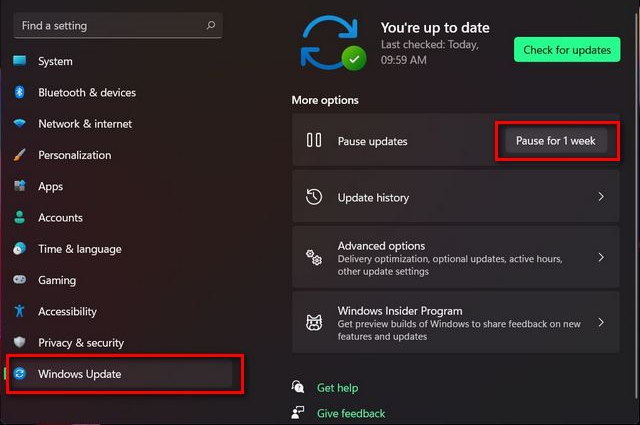
- Open the control panel of the system and navigate to the setting. You can use a shortcut press the window +i button.
- Now under Settings, click on Windows Update.
- After that, click on pause for one week.
This step will stop all automatic updates for the next seven days. After that, you can download the updates manually. If you want to pause for a long time, then repeat the process regularly.
Also Read
Method 2: Disable Windows Update in Windows 11
you can directly disable the update services of Windows by the steps below:
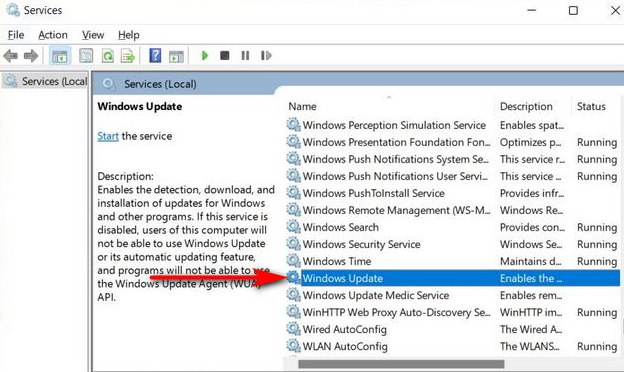
- Search for Services in the search bar of the Start menu and click on it.
- On the next window, scroll down and click on the Window Update.
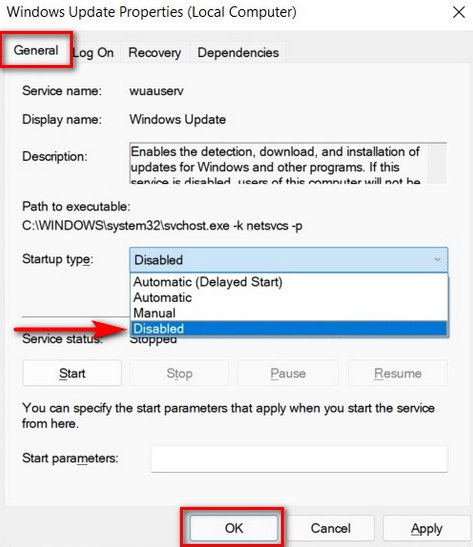
- After that, on a new tab of properties, click on Start type.
- Then select the disable option.
- Next, press OK to stop the updates.
Method 3: Set Up Metered Connection
A metered connection stands for capping the data uses of the internet that can prevent Windows 11 from updating the vast files in your system. It will restrict your system from using data, not more than you allowed like we use data limit in our smartphone.
- Open the control panel of the system and navigate to the setting. You can use a shortcut press the window +i button.
- Now navigate and click on the Network and Internet.
- After that, you will see the network name which is connected. It can be WIFI or Ethernet.
- Click on the properties of the current connection.
- Please scroll down below to the Metered connection on the properties page and turn it on by toggle switch.
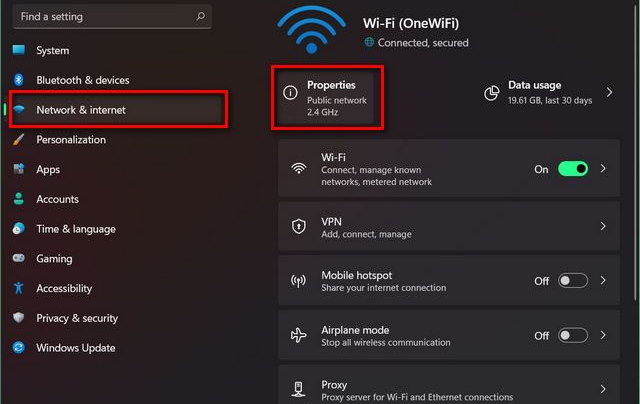
- After turning on the settings of Metered connection, Windows will not download any updates. To check whether it is enabled or not, go to Window Update in the system’s settings.
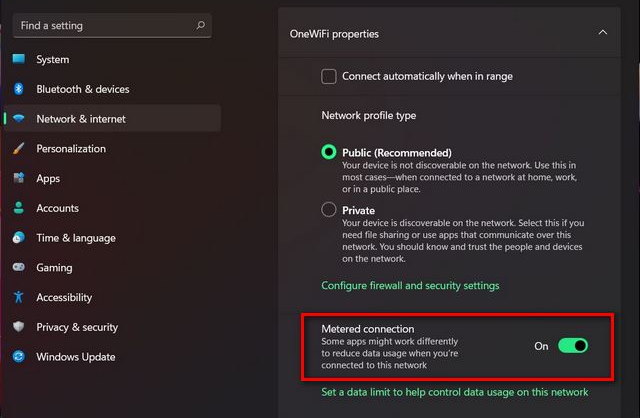
- Then click on Window Update and then Advanced options.
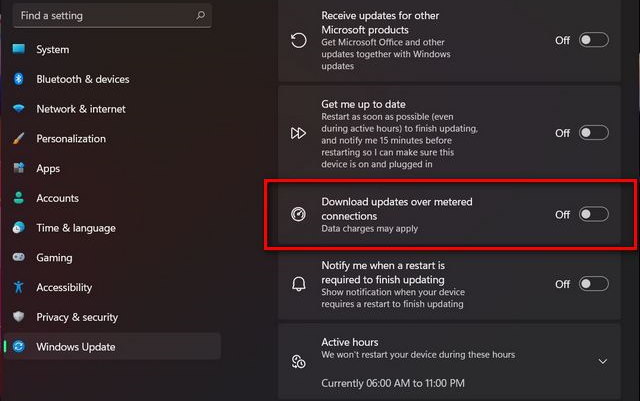
- Check whether the Download over a metered connection is off. If it is on, then switch it off mode to disable the Windows update.
You can add multiple connections to stop the window update if you are using more than one connection. Also, you can manually download and install the update whenever you want.
Method 4: Turn Off Automatic Windows 11 Updates via Registry
It is a permanent method to stop the automatic updates in Windows 11 with Registry. However, it is a dangerous and risky procedure so before applying this step, make a copy of your data.
- Open the registry window by searching Regedit on the search bar of the Start Menu.
- Then click on Registry Editor.
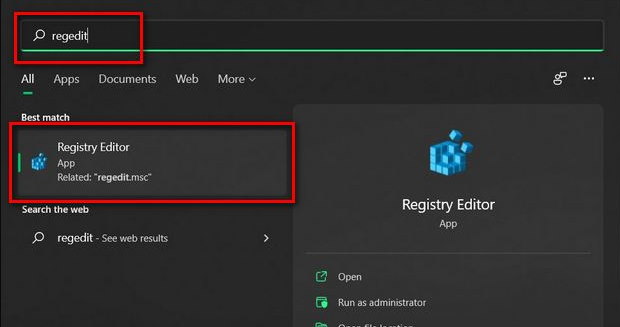
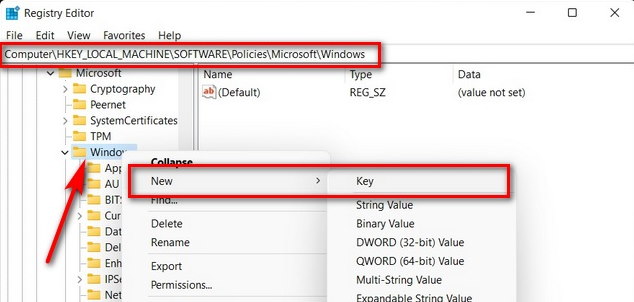
- Next, paste the below command on the left sidebar path.
HKEY_LOCAL_MACHINE\SOFTWARE\Policies\Microsoft\Windows
- Check for the folder Windows update exists or create a key of Window update by right click and then select New then Key.
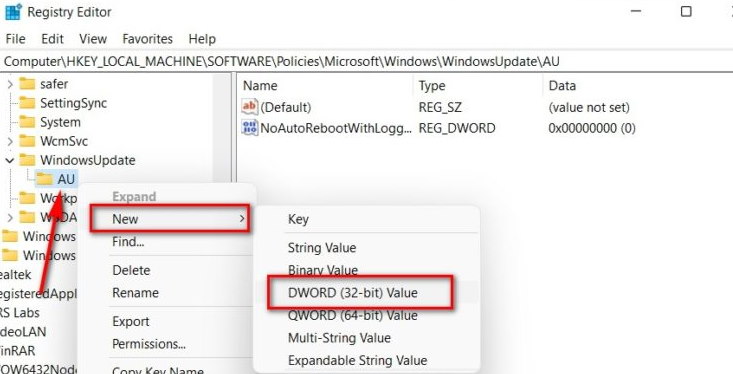
- After that, select the key names as AU. If not available, create a new key as the above step and do the same process to select or create DWORD(32-bit Value).
- To create DWORD, right-click on the AU key, then select New. After that, click on DWORD(32-Bit Value) and name it NoAutoUpdate.
- Now double-click on the DWORD and change the Value from 0 to 1.
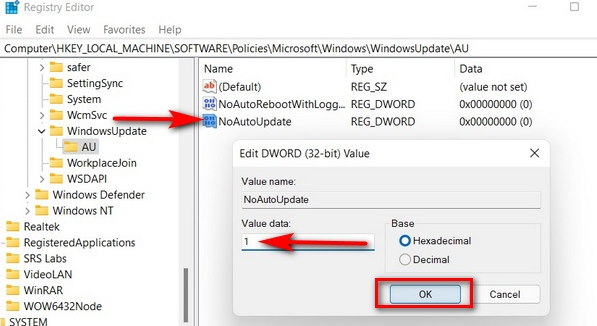
- Next, click Ok to apply the changes and then restart your system.
Method 5: Turn off Updates with Group Policy
There is no official information that Group policy editor is available in Windows 11, but you can enable it by the below steps:
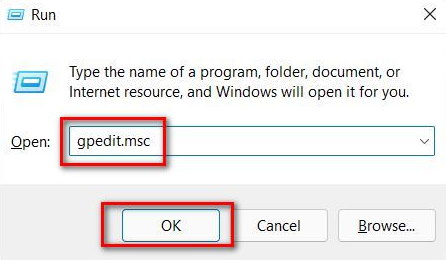
- Open the Local Group Policy Editor. Open group policy clicks on Run or uses the shortcut by pressing the Windows + R key.
- Now type gpedit.MSc in the text box and then click on OK.
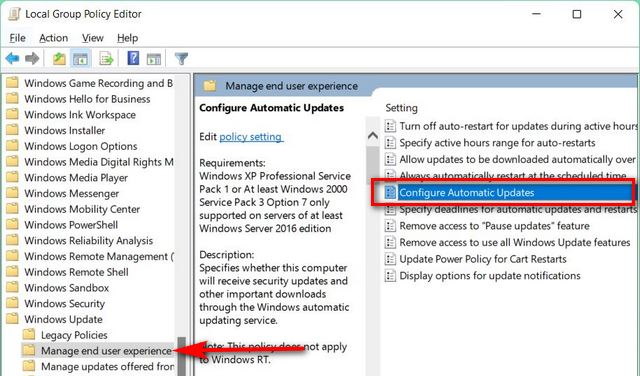
- After that, under the Group Policy Editor, go to the below path.
Computer Configuration > Administrative Templates > Windows Components > Windows Update > Manage end-user experience
- Double-click on the “Configure Windows Updates ” to open the automatic updates configuration page.
- Next, click on disable option hit on Apply, then Ok to save the changes.
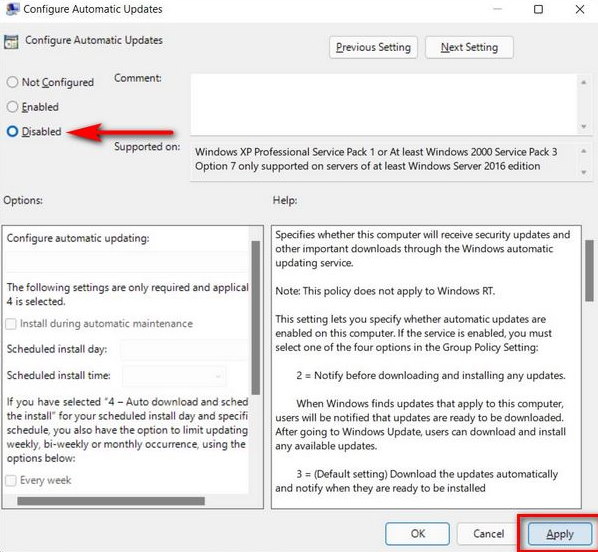
- After this modification, you have to download the available update manually to disable the permanently automatic Window update.
Conclusion
Here is all solution for how to stop automatic updates in Windows 11. There is a lot of third-party software available that can block the automatic updates easily, but we always recommend tweaking settings instead of downloading any third-party app that may harm your system. Also, downloading the update over a WIFI connection is more fast and easy and there is an option to check and download the update as per scheduled time. Please share your feedback in the comment box below, and for more information on Windows 11, navigate to our homepage.
