Riot Games‘ Valorant becomes one of the popular gaming titles under the free-to-play shooter games. Although Valorant players are quite satisfied with its graphics, controls, frequent patch updates, etc, it does have multiple bugs or errors. Valorant Error Code 57 is one of them and if you’re experiencing it on your Windows 10, you can follow this guide.
According to multiple reports online, several Valorant players are encountering the ‘Vanguard Not Initialized’ error message along with the particular error code. To be very precise, this error appears whenever the game’s anti-cheat system fails to initialize for some unexpected reasons. It’s basically occurring on the Windows platform and can be fixed completely.
Also Read
Download Dolby Audio Driver for Windows 11/10/8.1
How To Fix External Hard Drive I/O Device Error in Windows 11/10
Valorant Ranking System Guide: How Does It Work?
Fix: Win+Shift+S Not Working on Windows 11/10
Top 7 Best Valorant Stat Trackers
Best Valorant Trackers in 2022, Is it Safe to Use?
How to Fix If Valorant Updating Stuck at 0%, 45% or 0.1 KB
Fix: Valorant Val 59 Login Queue Fetch Token Failure Error
How to Fix If Valorant Texture Not Loading or Blurry
How to Fix Valorant VAN9005 Error

Page Contents
Fix: Valorant Error Code 57 on Windows 10
Talking about the full error message, affected Valorant players are getting “Vanguard Not Initialized. Vanguard Anti-Cheat has not been initialized. If this is your first time playing you will need to reboot your computer to continue. If you see this message frequently you may need to update your drivers. Error Details: Error Code: 57”.
It offers you Reboot Computer and Quit option to choose with. The chances are high that the Riot Vanguard anti-cheat system has some issues, Vanguard files are missing or corrupted, Vanguard service is disabled or stopped, issues with your DNS address, etc. So, without wasting any more time, let’s jump into it.
Also Read
1. Reboot Your PC
Sometimes a simple reboot of your PC can resolve plenty of potential errors or bugs regarding games. Although this method may not work for everyone, we’ll suggest you rebooting your computer once to check the issue.
2. Force Close Riot Vanguard
It can possible that somehow the Riot Vanguard service is conflicting with some other background running services or temporarily having a glitch on your computer. By force closing the anti-cheat system, you may be able to use it properly.
- Make sure that the Riot Vanguard service is fully closed and not running in the background. To do this:
- Go to the system tray icon on the Taskbar > Right-click on the Riot Vanguard icon.
- Click on Exit Vanguard.
- Next, open Task Manager by pressing Ctrl+Shift+Esc keys > Go to Processes > Then check the Riot Vanguard is running or not.
- If still running, click on Vanguard and choose End Task.
- Finally, restart your PC and launch the Valorant game again to check whether the Error Code 57 has been fixed or not.
3. Enable Vanguard Service
It may also possible that your Riot Games Vanguard service isn’t running properly on your Windows system. Vanguard is one of the anti-cheat security systems for PC games that prevent hackers or cheaters in gameplay.
There are two methods to enable Riot Vanguard service on your Windows system. If in case, this service isn’t running well, the vanguard not initialized error may appear. To check it:
- Press Windows + R keys to open the Run dialog box.
- Type services.msc and hit Enter to open Services.
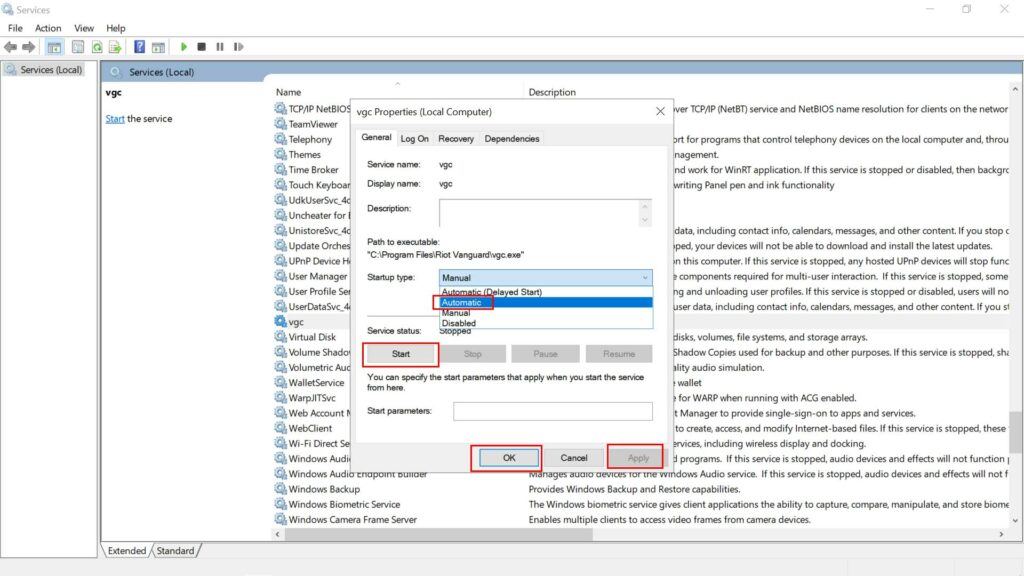
- Now, look for VGC from the list and right-click on it.

- Go to Properties > Set the ‘Startup Type’ to “Automatic”. [If not selected yet, make sure to select it]
- If in case, it’s not running, click on Start > Select Apply and OK to save changes.
- Finally, restart your computer to apply changes.
Once you’re done with the first method, it’s time to follow the second method below using the System Configuration option.
- Click on the Start menu > Type msconfig and click on the System Configuration from the search result.
- Once the system configuration window pops up, click on the Services tab.
- Now, find out the VGC service from the list of Riot Games.
- Click on the VGC checkbox to enable it.
- Next, click on Apply and then OK to save changes.
- Restart your computer and try running Valorant again to check the error.
Also Read
4. Flush Your DNS Cache
If in case, the above methods don’t fix the issue for you, make sure to clear the DNS cache on your computer by following the steps below:
- Click on the Start Menu > Type cmd.
- Right-click on Command Prompt from the search result.
- Select Run as administrator > If prompted by UAC, click on Yes to proceed.
- Now, run the following commands individually to reset your Network Configuration:
ipconfig /flushdns
- Then execute the following command to renew the IP configuration on your computer again:
ipconfig /renew
- Once done all, close the command prompt window.
- Finally, make sure to reboot your computer to apply changes.
5. Use Google DNS Address
Changing the Google DNS server instead of a private DNS can quickly resolve several issues with the game server connectivity or even the Riot Vanguard not initialized problem on your Windows PC. To do so:
- Click on the Start Menu > Search for Control Panel and click to open it.
- Now, click on Network and Internet > Select Network and Sharing Center.
- Go to Change adapter settings > Click on the active network that you’re using.
- Right-click on the Wi-Fi/Ethernet connection details > Select Properties.
- If prompted by UAC, click on Yes to allow the admin privilege.
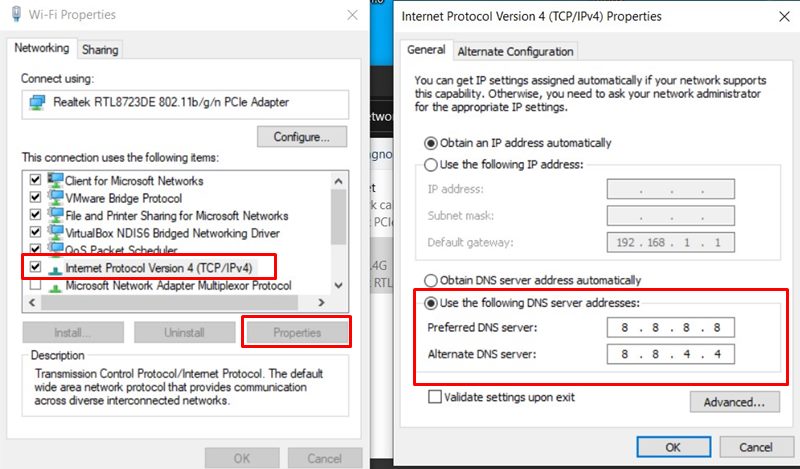
- Next, go to the Networking tab > Double-click on Internet Protocol Version 4 (TCP/IPv4).
- Click on Use the following DNS server addresses. (If any DNS addresses listed there, write them down for future reference, and remove them)

- Input 8.8.8.8 for Primary DNS and 8.8.4.4 for Secondary DNS.
- Similarly, go to the Internet Protocol Version 6 (TCP / IPv6) option > Input the mentioned values in the field – 2001:4860:4860::8888 and 2001:4860:4860::8844 respectively.
- Once done, restart your computer and try running Valorant again to check for the issue further.
6. Reinstall Vanguard System
If none of the methods worked for you, try simply uninstalling the Vanguard system on your computer to refresh it. It’s needless to say that even if you uninstall the Valorant game, it won’t disable or uninstall Riot Vanguard from your computer. So, you will need to manually disable it first and then uninstall it.
Disable Vanguard:
- Click on the System Tray icon > Right-click on the Riot Vanguard icon.
- Select Exit Vanguard.
- A warning pop-up may appear. Click on Yes to confirm.
Uninstall Vanguard:
- Click on the Start menu > Type Add or remove programs and click on it from the search result.
- Scroll down and click on Riot Vanguard.
- Click on the Uninstall button.
- It will ask you to confirm again. Just click on Uninstall again.
- If prompted by the UAC, click on Yes to confirm the changes.
- Finally, reboot your PC and check the Valorant game. It will reinstall the Vanguard automatically.
That’s it, guys. We assume you’ve found this guide helpful. For additional queries, you can comment below.
