Windows 11 is essentially a replica of Windows 10 when it comes to settings and features. The steps to disable Wifi or Ethernet adapter on Windows 11 is essentially the same. But if you have installed a new version of the OS, then obviously you will feel some difficulty navigating around settings to change Wifi or Ethernet preferences.
Windows 11 developer preview is out now and if you are one of the lucky ones who got hands-on with the latest Windows 11, then congratulations. Although you should already know that the builds are not stable and production-ready yet. So there might be some issues with devices and the components in the operating system.
Also Read
Fix: Windows 11 Audio Sound Distortion issue
How to Install Dolby Atmos Home Theater on Windows 11
What Is Mouse Acceleration and How to Disable It in Windows 11
Fix: Windows 11 Clipboard History Not Working
Fix: Miracast Not Working on Windows 11 and 10
How To Fix External Hard Drive I/O Device Error in Windows 11/10
How to Fix if 4K Videos Not Playing on Windows 11
Fix: Windows 11 Taskbar Not Hiding in Full Screen
How to Fix Scanner Not Working Issue on Windows 11
Fix: Mouse Scroll Wheel Jumps Up and Down on Windows 10, 11
How to Enable New CoPilot AI in Windows 11 23493
Some users of the Windows 11 prebuilt are complaining about Wifi and network issues. You may also have issues with networking that could cause interference with other parts of the OS. So you may want to disable the wifi and network adapters to make sure there are no network issues. Here is how you can disable Wifi and ethernet adapter in Windows 11.
Page Contents
How to disable WiFi or Ethernet adapter on Windows 11
The process to disable Wifi is pretty easy and straightforward. As you can edible it via the quick notification toggles. But for ethernet, you have to dig into settings and disable the options manually.
Also Read
Fix Windows 11 Random Shutdown Issue
How to Fix If Brightness Slider Missing on Windows 11 and 10
Fix: Windows 11 Context Menu Is Slow, Missing Item, and Not Working
TranslucentTB Windows 11 Not Working, How to Fix?
Fix: Windows 11 Multi Display Not Working
Fix: Windows 11 Won’t Wake Up From Sleep With Keyboard or Mouse
Method 1: From the settings app
Windows 11 features a new and improved settings app. From here you can disable or enable your Wi-Fi as well as internet adapter. To do so:
- Open the Settings app from the Start menu.
- On the left side, you should be able to find Network and internet, click on it.

- Now on the right side, you should be able to see “Advanced network settings” at the very bottom of the list.
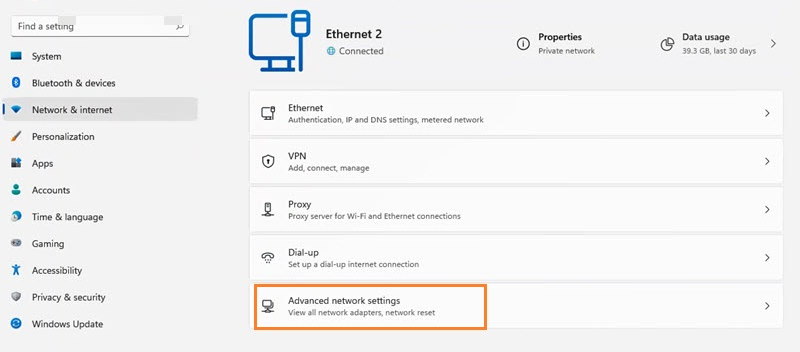
- Click on it and it should show you all available network adapters in your system along with wifi and ethernet.
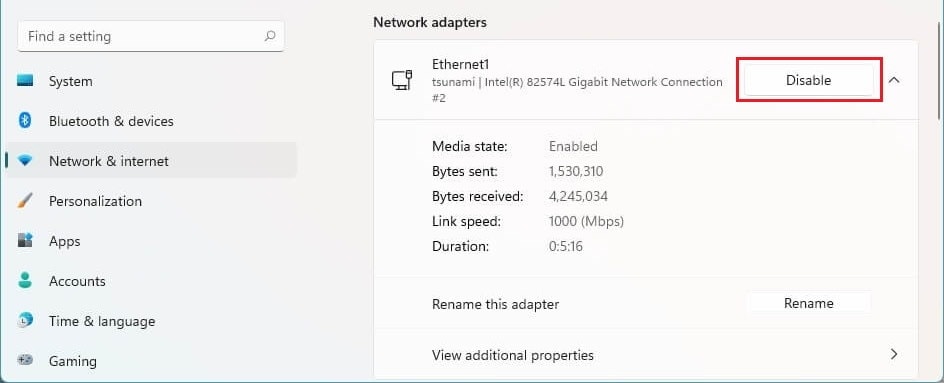
- From here you can Disable them or enable them as per your need.
Also Read
Method 2: From the Network Connections control panel
This is a more traditional method. That said, this method will work on all windows versions including windows 10 and windows 11.
- Open the Run box by pressing the Windows key and the R key at the same time.
- Now, type in ncpa.cpl and hit enter.
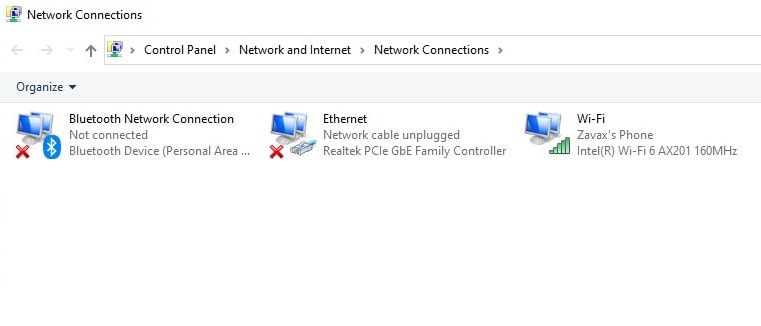
- This will open the network connections panel from the control panel.
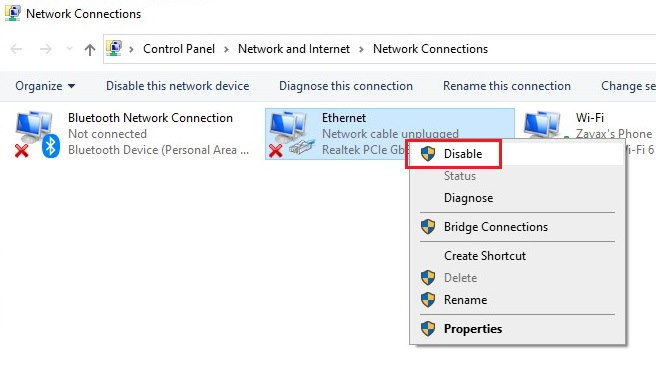
- From here, right-click on the adapter you want to change and click on Enable or Disable.
Also Read
Method 3: From Device Manager
For an added requirement you can also directly disable the device adapter directly from the Device manager itself.
- Open the Run box using the shortcut mentioned above.
- Type in the following text and hit enter.
devmgmt.msc
- Now from the list of available devices, look for a network adapter and Ethernet controller.
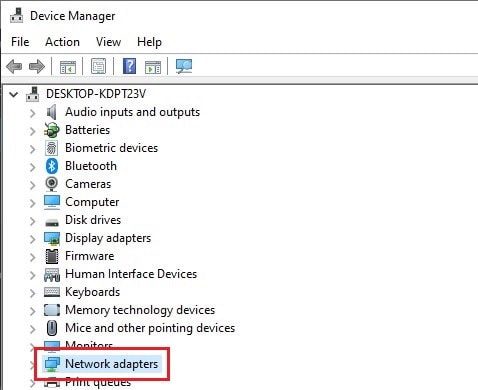
- Right-click on them and select Disable device.
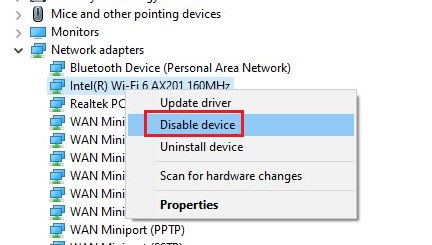
That’s it the device will be disabled on your Windows 11 PC.
Method 4: From the Command Prompt
For some reason, if you are unable to access any of the GUI methods mentioned above, then you should definitely try out the CMD method.
- Open Command prompt as admin. For that, search CMD on the start menu click on Run as administrator from the options.
- Now type in the following command:
netsh interface show interface
- Now take a note of the name of the adapter you want to disable. For instance, if you want to disable the Ethernet device, type in the following command:
netsh interface set interface "Ethernet" disable
(or)
netsh interface set interface "Ethernet" enable
- This command will disable or enable the device accordingly
Conclusion
So as you can see, enabling or disabling a network adapter in windows 11 is easy. If you have noticed, only the first method might seem different due to the new settings app included with Windows 11. Although you can easily use the other methods shown in the list without any issue. They will work fine without any issues since it is compatible with all windows version from Windows 7 and above.
