Here in this guide, we will help you to flash the magisk to root UMiDIGI A3X. Read our step by step guide properly!
Who doesn’t want to get the most of his Android device..?! Getting the superuser access through the root and to be able to control various aspects like clock, access to cache etc. are few of the various possibilities that we can explore. When we mention root access, this means we need to perform a certain modification that will root our phone and we will have access to the root directory of our device. In this post, we will show you how to root UMiDIGI A3X.
We will use the Magisk by patching the stock boot image and flash that to your boot partition. All you need to do is download the patched image file from Magisk Manager and flash it.
Mostly uninitiated people compare rooting with hacking which is not correct. The purpose in both contexts is quite different. Hacking is more like breaking into someone’s else system illegally, whereas rooting is mostly done by the owner of an Android device to gain superuser advantages of the device.

UMiDIGI A3X Device Overview
The Umidigi A3X sports a 6.26-inch IPS LCD waterdrop notch Display with an HD+ resolution and an aspect ratio of 19:9. That is this display has a resolution of 720 x 1520 pixels. Further, this display has a pixel density of 267PPI and a screen to body ratio of 81.19% with that waterdrop notch. The brand uses a 2.5D curved glass screen just like other smartphone vendors. Underneath the Umidigi A3X, it sports the popular budget chipset from the brand MediaTek, i.e. it has the popular chipset i.e. MediaTek Helio P22 chipset. We have seen this chipset on popular Xiaomi budget smartphone i.e. Redmi 6A and many other budget smartphones which came later on.
Coming back to the Helio P22 SoC, it is an octa-core SoC and has four Cortex A53 cores that are clocked at 2GHz, other four Cortex A53 clocked at 1.5GHz and pairs with PowerVR GE8320 GPU. The Umidigi A3X pairs with 4GB of LPDDR3 RAM and 64GB of eMMC 5.1 of Internal Storage. This is also further expandable via a micro SD card up to 128GB. The device has a hybrid SIM card slot i.e. you can insert two Nano-SIM cards at a time or a Nano SIM card and a micro SD card at a time.
Coming to the optics department, the Umidigi A3X has a dual rear camera setup. This dual rear camera setup includes a 16MP primary sensor with an f/2.2 aperture value and pixel size of 1.12 µm. This primary sensor pairs with a 5MP secondary sensor with f/2.4 aperture value. Further, this also comes with an LED flash and support for Digital Zoom, Autoflash, Face detection, and Touch to focus feature. To the front, the smartphone has a 13MP sensor with f/2.4 aperture value and it supports fixed focus.
The Umidigi A3X packs a 3,300 mAh battery which is a non-removable one. The brand claims that it has a standby time up to 288hrs (2G) on a single charge. The device runs on Leagoo OS which is based Android 9 Pie. It will be upgraded to the next Android version when it will be available. Coming to the dimensions, it measures around 76.5 mm x 158.3 mm x 8.6 mm and weighs about 174 grams. This smartphone is available in three color options namely Blue, Black, and Red. It has sensors like Accelerometer, Compass, Gyroscope, Light Sensor, and Proximity. Further, it has a fingerprint scanner and faces unlock for security measures. Connectivity options include, Wi-Fi 802.11 a/b/g/n, Bluetooth v4.0, A2DP, GPS with A-GPS, GLONASS, and FM radio.
Steps To Root UMiDIGI A3X Using Magisk
Remember,
- After Rooting, it may void the warranty of your phone.
- Rooting will block the OTA updates
Before moving on to the flashing steps, you need to follow a few,
Pre-Requisites
- Make sure to have enough battery charge on your phone to avoid interruption during the patch installation.
- Before performing any modification take backup of your device data.
- This image file is strictly for UMiDIGI A3X only. Do not use it on any other OnePlus or other Android devices.
- You need PC/Laptop with a micro USB cable to connect.
- Make sure that you download all the required files on your PC/Laptop
Required Downloads:
- Download ADB and Fastboot files. (Windows/MAC)
- Download and Install UMiDIGI USB Drivers.
- Download Other Drivers: Mediatek VCOM Drivers or MTK USB Drivers
- Download Latest UMiDIGI A3X Stock ROM
- Download and Install SP Flash tool on your PC
Disclaimer: We are at GetDroidTips will not be responsible for any bricking/damage to your phone while/after installing this ROM.
1. How to Extract and Patch Boot.image using Magisk?
- First of all, download and extract the ROM to your PC.
- Attach your device via USB cable and copy only the boot.img file from the extracted folder to your device storage
- Launch Magisk Manager. When a popup appears asking to install Magisk, select INSTALL and choose install again.
- Tap on “Patch Boot Image File”.
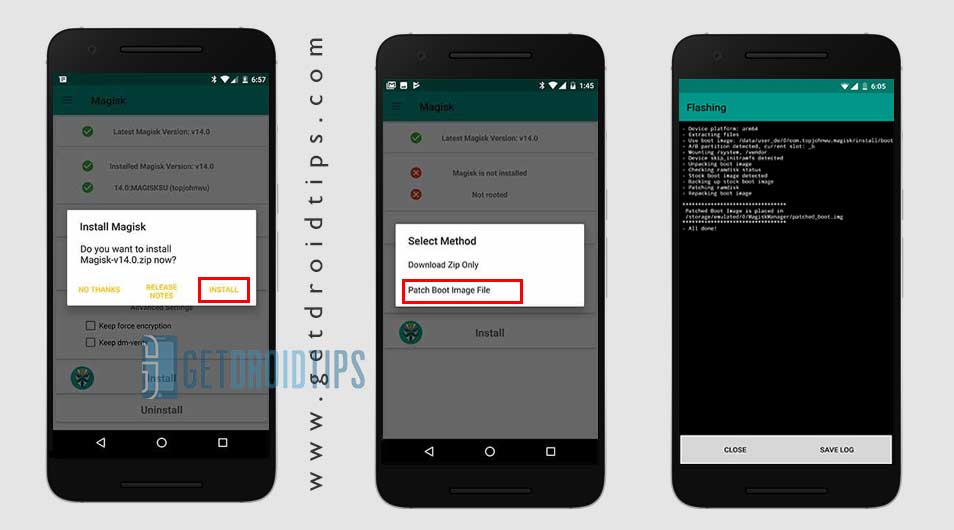
- Navigate to internal storage and select your phone’s boot image that you transferred earlier.
- Wait for a couple of seconds. Magisk will start patching the boot image.
- Once the boot image has been patched, copy the “patched_boot.img” from the internal storage and replace it in the same extracted ROM folder on your PC.
Now you can follow the second step to flash the patched boot image file.
2. How To Install the Patched Boot Image on UMiDIGI A3X
Follow the given link to install Patched Boot Image on UMiDIGI A3X:
How To Install the Patched Boot Image on MediaTek device
Second method
- We assume that you have already downloaded the ADB & Fastboot tool from the link given above.
- Now, extract the ADB fastboot tool, then move the patched boot image to the same folder.
- Hold the Shift key and right-click on the mouse to open the command window/PowerShell.
- Next, enter the following command:
- Flash the “patched_boot.img” to install Magisk and root your Android device:
fastboot flash boot patched_boot.img
- For devices with A/B partition system, use the following commands:
fastboot flash boot_a patched_boot.img

fastboot flash boot_b patched_boot.img
Please replace [patched_boot.img] with the name of the boot image file you downloaded followed by the .img extension.
- Flash the “patched_boot.img” to install Magisk and root your Android device:
- The flashing process will begin. Once done, run
fastboot reboot
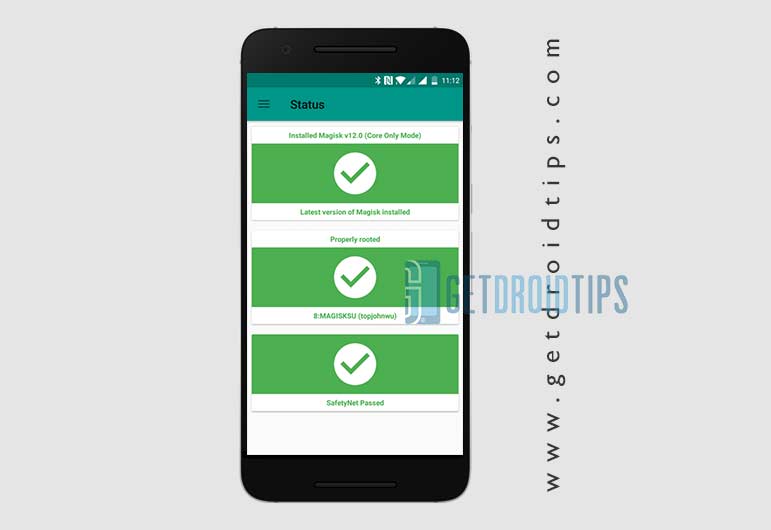
How to Verify if your phone has a systemless root?
- Download and install the Magisk Manager app APK, and launch it.
- To verify that you have systemless root, check the top of the screen and if you see all option with Green Tick which means you have successfully rooted and bypassed SafteyNet.
So, that’s it. Now that you have rooted your UMiDIGI A3X. If you have any queries regarding this, do let us know.