Apple is pretty specific about its gadgets and its services. I mean if you have an Apple iPhone or iPad, you will see the device will only allow legit music and songs from iTunes. It won’t allow you to download any music from anywhere. I know our Android users will smirk at this but this is how Apple prefers it. On the other hand, there may be some users that cannot afford to have Apple Music or they may already be using services like Spotify. Some may not even have Spotify. Then how will these guys add music to their iPhone or iPad.?
In this guide, I will explain how to include music from iTunes on your iPhone/iPad. Also, there are a few cool workarounds for non-Apple Music users. I have covered how to add new music or album from iTunes. Then you can access the same from your iPhone and iPad. You can also transfer music using WiFi. Another thing is, even if you do not have iTunes, you can still export music of your choice to your iPhone and iPad. The default player on the Apple phone and tab can easily play the mp3 songs. I have also explained how you can do this.
Also Read
iPhone Battery Draining Overnight, How to Fix?
How to Fix iOS 16 Music App Crash
How to Fix if YouTube Music Crashing on iPhone or After iOS Update
Fix: Apple Wallet Not Showing Add Card Option
5 Easy Ways to Turn Off iPhone without Power Button
How to Fix If iOS 16.4 Update Won’t install on iPhone
Fix: Google Chat Notifications Not Working on Android and iPhone
How to increase Cellular Data/ Mobile Data Speed on iPhone
Fix: Dolby Atmos Not Working / Not Showing in Apple Music
Does Apple Music Work Without Internet? How to Listen Offline?

Add Music to Your Apple iPhone or iPad
Now, for this particular method to add music to your iPhone or iPad, you must have an active membership in the Apple Music. Then only you can add or purchase music or albums of your choice.
Locally Adding Music from your PC to iTunes Library
This is very simple to do.
- Make sure you have installed the latest version of iTunes on your PC
- Launch iTunes
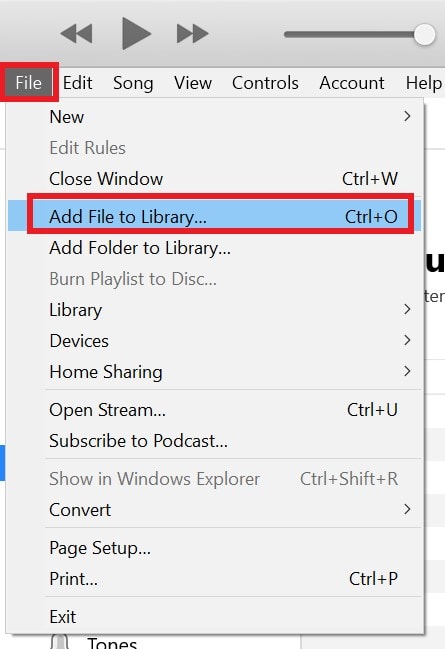
- Click File > navigate to Add File to Library and click it

- Then browse for the song files and albums you have on your PC.
- Add them to the iTunes library so that you can later exchange the content of the iTunes library into your iPhone or iPad.
iTunes WiFi Sync
The present-day smartphone users always want to do all the works wirelessly. You can also add music without having to physically connect your PC and iPhone/iPad.
Pre-Requisites
You have to keep in mind a few tricks that will be important in implementing the iTunes sync in this wireless method. Here it goes.
- iPhone/iPad Must be connected to a WiFi network
- your iPhone or iPad must be set to charging
The idea is simple. iPhone or iPad will sync with the PC that is running iTunes and from Apple Music, the songs or albums you have downloaded will reflect on your iPhone and iPad.
- Set up your iPhone/iPad to charge and connect to WiFi
- Launch Settings > go to General
- Scroll to iTunes Wi-Fi Sync and tap on it
- tap on Sync Now option
Also Read
Transfer Music from iTunes Library Using Lightning Cable
The next method is to connect your iPhone or iPad with your PC in which you have installed the latest version. of iTunes. Then from your iTunes Library, you have to select your choice of songs and playlists and sync them to your iPhone and iPad. For this method, you must have a legit subscription to Apple Music and you must have downloaded some music into your personal iTunes.
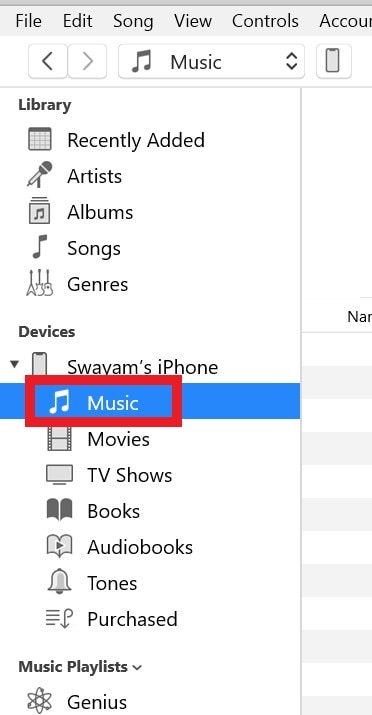
- On the left-hand side in the iTunes app, click on Music

- Then all your music will be shown categorized into the genre, playlist, artist, etc.
- Select by check-marking the songs and albums that you wish to sync with your iPhone/iPad.
- Then click Sync
What if you Don’t Have an iTunes Subscription?
If you cannot or do not want to subscribe to iTunes and grab music from there, then you may try to opt for Spotify or Amazon Music. If at all you cannot afford these two, then sure you can download your music from YouTube or anywhere from the internet. Here is the trick if you already have a collection of mp3 that you wish to transfer to your iPhone or iPad.
Note that when you transfer any file mostly a song file, then just check what file name extension it has. IF it has an extension other than mp3, then change it. This will allow the native music player of the iPhone or iPad to play that song.
For a better listening experience with options like track shuffle, track repeat, etc, I suggest you download and install the VLC media player.
Add Music to iPhone from Other Devices Using Bluetooth
Every device today comes with Bluetooth. Simply pair your recipient iPhone/iPad and the other smartphone or PC that has a Bluetooth client. Then transfer the files easily.
Exchange the MP3 files Via iTunes [Without Apple Music Subscription]
You can also transfer using iTunes provided you are transferring via cable using iTunes. Let me simplify. What I mean here is you won’t have to transfer any Apple Music content. It’s just some mp3 files are lying on your PC. Using iTunes you can transfer them to your iPhone or iPad.
- Connect your iPhone/iPad to your PC
- Open the latest iTunes version you have installed/updated on the PC. let your iPhone and PC Sync. It will take a minute hardly.
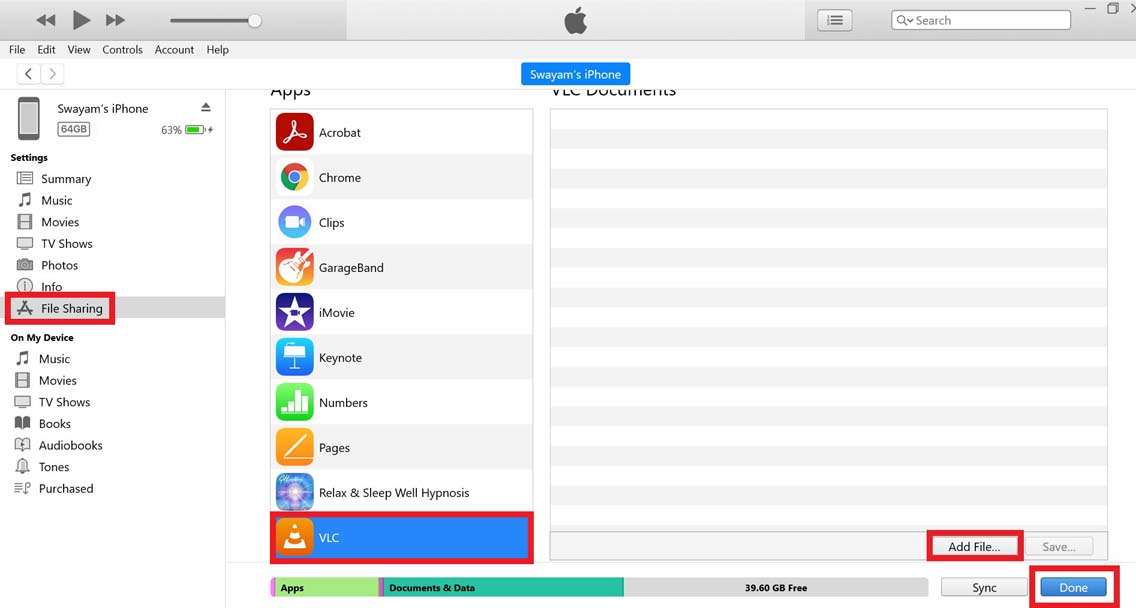
- Click on the phone symbol.
- Then on the left-hand panel click File Sharing under Settings
- From the Apps choose VLC [provided you have installed it on your iPhone/iPad]

- As you highlight VLC on the right-hand side, you will see the Add File option. Click on it
- The browse from your PC and add the songs files
- Once finish click on Done
- Now disconnect your iPhone/iPad
Open your iPhone and in the files, you should see the songs files you have just transferred. You can play using the native player of iOS/iPadOS or share via VLC and play through VLC. That’s why I mentioned about installing the VLC media player on iPhone/iPad as wit will support playing audio tracks.
So, that’s it. These are the various ways to add music to your iPhone or iPad. It is not mandatory that you have to subscribe to Apple Music to download music by paying for it. You can also transfer music files from other devices or PCs to your iPhones or iPad. I hope that you found this guide useful. Do check out my other guides on iPhones and iOS.
