Call of Duty: Warzone 2.0 is finally released with a massive free-to-play battle royale arena, including the new map and Al Mazrah. As a sequel to the Call of Duty: Warzone 2020 edition, it’s a part of 2022’s Call of Duty: Modern Warfare II if you’ve purchased the base title. Though it’s an improved version of its predecessor in terms of graphics and controls, some players are experiencing the COD Warzone 2 Texture Glitch and Blurry Graphics issue on the PC.
Now, if you’re one of the victims of such an issue, follow this troubleshooting guide to resolve it. It’s worth mentioning that the launch of Warzone 2.0 didn’t go smoothly for everyone and unfortunately, players are facing plenty of issues related to graphics quality or texture bugs. Additionally, issues with startup crashes, graphical glitches, voice chat not working, frame rate drops, lags, stutters, etc can be a mess for some players.
Fix: COD Warzone 2 Texture Glitch and Blurry Graphics
It seems that plenty of affected Warzone 2.0 players have already reported this issue due to the texture loading and blurry graphics on the PC. Not only it affects the gaming experience but also reduces framerate drops. The chances are high that conflicts with the in-game graphics settings, issues with the graphics drivers, corrupted or missing game files, an outdated game version, etc can be possible reasons behind such an issue.
Luckily, here we’ve mentioned a couple of possible workarounds below that should come in handy. So, without further ado, let’s get into it.
1. Adjust Render Resolution
Sometimes issues with the render resolution in the game’s graphics menu can cause texture not loading or blurry graphics issues on the PC. You can follow the steps below to do so:
- Launch the COD Warzone 2.0 game.
- Go to the in-game Settings menu.
- Select Graphics > Set Fullscreen Exclusive to the Display Mode.
- Choose Borderless or Windowed mode.
- Next, click on the Quality Preset tab at the top.
- You’ll see the Render Resolution option which can go to 30 or 50.
- Then set it back to 100 and apply the changes.
2. Disable Motion Blur
You can follow the steps below to turn off motion blur from the game settings menu to reduce graphical glitches in most cases. This setting will clear out most of the blurs around the in-game environment and weapon while moving. You should Disable the ‘Weapon Motion Blur’ and ‘World Motion Blur’ options.
Also Read
3. Enable On-Demand Texture Streaming
There are a couple of important settings that come enabled by default which can impact the in-game performance. You can follow the steps below to fix it.
- Open the COD Warzone 2.0 game > Select the gear icon in the top-left corner.
- Go to the Settings tab > Head over to the Graphics section.
- Turn On the On-Demand Texture Streaming option in the ‘Details and Textures’ panel.
- Next, increase the Texture Cache Size.
- Additionally, it’ll also remove download restrictions, turn in-game local texture upgrades, and more.
- You can also adjust Details and Textures under Post-Processing Effects to reduce blur.
Also Read
4. Set Display Resolution Scaling
The default Display Resolution Scaling can be a reason behind the graphical blurriness. So, Warzone 2.0 players can set the Display Resolution Scaling to the appropriate value according to the system’s preference.
5. Reduce Film Gain Parameter
This option will help you to reduce the blur and texture glitch under the motion blur setting. You can lower the default value of the film grain from 0.25 to zero (0) or 0.05 to get better visibility.
6. Keep the Stable Nvidia GPU Driver
It’s also worth recommending using the Nvidia GeForce App for v516.59 or v522.25 drivers to minimize the stability issues with the Call of Duty Warzone 2.0 until the new patch update arrives.
We've noticed some stability issues with the latest NVIDIA drivers 526.47 on Call of Duty #MWII. For now we'd suggest you keep the 516.59, or 522.25 drivers.
— BeenoxCODPC (@BeenoxCODPC) October 27, 2022
7. Use a Dedicated Graphics Card
First of all, it’s highly recommended to use the dedicated graphics card on the PC to be able to run graphics-intensive games like COD Warzone 2.0 smoothly. It’ll basically reduce game stutters, lags, and frame drops. If you don’t know which settings you need to adjust then follow the steps below.
For Nvidia:
If you’re using the Nvidia graphics card then you can do the following.
- Right-click on the desktop blank screen > Click on NVIDIA Control Panel.
- Click on 3D settings > Select Manage 3D settings in the left pane.
- Select the Program Settings tab.
- Choose COD Warzone 2.0 from the drop-down list.
- Now, select a High-performance NVIDIA processor.
- Save changes and reboot the PC to apply changes.
For AMD:
AMD graphics card users can do the following.
- Right-click on the Desktop blank screen > Select AMD Radeon Settings from the context menu.
- Now, click on System > Select Switchable Graphics.
- Make sure to save changes and reboot the PC to apply changes.
8. Update GPU Drivers
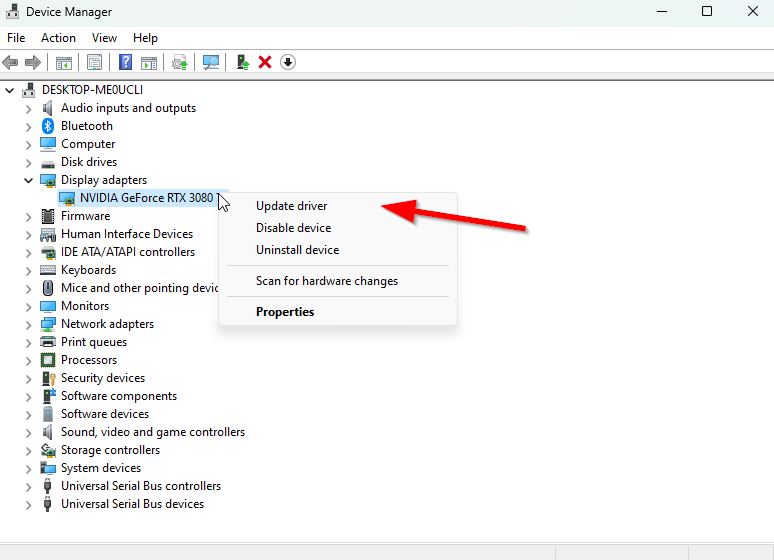
An outdated or corrupted graphics card driver can trigger multiple issues with the games or system performance while running programs. It’s highly recommended to check the graphics driver update. To do so:
- Press the Win+X keys to open the Quick Link Menu.
- Click on Device Manager from the list > Double-click on Display adapters.
- Right-click on the dedicated graphics card that you’re currently using.

- Click on Update driver > Choose Search automatically for drivers.
- If there is the latest update available, it’ll automatically download & install the latest version.
- Once done, restart the computer to apply changes immediately.
Alternatively, you can manually download the latest version of the graphics driver and install it on the PC via the official website. Make sure to download the graphics driver file respective to your graphics card model and manufacturer. Nvidia graphics card users can update the GeForce Experience app via the Nvidia official site and AMD graphics card users can visit the AMD website for the same. While Intel graphics users can visit here.
9. Repair Game Files
Sometimes corrupted or missing game files on the PC may trigger some issues with the game launching or running smoothly. Make sure to verify the game files and repair them via the Steam or Battle.net client by following the steps below:
For Steam:
- Open the Steam client on the PC and log into the account > Head over to Library.
- Right-click on the COD Warzone 2.0 game from the left pane.
- Click on Properties > Click on the Local Files tab.
- Then click on Verify Integrity of game files…
- Now, wait for the process to complete, and close the Steam client.
- Finally, restart the PC to apply changes.
For Battle.net:
- Open the Battle.net client on your PC.
- Click on the Call of Duty: Warzone 2.0 game.
- Now, click on OPTIONS (Gear icon) > Click on Scan and Repair.
- Choose Begin Scan and wait for the process to complete.
- Once done, close the Battle.net launcher and restart your PC.
10. Update COD Warzone 2.0
In some scenarios, it’s always a better idea to update the game version because an outdated game patch version can trigger several potential issues on the gaming device that lead to crashes, lags, stutters, CPU/GPU-related issues, and more. To do so:
For Steam:
- Open the Steam client > Go to Library.
- Click on COD Warzone 2.0 from the list of installed games on the left pane.
- Now, the client will automatically search for the available update.
- If there is an update available, click on the Update option.
- Wait for a couple of minutes or so until the game update is complete. [Depends on the storage space and internet connectivity]
- Once done, make sure to close the Steam client.
- Finally, reboot your PC to apply changes, and launch the COD Warzone 2.0 game again.
For Battle.net:
- Open the Battle.net (Blizzard) launcher.
- Click on the Blizzard logo from the top left corner.
- Go to Settings > Click on Game Install/Update.
- Click on Apply latest updates and download future patch data for recently played games to enable it.
- Now, click on Done to save changes > Restart the Battle.net launcher to apply changes.
- It should automatically update the game to the available version.
That’s it, guys. We assume this guide was helpful to you. For additional queries, you can comment below.
Also Read
All the Keys in COD MW2 Warzone 2 DMZ – DMZ Key Tier List
Warzone 2 Not Using 100% GPU and CPU, How to Fix?
Is Warzone 2 Shutting Down in 2023?
Discord Doesn’t Work while playing COD Warzone 2 / MW2: Fix?
Fix: COD Warzone 2 Controller Not Working or Not Detected Error
Best AMD and Nvidia Graphics Drivers for Warzone 2
MW2 and Warzone 2 Unsupported Device Warning Explained
How to Play Call of Duty Warzone Mobile on PC?
Fix: Warzone 2 DMZ Can’t Access Backpack After Wallet Unlock
All Black Mous Faction Missions in Warzone 2 DMZ
