Using Bluetooth devices on your Windows computer seems very easy and stable these days because all you need to simply turn on Bluetooth, search for the available devices, and connect to them. But some of the Windows users literally going through a lot of issues such as can’t connect or can’t remove Bluetooth devices on Windows 11 or 10 whatsoever. If you’re also one of the victims then make sure to follow this guide completely.
Also Read
How to Fix Windows 11 Bluetooth Not Working Issue
Fix: Windows 11 Audio Sound Distortion issue
How to Fix Windows 11 WiFi Not Working Issue
Fix: Touchpad Not Working After Windows 11 Update
Fix: Windows 11 Clipboard History Not Working
Download Dolby Audio Driver for Windows 11/10/8.1
Fix: Miracast Not Working on Windows 11 and 10
Fix: Windows 11 Taskbar Not Hiding in Full Screen
Fix: Mouse Scroll Wheel Jumps Up and Down on Windows 10, 11
Fix: Windows 11 Won’t Wake Up From Sleep With Keyboard or Mouse
Windows OS running desktops and laptops has a fair amount of Bluetooth connectivity or stability or even operational issues that can eventually leave you in an awful moment which you didn’t expect at all. As we mentioned, one of the frustrating issues with Windows computers is that unable to remove already paired Bluetooth devices from the system.
Page Contents
- Fix: Can’t Remove Bluetooth Devices on Windows 11 or 10
- 1. Update Bluetooth Drivers
- 2. Turn On and Off Airplane Mode
- 3. Uninstall Bluetooth Device via Device Manager
- 4. Set Bluetooth Services to Automatic
- 5. Run Bluetooth Troubleshooter
- 6. Remove Other Wireless Devices
- 7. Remove Bluetooth Device from Control Panel
- 8. Run SFC Scan
- 9. Remove Bluetooth Device Key from Registry Editor
- 10. Turn On Device Association Service
Fix: Can’t Remove Bluetooth Devices on Windows 11 or 10
Mostly affected users may receive a ‘Remove Failed’ error message while trying to disconnect a Bluetooth device from the Windows Bluetooth Settings option. In some scenarios, the connected Bluetooth device doesn’t even appear under the ‘Bluetooth & other devices’ section in the Settings menu which is a major concern. Luckily, here we’ve shared a couple of possible workarounds that you can try out.

1. Update Bluetooth Drivers
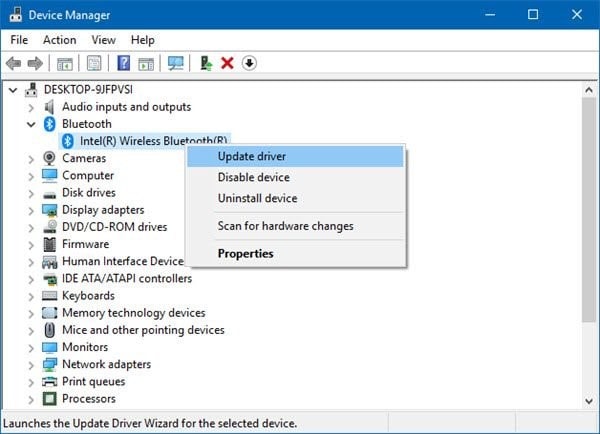
Try updating the Bluetooth device drivers on your Windows computer to check whether the problem is occurring at the driver end or not. Sometimes a corrupted or outdated driver version can also cause several issues with the Bluetooth device connectivity or removal process. To do so:
- Press the Windows + X keys to open the Quick Link Menu.
- Click on Device Manager from the list > Now, double-click on Bluetooth.
- Right-click on the Bluetooth adapter > Select Update driver.

- Next, click on Search automatically for drivers.
- If there is an update available, the system will automatically download and install it.
- Once done, make sure to restart your computer to apply changes.
- Finally, you can easily connect or remove Bluetooth devices on your PC.
Also Read
How to Fix Black Screen of Death in Windows 11?
How to Fix Runtime Error in Windows 11
How To Fix External Hard Drive I/O Device Error in Windows 11/10
How to Fix if 4K Videos Not Playing on Windows 11
Fix: Win+Shift+S Not Working on Windows 11/10
How to Fix If Brightness Slider Missing on Windows 11 and 10
How to Fix Scanner Not Working Issue on Windows 11
How To Fix No Audio Output Device Is Installed In Windows 10/11
2. Turn On and Off Airplane Mode
The second thing you can do is to simply turn on the Airplane Mode on your Windows computer for a while and then turn it off to refresh any kind of connectivity glitch that may happen on the system. This is one of the common solutions and it helped a lot of affected Windows users over years. To do this:
- Press the Windows + I keys to open Windows Settings.
- Go to Network & Internet > Click on Airplane Mode from the left pane.

- Now, turn on the toggle, wait for a couple of seconds, and then turn it off.
- Make sure that Bluetooth is turned on both the devices and try removing the device again.
Also Read
How to Fix Laptop Hotkeys Not Working on Windows 11
Fix Windows 11 Random Shutdown Issue
Fix: Windows 11 Context Menu Is Slow, Missing Item, and Not Working
TranslucentTB Windows 11 Not Working, How to Fix?
Fix: Apple Magic Keyboard Not Showing Up in Windows 10 / 11
How to Enable New CoPilot AI in Windows 11 23493
3. Uninstall Bluetooth Device via Device Manager
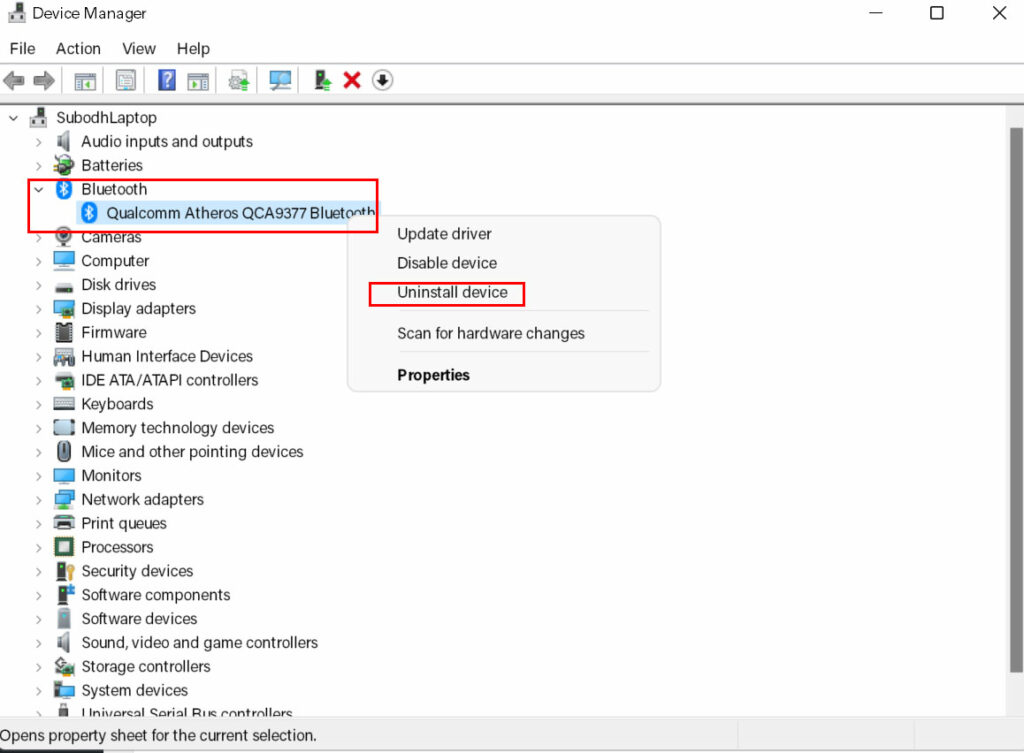
Uninstalling or removing the Bluetooth device via Device Manager is one of the most useful ways if you’re unable to do it from the Bluetooth Settings page on your PC. Well, uninstalling the Bluetooth device will automatically remove the paired or connected BT device from your computer whatsoever. If you want to connect the removed Bt device again, you’ll have to pair it again. To do this:
- Press the Windows + X keys to open the Quick Link Menu.
- Click on Device Manager from the list > Now, click on View on top.
- Select Show hidden devices from the list (if any device doesn’t appear properly).
- Double-click on Bluetooth > Right-click on the Bluetooth adapter.

- Select Uninstall device > If prompted, make sure to properly delete the BT device by following the on-screen instructions.
- Once done, close Device Manager, and reboot your PC to change effects immediately.
- By restarting the computer, your system will automatically try reinstalling the Bluetooth driver by default.
- If not, then try heading over to the manufacturer’s website, and download the latest Bluetooth driver for your particular model then install it manually.
- Once done, make sure to check whether the Bluetooth device has been removed or not.
It should fix the issue for most of the users. However, if the problem still appears then you can follow the next method.
4. Set Bluetooth Services to Automatic
If the Bluetooth services are stopped or set to manual then you’ll need to set it to Automatic and start the service for sure. Mostly the Bluetooth Support Service doesn’t run automatically until you turn it on. To do so:
- Press the Windows + R keys to open the Run dialog box.
- Input services.msc and hit Enter to open the Services window.
- Check whether the Bluetooth Support Service is turned on and set to Automatic or not by double-clicking on it.
- If not turned on or the service is stopped (manual) then set it to Automatic and start the service too.
- Once done, click on Apply and then OK to save changes.
- Finally, restart your computer, and check for the issue again.
5. Run Bluetooth Troubleshooter
- Go to Windows Settings by pressing the Windows + I keys.
- Search for Troubleshoot and select it > Go to Bluetooth.
- Next, select Run the troubleshooter.
- You can also run the Hardware & Devices troubleshooter if you want to ensure there are no hardware-related issues on your PC.
6. Remove Other Wireless Devices
We should also mention removing other wireless (Bluetooth) devices from the PC and keep only the particular Bluetooth device that you’re facing the issue with. It may fix the can’t remove error straight away.
7. Remove Bluetooth Device from Control Panel
Well, removing the Bluetooth device on the PC from Control Panel may resolve the Can’t Remove Bluetooth Devices error on Windows 11 or 10. To do so:
- First, click on the Windows Start menu and search for Control Panel.
- Now, open Control Panel > Go to Hardware and Sound.
- Click on Devices and Printers > Here you’ll see a list of devices that are connected to your PC.
- Just right-click on your particular device > Choose Remove device from the drop-down menu.
- Once done, restart your computer to apply changes immediately.
Must Read: How to Fix If Bluetooth Missing From PC and Devices List
8. Run SFC Scan
- Click on Windows Start menu > Type cmd.
- Right-click on Command Prompt > Select Run as administrator.
- If prompted by the UAC, click on Yes to proceed.
- Now, type the following command and hit Enter:
sfc /scannow
- Wait for the scanning process to complete and then restart your computer.
This method should fix all corrupted files on your system properly.
9. Remove Bluetooth Device Key from Registry Editor
If you’re a techy person and want to deep dive into the Windows Registry Editor then you can try removing the problematic Bluetooth device key from Registry Editor. To do so:
- First of all, press the Windows + R keys to open up the Run dialog box.
- Now, type Regedit and hit Enter to open Registry Editor.
- Navigate to the following directory by copy/pasting it in the address bar:
Computer\HKEY_LOCAL_MACHINE\SYSTEM\CurrentControlSet\Services\BTHPORT\Parameters\Devices
- From the right pane window, you’ll be able to see 12-digit device keys.
- Just double-click on the device key to check which Bluetooth device is for the respective device key.
- Once you’ve found the particular device key for the problematic Bluetooth device, right-click on it.
- Choose the Delete option > Reboot your system.
- Once your computer boots up, the problematic Bluetooth device should be removed completely.
10. Turn On Device Association Service
It seems that the Windows service is responsible for pairing Bluetooth devices to your computer. If the Device Association Service isn’t running on the system then make sure to it on right now to fix the issue most probably. To do that:
- First of all, open up the Run dialog box by pressing the Windows + R keys.
- Type services.msc and hit Enter > The Windows Services interface.
- Locate the Device Association Service from the list.
- Now, double-click on it to open up the Properties window.
- Make sure to set Automatic for the Startup type.
- Whereas if the service is stopped then click on the Start button for sure.
- Once done, restart your computer, and try removing the Bluetooth device to see if the problem is still bothering you or not.
That’s it, guys. We assume this guide was helpful to you. For additional queries, you can comment below.

I have tried every single one of these and nothing is working. I just upgraded my PC and the C drive was cloned to a new SSD. It’s done stuff like this in the past but not to every single bluetooth device. Please help :/
I suffered this for a few days, when I tried installing it again without removing the previous one, and worked just like that, I guess it was because I changed the old usb dongle for a new one.
Hope this help someone.
Congrats! Very good post! I’ve been suffering with my bluetooth devices for weeks. The topic number 7 solved my problem. Thanks!