After announcing the Android app support on Windows 11, Microsoft did finally release Windows 11 officially, and now the Windows Subsystem for Android (WSA) for Windows 11 is rolling out in the Beta channel. Due to the Android’s open-source nature developers are modding WSA for Win11 since the announcement. Now, if you’re using Win11 and interested in Root Windows Subsystem for Android via Magisk on Windows 11, you can check this guide.
Developers are fast and dedicated enough to provide Google Play Store (GApps) on Windows 11 Subsystem for the Android platform for a while. For those who don’t know about Magisk, it’s a systemless rooting method for Android that doesn’t break or conflict with the system files and can seamlessly offer you all rooting abilities whatsoever. Unlimited thanks to the developer @topjohnwu for making such a powerful rooting tool for Android.
Also Read
Fix: Windows 11 Won’t Boot After Bios Update
How to Fix if 4K Videos Not Playing on Windows 11
How to Fix If Brightness Slider Missing on Windows 11 and 10
TranslucentTB Windows 11 Not Working, How to Fix?
Fix: Mouse Scroll Wheel Jumps Up and Down on Windows 10, 11
How to Enable New CoPilot AI in Windows 11 23493

It’s also worth mentioning that apart from Magisk, some other exploits or rooting tools are working such as Riru and LSPosed on Windows Subsystem for Android (WSA) based on Windows 11. Well, the process of enabling the root to WSA on Win11 is quite easier than might think. Just like installing Google Apps (GApps) on Win11, you’ll need to install a modded Windows Subsystem for Android (WSA) that comes pre-installed with Magisk and GApps.
Maigsk, Riru, and LSPosed are now working on WSA🥳 pic.twitter.com/JZnTGIrokj
— LoveSy (@shanasaimoe) October 21, 2021
Page Contents
- How to Root Windows Subsystem for Android via Magisk
- 1. Uninstall Previous Version of WSA
- 2. Install Android SDK Platform Tools
- 3. Download Rooted WSA
- 4. Download Magisk for Windows 11
- 5. Enable Developer Mode on Windows 11
- 6. Enable Virtual Machine Platform in Windows 11
- 7. Install Rooted Windows Subsystem for Android
- 8. Enable Developer Mode in WSA on Win11
- 9. Establish Wireless ADB Connection
- 10. Install Magisk in Windows 11
- How to Verify if your Windows 11 PC is Rooted via Magisk or Not?
How to Root Windows Subsystem for Android via Magisk
You’ll love to hear that it’s a pure stock Android 11 build and after rooting via Magisk, the Google Play Store or Play Services will come pre-installed. So, you’ll get a fully-featured rooted Android 11 subsystem on your Windows 11 OS. Although Microsoft hasn’t released the Android apps support to all regions as of now, by changing the system region to the USA you can start enjoying the same right now with the Win11 latest Beta or Dev channel build.
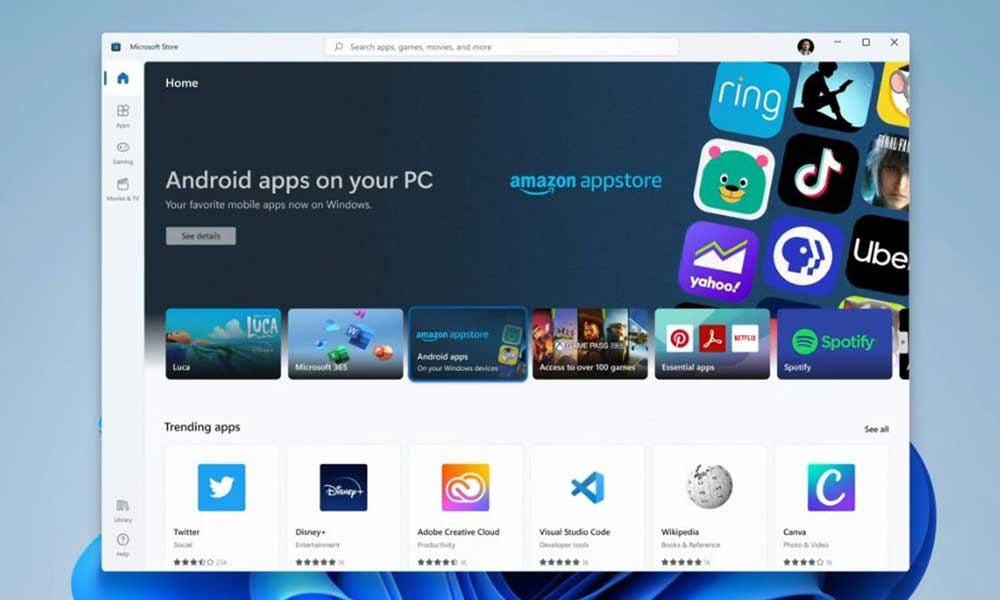
While Windows 11 can officially allow you to install Android apps or games via Amazon Appstore, you can also sideload the APK file on your Win11 machine apart from Google Play Store to enjoy a wide range of applications. Now, without further ado, let’s jump into the guide below.
Also Read
1. Uninstall Previous Version of WSA
First of all, if you’ve installed any version of Windows Subsystem for Android (WSA) on your Windows 11 computer then please uninstall it straight away. To do so:
- Head over to Start Menu > Search for Windows Subsystem > Right-click on it and select Uninstall.
- Once done, reboot your PC to apply changes.
Also Read
2. Install Android SDK Platform Tools
You’ll have to install the Android SDK Platform Tools (ADB and Fastboot Tools) on your PC. This is the official ADB and Fastboot binary provided by Google to run commands on the system to execute tasks.
3. Download Rooted WSA
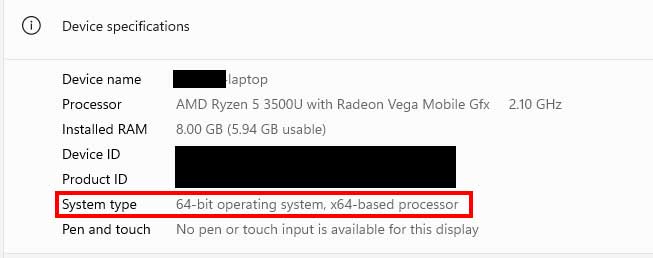
Now, you’ll need to download the Rooted Windows SubSystem for Android (WSA) with GApps+Magisk using the link below. Make sure to download the respective file according to your hardware architecture (arm64 or X64). You can check which architecture type is you’re using by heading over to Settings > System > About > System type under Device specifications.

- WSA-magisk-GApps-pico_1.8.32822.0_arm64_Release (Nightly)
- WSA-magisk-GApps-pico_1.8.32822.0_x64_Release (Nightly)
Once you downloaded the WSA file on the PC, make sure to extract it to a folder or any other location on your PC for your ease. [Do not put space between the folder name. Keep it WSA_Rooted]
4. Download Magisk for Windows 11
Make sure to download the Magisk APK file on your Windows 11 PC that will be used for rooting. Once you’ve downloaded the zip file, you’ll need to extract it, and copy the magisk.apk file from the folder and paste it to the extracted Platform-Tools folder on your PC.
Note: Magisk for Win11 is totally different from the Magisk for Android. So, don’t do mistakes while downloading the file. Just download the file using the link given below.
5. Enable Developer Mode on Windows 11
Microsoft has provided the Developer Mode on Windows 11 that you can enable or disable by following the steps below:
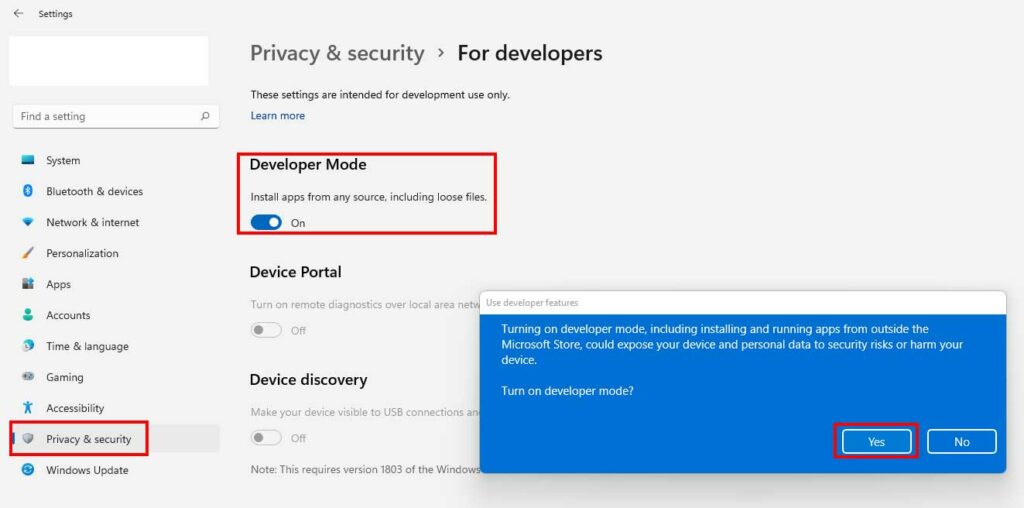
- Press the Windows + I keys to open Settings > Click on Privacy & security.
- Click on For developers from the right pane window > Click on the Developer Mode toggle to turn it on.

- Now, you’ll see a confirmation dialog popup box > Just click on Yes to confirm.
6. Enable Virtual Machine Platform in Windows 11
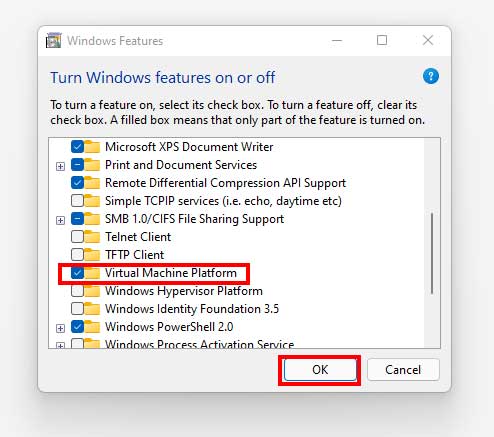
- Head over to the Start Menu > Search for Turn Windows features on or off > Then click on it to open.

- Now, checkmark the Virtual Machine Platform option > Hit OK.
- Finally, restart your PC for the changes to take place.
7. Install Rooted Windows Subsystem for Android
- Click on the Start menu (Press the Windows key) > Search for Windows PowerShell.
- Right-click on Windows PowerShell > Select Run as administrator > If prompted by UAC, click on Yes to proceed.
- Now, the Windows PowerShell window will open on the screen > You’ll need to change the directory to the folder where you have extracted the WSA by running the command below. [For instance, if you’ve extracted the WSA folder to D:\WSA_ROOTED then make sure to change the location of the directory]
cd
D:
cd WSA_Rooted
- Once you’re inside the location where the extracted WSA folder is available on the PC, make sure to run the following command to install the rooted WSA file on your Windows 11 system:
Add-AppxPackage -Register .\AppxManifest.xml
- Now, close the Windows PowerShell window, and head over to the next method.
8. Enable Developer Mode in WSA on Win11
As you’ve recently installed Windows Subsystem for Android (WSA) on your Windows 11 computer, you’ll need to enable developer mode inside the subsystem too.
- Click on the Start menu (Press the Windows key) > Search for Windows Subsystem for Android Settings.
- Click on it to open > Enable the Developer mode toggle.
- Once done, make sure to click on the arrow icon next to Files > It’ll open the Windows Subsystem for Android.
- Then it’ll open the File Explorer inside the WSA which will indicate that the installation is successful.
9. Establish Wireless ADB Connection
You’ll now have to create a wireless ADB connection between the Windows Subsystem for Android and the Windows 11 OS. To do so:
- Click on the Refresh button next to IP Address in the Windows Subsystem for Android.
- Next, click on the Copy button next to the IP address that appears.
- Go to the extracted platform-tools folder, type in CMD in the address bar, and hit Enter to open the Command Prompt window.
- Now, execute the following command in the CMD window, and replace the ‘IP’ with the actual IP Address that you’ve copied earlier:
adb connect IP
- You might get an error the first time. But don’t worry. Run the command again or multiple times to get successful.
10. Install Magisk in Windows 11
- Now, you’ll have to execute the following command in the CMD window to install Magisk on Windows 11. Ensure that you’ve already copied the magisk.apk file to the extracted platform-tools folder.
adb install magisk.apk
- The Magisk app is now installed on your Windows 11 PC > Go to the Start menu and search for Magisk.
- Click on Magisk to open it > Now, it’ll ask you to make an additional setup for Magisk and then reboot. To do so: click on OK.
- It’ll do the necessary task and then reboot the system automatically to apply changes.
- You’re done. Enjoy!
How to Verify if your Windows 11 PC is Rooted via Magisk or Not?
Well, the process is really simple and traditional one similar to the Android rooting status. To do so:
- Click on the Start menu > Search for Google Play Store and open it.
- Download and Install the Root Checker app > Now, open the Magisk app.
- Go to the SuperUser tab at the bottom > Enable the toggle next to the Root Checker Basic option.
- Now, open the Root Checker app on the PC > Tap on Verify Root.
- It’ll show you the success message “Congratulations! Root access is properly installed on this device!”.
Note: It will show you Android Version: 11 and Device: Pixel 5 in the Verify Root Status tab which is absolutely fine.
That’s it, guys. This is how you can easily enable root access on Windows Subsystem for Android in Windows 11 computer. We assume this guide was helpful to you. For further queries, you can comment below.
Also Read

I’ve run the command “adb connect ” (with actual copied IP) 12-15 times, but it’s not connecting.
It’s showing that the connection couldn’t be established, as the connection didn’t respond in a given time frame.
How to fix it?