In this guide, we will show you how to make full use of the Nintendo Switch Parental Controls. This video game console was quick to gather a massive fan following in a short span of time. With games such as Animal Crossing, Fortnite, Minecraft, and the likes, it managed to cater to the fanbase of every age group as well as to every domain. Plus the fact that you could try out local multiplayer, online multiplayer as well as local wireless with other consoles further adds feathers to its cap.
And it goes without saying that the online multiplayer game mode has always been the preferred one for a lot of users. With that said, for parents, there’s always a concern that their children don’t end up interacting with unknown strangers in this unchartered territory of the online world. Fortunately, Nintendo has given weightage to this concern and has added a pretty useful feature. You could easily enable the Nintendo Switch Parental Controls and stop your kids from talking to strangers. Here are all the required instructions for the same.

Page Contents
Nintendo Switch Parental controls: Stop Kids from Talking to Strangers
Once you have enabled this feature, then you wouldn’t be able to send voice, text, or other interactive forms of messages to any player online. As an example, you wouldn’t be able to play Minecraft in multilayer online mode or carry out Voice Chat with others in Fortnite. So if that’s all well and good, then let’s begin with the Nintendo Switch Parental Controls guide.
Also Read
How To Set Daily Play Time Limit On Nintendo Switch
How to Fix If Nintendo Switch Online Account Hacked or Compromised
Fix: Minecraft lags on Nintendo Switch After An Update
Fix: STAR WARS The Force Unleashed Not Loading or Crashing on Nintendo Switch
Fix: Nintendo Switch Stuck on Logo Screen
When Will Roblox Come to Nintendo Switch | Release Date
Fix: Nintendo Switch/OLED Touch Screen Not Working
How to Fix Nintendo Switch Not Charging Problem
Fix: Nintendo Switch Games Keep Corrupting or Damaged
How To Download Faster On Nintendo Switch in 2022
Nintendo Switch Keeps Asking For Password, How to Fix?
How To Check If Your Nintendo Switch Is Moddable
STEP 1: Setting up the Nintendo Switch Parental Controls App
- First and foremost, you will have to link your account with Nintendo’s Parental Controls app.
- So head over to Play Store or App Store and install the app onto your device.
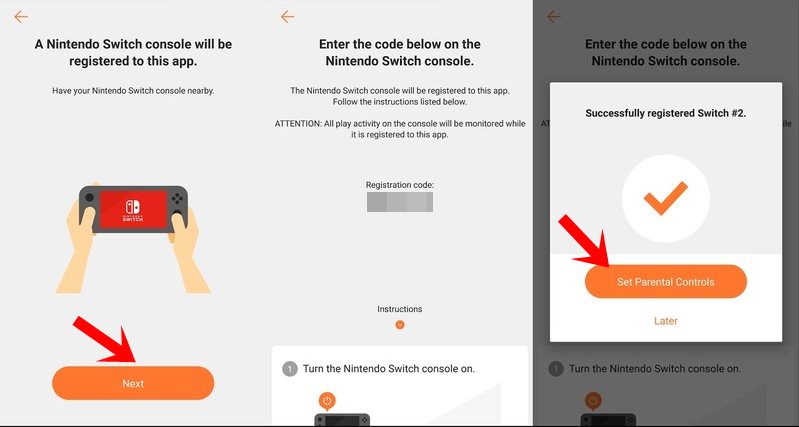
- Now launch the app, tap on Next > Sign In/Create Account.
- Tap Sign in and enter your account credentials. If you don’t have an account yet, then select the Create a Nintendo Account option and proceed with the on-screen instructions to create one.
- Once you are signed in, tap on Use this account followed by Next. It will now display a registration code.

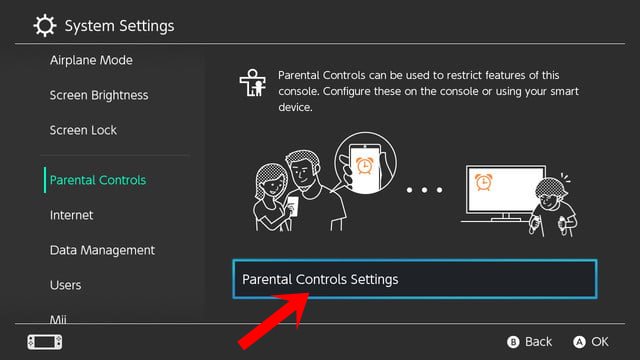
- In this instance, bring up your console and go to the Settings menu.
- Now go to the Parental Controls section and tap on Parental Controls Settings.

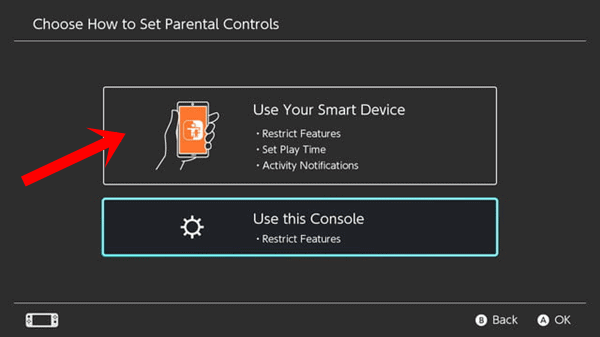
- Tap on the Use your Smart Device option. It will verify if you have set up the Parental Control app, tap on Yes.

- Now type in the registration code that you had got from the app and enter it here.
- Then tap on Register to link both these accounts.
- Finally, hit the Continue Setup on the Smart Device option. You should now get the successful message inside the app on your device.
With this, we are done setting up the Nintendo Switch Parental Controls. It’s now time to modify the settings and limit the online interactions for the concerned users. Follow along.
STEP 2: Setting the Required Restriction Level
- Now that the linking of the account is complete, pick up your console and head over to Console Settings.
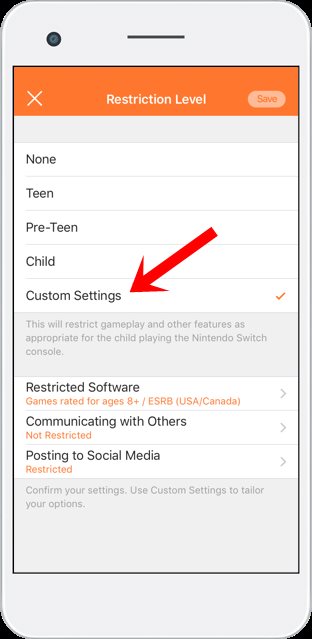
- Within that, go to Restriction Level and select Restriction Level Settings.
- You should now see four different options: Teen, Pre-Teen, Child, and Custom Settings.
- As for this guide, go ahead with the last option i.e. Custom Settings.

- Now select Communicating with Others and enable the Restrict Communicating with Others option.
- Scroll a little bit below and you should see the list of games installed on your console.
- All you have to do is just enable the toggle next to the desired game/games that need to respect this restriction level.
That’s it. These were the required instructions to set up the Nintendo Switch Parental Controls. No doubt these restrictions will go a long way in securing the online privacy of your concerned users. With that said, if you have any issues concerning the aforementioned steps, do let us know in the comments section below. Rounding off, here are some iPhone Tips and Tricks, PC tips and tricks, and Android Tips and Tricks that deserve your attention as well.
- How To Manually Update Game Software On Nintendo Switch?
- How to Play Roblox on Nintendo Switch?
- How to Appear Offline on Nintendo Switch
- How To Get PS5 DualSense Working on Nintendo Switch?
- How to Fix If Nintendo Switch Online Account Hacked or Compromised
- How to Attach and Detach Joy-Con Controllers from Nintendo Switch
- How to Fix Nintendo eShop Not Available in Your Country/Region
- Fix: Nintendo Switch Not Seeing 5Ghz WiFi
- Pokemon Scarlet and Violet Connection Issues, Is There A Fix?
- Fix: Nintendo Switch Sound But No Picture
- How To Track a Lost Nintendo Switch
- 5 Best Nintendo Switch Emulators for PC (100% Working)
