In this guide, we have shared with you the steps to root Infinix Note 12 Turbo (X670) using Magisk without TWRP in a very simple way for your ease. Infinix Note 12 Turbo was launched in India and runs on Android 11 with XOS 10.6 on top. The device features a 6.7-inch full-HD+ AMOLED display. It is powered by a MediaTek Helio G96 SoC, along with up to 8GB of RAM and 128GB of storage. Infinix Note 12 Turbo sports a triple rear camera setup that compromises a 50 MP primary sensor, along with a 2 MP macro shooter and a QVGA sensor. There is a 16-megapixel selfie camera on the front with a dual-LED flash.
To root your Infinix Note 12 Turbo (X670), we will use the Magisk to patch the stock boot image and flash that to your device’s boot partition. Now, if you ask why Magisk? It’s a system-less root process that doesn’t tamper with the system partitions while enabling root access. Magisk can also hide online security measures to work apps properly like any banking app, SafetyNet, etc.

Infinix Note 12 Turbo Device Overview:
The Infinix Note 12 Turbo features a 6.7 inches AMOLED panel with a 60 Hz refresh rate. It is an FHD+ panel with a resolution of 1080 x 2400 pixels and an aspect ratio of 20:9. The screen has a peak brightness of 1000 nits. We also get Corning Gorilla Glass 3 at the front for protection. Under the hood, we get the MediaTek Helio G96 processor built on a 12 nm manufacturing process. It is an octa-core processor with two Cortex-A76 cores clocked at 2.05 GHz and six Cortex-A55 cores clocked at 2.0 GHz. For handling the graphics-intensive tasks, we have the Mali-G57 MC2. The smartphone comes with Android 12 out of the box with XOS skin running on it.
In terms of optics, we get a dual-camera setup at the rear and a single selfie camera at the front. The dual rear camera setup consists of a 50MP primary sensor paired with an f/1.6 lens, and a 2MP depth sensor paired with an f/2.4 lens. The selfie camera at the front is a 16MP primary sensor paired with an f/2.0 lens. The rear camera system can capture 2K videos at 30 fps, while the front camera is limited to 1080p video recording.
The smartphone comes with a single storage variant with 8GB of RAM and 128GB of internal storage. We also get a dedicated microSD slot for storage expansion. In terms of communications, we get WiFi with a/b/g/n, Bluetooth 5.0, GPS, Infrared, and USB Type C. And for sensors, we get a side-mounted fingerprint sensor, light sensor, proximity sensor, accelerometer, compass, and gyroscope. Powering it all is a 5000 mAh battery that can be topped up quickly using a 33W power adapter. The smartphone is available in three color options: Sapphire Blue, Force Black, and Snowfall.
What is Root? (Advantages)
Smartphone Rooting is the unofficial way to enable an administrator or superuser access to your device system and subsystem. Therefore, the user can easily tweak, change, edit, or delete system files and apps.
The advantage of Rooting:
- You can get access to all files on your Infinix Note 12 Turbo, even the files present in the root directory of your phone.
- You can increase the performance of your Infinix Note 12 Turbo by overclocking.
- By rooting, you can increase battery life by underclocking Infinix Note 12 Turbo.
- Uninstall Bloatware on Infinix Note 12 Turbo.
- You can block Ads on any Android applications such as Youtube and other game-related applications. Also Read: Top 5 Adblock Plus Alternatives for Android
- By Rooting Infinix Note 12 Turbo, you can View, Edit, or Delete any system file inside the root directory.
- You can install the Xposed Framework and many Xposed module support.
Steps To Root Infinix Note 12 Turbo (X670) Using Magisk
Follow the full-depth guide along with the requirements and download the links below.
Keep in mind:
- You must first unlock the bootloader on your Tecno (X670) variant to root.
- Rooting may void the manufacturer’s warranty on your device.
- Rooting will block the firmware OTA updates.
Now, let’s head over to some of the necessary steps which you need to abide by:
Pre-Requirements
- Your phone should have a battery juice of more than 60%.
- Keep a backup of your device data at first. Therefore, you can get back the important data if anything goes wrong.
- The image file in this article is supported by the Infinix Note 12 Turbo model only. DO NOT try to flash it on other models.
- You will also require a PC/Laptop and a USB cable to connect your device to the computer.
- You should download all the necessary files, tools, and drivers below accordingly.
Required Downloads:
- Download ADB & Fastboot files (Windows/MAC)
- Infinix USB Drivers – Download and install it on your computer
- Download Other Drivers: Mediatek VCOM Drivers or MTK USB Drivers
- Download And Install the SP Flash tool on your computer
- Download the latest Infinix Note 12 Turbo Firmware
Warning:
1. How to Extract and Patch Boot.image using Magisk?
- First of all, you need to extract the boot image using the MTK Droid Tool
- Attach your device via USB cable and copy only the boot.img file from the extracted folder to your device storage
- Launch Magisk Manager. When a popup appears asking to install Magisk, select INSTALL and choose to install again.
- Tap on “Patch Boot Image File”.
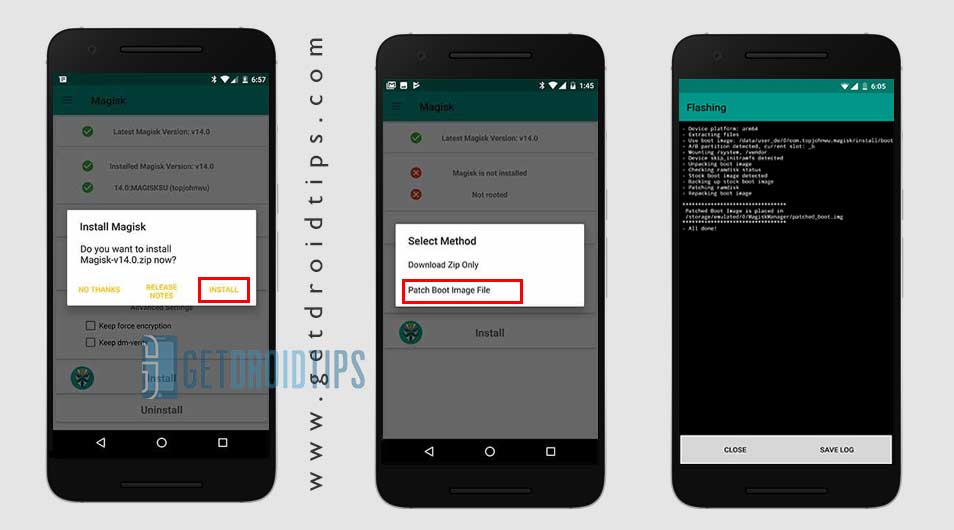
- Navigate to internal storage and select your phone’s boot image that you transferred earlier.
- Wait for a couple of seconds. Magisk will start patching the boot image.
- Once the boot image has been patched, copy the “patched_boot.img” from the internal storage and replace it in your PC’s same extracted ROM folder.
Now you can follow the second step to flash the patched boot image file.
2. Steps To Install the Patched Boot Image on Infinix Note 12 Turbo
Follow the proper guide to install Patched Boot Image on Infinix Note 12 Turbo from the below link:
Guide to Install Patched Boot Image on MediaTek Device
In some cases, if the above method doesn’t work on your Infinix Note 12 Turbo, then try via ADB fastboot method.
- Now, extract the ADB & Fastboot tool, then move the patched boot image file to the same folder.
- Press and hold down the Shift key + right-mouse-click to open the command window/PowerShell.
- Next, enter the following command in order to flash the “patched_boot.img” to install Magisk and root your Android device:
fastboot flash boot patched_boot.img
- For devices with an A/B partition system, you have to use the following commands:
fastboot flash boot_a patched_boot.img

fastboot flash boot_b patched_boot.img
Please replace [patched_boot.img] with the name of the boot image file you downloaded, followed by the .img extension.
- Wait for the flashing process to complete.
- Finally, type in the command to reboot your device.
fastboot reboot
- That’s it.
Steps to Verify the Systemless Root
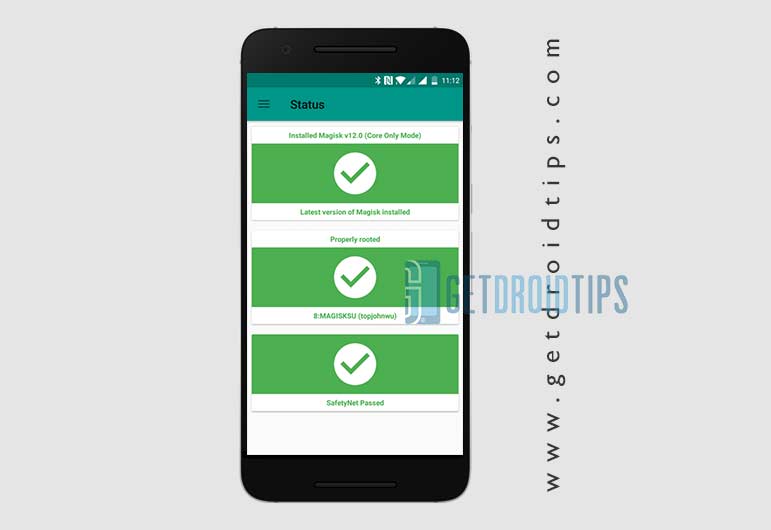
- Launch the Magisk Manager app on your device.
- To verify the systemless root access on your phone, you will see the status screen. Here all options should be green ticked if properly rooted. If yes, that means you’ve successfully bypassed the Google SafetyNet measure.
That’s it, guys. We hope you’ve found this guide useful and successfully rooted your Infinix Note 12 Turbo device. For any queries, feel free to ask in the comments below.