If you’re experiencing the ‘Wi-Fi Doesn’t Have a Valid IP Configuration’ Error on your Windows 10 or Windows 11 computer then the chances are high that there is a misconfigured IP address placed either on the PC’s network settings or Wi-Fi router settings. Well, there is nothing to worry about as we’ve shared a couple of possible workarounds that should help you out of it.
Also Read
FIX: Windows Defender Crashing in Windows 11/10
Fix: Windows 11 Clipboard History Not Working
Download Dolby Audio Driver for Windows 11/10/8.1
Fix: Miracast Not Working on Windows 11 and 10
How To Fix External Hard Drive I/O Device Error in Windows 11/10
How to Fix if 4K Videos Not Playing on Windows 11
Fix: Windows 11 Taskbar Not Hiding in Full Screen
How To Fix No Audio Output Device Is Installed In Windows 10/11
Fix: Mouse Scroll Wheel Jumps Up and Down on Windows 10, 11
Sometimes an outdated networking driver, issues with the Wi-Fi router, networking glitch, issues with the TCP/IP protocol, etc can cause this particular issue whatsoever. Although this type of issue may not happen usually which is quite obvious because most of the users don’t play with IP configuration and other WAN/LAN settings on the router that much. But somehow if you’re facing this issue, follow the steps below.
Page Contents
- What is an Invalid IP Configuration?
- How to Fix a ‘Wi-Fi Doesn’t Have a Valid IP Configuration’ Error
- 1. Restart Your Computer
- 2. Restart Your Wi-Fi Router
- 3. Power Cycle Your PC and Router
- 4. Renew IP Address on PC (TCP/IP/DNS)
- 5. Update Wireless Adapter Driver
- 6. Manually Check IP Address Configuration
- 7. Scan PC using Antivirus Software
- 8. Change Wi-Fi SSID and Password
- 9. Set Channel Width to Auto
- 10. Increase Numbers of DHCP Users
- 11. Perform a Clean Boot
- 12. Reset Network Settings on PC
What is an Invalid IP Configuration?
So, you may ask what’s this issue? This is nothing but a conflict with the IP configuration between your Wi-Fi router and the PC. Whenever you try connecting to Wi-Fi, your router assigns an IP address to your computer to get it online.
But if something goes wrong with the given IP configuration on your computer, then the router can’t be able to communicate with that IP. So, the problem starts appearing to the users and they seem to get the “doesn’t have a valid IP configuration” error consistently until it gets fixed.
Also Read
How to Fix If Brightness Slider Missing on Windows 11 and 10
How to Fix Scanner Not Working Issue on Windows 11
Fix: Windows 11 Context Menu Is Slow, Missing Item, and Not Working
TranslucentTB Windows 11 Not Working, How to Fix?
Fix: Windows 11 Multi Display Not Working
Download Superlite Version of Windows 11 Ghost Spectre
How to Enable New CoPilot AI in Windows 11 23493
How to Fix a ‘Wi-Fi Doesn’t Have a Valid IP Configuration’ Error
Now, without further ado, let’s jump into the troubleshooting steps below.
1. Restart Your Computer
Restarting your PC will definitely help you to fix multiple performance-related issues whatsoever. Plenty of users have already reported that they’ve found this trick useful on several occasions. So, it’s always better to simply restart your computer once to check whether the problem has been fixed or not.
2. Restart Your Wi-Fi Router
Make sure to simply restart your Wi-Fi router if restarting the computer didn’t work for you. It’s also worth mentioning that sometimes networking glitch on the router or its firmware may cause several issues with the invalid IP configuration.
Also Read
3. Power Cycle Your PC and Router
Additionally, we’ll also recommend you to perform a power cycle to your PC and router by following the steps below to easily clear system glitches or temporary cache issues.
- Just turn off both the PC and router.
- Once the LED indicator stops blinking, unplug the power cable from the power source.
- Wait for around 30 seconds and then plug back in the power cable.
- Now, try checking the issue again.
4. Renew IP Address on PC (TCP/IP/DNS)
- Press Windows + X keys to open the Quick Access Menu.
- Click on Command Prompt (Admin) or Windows Terminal (Admin) from the list.
- Next, click on Yes (if prompted by UAC) to grant admin privilege.
- Then type the following command and hit Enter to execute it:
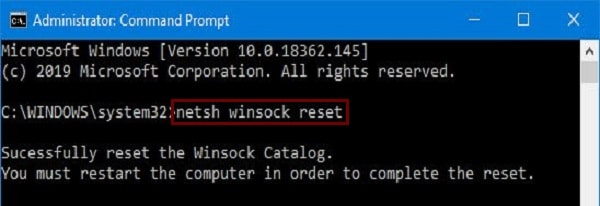
netsh winsock reset
- Once done, execute the following command:
netsh int ip reset
- Close the command prompt window and restart your PC.
Now, you’ll need to release and renew the IP address on your computer by following the steps below:
- Make sure to open the command prompt window again.
- Run the following commands one by one:
ipconfig/release
ipconfig/flushdns
ipconfig/renew
- Once done, restart your computer again to apply changes.
- Finally, you should be able to fix the ‘Wi-Fi Doesn’t Have a Valid IP Configuration’ Error.
5. Update Wireless Adapter Driver
The chances are also high enough that updating the wireless adapter driver on the Windows computer may also fix multiple issues with the network connectivity. If you haven’t updated the wireless adapter driver for a while, then we’ll highly recommend you updating it right now. To do so:
- Press Windows + X keys to open the Quick Start Menu.
- Now, click on Device Manager from the list > Double-click on Network adapters.
- Right-click on the wireless driver that you’re using.
- Next, select Update driver > Choose to Search automatically for drivers.
- If there is an update available, it’ll automatically download & install the latest version.
- Once done, restart the system to apply changes immediately.
However, if this doesn’t resolve the issue then make sure to ‘Uninstall device’ from the wireless driver option and restart the PC to automatically get back the wireless driver installed again.
This method should help you to fix the invalid IP configuration error on your computer quite easily.
6. Manually Check IP Address Configuration
- Click on the Wi-Fi icon from the bottom right side of your taskbar.
- Then click on Network & Internet settings.
- Under the Advanced network settings, click on Change adapter options.
- Now, double-click on your connected network adapter.
- Click on Properties > Now, you’ll have to ensure that all the following options are enabled or check-marked:
- Client for Microsoft Networks
- File and Printer Sharing for Microsoft Networks
- Internet Protocol Version 4 (TCP/IPv4)
- Internet Protocol Version 6 (TCP/IPv6)
- Link-layer Topology Discovery Responder
- If not enabled, click on the checkbox to enable all of these.
- Once done, click on OK to save changes.
Additionally, you should follow the steps below to manually add IP configuration on the Internet Protocol Version 4 (TCP/IPv4) option:
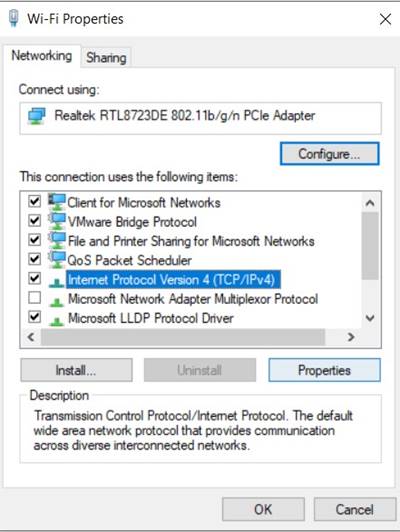
- Double-click on it and select ‘Use the following IP address’ > Enter the specific IP address, subnet mask, and default gateway on the field which has been provided by your ISP.
- Next, select ‘Use the following DNS server addresses’ > Enter 8.8.8.8 on the Preferred DNS server field and 8.8.4.4 on the Alternate DNS server field.
- Click on OK to apply changes.
- Finally, restart your computer to take effect immediately.
7. Scan PC using Antivirus Software
It’s also highly recommended to scan your PC for malware or virus using the antivirus software whether you’re using Windows Defender or any other third-party software. If in case, you’re not aware of how to scan your PC then follow the steps below:
- Press Windows + I keys to open Windows Settings.
- Click on Privacy & security from the left pane.
- Click on Windows Security from the right pane window.
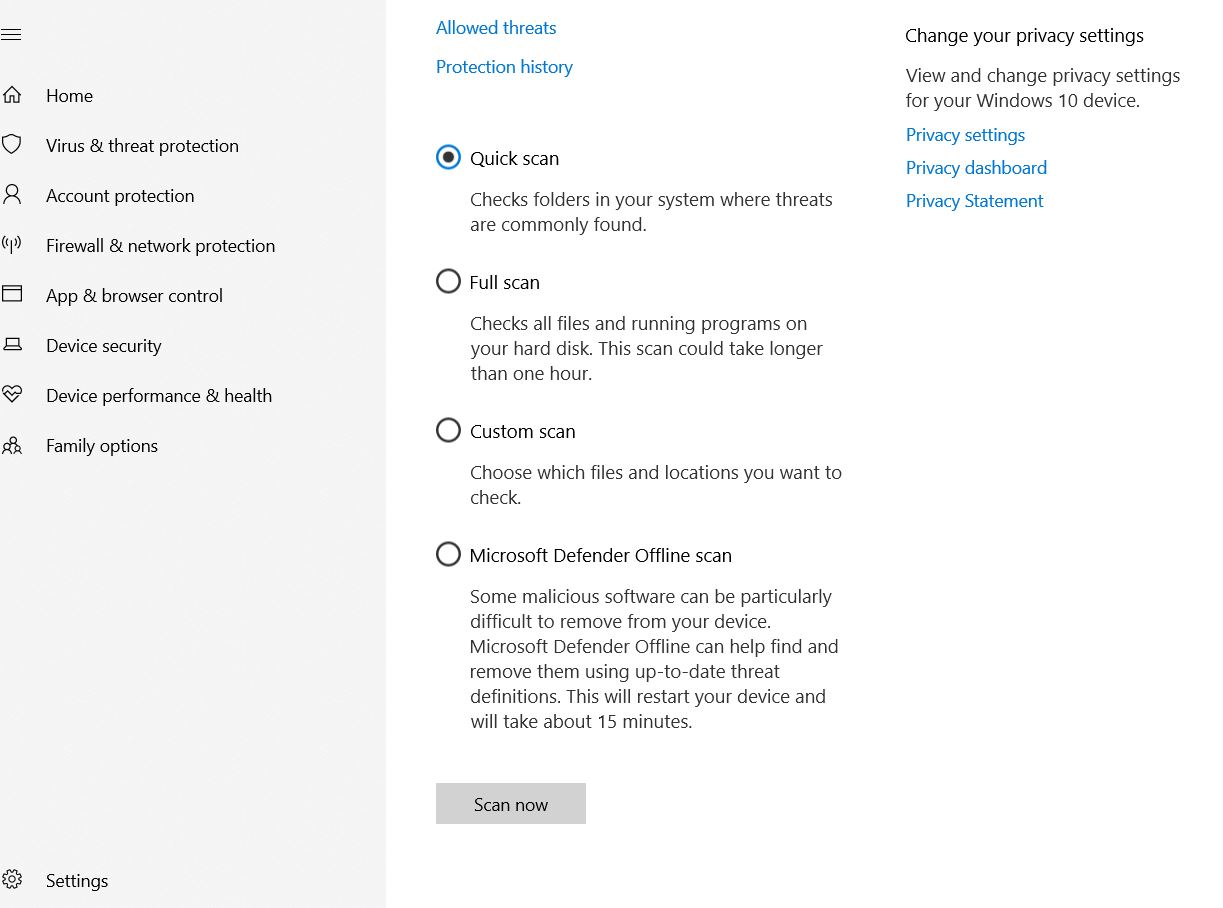
- Now, click on Virus & threat protection > A new popup window will open.
- Here you’ll need to click on Quick Scan to start scanning your PC.
- It may take some time depending on the storage size and types of files that you’ve on the PC.
- So, just wait for it to complete > We recommend not to use heavy tasks during the background scanning process.
- Once done, if there is any malware or potential threat found, the antivirus program will automatically block it or ask you to choose an action according to your preference.
Similarly, if you’re using any other third-party antivirus program on your computer then make sure to open that tool and scan the PC completely.
8. Change Wi-Fi SSID and Password
Several users have also reported that they’ve resolved the ‘Wi-Fi doesn’t have a valid IP configuration’ error by changing the Wi-Fi SSID and Password.
Just head over to the router’s admin page and change the SSID and Password of Wi-Fi that you want to use. Save changes and restart your router to apply changes. Simply search for the Wi-Fi network on your PC again and enter the newly added password for the new SSID by clicking on it. It’s simple.
9. Set Channel Width to Auto
- Press Windows + X keys to open the Quick Access Menu.
- Select Network Connections from the menu.
- Now, right-click on the wireless connection that you’re using.
- Choose Properties from the menu > Click on the Configure option.
- Head over to the Advanced tab > Then locate 802.11n Channel Width for 2.4GHz band and set it to Auto.
- Finally, click on OK to save changes > Restart your computer to change effects immediately.
This should fix the Wi-Fi Doesn’t Have a Valid IP Configuration issue on your computer.
10. Increase Numbers of DHCP Users
Most of the Wi-Fi routers do have a default number of DHCP users that can connect once at a time. If you’re using multiple devices to run on the same Wi-Fi network at the same time such as computers, smart IoT devices, smartphones, etc apart from your family or friends who’re also using the same Wi-Fi, then you should increase the DHCP users number.
You’ll find it on the router’s admin panel after you log into it using the username and password. For further information or steps to increase the number of DHCP users on the router’s settings page, you can find out the official user guide of the specific router’s model.
11. Perform a Clean Boot
Some of the affected users have already mentioned that performing a clean boot can fix this particular invalid IP configuration error on your Windows computer. If some of the third-party programs are conflicting with the system functions or its performance from Windows startup then this method will fix that issue. To do this:
- Press Windows + R keys to open the Run dialog box.
- Now, type msconfig and hit Enter to open the System Configuration window.
- Go to the Services tab > Enable the Hide all Microsoft services checkbox.
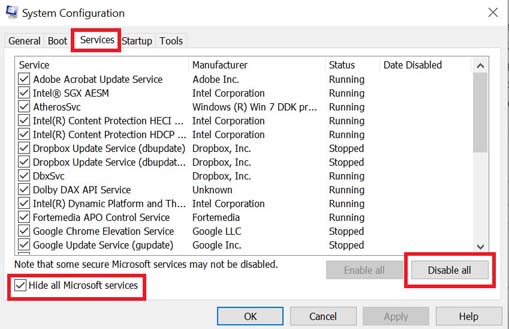
- Check all the services from the list and click on Disable all.
- Click on Apply and then OK to save changes.
- Now, click on the Startup tab > Click on Open Task Manager.
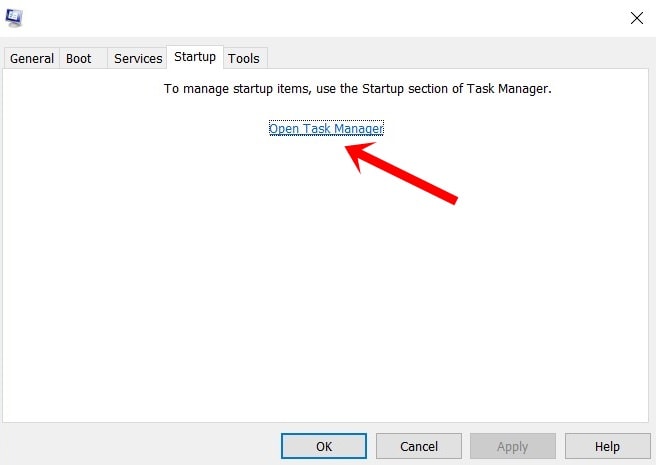
- Under the Startup tab from the Task Manager interface, click on the particular tasks which are enabled for startup boot > Click on Disable.
- Make sure to select and disable one by one.
- Once done, restart your computer to change effects immediately.
12. Reset Network Settings on PC
It seems that if none of the methods worked for you, then try performing the network reset method by following the steps below on your Windows computer. This method will basically remove all the network adapters as well as other networking components and reinstall them back to their factory defaults to fix multiple issues regarding the network & internet. To do so:
- Press Windows + I keys to open Windows Settings.
- Now, click on Network & internet from the left pane.
- Click on Advanced network settings from the right pane window.
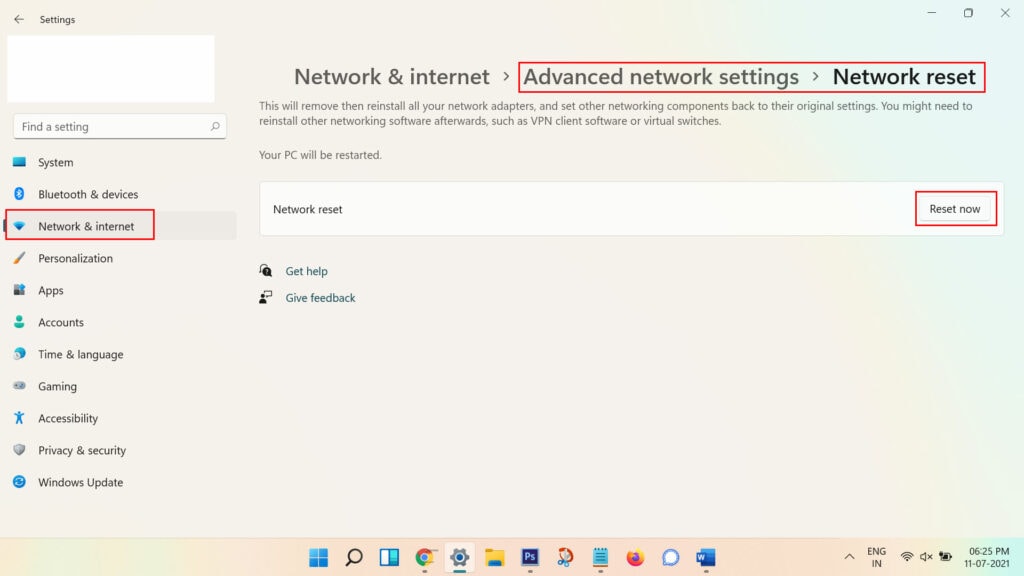
- Select Network reset > Then click on Reset now to let the process complete.
- Your computer will take some time to do this and finally, it’ll reboot automatically.
So, have some patience, and just set up the IP configuration to the network settings to try again.
That’s it, guys. We assume this guide was helpful to you. Feel free to ask in the comment below.
