On this page, we will share the full instructions to download and install Magisk zip on your Android Phone. This tutorial is also for the newbies/noobs who never installed root on their phones.
Magisk, the well-known tool for acquiring root permissions on Android devices, has received a new update that fixes unexpected bugs and introduces the obfuscation feature. If you already have magisk root on your phone, you can simply upgrade your phone to Magisk Zip v30.6 and Magisk Manager apk to 8.0.7. If you are installing Magisk root on your phone for the first time, then you can follow our instructions to install it on your phone.
Also Read
Customizing an Android smartphone and performing advanced tweaks like flashing custom kernels, custom ROMs, overclocking, and changing system settings is fun. Still, you need root access to your device to do these. Some time ago, SuperSU was the popular way of gaining root access on an Android smartphone be; Magisk has become the go-to way of rooting a smartphone since its release. You can easily manage root access with the Magisk Manager apk and implement many functionalities with the various modules available.
There are many root apps available out there that you can use to gain root access on your Android device, but perhaps the simplest and easiest to use is Magisk. Magisk is an Android utility that grants you a systemless root on your Android device and manages an application called Magisk Manager.

What is Magisk?
Magisk is an open-source rooting solution for Android devices that allows users to gain administrative privileges, known as root access, on their devices. It was developed by topjohnwu and first released in 2016. Magisk can be installed on most Android devices running Android 5.0 Lollipop or later, and it offers a way to bypass Google’s SafetyNet system, which checks for device integrity and compatibility with certain apps.
Magisk provides several features beyond traditional root access, including the ability to install modules that can modify system behavior and appearance, support for hiding root access from apps that may detect it and prevent access, and an interface for managing app permissions and system-level features.
One of the significant advantages of Magisk is that it doesn’t modify the device’s system partition directly, allowing for seamless OTA (Over-The-Air) updates from the manufacturer or carrier. This makes it a popular choice for users who want to maintain root access while still receiving the latest security updates and features.
What is Magisk Manager?
Magisk Manager is an Android application that works with the Magisk rooting solution to provide users with additional functionality and features. It serves as a central hub for managing Magisk modules, root access, and other advanced settings.
Magisk Manager allows users to install and manage Magisk modules, which are essentially modifications that can be installed on top of Magisk to add new functionality or modify system behavior. These modules can be downloaded and installed directly from the Magisk Manager app, ranging from simple tweaks to more complex modifications.
Additionally, Magisk Manager provides users with various tools and features for managing root access, such as toggling root access on or off for individual apps, hide root from apps that may detect it, and manage permissions and advanced settings.
Magisk Manager also includes a feature called MagiskHide, which allows users to hide that their device is rooted from certain apps and services that may detect it and prevent access. This can be useful for apps requiring specific security features or not functioning properly on rooted devices.
Overall, Magisk Manager provides a convenient and powerful way for users to manage their root access and customize their Android devices.
Also Read
Advantages of Magisk
There are many benefits associated with rooting your device via Magisk. First, it doesn’t tweak your device’s /system partition. As a result, SafetyNet wouldn’t be tripped, and apps like Google Pay and Pokemon GO will work without any issues. Some apps refuse to work on a rooted device. In that case, you could use the Magisk Hide functionality. This hides root from your selected apps and will then function as it does in a non-rooted device.
Well, rooting does bring in a lot of goodies with itself as well. These include trying out Magisk modules, Xposed Framework, or overhauling your device via Substratum Themes. Likewise, you could also remove unnecessary apps (bloatware) that come pre-installed on your device. Some of the other benefits are taking a complete device backup via Titanium backup or flashing a custom Kernel to overclock the device’s CPU. There is no end to the benefits a rooted Android device brings. And Magisk plays a highly crucial role in all this.
- The main Advantage is their systemless root: You can carry out any system or vendor modification on your Android smartphone without tampering with the system partitions.
- MagiskSU: You have the option to Grant or Deny permission of any application
- Magisk Manager: You can install new updates and add or delete the modules on your phone. With Manager, you can also hide the root to bypass the SafetyNet check, download modules, and you have the option to Grant or Deny permission of any application.
- ByPass SafetyNet Check: Google’s SafetyNet detects when the system has been tampered with and blocks certain apps from working properly.
- OTA Updates: With Magisk, you can enjoy seamless OTA updates without any problem.
- Install Systemless Xposed: You can install the Magisk modules to tweak, enhance, and add functionality to your device. You can use them for everything from improving battery life to installing iOS emojis on your Android phone.
Why is Magisk so important?
Google SafetyNet is the main reason why many people use this tool over other methods like SuperSU, Kingoroot, etc. Google’s SafetyNet detects when the system has been tampered with and blocks certain apps from working properly, such as Google Pay, Netflix, and Pokemon GO, are a few examples. Unlike SuperSU, which only grants or denies root permissions for specific apps, Magisk can hide root from an app completely. By hiding the root from an app, banking app, or Pokemon Go on your rooted device can work if you’re rooted.
What is Magisk Modules?
Magisk modules are add-ons or modifications that can be installed on top of Magisk, a popular rooting solution for Android devices. The Magisk community typically creates these modules, and they can range from simple tweaks to more complex modifications that can significantly enhance the functionality of an Android device.
Magisk modules are installed using the Magisk Manager app, which provides users with a range of modules to choose from. These modules can modify the behavior of the Android system, add new features, or modify existing ones.
For example, there are Magisk modules that can modify the system UI, such as adding new themes or changing the color scheme. There are also modules that can improve performance by optimizing system settings, such as increasing the speed of app launches or reducing battery drain.
In addition, there are modules that can add new features to the Android system, such as support for new hardware or software, or that can modify existing features, such as improving the camera app or adding new camera features.
Overall, Magisk modules provide a powerful way for users to customize their Android devices and enhance their functionality, all while maintaining the benefits of root access provided by Magisk.
You may further download various modules from the official repository or from here.
Also Read: Best Magisk Modules You Should Try in 2026
New Magisk v30.6 Changelog:
- [MagiskInit] Revert a change that could result in bootloops
New Magisk v30.5 Changelog:
- [General] Improve commandline argument parsing logic
- [resetprop] Properly support Android versions with property overrides
New Magisk v30.4 Changelog:
- [MagiskSU] Fix several implementation bugs
New Magisk v30.3 Changelog:
- [General] Support installing Magisk into vendor_boot partition
[MagiskPolicy] Support new sepolicy binary format introduced in Android 16 QPR2
[Core] Migrate much more code into Rust
[MagiskSU] Fallback to older implementation when the kernel doesn’t support zero userspace copy APIs
New Magisk v30.2 Changelog:
- [Core] Fix an edge case breaking modules when overlayfs is involved
- [Core] Fix module
.replacefunctionality in certain situations - [resetprop] Reduce property modification traces
New Magisk v30.1 Changelog:
- [Core] Fix bug in module mounting implementation
- [MagiskSU] Add ability to restrict Linux capabilities even if running as root (uid=0)
New Magisk v30.0 Changelog:
- [General] Various minor bug fixes
- [Core] Migrate module implementation to Rust
- [Core] Improve Magisk specific files injection logic
- [MagiskBoot] Migrate compression code to Rust
New Magisk v29.0 Changelog:
- [General] Massive internal refactoring and code migration
- [App] Support downloading module zip files with XZ compression
- [App] Disable app animations when system animations are disabled
- [Core] Support systemlessly deleting files with modules using blank file nodes
- [MagiskInit] Redesign sepolicy patching and injection logic
- [MagiskSU] Better TTY/PTY support
New Magisk v28.1 Changelog:
- [App] Fix stub APK download link
- [App] Fix support for Android lower than 8.0
- [General] Fix support for MTK Samsung devices
- [MagiskInit] Fix a regression for 2SI devices
- [MagiskPolicy] Fix a regression causing
overlay.dreplaced files to be not accessible
New Magisk v27 Changelog:
- [Zygisk] Introduce new code injection mechanism
- [Zygisk] Support new signature introduced in U QPR2
- [SEPolicy] Update libsepol to properly set some policy config bits
- [MagiskBoot] Support compressing
initso Magisk is installable on devices with small boot partitions - [ResetProp] Add new wait for property feature
resetprop -w
New Magisk v26.4 Changelog:
- [MagiskBoot] Don’t pad zeros if signed boot image is larger
- [MagiskPolicy] Fix
genfsconandfilename_trans - [MagiskPolicy] Fix bug in
libsepol - [Zygisk] Fix and simplify file descriptor sanitization logic
- [App] Prevent OOM when patching AP tarfiles
- [App] Fix bug in device configuration detection
- [Daemon] Fix certificate parsing of APKs
- [General] Fix logging errors from C++ code being ignored
New Magisk v26.3 Changelog:
- [General] Fix device information detection script
- [General] Update BusyBox to 1.36.1
- [General] Update toolchain that produces broken arm32 executables
- [App] Fix root service unable to bind on OnePlus devices
New Magisk v25.2 Changelog:
- [MagiskInit] Fix a potential issue when stub cpio is used
- [MagiskInit] Fix reboot to recovery when stub cpio is used
- [MagiskInit] Fix sepolicy.rules symlink for rootfs devices
- [General] Better data encryption detection
- [General] Move the whole logging infrastructure into Rust
New Magisk v25.1 Changelog:
- [MagiskBoot] Fix ramdisk backup being incorrectly skipped
- [MagiskBoot] Add new feature to detect unsupported dtb and abort during installation
- [Zygisk] Change binary hijack paths
- [App] Fix incorrect recovery mode detection and installation
- [MagiskInit] Fix config not properly exported in legacy SAR devices
- [General] Enforce the Magisk app to always match or be newer than magiskd
New Magisk v25.0 Changelog:
- [MagiskInit] Update 2SI implementation, significantly increase device compatibility (e.g. Sony Xperia devices)
- [MagiskInit] Introduce new
sepolicyinjection mechanism - [MagiskInit] Support Oculus Go
- [MagiskInit] Support Android 13 GKIs (Pixel 6)
- [MagiskBoot] Fix vbmeta extraction implementation
- [App] Fix stub app on older Android versions
- [App] [MagiskSU] Properly support apps using
sharedUserId - [MagiskSU] Fix a possible crash in
magiskd - [MagiskSU] Prune unused UIDs as soon as
system_serverrestarts to prevent UID reuse attacks - [MagiskSU] Verify and enforce the installed Magisk app’s certificate to match the distributor’s signature
- [MagiskSU] [Zygisk] Proper package management and detection
- [Zygisk] Fix function hooking on devices running Android 12 with old kernels
- [Zygisk] Fix Zygisk’s self code unloading implementation
- [DenyList] Fix DenyList on shared UID apps
- [BusyBox] Add workaround for devices running old kernels
Old Magisk Changelog
Magisk v24.3
- [General] Stop using
getrandomsyscall - [Zygisk] Update API to v3, adding new fields to
AppSpecializeArgs - [App] Improve app repackaging installation workflow
Magisk v24.2
- [MagiskSU] Fix buffer overflow
- [MagiskSU] Fix owner managed multiuser superuser settings
- [MagiskSU] Fix command logging when using
su -c <cmd> - [MagiskSU] Prevent su request indefinite blocking
- [MagiskBoot] Support
lz4_legacyarchive with multiple magic - [MagiskBoot] Fix
lz4_lgcompression - [DenyList] Allow targeting processes running as system UID
- [Zygisk] Workaround Samsung’s “early zygote”
- [Zygisk] Improved Zygisk loading mechanism
- [Zygisk] Fix application UID tracking
- [Zygisk] Fix improper
umaskbeing set in zygote - [App] Fix BusyBox execution test
- [App] Improve stub loading mechanism
- [App] Major app upgrade flow improvements
- [General] Improve commandline error handling and messaging
Magisk v23
- [App] Update snet extension. This fixes SafetyNet API errors.
- [App] Fix a bug in the stub app that causes APK installation to fail
- [App] Hide annoying errors in logs when hidden as stub
- [App] Fix issues when patching ODIN tar files when the app is hidden
- [General] Remove all pre Android 5.0 support
- [General] Update BusyBox to use proper libc
- [General] Fix C++ undefined behaviors
- [General] Several sepolicy.rule copy/installation fixes
- [MagiskPolicy] Remove unnecessary sepolicy rules
- [MagiskHide] Update package and process name validation logic
- [MagiskHide] Some changes that prevents zygote deadlock
Magisk v22.1
- [App] Prevent multiple installation sessions running in parallel
- [App] Prevent OutOfMemory crashes when checking boot signature on PXA boot images
- [General] Proper cgroup migration implementation
- [General] Rewrite log writer from scratch, should resolve any crashes and deadlocks
- [General] Many scripts updates fixing regressions
- [MagiskHide] Prevent possible deadlock when the signal arrives
- [MagiskHide] Partial match process names if necessary
- [MagiskBoot] Preserve and patch AVB 2.0 structures/headers in boot images
- [MagiskBoot] Properly strip out data encryption flags
- [MagiskBoot] Prevent possible integer overflow
- [MagiskInit] Fix
sepolicy.rulemounting strategy - [resetprop] Always delete existing
ro.props before updating. This will fix boot loops that could be caused by modifying device fingerprint properties.
Magisk v22
- [MagiskHide] Fix a bug when stopping MagiskHide does not take effect
- [MagiskBoot] Fix bug when unpacking
lz4_lgcompressed boot images - [MagiskInit] Support Galaxy S21 series
- [MagiskSU] Fix incorrect APEX paths that caused
libsqlite.sofail to load
Magisk v21.4
- [MagiskSU] Fix
su -cbehavior that broke many root apps - [General] Properly handle read/write over sockets (the
broken pipeissue)
Magisk v21.2
- [MagiskInit] Detect 2SI after mounting
system_rooton legacy SAR devices - [General] Make sure
post-fs-datascripts cannot block more than 35 seconds - [General] Fix the
magisk --install-modulecommand - [General] Trim Windows newline when reading files
- [General] Directly log to file to prevent
logcatweirdness - [MagiskBoot] Fix header dump/load for header v3 images
Magisk v21.1
- [MagiskBoot] Support boot header v3 (Pixel 5 and 4a 5G)
- [MagiskBoot] Distinguish
lz4_lgandlz4_legacy(Pixel 5 and 4a 5G) - [MagiskBoot] Support vendor boot images (for dev, not relevant for Magisk installation)
- [MagiskInit] Support kernel cmdline
androidboot.fstab_suffix - [MagiskInit] Support kernel initialized dm-verity on legacy SAR
- [General] Significantly broaden sepolicy.rule compatibility
- [General] Add Magisk binaries to
PATHwhen executing boot scripts - [General] Update
--remove-modulescommand implementation - [General] Make Magisk properly survive after factory reset on Android 11
- [MagiskSU] Add APEX package
com.android.i18ntoLD_LIBRARY_PATHwhen linkinglibsqlite.so - [MagiskHide] Support hiding apps installed in secondary users (e.g., work profile)
- [MagiskHide] Make zygote detection more robust
Download Magisk Zip and Magisk Manager
Latest version Magisk v30.6 and Magisk Manager 8.0.7
- Magisk-v30.6 apk – Latest
- Magisk-v30.5 apk
- Magisk-v30.4 apk
- Magisk-v30.3 apk
- Magisk-v30.2 apk
- Magisk-v30.1 apk
- Magisk-v28.1.apk
- Magisk-v27.0.apk
- Magisk.v26.4.apk
- Magisk.v26.3.apk
Steps to Install Magisk Zip on your phone:
There are two methods to install this on your device. If you have TWRP Recovery, you can now flash the flashable zip without hassle. All you have to do is download the latest version from the link given below to enjoy systemless root and their benefit on your device. Also, make sure to download the latest Magisk Manager apk file.
There are several ways to install Magisk on your Android smartphone, and the one you go for depends on your device’s current status. If your phone is not rooted, you can install Magisk and gain systemless root access on your device in one pass by using TWRP Recovery. If you don’t have TWRP Recovery, you can either install the TWRP recovery or simply follow the second method by patching the stock boot image (kernel) and flashing the modified boot on your device.
Also Read
If your phone is already rooted and you want to use Magisk, you can unroot your phone, remove all existing root software on your phone, and then install Magisk using TWRP. Here is the complete guide on how you can switch over from SuperSU to Magisk. I’ll be covering all of these methods in this guide.
Method 1: Install using TWRP Recovery
First things first, let’s see how to install TWRP Recovery on your Android smartphone.
TWRP Recovery is a custom recovery that offers far more features and functionalities than the default Android recovery. With the default Android Recovery, you can only perform a factory reset, wipe data and cache and carry out some other minor functions. but with TWRP Recovery, you can install custom modules, flash custom ROMs, install custom firmware, root your Android smartphone, perform a full Nandroid backup and carry out a host of other functions.
TWRP is short for TeamWin Recovery Project, and it’s an open-source custom recovery image for Android smartphones developed by (you guessed right) TeamWin. In this guide, we’ll be using TWRP Recovery to install Magisk and root your Android device.
The fastest way to install TWRP is via Fastboot (pun unintended), and as most Android smartphones have fastboot, I’ll be covering only this method in this article. If you already have TWRP installed, you can skip this step.
Note: If you own a Samsung smartphone, follow this guide to install TWRP using Odin.
Steps to Install TWRP Recovery:
We already covered many guides on how to install TWRP Recovery on each device. In case if you are here for the first time, then let’s make things more clear. Make sure to download and keep the required drivers and files on your PC.
Watch The Video on How to Download & Install Magisk Manager and Root your phone
Pre-Requisite:
- Download the latest Android USB drivers [Here is the guide on how to install Android USB drivers]
- Download TWRP Recovery for your device from the here
- Download ADB drivers on your PC and extract them to C:/ drive.
- You need to Unlock the bootloader on your device.
Installation Guide:
- First of all, Install ADB and Fastboot on your PC.
- Enable Developer Mode on your Android device by tapping continuously on Build Number on your phone About Phone settings.
- Open up the Developer Settings, find the OEM Unlocking settings and toggle it on.
- Next, you need to unlock your bootloader. If you’ve performed an advanced tweak on your device before, you’ve probably done this, and you can skip this step. Note that unlocking the bootloader will wipe your device data.
- Run adb on your PC with your device connected via USB cable.
- If your smartphone is running on Lollipop (Android 5.1) or lower, run the following commands
fastboot oem unlock
if it’s running on Marshmallow (Android 6.0) or higher, run
fastboot flashing unlock
- Use your Volume buttons to move up and down and highlight Yes, then press your power button to confirm the process, and your bootloader will be unlocked.
- Download the latest TWRP image file here and extract it into the same folder in which you installed ADB and Fastboot.
- Power off your device.
- Boot the device into the bootloader. To do this, press the Volume up and Power buttons together until the bootloader menu comes up.
- Connect the device to your PC via USB.
- On your PC, navigate to your ADB installation folder. Right-click on any space within the folder while holding the shift key on your keyboard, and click the Open command window here.
- Run the following command in the open command prompt.
fastboot flash recovery [filename.img]
[su_note note_color=”#fefdef” text_color=”#000000″]Please replace [filename.img] with the name of the TWRP Recovery img file you downloaded followed by the .img extension.[/su_note]
- The flashing process will begin. Once done, run
fastboot reboot
to reboot the device. You now have TWRP installed on your Android smartphone.
Install Magisk using TWRP Recovery
- If you moved the latest Magisk zip to your internal storage root, you can boot into TWRP Recovery.
- In TWRP Recovery Interface, Tap on Install Button.
- Navigate to internal storage where you transferred or downloaded the Magisk zip file and proceed. Tap on the file and proceed.
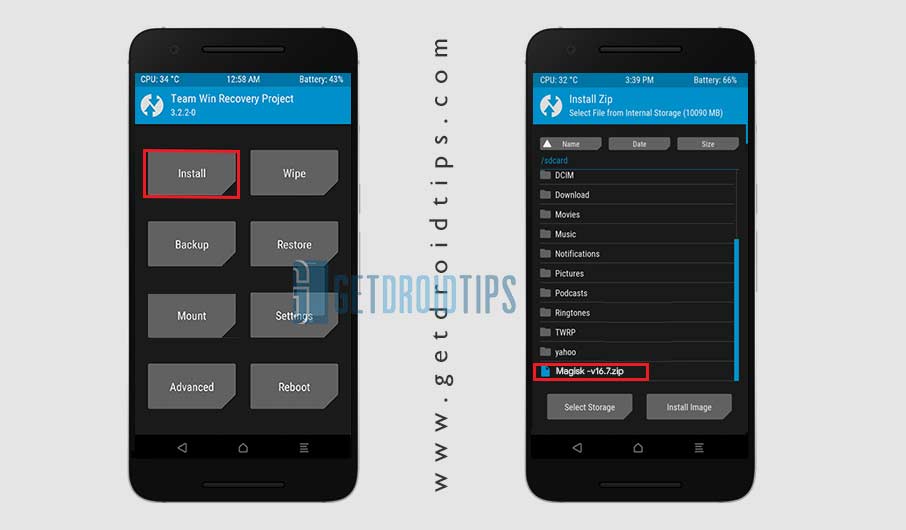
- Once selected, Now you have to Swipe to confirm the flash.
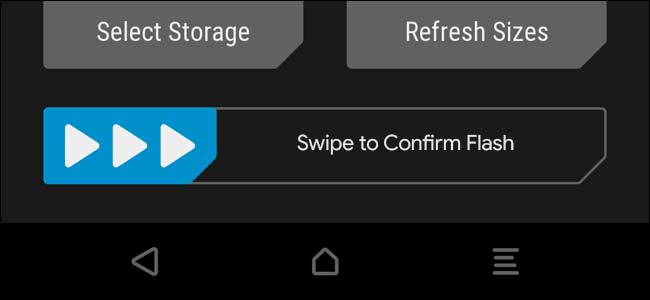
- When the flashing process completes, you can tap on the reboot button to reboot your phone.
That’s it! You can now download and install the Magisk Manager apk to enjoy systemless root on your device.
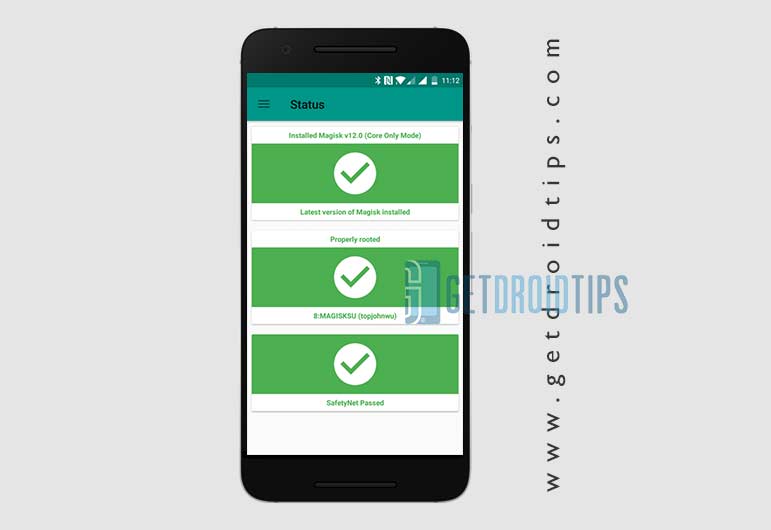
How to Verify if your phone has a systemless root?
- Download and install the APK above, and launch the Magisk Manager app.
- To verify that you have a systemless root, check the top of the screen and if you see all options with Green Tick, which means you have successfully rooted and bypassed SafetyNet.
Method 2: Install Magisk using Patched Stock Boot Image
To do this, you need to patch the stock boot image. You can follow this method by installing the Magisk Manager on your device.
Requirements:
- First of all, you need to grab the stock boot image for your current firmware installed on your phone. You can always get this file from the stock firmware or extract (Read) it using tools like CM2, Miracle Box, NCK, etc.
- Download and Install the latest Magisk Manager APK from above
- Download ADB drivers on your PC and extract in C:/Drive
- If you have the Stock Boot image, then move the boot image to your phone’s internal storage.
- Launch Magisk Manager. When a popup appears asking to install Magisk, select INSTALL and choose to install again.
- Tap on “Patch Boot Image File.”
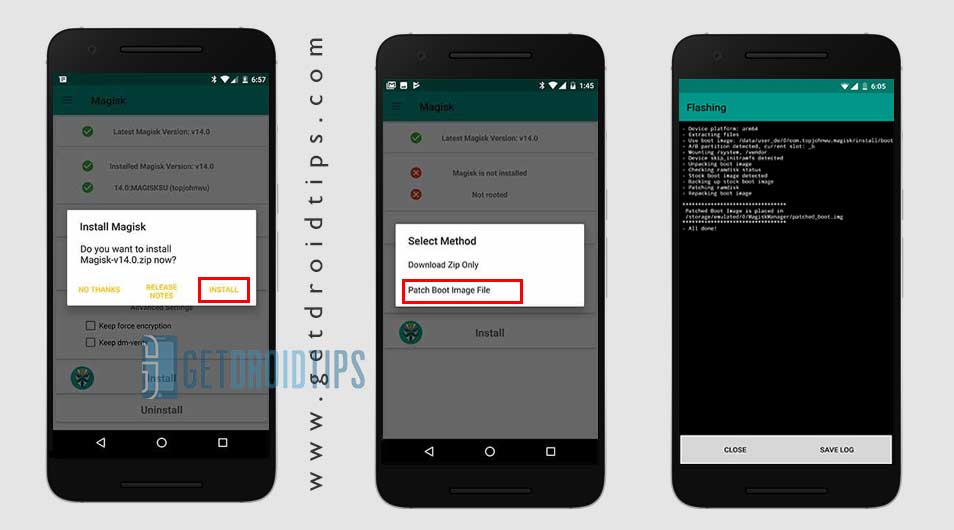
- Navigate to internal storage and select your phone’s boot image that you transferred earlier.
- Wait for a couple of seconds. Magisk will start patching the boot image.
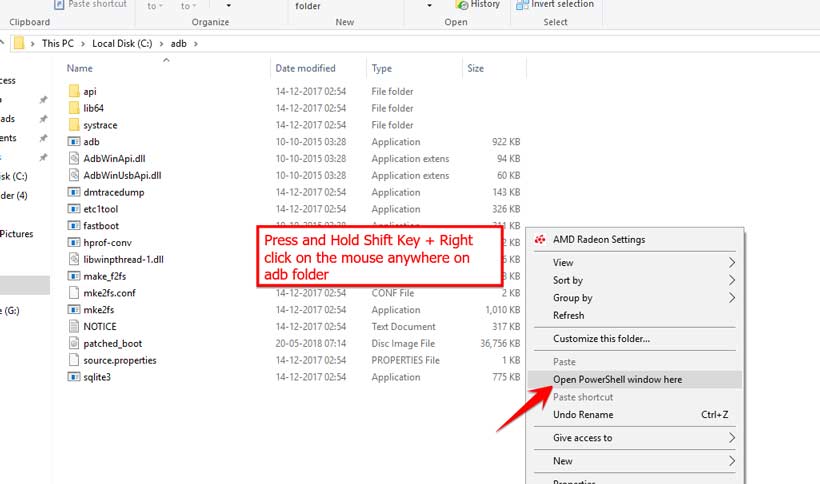
- Once the boot image has been patched, copy the “patched_boot.img” from the internal storage and move it to the C:\ drive adb folder on your PC.
- In the same folder, hold the SHIFT key and right-click on an empty space.
- Select “Open PowerShell window here.”
- Now you need to boot your device into Bootloader/Fastboot mode.
- Connect your phone to the PC using a USB Cable
- You need to type the below command to install Magisk and root your Android device in your command window shell.
fastboot flash boot patched_boot.img
- Once done, reboot your phone using:
fastboot reboot
Once your phone reboots, open the Magisk Manager and confirm that the installation was successful.
Now, if you wish to uninstall Magisk for any reason, the steps below will assist you in doing so. The most certain way to do this is via the Magisk Manager app itself. Before you uninstall Magisk, make sure to disable and remove all the modules.
How to Uninstall Magisk and Unroot Android
You can now follow our separate guide to uninstall Magisk on your device.
- Open the “Magisk Manager” app on your phone.
- Now Tap on the “Uninstall” button.
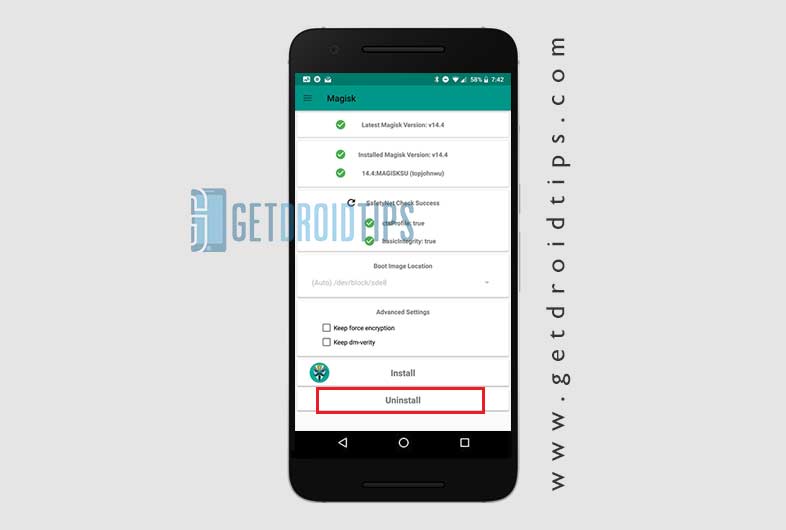
- Now confirm uninstallation by taping the “COMPLETE UNINSTALL.”
- Once the uninstallation process is done, you can reboot your device.
Note: You can also flash the Magisk Uninstaller zip using TWRP Recovery to uninstall.
Discussion
90 CommentsHello, I’m having trouble at 5.
When you say “run adb”, how do I run adb? When I click on the adb.exe from installation directory it opens a window but closes automatically 1sc after opened it.
Thanks for helping
In the ADB folder, Shift Key + Right Mouse click to open the command window.
Okkk
Hello,
At 6. when I run ADB and type “fastboot flashing unlock” it says “waiting for device”
What i’m supposed to do because nothing happen
thx for your help
which phone?
XXXXX, of course LG MANGO!
Not Supported.
Oky
Does this process work on itel devices too?
Rpower 18t
Please how do I use miracle box to grab boot image of my oukitel u20 plus Android 7 version??
How do I install Magisk on an Oukitel K10? It says it ran fine in TWRP, but then it bootloops after a restart (yes, the bootloader is unlocked). How to fix it? I also tried to turn off verified boot and kept the force encryption. Literally tried everything. Help, please!
Holaaaaaaaaaaaaa
Holaaaaaaaaaaaaa
Holaaaaaaaaaaaaa
Holaaaaa
Holaaaaaaaaaaaaa
I don see the .IMG file in TWRP options I have a Tecno W3 Pro
Did you create the Stock Patched boot image?
Itel 26
I can’t press up or down in the oem unlock screen
Can one install OTA update on Xiaomi phone rooted with Magisk without issue like bricking etc?
HI, IS POSSIBLE TO CARRY OUT INCREMENTAL OTA UPDATE ON A XIAOMI PHONE ROOTED WITH MAGISK WITHOUT BRICKING MY DEVICE?
Yes possible.
ماهي طريقة تثبيتmgisk manager
على هاتفhuwaieGR5
KII_L21
اصدار 6.0.1
لا يوجد روت على هاتفي
هل يشترط فتح البوت لدور
التثبيت البرنامج
وكيف احصل علىTWRP. هاتفي
ارجو شرح طريقة التثبيت
My Moto g5s plus is showing error 1 while flashing. What should I do? I have the lastest and older versions… But every time repeats the same
What kind of error? Can please share the error code.
Je veux que mon téléphone portable soit beau à l’intérieur
Great Article. Finally rooted my device
Thank you so much
Can you root no pc and twrp ?
hey can i root my xiaomi redmi note 1s gucci with magisk
Yes
hey can i root my alcatel a30 5046g, i have tried other like kingo and 360 and didnt work
sir how about cherry moble flare p1 ? does it support magisk?
After install magisk v18 in oreo 8.1 restar,advance recovery,shutdown not working,supose i want to restart the phone,phone was off but no starting then remove the battery & reinsert agin & press the power key then phone is one,how to solve?
Lenovo k8 note support
so i am trying this wit a BLU Vivo XL 3 plus, but every time i try to flash the image i get
“C:\adb>fastboot flash recovery bluvivoxl3plus.img
target reported max download size of 535822336 bytes
sending ‘recovery’ (16730 KB)…
OKAY [ 0.527s]
writing ‘recovery’…
OKAY [ 0.203s]
finished. total time: 0.731s”
i assumed that was how it was meant to be, so i tried to boot and it keeps saying
“C:\adb>fastboot boot bluvivoxl3plus.img
downloading ‘boot.img’…
OKAY [ 0.528s]
booting…
FAILED (remote: dtb not found)
finished. total time: 0.616s
C:\adb>fastboot boot bluvivoxl3plus.img
downloading ‘boot.img’…
OKAY [ 0.528s]
booting…
FAILED (status read failed (Too many links))
finished. total time: 0.637s”
the second time it just turns the screen black and i have to force reboot. any ideas?
Yes I saw the magisk video I want to do but how do I go about it where I can have my cellular data plan on my phone I have a Moto e4 xt1766 Amazon can you please help me out
Hey i cant get cts profile as green ..why so…it shows cts profile false on my moto g4 plus with lineage os..can you guys help me.
So, I just went through hundred of articles over the past day and many many different attempts to root my Xiaomi Mi Mix 3. I succeeded, but you need to do it in a certain way – because I had to wipe my phone and try again maybe 6-7 times. HERE:
My phone is updated as of 5/25/19 … the day I got it to root (today). I downloaded the firmware/rom from Xiaomi/mi.com whatever. It is 10.3.1.0 global. I at least extracted the ZIP and saved the boot.img as a backup – which came in handy. I plopped it in the ADB folder for easy access. The pre patched boot images left me in a stock recovery reboot loop. If that happened I restarted and quickly hit volume down + power to get into fastboot and flashed the boot.img backup and everything came back. I might have had to reboot it twice after but only one time.
Patching the boot.img with Magisk did not work – stuck in recovery or stuck in fastboot.So I started fresh. Let’s see if I remember it all:
Used adb to flash recovery twrp.img – the latest version … had trouble a few times getting into twrp, but after I checked that OEM unlocked was done in developer options it came up. Basically, I followed the twrp directions exactly … though earlier it would sometimes get into a twrp recovery loop. After that I think I re-flashed the stock boot.img.
The main thing that worked for me, and what everyone needs to know is DO NOT USE MAGISK 19 OR ANYTHING OTHER THAN THE 17.3 ZIP!!!!!!!!!!!!!!
Also, I used the Magisk Manager 6.0.1 apk and only upgraded after flashing the zip. You have to get the Magisk 17.3 zip and install that via twrp. Version 19.1 and 19.2 only got me in a stock recovery or fastboot loop. Again, if you get stuck in a loop get it into fastboot and flash the boot image from Xiaomi’s official rom. You’ll know it works when after the Mi logo is goes to a MIX logo.
I installed Magisk 17.3 via twrp and rebooted – did not install the manager when it asks and did not clear the cache. I actually installed the new version manually after rebooting.
Checked with root check/Super SU and ROOTED!!!
The key is to use only 17.3 for the time being.
After using thisMotorola Droid turbo is goin to be root….?
Tell me
Nice
Realme c2 100% kam Karega root
is there a telegram group to this site
i need to root my redmi 5 plus and i need a guide as i dont want anything to go wrong
does this need bootloader code to unlock??
Please bhai infinix Ka video banao na root ka
Can i root my vivo z1 pro mobile
i love this application
please help me to get mate 20 pro twrp.img for mate 20 pro
Please infinix Ka root ka video banao na
THERE IS NO **FASTBOOT** on the R2 !!!!
Can i root my vivo z1 pro
This guide, along with so many others, simply do NOT work with the Nokia 7.2. Trwp won’t load, or work without root, and Magisk won’t work without twrp. Nicely, written guide, though. Nicely written, but useless for me.
I hv tried it to my resmi S2 but it not able to boot it keep showing booting and Android booting progress bar is in progress.
I hv tried patched boot image.
Pls tell me because I don’t want to buy a sdcard only for doing such things.
I want to have OTA updates on my Redmi Note 8 Pro. By using either of these methods, will I get them or which I should use to get the OTA udates?
Vbmeta boot loop error after magisk patch in samsung galaxy A51 plz fix it
Magisk does not install
I moved the Magisk-v20.3.zip file to internal memory. Also the Magisk Manager v7.5.1.apk.
After I selected and installed the Magisk Manager, it shows “? Magisk is not installed”.
In the step-by-step instruction, I read there should come another prompt to install Magisk_v20.x.zip file. However no pop up appears asking to install Magisk.
who can help me? Thx
Is this method also functional for Samsung Galaxy Tab A10.1 SM-T515 (2019)?
How can I root my oppo A31
I am really a novice in all that is android, I try to root a UMIdigi A3S and I remain blocked in fastoob mode: waiting for device, however I put the cell in fastboot mode via adb commands
can someone help me please
Can I root an Allwiew X4 Infinity Soul N whit Magisk
Is it possible to root Alcatel A3 10 tablet using magisk(9026t)?
Can I root my tecno pop 2f
Followed the steps to install Magisk with TWRP. When I rebooted, 80012A99-867FDA48-4E357816-0E549F1B-B067FBD5 appears.
Moto E5 Plus
does this work for Doogee Piano Y6 also?
You have to extract the boot image
Sir, I am using mi4i phone, which runs on Android OS 5.O LOLLIPOP. CAN I UPGRADE from MY Present version to the latest version of Android 9/10.If yes, tell me how to do it without any issues or problems.
ROOT SUCCESS ” HTC M9+ ”
FROM SRILANKA.
Hi buddy I seriously need to inquire from you Sir, please respond to me and we see how to get going
Unfortunately, tha works with the 2076 model, but not the 2075.
I can unlock, install magisks manager, but then the phone does not boot until I re-install the stock boot img and then no root.
Any idea when a 2075 version will be ready?
Hello?
Can you walk me through booting into TWRP Recovery.
Oh and I am on blackview A80 pro. I was able to successfully unlock bootloader but I couldn’t go further with root my device.
Iubeqcf?d kwd
Sanjukta
Sanjukta Bagartti
Grive T7
Algeria
Can i do this to my redmi hm note 1s without pc
Front
Front
Boumerdes
Itel vision1
Nice
Itel 26 ops13 emoji
NHOW TO DOWNLOAD MAGISK
No sé
No sé nada la verdad
Magisk app I want in itel A26
Please halp me
Algérie
My Redmi Note 6 Pro was accidentally factory reset, and I didn’t took backup of my photos, whatsapp messages etc except Contacts & Notes. Now I want to restore the data. There are several applications like iMobie, FonePaw etc, but the pre-requisite to restore the data using those requires a Rooted Phone. I tried KingoRoot but the root failed. That’s the reason I am here. But in every step towards enabling root the phone is formatted..like in 1st step Unlocking BootLoader, 2nd step Installing TWRP. So in every step phone is being formatted. And at the end even if the phone is rooted, what are chances that I will be able to recover my data from the recovery apps?
Can you/someone please tell me were you successful to recover the data after rooting the phone using the above method?
Magic Manager was deprecated already last year. This article is a joke or copy paste from some other old tutorial.
I think you are on Space time; follow the official site: https://github.com/topjohnwu/Magisk/releases
Es una basura tengo años tratando de rootear con magestik y jamás hace nada